Posts with «matlab» label

Matlab with Arduino - Part 1

In this post, we are going to install arduino library in matlab.
There are two options available:
Online and Offline support package for matlab. We are using offline method for installation of arduino library.


  • Matlab 
  • Matlab account (for downloading support package)
  • Arduino IDE
  • Arduino UNO board
First of all, download the support package zip file from:


For Matlab 2013b or earlier
For Matlab 2014a and beyond

After downloading the support package, extract the zip file and paste it in installation directory:

C:/Program Files/Matlab/Bin/ArdunioIO

After pasting, open Matlab. In command window: install_arduino

Upload the adioes program in arduino board

% connect the board
a=arduino('COM5') % Choose correct com port

pinMode(a,13,'output'); % make pin13 as output

digitalWrite(a,13,0);  // make digital pin 13 low (0) 

Video for library installation:
FunWithElectronics 24 Mar 02:47
arduino  matlab  

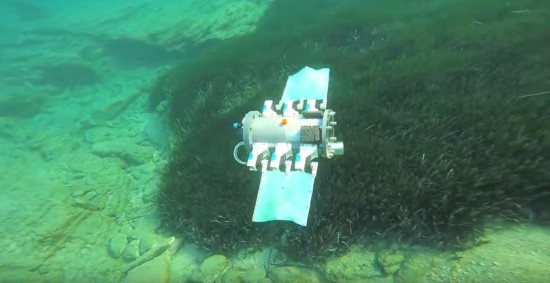
Watch a fin-propelled underwater robot prototype

The robotic prototype swimming under water propelled by fins, it was developed at the Control Systems and Robotics Laboratory of the Technological Educational Institute of Crete, in Heraklion (Greece) and it’s controlled by an Arduino Mega:

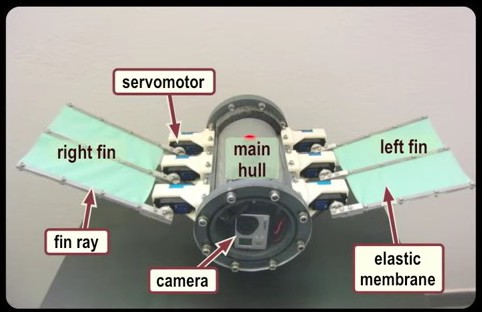
Each fin is comprised of three individually actuated fin rays, which are interconnected by an elastic membrane. An on-board microcontroller generates the rays’ motion pattern that result in the fins’ undulations, through which propulsion is obtained. The prototype, which is fully untethered and energetically autonomous, also integrates an IMU/AHRS unit for navigation purposes, a wireless communication module, and an on-board video camera. The video contains footage from experiments conducted in a laboratory test tank to investigate closed loop motion control strategies, as well as footage from sea trials.

the Arduino runs a custom-developed real time firmware that implements two Central Pattern Generator (CPG) networks to generate the undulatory motion profile for the robot’s fins. The robot  contains a  7.4V lipo battery powering also a Bluetooth module for wireless communication and a video camera to record footage of the missions.


This Cereal-Stealing Robot Will Swipe Your Breakfast

One Maker’s experiment in robotics results in an insatiable cereal transport system using Arduino, 3D printing, and Rice Krispies.

Read more on MAKE

The post This Cereal-Stealing Robot Will Swipe Your Breakfast appeared first on Make: DIY Projects, How-Tos, Electronics, Crafts and Ideas for Makers.

Arduino / MATLAB - 4DOF with force sensing

Primary image

What does it do?

4DOF manipulator with force sensing to map surroundings

Setup can be made to automatically sweep in X and Y direction or controlled manually using the GUI. Last link is fitted with a force sensing resistor to detect obstacles. It is always perpendicular to the datum plane. On contact with obstacle (my hand in the video), it changes direction in the Z axis. The location of the obstacle is recorded and shown on the MATLAB GUI. Resources: Seeeduino Mega1280, MATLAB, x4 Hitec servomotors and 1 force sensing resistor. For more projects, visit http://retardokiddo.blogspot.sg/

Cost to build

Embedded video

Finished project

Number

Time to build

Type

URL to more information

Weight

Arduino / MATLAB - Servo Calibration

Interface between MATLAB and Arduino microcontroller to calibrate servo.

The Seeeduino Mega 1280 is used in this case.

Problem:Servo does not center accurately and extends beyond 180 degrees.

Solution:Identify error margin and apply correction in MATLAB

Resources used:

http://www.mathworks.com/matlabcentral/fileexchange/27843

http://arduino.cc/en/Reference/map

For more projects, please visit: http://retardokiddo.blogspot.com/

Let's Make Robots 03 Aug 14:36
arduino  matlab  robotics  servo  

Arduino based Milling Machine

This is a working model of an Arduino based Milling Machine created using FischerTechnik. For those of you who are unaware of FischerTechnik, it is similar to the LEGOTM Building Blocks.
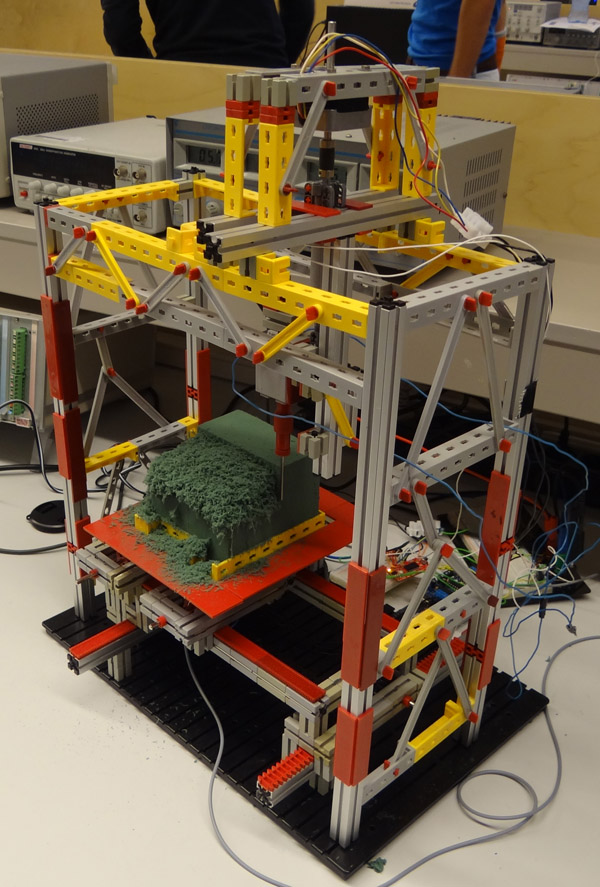
A group of four Mechanical Engineering students at the Delft University of Technology (Netherlands) created this project as part of their Mechatronics class in their Second year of Bachelor of Sciences (B.Sc.) Program.

Laurens Valk, one of the creators, explains the essence of Arduino in the project:

“The system uses the Adafruit motor shield to run two stepper motors, and the Sparkfun EasyDriver for the third stepper motor. The Arduino runs code that listens to Matlab commands over USB. We expanded that code a little to make it possible to add the third stepper motor and some other commands. Most of the actual code was programmed in Matlab, with the Arduino as the interface between computer and motors/sensors.”

We had a little chat with Laurens. Here is the excerpt:


When did you first hear about Arduino, and when did you first start using it?
I’ve seen a lot of Arduino projects over the years, but this was the first time we used it in a project. Personally, I usually build robots with MINDSTORMS NXT, but this felt like a good opportunity to combine mechanical work (the printer hardware) with real electronics (Arduino).
How did you end up making a Milling Machine/ 3D Printer for your project?

We chose to come up with our own design challenge and decided not to do the standard exercise. Initially we thought about making a (2D) plotter or scanner. Then quickly we started thinking about the same things, except in 3D. One of the projects that inspired us was the LEGO Milling Machine by Arthur Sacek. Both a scanner and printer would still be doable in 3D, but the time was limited, so we settled with the printer idea.

All construction had to be done in one workweek for logistical reasons. To make sure we were able to finish in time, we prepared much of the electronics and software outside the lab. We finished just in time, but unfortunately we could do only one complete print before we had to take it apart. Not surprisingly, it was very exciting to wait for the result of the one and only complete test run. We couldn’t see the result until we used the vacuum cleaner to remove the dust.

Here is a video showing the working of this machine. [And the Vacuum Cleaner Laurens is talking about]:

This gives an Insight into the many feats that an Arduino can accomplish.


Portal turret using MATLAB + Arduino

In the Maker’s own words:

This is the final project for my Advanced Mechatronics class at Penn State University. The robot is the skeleton of a turret from the game Portal that uses an IP webcam to track a target and fire nerf bullets at them. This is the current state of the robot as of 5/9/12, but I am currently molding a shell for the frame to make it look like the Portal turret, along with improving my code to make the tracking faster. All programming is done with MATLAB and Arduino. Enjoy!

Via:[Youtube]

Arduino Blog 10 May 20:10