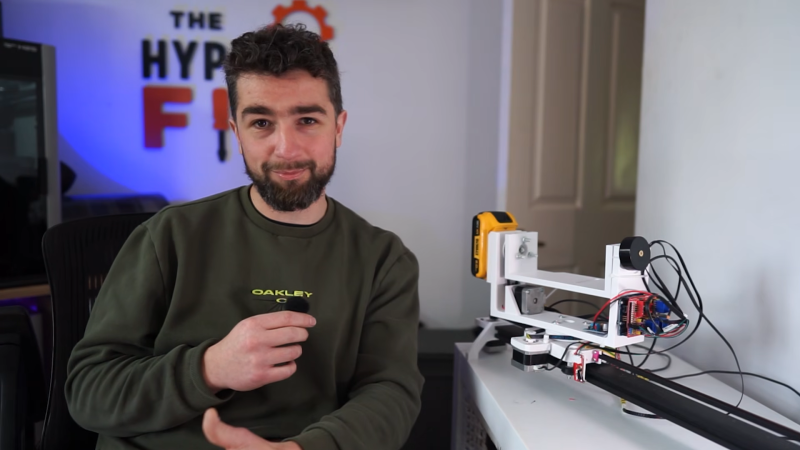
[TheHyperFix] had a problem. He’d spied a brilliant camera slider, but didn’t want to lay out big money to acquire it. The natural solution? Build one! Only, life is seldom so straightforward.
The plan was straightforward – take an old broken 3D printer, and repurpose its parts to make a camera slider instead. The build started with a aluminium extrusion, some V-slot wheels, and a 3D printed platform to hold the camera. Moving the platform was done via a belt drive, using the stepper motors and some software to tell the original printer controller what to do.
Unfortunately, the early experiments failed when the controller blew up under load. An Arduino was subbed in with a CNC shield, which got things back on track, and [TheHyperFix] had a somewhat functional slider with relatively jerky movement. A tough iterative design process ensued to work out problems with bearings and the Arduino’s pulse limit, among others.
As it stands, the slider is semi-functional, but it’s not quite well behaved enough to use for professional shooting. Still, for a first attempt at electronics prototyping, we think [TheHyperFix] did a pretty solid job. It might not be all there yet, but it’s well on the way, and a great deal was learned in the process.
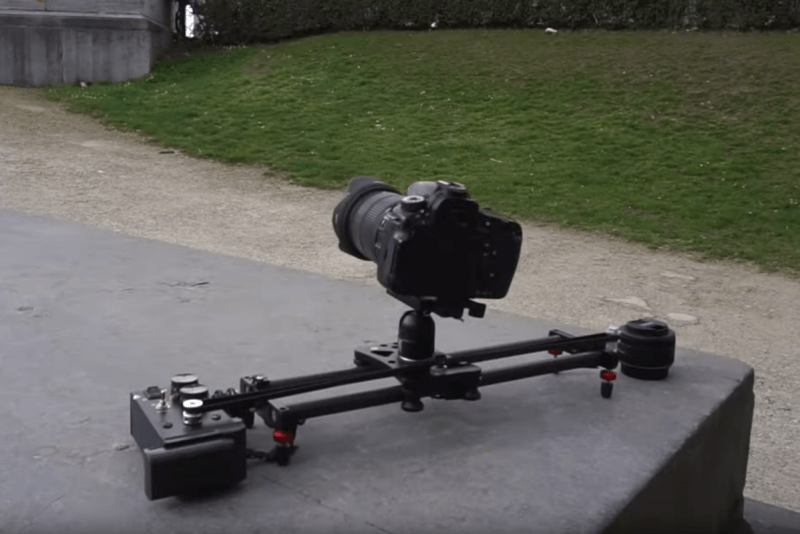
While not every camera mount needs to have six degrees of freedom, one or two can be extremely helpful in the photographic world. In order to make time-lapse shots with some motion or shots that incorporate some parallax, a moving camera mount or dolly is needed, and this small one builds upon a pre-existing, although non-motorized, camera slider.
The slider is an inexpensive model from everyone’s favorite online warehouse, with rails that are at least coated in carbon, if not made out of it entirely, to ensure smooth camera motion. To add the motorization to automatically move the camera, a stepper motor with a belt drive is used which is controlled by an Arduino. A few limit switches are added, letting the dolly perform different movement patterns automatically, and a pair of potentiometers for fine and coarse speed control are included as well, letting the camera take both time-lapse and video while using this mount at various controllable speeds.
With everything tucked into a relatively small box at one end of the dolly, the build is both accessible and functional. The code for the microcontroller is also available on the project’s GitHub page for anyone looking to replicate or build upon the project. And, for those looking to add more degrees of freedom to their camera setups, take a look at this DIY pan and tilt mount.
If your favorite person has a love of video or photography, a camera may be the best gift they’ll ever get. Some may want to capture their adventures with an action camera, while others may desire a mirrorless camera for portraits, movies or artistic shots. The technology is better than ever as camera makers try to stay ahead of smartphones with faster shooting speeds, sharper video and incredible autofocus. We found the best models for budgets ranging from $400 to $2,500, along with top accessories to complement their existing gear.
GoPro Hero 10 Black
Will Lipman Photography for Engadget
For the adventurer on your gift list, there’s no better action camera than the GoPro Hero 10 Black. It bests the previous Hero 9 Black model in a number of key ways, thanks mainly to the faster GP2 processor. That helps it deliver improved image quality, with higher resolution at up to 5.3K/30fps instead of 5K as before. It also offers improved noise reduction, smoother stabilization, more faithful color reproduction and better handling.
Sony’s A6100 is a great gift idea for budding photographers, as it offers the best features of its APS-C mirrorless camera series at the best price. Chief among those is the incredibly reliable autofocus system with eye-detection and other AI tricks. Even with fast-moving action, the A6100 will nail focus for video or photos most of the time thanks to the extremely rapid tracking system. It also offers accurate colors, good low-light performance and a flip-up display that allows for selfies and vlogging, with sharp video capture at up to 4K. It’s also one of the best mirrorless camera deals around at $748, or $848 with a 16-50mm kit lens.
A gimbal is a great gift idea for video shooters, helping them boost production value with smooth tracking, panning and other shots. If your loved one has a mirrorless camera, the best option is DJI’s Ronin-SC model. It weighs just 2.4 pounds, 41 percent lighter than DJI’s original Ronin-S — making it easier to use for longer periods. It can stabilize just about any type of video as well, thanks to the ActiveTrack 3.0 mode and AI that can lock onto and track human or other subjects.
If your gift recipient is into making YouTube videos, the Panasonic GH5 has been the vlogging camera of choice since it first came out . The 20-megapixel Micro Four Thirds sensor delivers pin-sharp 4K video downsampled from the full sensor at up to 60fps, with a 10-bit high-color option that makes editing easier afterwards. It also includes other necessities for vlogging like a flip-out display, in-body stabilization and dual high-speed card slots. With the arrival of the $1,700 GH5 II, the original GH5 is cheaper than it’s ever been at $1,300, giving your loved one a lot of camera for the money.
If your giftee is starting to get serious about video, the Magnus VT 4000 is the best budget tripod option out there. It’s lightweight at 8 pounds, but the anodized aluminum construction is strong enough to handle a mirrorless camera and accessories weighing up to 8.8 pounds. The lack of heft makes it practical for travel, while the fluid head allows for smooth tilts and pans. Other features include a middle spreader to keep things steady and legs that extend up to 64 inches so you can match the eyeline of your subjects.
For a serious camera gift that’s around $2,500, Canon’s 20-megapixel EOS R6 is the best hybrid model out there. It delivers up to 20 fps burst shooting speeds while the Dual Pixel AF nails focus on nearly every shot, whether in bright sunlight or dim lighting. It’s also a solid pick for video, letting you shoot 4K supersampled video at 60 fps with 10-bit log and HDR options for maximum editing flexibility — again, with Canon’s Dual Pixel AF system that’s second to none. The caveat to that is overheating, which limits use for things like weddings and journalism.
Some of the most useful gifts out there for vloggers are Joby’s famous mini-tripods, and the best one for the money is the GorillaPod 3K. Attaching your camera using the secure clip-in mounting plate is dead simple, and you can ensure that everything is even with the built-in level. The flexible legs let you set your camera anywhere to shoot or even wrap it around a tree or other object. The most common usage is as a vlogging handle, as vloggers can bend the legs forward to fit themselves into the video and steady out their shooting.
Your favorite camera nerd can never have enough memory cards, but they can be a pretty pricey gift. SanDisk’s ExtremePro UHS-I SD cards are cheaper than UHS-II cards, but the 90 MB/s read/write speeds are fast enough for most types of photography and video. If your loved one needs that extra UHS-II speed, Lexar’s UHS-II SD 1667X (250MB/s) and 2000X (300MB/s) SD cards are solid picks.
If the vlogger in your life doesn’t already have one, Rode’s wireless and shotgun microphones are solid, affordable gifts. The VideoMic Go is ideal for interviews and run-and-gun shooting, thanks to the crisp directional audio and relative ease of use. It comes with a shock mount to eliminate bumps or vibrations that could interfere with sound and doesn’t require a battery, unlike past Rode models. Meanwhile, Rode’s Wireless Go is one of the most popular wireless lavalier mics out there, functioning as both a microphone and wireless transceiver. It offers a reliable connection and good audio quality, or you can maximize clarity by connecting an external 3.5mm microphone like Rode’s $40 SmartLav+, the Sennheiser Pro Audio ME2 or others.
A good light is an awesome tool in your favorite photographer or videographer’s arsenal, and a relatively affordable gift to boot. One of the best all-around models is the Nanlite LitoLite 5C RGBWW Mini LED Panel. It weighs just 4.8 ounces, but offers dimmable lighting across a range of colors, with adjustments either on the fixture or via a smartphone app. It mounts on any wall or light stand via a magnet or quarter-inch threads, has cordless operation and a battery that runs for 1.5 hours at full power (charged via USB). The most interesting feature is special effects that range from a cop car’s flashing lights, flames, candlelights, a lightning storm and more.
Backpacks are life for photographers and video shooters, so they make great gifts — if you get the right one. Peak Design’s Everyday Backpack 20L is a good choice, thanks to the stylish weatherproof design, internal dividers for laptops, cameras, lenses and more, a wrap-around zipper and a protected laptop sleeve. It offers excellent build quality and Peak Design backs that up with a lifetime warranty.
As someone who used to use Adobe’s Premiere Pro CC exclusively, I never thought I’d switch to another app. I did, though, and can’t recommend Blackmagic Design’s DaVinci Resolve 17.2 enough (either the free or $295 studio version). You get a lifetime of updates, so it’s far cheaper than Adobe’s subscription program that runs $630 per year. Resolve is slightly trickier to learn, but far more powerful than Premiere for key tasks like color grading and effects. Most importantly, I’ve found Resolve to be far, far more reliable than Premiere on a wide range of computers, which is easily the most important “feature” on an editing app.
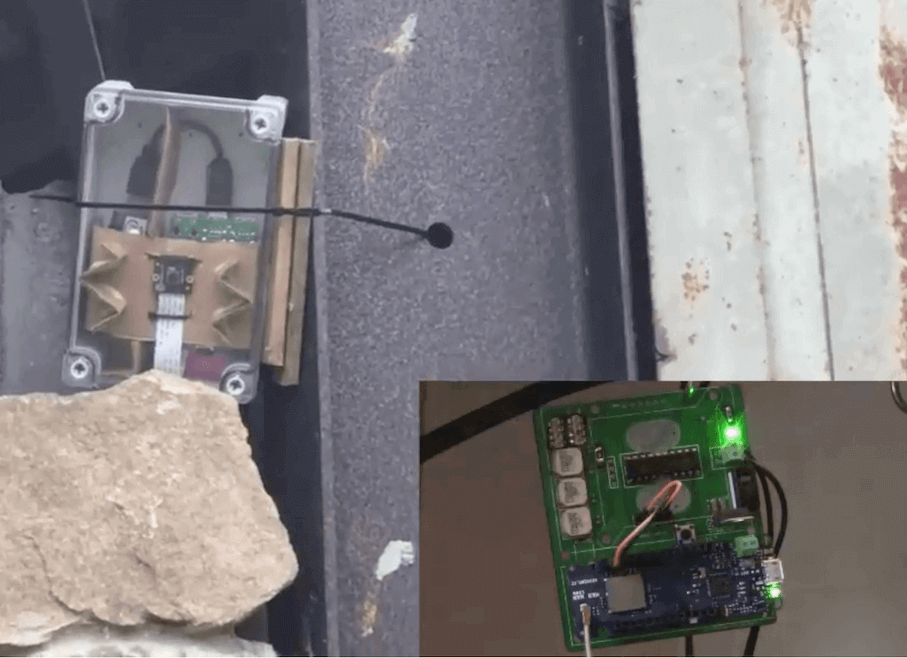
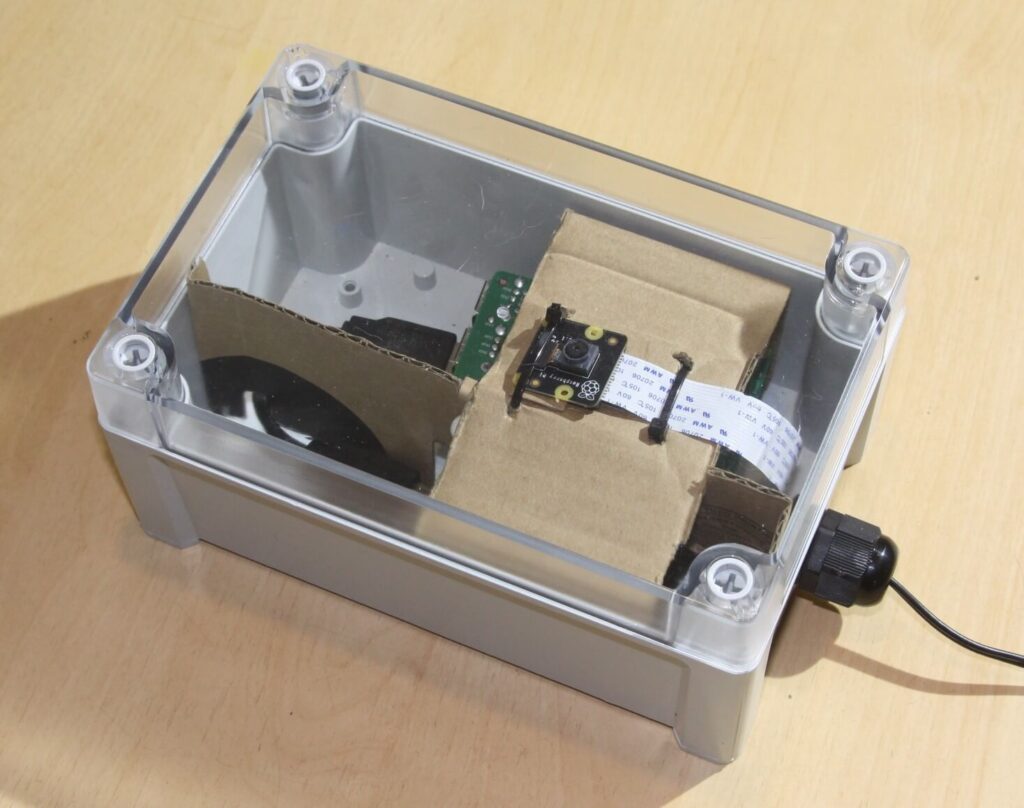
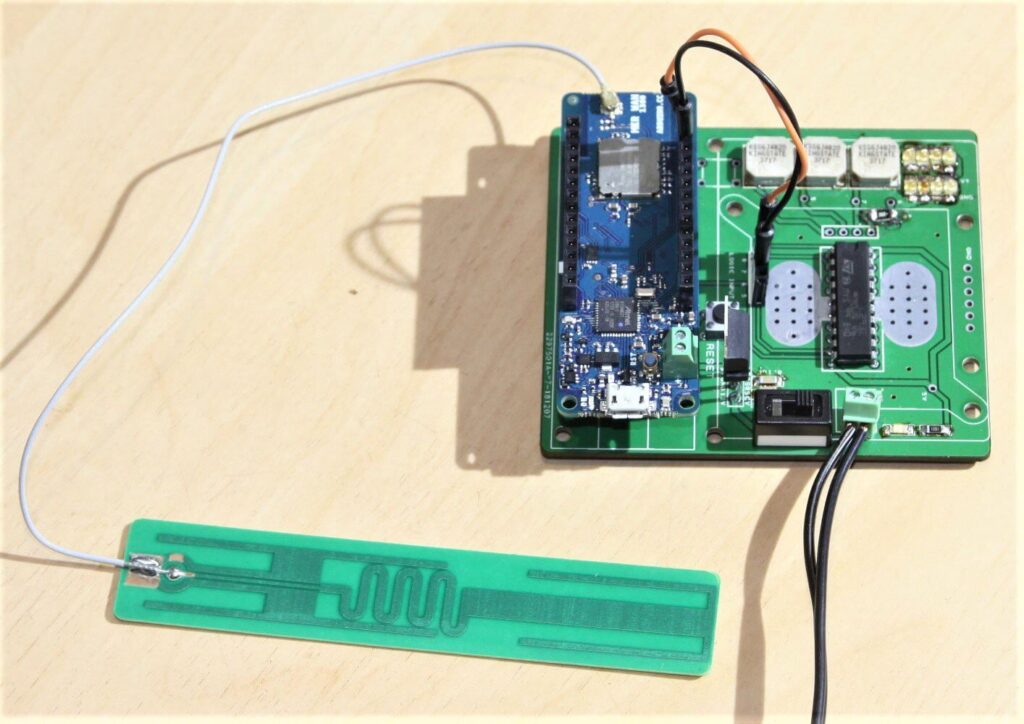
Security cameras are a great way to deter theft and vandalism, but what if the camera is out of WiFi range, or otherwise would need long cables to transmit pictures? As explained here, Tegwyn Twmffat has an interesting solution–taking advantage of neural network processing to recognize moving objects, along with a LoRa connection to sound the alarm when there is a potential problem.
Images are captured by a Raspberry Pi and camera, then processed with the help of an Intel Movidius Neural Compute Stick for identification. If it’s something of interest—a human, for example—a relatively small amount of data is transmitted to a MKR WAN 1300 base station, beeping faster and faster as the person approaches.
As seen in the video below, it’s able to properly ignore the ‘test dog,’ while it beeps away when a person approaches!
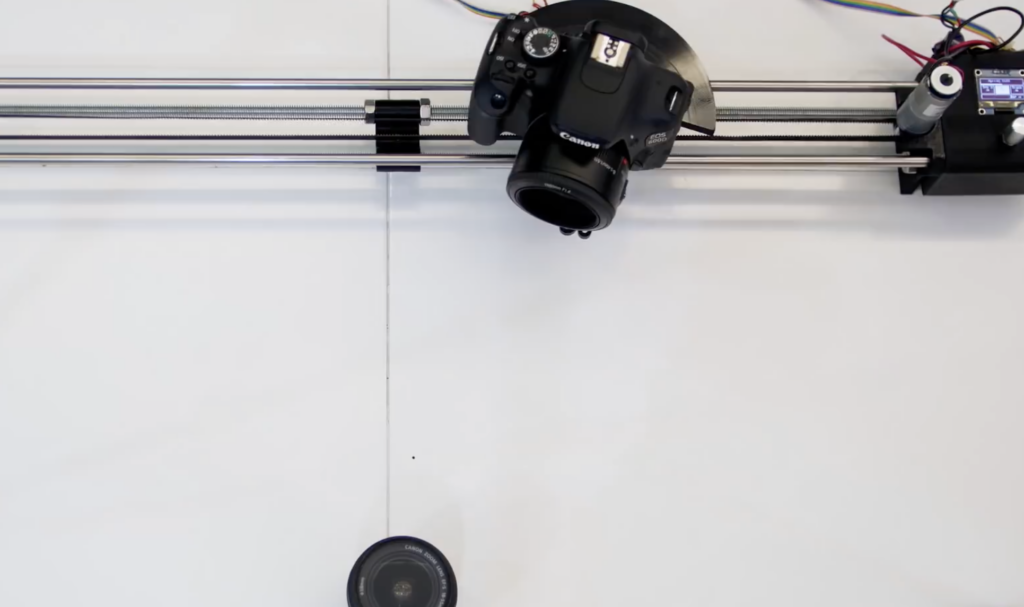
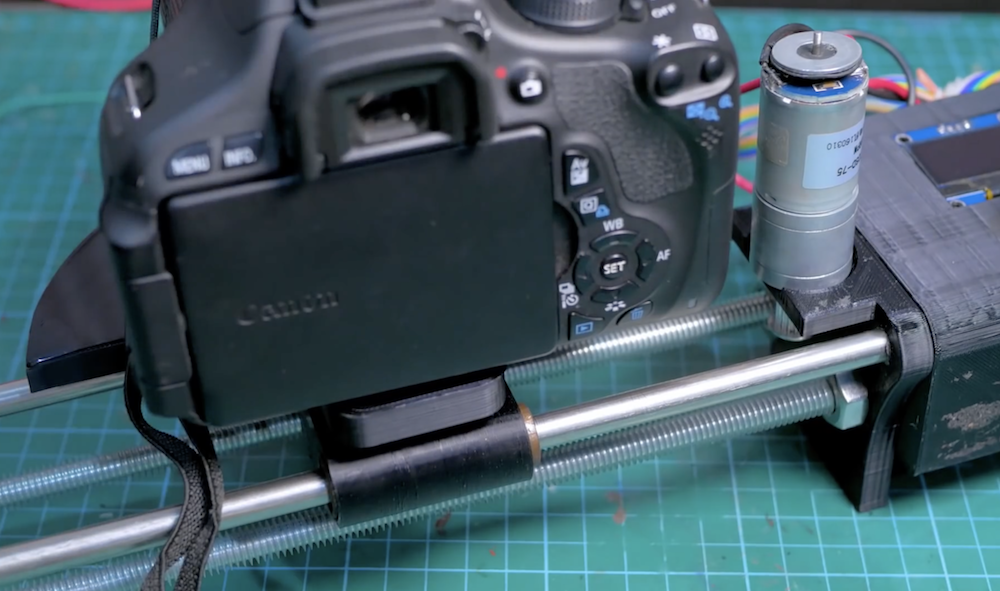
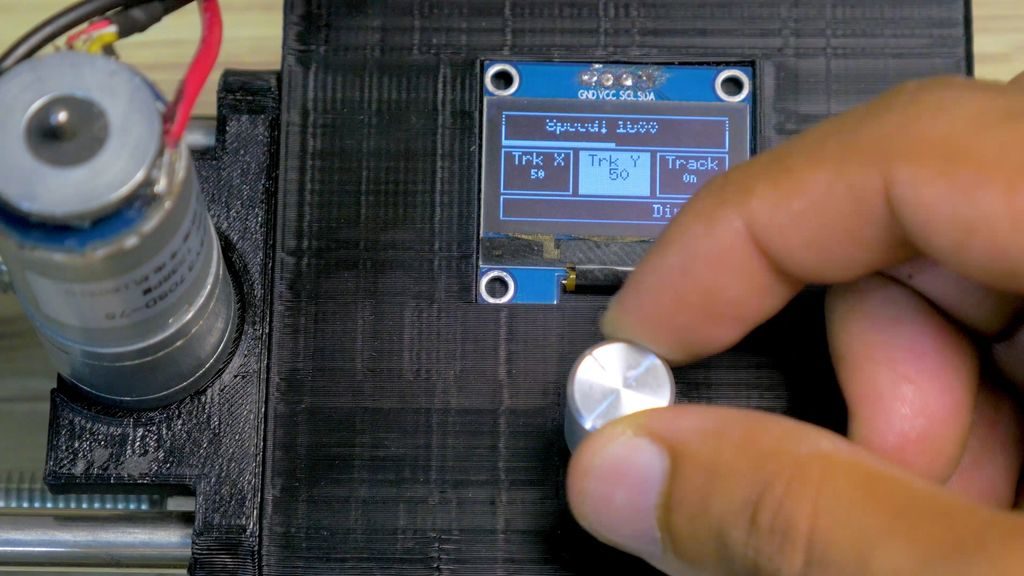
When filming your projects—or day-to-day life—static shots can be fun, but having a moving perspective often looks even better. The challenge is keeping the camera pointed at your subject, which maker Saral Tayal addresses with his automated slider.
This Arduino Uno-controlled slider is powered by a pair of brushed DC motors with encoders attached for feedback. One pulls the camera along a pair of rails on a set of linear bearings, while the other adjusts the camera’s horizontal angle using trigonometry to keep a particular object in-frame.
Code and print files are available in Tayal’s write-up, and some beautiful resulting shots with an explanation of the project can be seen in the video below.
Camera sliders are a popular build, and properly executed they can make for impressive shots for both time-lapse sequences or real-time action. But they seem best suited for long shots, as dollying a camera in a straight line just moves subjects close to the camera through the frame.
This slider with both pan and tilt axes can make moving close-ups a lot easier. With his extremely detailed build log, [Dejan Nedalkovski] shows how he went about building his with only the simplest of materials and tools. The linear rail is simply a couple of pieces of copper pipe supported by an MDF frame. The camera trolley rides the rails on common skateboard bearings and is driven by a NEMA-17 stepper, as are the pan and tilt axes. [Dejan] also provided a barn-door style pivot to tilt the camera relative to the rails, allowing the camera to slide up and down an inclined plane for really interesting shots. The controller uses an Arduino and a joystick to drive the camera manually, or the rig can be programmed to move smoothly between preset points.
This is a step beyond a simple slider and feels a little more like full-blown motion control. We’ve got a feeling some pretty dramatic shots would be possible with such a rig, and the fact that it’s a simple build is just icing on the cake.
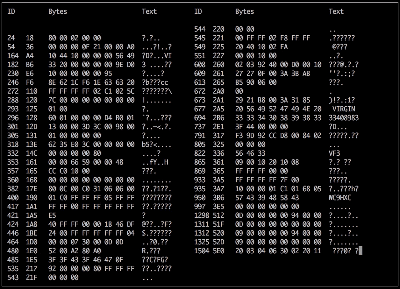
When you think of image processing, you probably don’t think of the Arduino. [Jan Gromes] did, though. Using a camera and an Arduino Mega, [Jan] was able to decode input from an Arduino-connected camera into raw image data. We aren’t sure about [Jan’s] use case, but we can think of lots of reasons you might want to know what is hiding inside a compressed JPEG from the camera.
The Mega is key, because–as you might expect–you need plenty of memory to deal with photos. There is also an SD card for auxiliary storage. The camera code is straightforward and saves the image to the SD card. The interesting part is the decoding.
The use case mentioned in the post is sending image data across a potentially lossy communication channel. Because JPEG is compressed in a lossy way, losing some part of a JPEG will likely render it useless. But sending raw image data means that lost or wrong data will just cause visual artifacts (think snow on an old TV screen) and your brain is pretty good at interpreting lossy images like that.
Just to test that theory, we took one of [Joe Kim’s] illustrations, saved it as a JPEG and corrupted just a few bytes in a single spot in it. You can see the before (left) and after (right) picture below. You can make it out, but the effect of just a few bytes in one spot is far-reaching, as you can see.
The code uses a library that returns 16-bit RGB images. The library was meant for displaying images on a screen, but then again it doesn’t really know what you are doing with the results. It isn’t hard to imagine using the data to detect a specific color, find edges in the image, detect motion, and other simple tasks.
Sending the uncompressed image data might be good for error resilience, but it isn’t good for impatient people. At 115,200 baud, [Jan] says it takes about a minute to move a raw picture from the Arduino to a PC.
We’ve seen the Arduino handle a single pixel at a time. Even in color. The Arduino might not be your first choice for an image processing platform, but clearly, you can do some things with it.
Here’s a classic “one thing led to another” car hack. [Alexandre Blin] wanted a reversing camera for his old Peugeot 207 and went down a rabbit hole which led him to do some extreme CAN bus reverse-engineering with Arduino and iOS. Buying an expensive bezel, a cheap HDMI display, an Arduino, a CAN bus shield, an iPod touch with a ghetto serial interface cable that didn’t work out, a HM-10 BLE module, an iPad 4S, the camera itself, and about a year and a half of working on it intermittently, he finally emerged poorer by about 275€, but victorious in a job well done. A company retrofit would not only have cost him a lot more, but would have deprived him of everything that he learned along the way.
Adding the camera was the easiest part of the exercise when he found an after-market version specifically meant for his 207 model. The original non-graphical display had to make room for a new HDMI display and a fresh bezel, which cost him much more than the display. Besides displaying the camera image when reversing, the new display also needed to show all of the other entertainment system information. This couldn’t be obtained from the OBD-II port but the CAN bus looked promising, although he couldn’t find any details for his model initially. But with over 2.5 million of the 207’s on the road, it wasn’t long before [Alexandre] hit jackpot in a French University student project who used a 207 to study the CAN bus. The 207’s CAN bus system was sub-divided in to three separate buses and the “comfort” bus provided all the data he needed. To decode the CAN frames, he used an Arduino, a CAN bus shield and a python script to visualize the data, checking to see which frames changed when he performed certain functions — such as changing volume or putting the gear in reverse, for example.
The Arduino could not drive the HDMI display directly, so he needed additional hardware to complete his hack. While a Raspberry Pi would have been ideal, [Alexandre] is an iOS developer so he naturally gravitated towards the Apple ecosystem. He connected an old iPod to the Arduino via a serial connection from the Dock port on the iPod. But using the Apple HDMI adapter to connect to the display broke the serial connection, so he had to put his thinking cap back on. This time, he used a HM-10 BLE module connected to the Arduino, and replaced the older iPod Touch (which didn’t support BLE) with a more modern iPhone 4S. Once he had all the bits and pieces working, it wasn’t too long before he could wrap up this long drawn upgrade, but the final result looks as good as a factory original. Check out the video after the break.
It’s great to read about these kinds of hacks where the hacker digs in his feet and doesn’t give up until it’s done and dusted. And thanks to his detailed post, and all the code shared on his GitHub repository, it should be easy to replicate this the second time around, for those looking to upgrade their old 207. And if you’re looking for inspiration, check out this great Homemade Subaru Head Unit Upgrade.
It’s 2017 and even GoPro cameras now come with voice activation. Budding videographers, rest assured, nothing will look more professional than repeatedly yelling at your camera on a big shoot. Hackaday alumnus [Jeremy Cook] heard about this and instead of seeing an annoying gimmick, saw possibilities. Could they automate their GoPro using Arduino-spoken voice commands?
It’s an original way to do automation, for sure. In many ways, it makes sense – rather than mucking around with trying to make your own version of the GoPro mobile app (software written by surfers; horribly buggy) or official WiFi remote, stick with what you know. [Jeremy] decided to pair an Arduino Nano with the ISD1820 voice playback module. This was then combined with a servo-based panning fixture – [Jeremy] wants the GoPro to pan, take a photo, and repeat. The Arduino sets the servo position, then commands the ISD1820 to playback the voice command to take a picture, before rotating again.
[Jeremy] reports that it’s just a prototype at this stage, and works only inconsistently. This could perhaps be an issue of intelligibility of the recorded speech, or perhaps a volume issue. It’s hard to argue that a voice control system will ever be as robust as remote controlling a camera over WiFi, but it just goes to show – there’s never just one way to get the job done. We’ve seen people go deeper into GoPro hacking though – check out this comprehensive guide on how to pwn your GoPro.


 Adding the camera was the easiest part of the exercise when he found an after-market version specifically meant for his 207 model. The original non-graphical display had to make room for a new HDMI display and a fresh bezel, which cost him much more than the display. Besides displaying the camera image when reversing, the new display also needed to show all of the other entertainment system information. This couldn’t be obtained from the OBD-II port but the CAN bus looked promising, although he couldn’t find any details for his model initially. But with over 2.5 million of the 207’s on the road, it wasn’t long before [Alexandre] hit jackpot in a French University student project who used a 207 to study the CAN bus. The 207’s CAN bus system was sub-divided in to three separate buses and the “comfort” bus provided all the data he needed. To decode the CAN frames, he used an Arduino, a CAN bus shield and a python script to visualize the data, checking to see which frames changed when he performed certain functions — such as changing volume or putting the gear in reverse, for example.


