Posts with «parallax» label

Motorized Camera Slider Rides on Carbon

While not every camera mount needs to have six degrees of freedom, one or two can be extremely helpful in the photographic world. In order to make time-lapse shots with some motion or shots that incorporate some parallax, a moving camera mount or dolly is needed, and this small one builds upon a pre-existing, although non-motorized, camera slider.

The slider is an inexpensive model from everyone’s favorite online warehouse, with rails that are at least coated in carbon, if not made out of it entirely, to ensure smooth camera motion. To add the motorization to automatically move the camera, a stepper motor with a belt drive is used which is controlled by an Arduino. A few limit switches are added, letting the dolly perform different movement patterns automatically, and a pair of potentiometers for fine and coarse speed control are included as well, letting the camera take both time-lapse and video while using this mount at various controllable speeds.

With everything tucked into a relatively small box at one end of the dolly, the build is both accessible and functional. The code for the microcontroller is also available on the project’s GitHub page for anyone looking to replicate or build upon the project. And, for those looking to add more degrees of freedom to their camera setups, take a look at this DIY pan and tilt mount.

Venduino Serves Snacks, Shows Vending is Tricky Business

Seems like just about every hackerspace eventually ends up with an old vending machine that gets hacked and modded to serve up parts, tools, and consumables. But why don’t more hackerspaces build their own vending machines from scratch? Because as [Ryan Bates] found out, building a DIY vending machine isn’t as easy as it looks.

[Ryan]’s “Venduino” has a lot of hackerspace standard components – laser-cut birch plywood case, Parallax continuous rotation servos, an LCD screen from an old Nokia phone, and of course an Arduino. The design is simple, but the devil is in the details. The machine makes no attempt to validate the coins going into it, the product augurs are not quite optimized to dispense reliably, and the whole machine can be cleaned out of product with a few quick shakes. Granted, [Ryan] isn’t trying to build a reliable money-making machine, but his travails only underscore the quality engineering behind modern vending machines. It might not seem like it when your Cheetos are dangling from the end of an auger, but think about how many successful transactions the real things process in an environment with a lot of variables.

Of course, every failure mode is just something to improve in the next version, but as it is this is still a neat project with some great ideas. If you’re more interested in the workings of commercial machines, check out our posts on listening in on vending machine comms or a Tweeting vending machine.

[via r/arduino]


Filed under: Arduino Hacks, misc hacks
Hack a Day 02 Jul 21:01

Quick and Dirty RFID Door Locks Clean up Nice

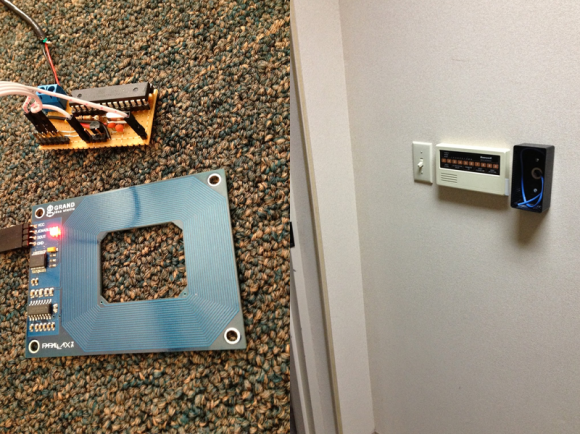
[Shawn] recently overhauled his access control by fitting the doors with some RFID readers. Though the building already had electronic switches in place, unlocking the doors required mashing an aging keypad or pestering someone in an adjacent office to press a button to unlock them for you. [Shawn] tapped into that system by running some wires up into the attic and connecting them to one of two control boxes, each with an ATMega328 inside. Everything functions as you would expect: presenting the right RFID card to the wall-mounted reader sends a signal to the microcontroller, which clicks an accompanying relay that drives the locks.

You may recall [Shawn's] RFID phone tag hack from last month; the addition of the readers is the second act of the project. If you’re looking to recreate this build, you shouldn’t have any trouble sourcing the same Parallax readers or building out your own Arduino on a stick, either. Check out a quick walkthrough video after the jump.


Filed under: Arduino Hacks, Microcontrollers

How To: Arduino to Parallax Serial Terminal

Well folks, I finally got around to doing this...

read more

Let's Make Robots 29 Oct 02:16

New in the Maker Shed: Parallax Emic 2 Text-to-Speech Module

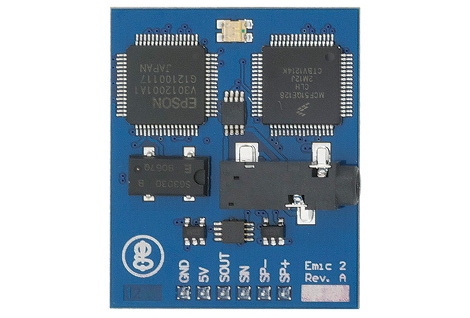
This unassuming little board can give your project the power of speech! Parallax’s new Emic 2 Text-to-Speech Module (now available in the Maker Shed) is an easy to use speech synthesis board capable of speaking both English and Spanish. You simply pass it text or numbers over serial and it converts them into a natural sounding voice. Project possibilities include talking GPS units, clocks, thermometers, timers, or giving your robot a voice. You can even have it read your e-mail or twitter feeds! It’s easy to hook up to an Arduino, runs on 5V, and only uses up two data pins for serial communication. Just plug in a speaker and you’ll have your projects talking in no time.

Features:

  • High-quality speech synthesis for English and Spanish languages
  • Nine pre-defined voice styles comprising male, female, and child
  • Dynamic control of speech and voice characteristics, including pitch, speaking rate, and word emphasis
  • Industry-standard DECtalk text-to-speech synthesizer engine (5.0.E1)

Filed under: Arduino, Electronics, Maker Shed

EMIC2 text to speech module

This is the EMIC2 text-to-speech module. You can see from the logo on the bottom left it’s the latest gadget coming out of [Joe Grand's] Grand Idea Studios. [Dino] tipped us off about his first experience with a prototype of the board. He’s driving it with an Arduino and the video after the break shows that the sound rendering is high quality and the words are very easy to understand. One of the things that we think is interesting is that the serial communications used to drive the board are not uni-directional. In fact, there’s a serial terminal that provides documentation on how to use the chip. Obviously this is most suited to the Arduino, which always has a PC-side terminal window available to it.

[Joe] himself shows some of the potential for the board. He gave new life to a broken toy by replacing its internals with a PIC-based circuit to drive the EMIC2. That video is also found after the break. He’s just using the demo clips, but from that you will get a good idea of the vocal modulations this device is capable of. The board rings up at $60 and is available from Parallax.

[Dino's] introduction:

[Joe's] project:

and it’s on sale now for about $60 for Parallax.


Filed under: arduino hacks

New in the Maker Shed: Arduino Robot Shield Kit

My first hands-on experience with robotics and microcontrollers came from using a Parallax Boe-Bot kit with a Basic Stamp. I had no programming experience but using the included documentation and my PC, I was able to figure out how to build a robot that would react to obstacles and navigate its environment. Since then I’ve switched over to the Arduino but I still miss the experience I received from the Boe-Bot. Parallax must have read my mind because they released the Robotics Shield Kit for Arduino which is now available in the Maker Shed. They’ve taken their excellent Board of Education and transformed it into a shield (also available separately) which fits on top of an Arduino. The rest of the kit remains largely unchanged from the original Boe-Bot, which I consider a good thing.  Full documentation with over 40 activities is available online so you’ll be learning in no time. Simply add your own Arduino and a USB cable and enter into the fascinating world of robotics and Arduino!

Features

  • Board of Education Shield PCB
  • High-quality aluminum robot chassis, continuous rotation servos, and wheels
  • Boe-Boost Module
  • All the assembly hardware needed (nuts, screws standoffs)
  • Parallax screwdriver
  • Detailed online documentation and tutorials
  • All the electronic components and sensors needed for the tutorials
  • Note: Requires Arduino and USB cable