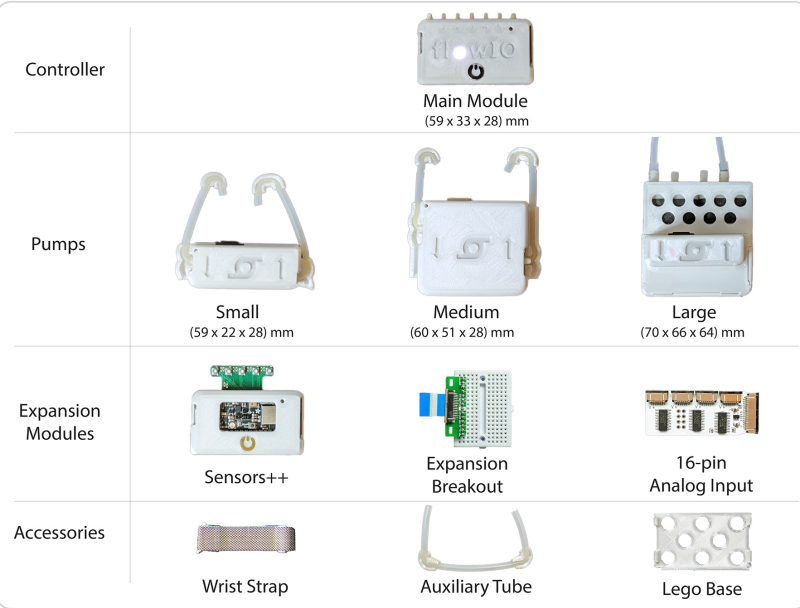
Hackaday Prize 2021 entry FlowIO Platform promises to be to pneumatics what Arduino is to Electronics. The modular platform comprises a common controller/valve block, a selection of differently sized pumps, and a few optional connectivity and sensing blocks. With Arduino software support as well as as Javascript and web-GUI, there’s a way to program this no matter what the level of experience the user has.
This last point is a critical one for the mission [Ali Shtarbanov] from the MIT Media Lab is setting out for this project. He reminds us that in decades gone by, there was a significant barrier to entry for anyone building electronics prototypes. Information about how to get started was also much harder to by before the internet really got into gear.
It’s a similar story for software, with tools like Scratch and Python lowering the barrier to entry and allowing more people to get their toes wet and build some confidence.
But despite some earlier work by projects like the Soft Robotics Toolkit and Programmable-Air, making a start on lowering the bar for pneumatics support for soft robotics, and related applications, the project author still finds areas for further improvement. FlowIO was designed from the ground-up to be wearable. It appears to be much smaller, more portable and supports more air ports and a greater array of sensing and connectivity than previous Open Source work to date.
Creative Commons Hardware
Whilst you can take all the plans (free account signup required) and build yourself a FlowIO rig of your very own, the project author offers another solution. Following on from the Wikipedia model of free sharing and distribution of information, FlowIO offers its hardware for free, for the common good. Supported by donations to the project, more hardware is produced and distributed to those who need it. The only ask is that redundant kits are passed on or returned to base for upgrade, rather than landfill.
The Consumer Electronics Show in Las Vegas is traditionally where the big names in tech show off their upcoming products, and the 2020 show was no different. There were new smartphones, TVs, and home automation devices from all the usual suspects. Even a few electric vehicles snuck in there. But mixed in among flashy presentations from the electronics giants was a considerably more restrained announcement from a company near and dear to the readers of Hackaday: Arduino is going pro.
While Arduino has been focused on the DIY and educational market since their inception, the newly unveiled Portenta H7 is designed for professional users who want to rapidly develop robust hardware suitable for industrial applications. With built-in wireless hardware and the ability to run Python and JavaScript out of the box, the powerful dual-core board comes with a similarly professional price tag; currently for preorder at $99 USD a pop, the Portenta is priced well outside of the company’s traditional DIY and educational markets. With increased competition from other low-cost microcontrollers, it seems that Arduino is looking to expand out of its comfort zone and find new revenue streams.
That’s a Lot of Pins
The Portenta H7 is obviously a far cry from the relatively dinky 8-bit Arduinos that we’ve all got filling up our parts drawers. Developed for high performance edge computing applications, the new board is powered by a 32-bit STM32H747XI that utilizes both an ARM Cortex M7 and an M4 running at 480 MHz and 240 MHz respectively. The two cores can work independently, allowing for example one core to run interpreted Python while the other runs code compiled in the Arduino IDE. When they need to work together, the cores can communicate with each other via a Remote Procedure Call (RPC) mechanism.
The new 80-pin connectors on the Portenta
Outwardly, the new board doesn’t look far removed from the modern Arduino form factor we’re used to. The USB connector has been upgraded to a Type-C, but the Portenta still retains the dual rows of pads ready for hand-soldered headers — that’s their more recent pinout that they call the Arduino MKR form factor.
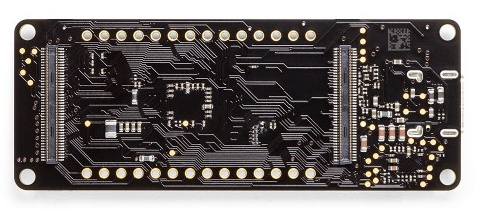
If you look on the back of the board however, you’ll see that they’ve added two 80-pin high density connectors. According to the product page, these are intended to allow the Portenta to simply be plugged into a device as a removable module. The idea being that devices in the field can easily have their Portenta swapped out for an upgraded model. Some digging into the product page documentation section turns up a schematic that lists the connectors as Hirose DF40C-80DP-0.4V(51).
The base model Portenta features 8 MB SDRAM and 16 MB NOR flash, but it can be custom ordered with up to 64 MB of memory and 128 MB of flash should you need it. It’s also possible to delete various interfaces from the board when ordering, so if you don’t want network connectivity or the NXP SE050C2 crypto chip, they can simply be left off. However as of this writing it is unclear as to what minimum order quantity is necessary to unlock this level of customization, or or how much these modifications will change the unit cost.
Year of the Arduino Desktop?
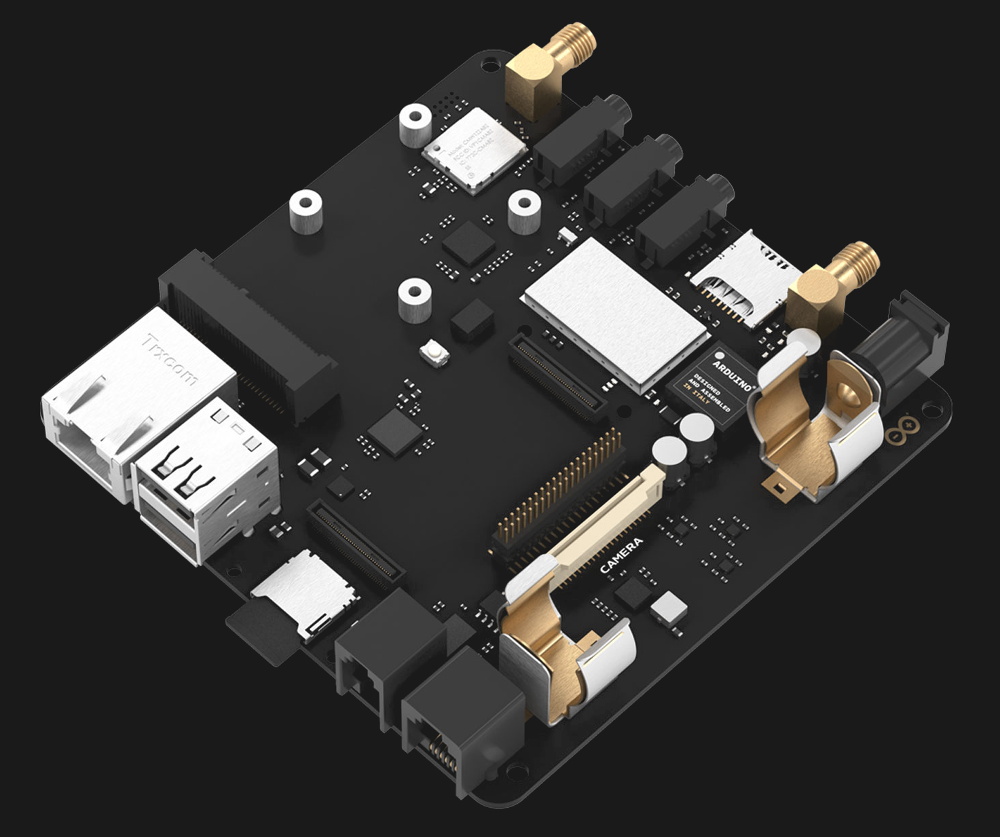
The Portenta Carrier Board
The Portenta H7 is an impressive enough piece of hardware on its own, but when it’s plugged into the optional Carrier Board, things really start to get interesting. The Carrier Board provides full size connectors for all of the onboard peripherals, and according to documentation, turns the Portenta into an eNUC-class embedded computer. There’s even support for DisplayPort to connect a monitor, and miniPCI for expansion cards.
With a fully loaded Portenta H7 slotted into the Carrier Board, it would seem you have the makings of a low-power ARM “desktop” computer. Albeit one that wouldn’t outperform the Raspberry Pi Zero, and which costs several times more.
The Arduino press release and product page doesn’t make any mention of what kind of software or operating system said computer would run, so presumably that’s left as an exercise for the customer. While not particularly well suited to it, the ARM Cortex-M family of processors is capable of running the Linux kernel, so spinning up a “real” OS image for it should be possible. Of course with a maximum of just 64 MB of RAM, you’ll want to keep your performance expectations fairly low.
Where Does Portenta Fit?
We can’t even speculate what a maxed out Portenta would cost, and there’s no pricing or release date for the Carrier Board. But even at $99, the base model Portenta H7 would be a tough sell for hackers and makers who are used to buying dual-core ESP32 boards at 1/10 of the price, or the Teensy 4.0 which has a 600 MHz Cortex-M7 at 1/4 of the price. Which is fine, since this board isn’t intended for the traditional core Arduino audience.
Seeing the carrier board, we can’t help but notice some parallels here with the Raspberry Pi Compute Module. With connections broken out to a SODIMM header, the idea of the Computer Module was to help bridge the gap between the DIY community and the commercial one by offering up a Raspberry Pi in a more rugged form factor that would be easier to integrate into end-user products. But since it wasn’t any cheaper than the stock Pi, there wasn’t a whole lot of incentive to switch over. We haven’t seen consumer products advertising “Raspberry Pi Inside!” so it’s hard to tell if there has been any meaningful adoption from industry.
One has to wonder why any company that has the resources to integrate such an expensive board into their products wouldn’t just come up with their own custom design around the Portenta’s STM32H747XI chip, which even in single quantities, can currently be had for less than $15. The difference may end up coming down to the world-renowned community that surrounds the Arduino brand, and the company’s efforts to modernize their toolchain.
Love it or hate it, for many people embedded systems means Arduino. Now Arduino is leveraging its more powerful MKR boards and introducing a cloud service, the Arduino IoT Cloud. The goal is to make it simple for Arduino programs to record data and control actions from the cloud.
The program is in beta and features a variety of both human and machine interaction styles. At the simple end, you can assemble a dashboard of controls and have the IoT Cloud generate your code and download it to your Arduino itself with no user programming required. More advanced users can use HTTP REST, MQTT, Javascript, Websockets, or a suite of command line tools.
The system relies on “things” like temperature sensors, LEDs, and servos. With all the focus on security now, it isn’t surprising that the system supports X.509 authentication and TLS security for traffic in both directions.
Honestly, we tried it and the web-based IDE couldn’t find our MKR1000 board under Linux. That could be a misconfiguration on our part, but it is frustrating how little information you get from many web-based tools. It decided we had multiple Arduinos connected (we didn’t). Then removing a multiport serial adapter made it see no Arduinos even though there was an MKR1000 Vidor attached.
Naturally, there are plenty of options when it comes to putting devices on the cloud. However, if you are only using Arduino boards, this one is going to be pretty seamless — assuming it works for you.
[Brian Khuu] bought a few Gameboy cameras on the Internet and found that they still had pictures on them from a previous owner. The memory in the camera has a backup battery and if that battery dies, the pictures are history. [Brian] bravely decided to extract the pictures to a PC. He knew the protocol for how the Gameboy talked to the companion pocket printer was available, so he used an Arduino and a Web browser to extract the photos. The resulting code is on GitHub if you want to save your pictures.
Although Brian didn’t have to crack the protocol, he does offer a good explanation of it. There’s even some sniffed displays. The Arduino does all the communications and fools the game into thinking it is the companion printer. However, it simply streams the data out and a Javascript decoder handles the actual decoding. In fact, in the blog post, you can enter data, click a button, and see the resulting Gameboy picture.
It works, but [Brian] did run into a few problems. For one thing, the devices don’t see to use any flow control so he had no choice but to keep up with the Gameboy. Also, there is a CRC he could not correctly decode. However, the pictures look good — well, as good as Gameboy pictures look, at least. So he did get results.
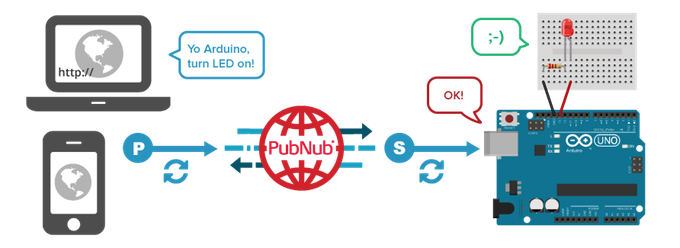
In this video, our friends at PubNub are going to create a smart home network that builds upon their previous Johnny Five tutorial. They again hack an Arduino Uno using JavaScript, but this time to create the simplest smart bulb. Because by “smart bulb,” we really just mean an LED.
The tutorial was developed by Tomomi Imura from PubNub and also uses Johnny-Five. No, not the robot from the movie Short Circuit. It is an open-source JavaScript robotics framework that lets you program an Arduino with Node.js. The bulb itself is remotely controlled via a web portal.
To establish the realtime communication between the Arduino and a web browser, the PubNub Data Stream Network (DSN) is used. PubNub provides global infrastructure and allows you to build and scale real-time apps and IoT devices quite easily.
The remote controller (web app) is written in JavaScript. This is a simple user interface that includes only one button. While a completed code sample is available on CodePen, this tutorial employs a simplified version so that it’s easier to follow along.
Interested in the world of hardware hacking, but feeling left out because you just don’t have the time to learn another language? Or maybe you aren’t comfortable using Sketch to program? Have no fear, you can easily use JavaScript to program boards like Arduino and Genuino. Yes, just JavaScript!
The idea in short: I will send a robot around planet earth. The robot will be sent to you free of charge. Let it run in your area for 24h and show all earthlings your projects or a piece of your country. Send the rover to the next destination after your mission is over (postal charges will be refunded). The robot can be controlled through a web interface while transmitting a live video stream. All young scientist and of course all discoverers that are young at heart get free access to the robots, there is even no registration needed.
Have you ever wanted to transmit Arduino data over the internet?
In this tutorial, we will design a web page that will retrieve Analog readings from the Arduino's Analog Pins and display them on a bar chart within the web page.
The web page will use jQuery and AJAX to request the data from the Arduino Web Server, allowing us to update the bar chart dynamically, without having to refresh the entire web page. The Arduino Web Server will send the Analog readings to the web page in JSON format where it will be processed and displayed accordingly.
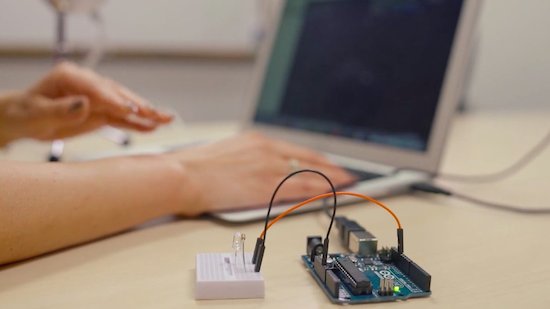
In this tutorial, I will not have anything connected to the Arduino's Analog pins, which means the data retrieved will be that of randomly floating analog pins. Feel free to connect a potentiometer, temperature sensor or any other analog sensor to these pins if you want to create a more "useful" project.
The main aim here was to show you how to transmit the data in JSON format, and to update only a portion of the web page using asynchronous communication (using AJAX), to improve the performance of data retrieval and visualisation.
Please note: The WIZnet ioShield-A ver1.1 actually comes with the WIZ550io board. So if you buy the ioShield-A, you will receive both boards. I have provided the link to the WIZ550io shield because you can buy that shield on its own. Regardless, you will need to use both boards for this tutorial.
Arduino Libraries and IDE
To program the Arduino you will need to download the Arduino IDE, and install the WIZnet Ethernet Library. The Arduino IDE version used in this tutorial was version 1.6.4. You may want to read the WIZnet wiki information for each WIZnet shield before use.
WIZnet Wiki page - for more information about the ioShield-A and the WIZ550io shield
ARDUINO CODE:
Full description of the Arduino code is included in the YouTube video above. Once you have set up your Arduino Web Server, you should be able to ping it. Look at this website, if you don't know how to use the windows ping feature.
Getting the Arduino Board onto the internet:
There isn't anything really to hook up for this project. You just have to align the pins for each board and stack them. You can power the Arduino via the USB cable. This will also be useful for debugging and printing to the Serial monitor. An ethernet cable needs to connect the WIZ550io board's ethernet port to your internet/network router
The WIZ550io board goes on the top
The ioShield-A is in the middle
The Arduino UNO is on the bottom
This is what it looks like when they are stacked together
If you want to gain easy access to the Analog or digital pins without de-soldering the ioShield-A, you can introduce some female headers like this:
Please note that the ioShield-A utilises a number of pins on the Arduino UNO - including: D2, D4, D7, D10, GND, and IOREF, RESET, 5V, GND, GND and ICSP pins
All Analog pins are available for use
Set the Arduino Web Server on your local network
You can test this project on your local network. You just have to choose an available IP address and PORT within your router's IP range. If you don't know your local IP address range - you can have a look at this site to give you a helping hand.
Set the Arduino Web Server to be accessed from anywhere in the world
If you want to access your Arduino from anywhere in the world, you need to set up Port Forwarding on your internet network router. The following useful guides will hopefully get you on the right track, if you have never set up Port forwarding.
In my case, I programmed the Arduino UNO Web Server to take the following ip address on my internal network: 10.1.1.99
I programmed the Arduino Web Server to listen for Web Browsers on port 8081. So if I wanted to connect to the Arduino Web Server through my home network, I just had to type in this web address into my web browser: http://10.1.1.99:8081
If you plan to connect to the Arduino using port 80 (which is the default port for web browsers), you can just type the IP address without specifying the port (eg. http://10.1.1.99/ )
The web browser should display the Arduino data in JSON format (the YouTube video above will show you what that looks like).
Once I knew I could connect to the Arduino in my internal network, I then set up port forwarding on my router so that I could type in my external IP address and special port to tunnel my way into my Arduino Web Server on my internal network. This is what I had to do on my router, but you may need to do something different.
My first step was to find out my public/external IP address by typing "what is my IP address" into google. If you want to know your external IP address click here.
I then typed my router's ip address into a web browser, and logged into my router.
I went to the advanced settings tab
Selected "Port Forwarding" from the side menu
Filled out all of the details on the first line of the Ports list
Enable box = ticked
Description = Arduino
WAN interface = pppoe_atm0/ppp0
Inbound port = 8082
Type = TCP
Private IP address = 10.1.1.99
Private port = 8081
Saved the settings
Now that I had port forwarding enabled, I could type the ip address (that I obtained in step 1) into my browser and specified port 8082 (instead of 8081) - eg. http://190.11.70.253:8082/
And now I can access my Arduino Web server from anywhere in the world. I can even access it from my smart phone. Once again, this will only return the Analog data in JSON format.
The Web Page GUI
The Arduino is now on the internet, so there are two options. You can either
or create the web page yourself (with a little help from the HTML code below)
Instructions on how to use these web pages, are listed below the HTML code.
To retrieve data from your Arduino Web Server, please make sure that it is connected and visible from outside of you local network. You will need to have port forwarding enabled. Information on port forwarding is described above.
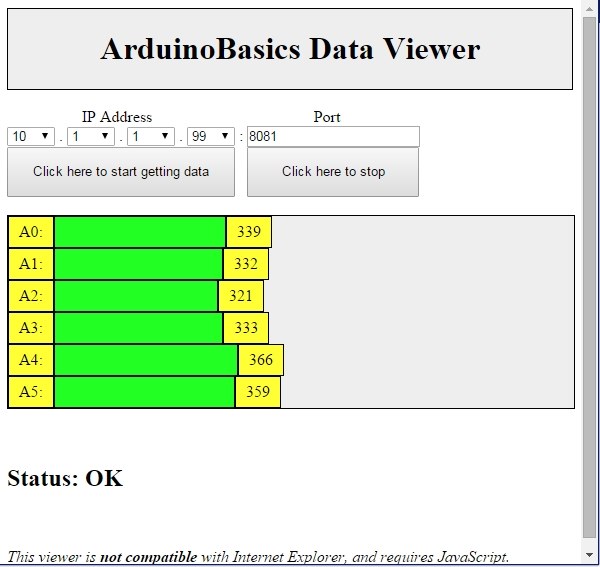
Enter the port forwarding port number (eg. 8082) into the box labelled "Port"
Then click on the "Click here to start getting data" button - you should start to see the bar charts moving and status should be OK
If the bar charts do not move, and the status message says "Failed to get DATA!!" - then the web page was unable to connect to the Arduino for some reason.
Troubleshooting
You may want to type in the web address into your web browser, to make sure that data is being retrieved.
You can also open the Serial monitor in the Arduino IDE to make sure that an IP address is being displayed
Ensure that you have enabled the port forwarding option on your router
The web page will not work properly if you use Internet Explorer or if you have javascript disabled within your browser.
Concluding comments
This tutorial showed you how to connect to your Arduino UNO over the internet, and retrieve data in JSON format using jQuery and AJAX. The web page can be modified to suit your own needs, plus it would be more useful if the Arduino was actually monitoring something, rather than logging data from floating pins. It would also be useful if the Arduino could be controlled to blink an LED, or to turn a motor... but I will leave that project for another day. Thank you.
If you like this page, please do me a favour and show your appreciation :
Have you ever wanted to transmit Arduino data over the internet?
In this tutorial, we will design a web page that will retrieve Analog readings from the Arduino's Analog Pins and display them on a bar chart within the web page.
The web page will use jQuery and AJAX to request the data from the Arduino Web Server, allowing us to update the bar chart dynamically, without having to refresh the entire web page. The Arduino Web Server will send the Analog readings to the web page in JSON format where it will be processed and displayed accordingly.
In this tutorial, I will not have anything connected to the Arduino's Analog pins, which means the data retrieved will be that of randomly floating analog pins. Feel free to connect a potentiometer, temperature sensor or any other analog sensor to these pins if you want to create a more "useful" project.
The main aim here was to show you how to transmit the data in JSON format, and to update only a portion of the web page using asynchronous communication (using AJAX), to improve the performance of data retrieval and visualisation.
To program the Arduino you will need to download the Arduino IDE, and install the WIZnet Ethernet Library. The Arduino IDE version used in this tutorial was version 1.6.4. You may want to read the WIZnet wiki information for each WIZnet shield before use.
WIZnet Wiki page - for more information about the ioShield-A and the WIZ550io shield
ARDUINO CODE:
Full description of the Arduino code is included in the YouTube video above. Once you have set up your Arduino Web Server, you should be able to ping it. Look at this website, if you don't know how to use the windows ping feature.
Getting the Arduino Board onto the internet:
There isn't anything really to hook up for this project. You just have to align the pins for each board and stack them. You can power the Arduino via the USB cable. This will also be useful for debugging and printing to the Serial monitor. An ethernet cable needs to connect the WIZ550io board's ethernet port to your internet/network router
The WIZ550io board goes on the top
The ioShield-A is in the middle
The Arduino UNO is on the bottom
This is what it looks like when they are stacked together
If you want to gain easy access to the Analog or digital pins without de-soldering the ioShield-A, you can introduce some female headers like this:
Please note that the ioShield-A utilises a number of pins on the Arduino UNO - including: D2, D4, D7, D10, GND, and IOREF, RESET, 5V, GND, GND and ICSP pins
All Analog pins are available for use
Set the Arduino Web Server on your local network
You can test this project on your local network. You just have to choose an available IP address and PORT within your router's IP range. If you don't know your local IP address range - you can have a look at this site to give you a helping hand.
Set the Arduino Web Server to be accessed from anywhere in the world
If you want to access your Arduino from anywhere in the world, you need to set up Port Forwarding on your internet network router. The following useful guides will hopefully get you on the right track, if you have never set up Port forwarding.
In my case, I programmed the Arduino UNO Web Server to take the following ip address on my internal network: 10.1.1.99
I programmed the Arduino Web Server to listen for Web Browsers on port 8081. So if I wanted to connect to the Arduino Web Server through my home network, I just had to type in this web address into my web browser: http://10.1.1.99:8081
If you plan to connect to the Arduino using port 80 (which is the default port for web browsers), you can just type the IP address without specifying the port (eg. http://10.1.1.99/ )
The web browser should display the Arduino data in JSON format (the YouTube video above will show you what that looks like).
Once I knew I could connect to the Arduino in my internal network, I then set up port forwarding on my router so that I could type in my external IP address and special port to tunnel my way into my Arduino Web Server on my internal network. This is what I had to do on my router, but you may need to do something different.
My first step was to find out my public/external IP address by typing "what is my IP address" into google. If you want to know your external IP address click here.
I then typed my router's ip address into a web browser, and logged into my router.
I went to the advanced settings tab
Selected "Port Forwarding" from the side menu
Filled out all of the details on the first line of the Ports list
Enable box = ticked
Description = Arduino
WAN interface = pppoe_atm0/ppp0
Inbound port = 8082
Type = TCP
Private IP address = 10.1.1.99
Private port = 8081
Saved the settings
Now that I had port forwarding enabled, I could type the ip address (that I obtained in step 1) into my browser and specified port 8082 (instead of 8081) - eg. http://190.11.70.253:8082/
And now I can access my Arduino Web server from anywhere in the world. I can even access it from my smart phone. Once again, this will only return the Analog data in JSON format.
The Web Page GUI
The Arduino is now on the internet, so there are two options. You can either
or create the web page yourself (with a little help from the HTML code below)
Instructions on how to use these web pages, are listed below the HTML code.
To retrieve data from your Arduino Web Server, please make sure that it is connected and visible from outside of you local network. You will need to have port forwarding enabled. Information on port forwarding is described above.
Enter the port forwarding port number (eg. 8082) into the box labelled "Port"
Then click on the "Click here to start getting data" button - you should start to see the bar charts moving and status should be OK
If the bar charts do not move, and the status message says "Failed to get DATA!!" - then the web page was unable to connect to the Arduino for some reason.
Troubleshooting
You may want to type in the web address into your web browser, to make sure that data is being retrieved.
You can also open the Serial monitor in the Arduino IDE to make sure that an IP address is being displayed
Ensure that you have enabled the port forwarding option on your router
The web page will not work properly if you use Internet Explorer or if you have javascript disabled within your browser.
Concluding comments
This tutorial showed you how to connect to your Arduino UNO over the internet, and retrieve data in JSON format using jQuery and AJAX. The web page can be modified to suit your own needs, plus it would be more useful if the Arduino was actually monitoring something, rather than logging data from floating pins. It would also be useful if the Arduino could be controlled to blink an LED, or to turn a motor... but I will leave that project for another day. I hope you enjoyed this tutorial - if it helped you in any way, please consider donating a small "tip" into my money jar. Thank you.
If you like this page, please do me a favour and show your appreciation :