Posts with «mqtt» label

Weasley Clock For Magically Low Cost

For those unfamiliar with the details of the expansive work of fiction of Harry Potter, it did introduce a few ideas that have really stuck in the collective conscious. Besides containing one of the few instances of time travel done properly and introducing a fairly comprehensive magical physics system, the one thing specifically that seems to have had the most impact around here is the Weasley family clock, which shows the location of several of the characters. We’ve seen these built before in non-magical ways, but this latest build seeks to drop the price tag on one substantially.

To do this, the build relies on several low-cost cloud computing solutions and smartphone apps to solve the location-finding problem. The app is called OwnTracks and is an open-source location tracker which can report data to any of a number of services. [Simon] sends the MQTT data to a cloud-based solution called HiveMQCloud, but you could send it anywhere in principle. With the location tracking handled, he turns to some very low-cost Arduinos to control the stepper motors which point the clock hands to the correct locations on the face.

While the build does rely on a 3D printer for some of the internal workings of the clock, this does bring the cost down substantially when compared to other options. Especially when compared to this Weasley family clock which was built into a much larger piece of timekeeping equipment, having an option for a lower-cost location-tracking clock face like this one is certainly welcome.

Trigger Your Home Automation Routines With Home Buttons

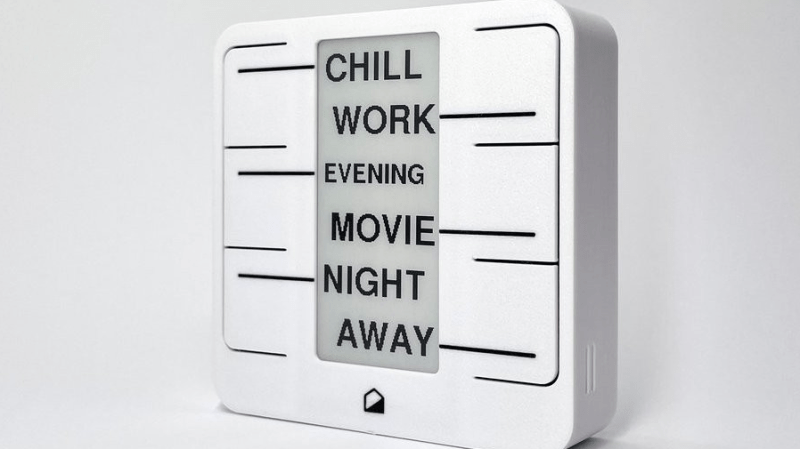
Home automation systems are all well and good, so long as the person who built it all is around to drive it. Let’s face it, they’re quite often a complex web of interconnected systems, all tied to the specifics of one’s home — and someone less familiar with it all could get a little irritated if, on a chilly day, the interface to the boiler is via a Python script, and something won’t work. Just saying. Home Buttons by [Matej Planinšek] over on Hackaday.IO is a nicely polished project, which aims to take some of the hackiness out of such automation by providing a sleek front end to those automation routines, enabling anyone to rock on over and set one in action without hassle.

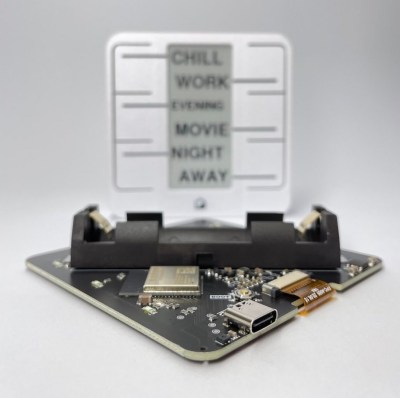
The PCB is based around the ESP32-S2-mini which deals with WiFi connectivity and integration with Home Assistant using the usual MQTT protocol. We expect integration with other flavors of home automation would not be difficult to achieve. The center of the unit holds a simple E-Ink display, for that low-standby power. Specifically, the unit chosen is a Good Display GDEY029T94 2.9″ which this scribe can confirm is easy to interface and pretty cheap to purchase from the usual Chinese online vendors. This was matched up with six clicky Alps SKRB-series low-profile tact switches, which sit on either side of the display, and corresponds to a flexure-type affair on the 3D printed front casing. Neat and simple.

The PCB design was provided in Altium format, which you can find on the project GitHub page. This shows a straightforward design, with a few nice little details here and there. The internally mounted 186550 cell is reportedly good for at least a year of operation, but when time, it can be charged via USB. A Xysemi XB8608AF (PDF) protection chip provides appropriate limiting for the 186550 cell, shielding it from the perils of overcharging, discharging, and whatnot. Not that that is likely in this current setup. A Sensiron SHTC3 humidity and temperature sensor is also in there, hanging off the I2C bus, which makes sense for this application.

Home Automation hacks are plenty on these pages, like this scroll-wheel interface, for instance. If all this stuff is looking quite overbearingly complicated to get into, how about starting with a Pico W?

How an Engineer Designs a DIY Energy Recovery Ventilator

We have no idea whether [Nick Goodey] is a trained engineer or not. But given the detailed design of this DIY energy recovery ventilator for his home HVAC system, we’re going to go out on a limb and say he probably knows what he’s doing.

For those not in the know, an energy recovery ventilator (ERV) is an increasingly common piece of equipment in modern residential and commercial construction. As buildings have become progressively “tighter” to decrease heating and cooling energy losses to the environment, the air inside them has gotten increasingly stale. ERVs solve the problem by bringing fresh, unconditioned air in from the outside while venting stale but conditioned air to the outside. The two streams pass each other in a heat exchanger so that much of the energy put into the conditioned air is transferred to the incoming unconditioned air.

While ERV systems are readily available commercially, [Nick] decided to roll his own after a few experiments with Coroplast and some extensive calculations convinced him it would be a viable idea. One may scoff at the idea of corrugated plastic for the heat exchanger, but the smooth channels through the material make it a great choice. He built up a block of Coroplast squares with the channels in alternate layers oriented orthogonally, letting stale inside air pass very close to fresh outside air to exchange heat without every mixing directly. The entire system, including fans, an Arduino for control, sensors galore, and the Hubitat home automation hub, is powered by DC, so no electrician was needed. [Nick] has a ton of detail in his build log, including all the tools and calculators he used to design the system.

Given the expense of ERV systems, we’re surprised we haven’t seen more stories about DIY versions. We have talked about HVAC systems a lot, though — after all, HVAC techs are hackers who make housecalls.

Arduino Enters the Cloud

Love it or hate it, for many people embedded systems means Arduino. Now Arduino is leveraging its more powerful MKR boards and introducing a cloud service, the Arduino IoT Cloud. The goal is to make it simple for Arduino programs to record data and control actions from the cloud.

The program is in beta and features a variety of both human and machine interaction styles. At the simple end, you can assemble a dashboard of controls and have the IoT Cloud generate your code and download it to your Arduino itself with no user programming required. More advanced users can use HTTP REST, MQTT, Javascript, Websockets, or a suite of command line tools.

The system relies on “things” like temperature sensors, LEDs, and servos. With all the focus on security now, it isn’t surprising that the system supports X.509 authentication and TLS security for traffic in both directions.

Honestly, we tried it and the web-based IDE couldn’t find our MKR1000 board under Linux. That could be a misconfiguration on our part, but it is frustrating how little information you get from many web-based tools. It decided we had multiple Arduinos connected (we didn’t). Then removing a multiport serial adapter made it see no Arduinos even though there was an MKR1000 Vidor attached.

Naturally, there are plenty of options when it comes to putting devices on the cloud. However, if you are only using Arduino boards, this one is going to be pretty seamless — assuming it works for you.

Hack a Day 07 Feb 16:30

Electricity Monitoring with a Light-to-Voltage Sensor, MQTT and some Duct Tape

When it comes down to energy management, having real-time data is key. But rarely is up-to-the-minute kilowatt hour information given out freely by a Utility company, which makes it extremely hard to adjust spending habits during the billing cycle. So when we heard about [Jon]‘s project to translate light signals radiating out of his meter, we had to check it out.

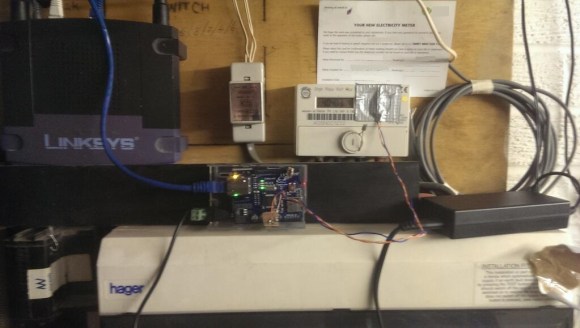
From the looks of it, his hardware configuration is relatively simple. All it uses is a TSL261 Light-to-Voltage sensor connected to an Arduino with an Ethernet shield attached. The sensor is then taped above the meter’s flashing LED, which flickers whenever a pulse is sent out indicating every time a watt of electricity is used. His configuration is specific to the type of meter that was installed by his Utility, and there is no guarantee that all the meters deployed by that company are the same. But it is a good start towards a better energy monitoring solution.

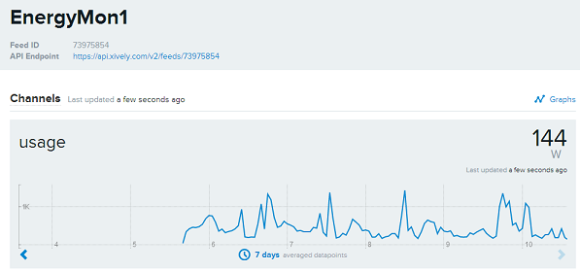
And the entire process is documented on [Jon]’s website, allowing for more energy-curious people to see what it took to get it all hooked up. In it, he describes how to get started with MQTT, which is a machine-to-machine (M2M)/”Internet of Things” connectivity protocol, to produce a real-time graph, streaming data in from a live feed.

Now, with all this valuable information, other applications can be built on top of it. Interfacing with something like the Pinoccio microcontroller system can allow for devices to be turned off during peak-power times, helping to reduce the billing price at the end of the month.

Energy-intelligence platforms like this assist in conserving electricity while keeping the rate-payer consistently informed of their power usage habits. A real win, win. However, we still need to figure out how to (legally) extract the data from other types of meters.

One example is to harvest the information wirelessly with a special USB dongle to gather the data emitting from the Utility meter. But this only works for that brand of meter. Another solution is to read infrared flashes with an AVR, a resistor, a capacitor, and a phototransistor, which is similar to what [Jon] created above.

So, what kind of meter do you have? And, do you think there is a better way to extract the kWh data? Let us know in the comments, and let’s see what we can come up with.


Filed under: home hacks

Long Range Wireless Sensors for the Home-Area-Network

In the near future, we will all reside in households that contain hundreds of little devices intertwingled together with an easily connectable and controllable network of sensors. For years, projects have been appearing all around the world, like this wireless sensor system that anyone can build.

[Eric] hopes his work will help bring the truly expansive Home-Area-Network (HAN) into fruition by letting developers build cheap, battery-powered, long-range wireless sensors. His method integrates with the pluggable OSGI architecture and home automation platform openHAB along with using an Arduino as the lower power, sensor node that is capable of utilizing many types of cheap sensors found online.

[Eric]’s tutorial depicts a few examples of the possibilities of these open-source platforms. For instance, he shows what he calls a ‘Mailbox Sentinel’ which is a battery-powered mail monitoring device that uses a Raspberry Pi to play the infamous, and ancient AOL sound bite “you’ve got mail.” It will also send an email once the postman cometh.

In addition, he lists other ideas such as a baby monitoring sentinel, a washer/dryer notification system, water leak detectors, and security implementations that blast a loud alarm if someone tries to break in. All of this potential for just around $20.

The key to making this project work, as [Eric] states, is the MQTT binding that ties together the Ardiuno and openHAB platform. This allows for simple messages to be sent over the Ethernet connection which is often found in IoT devices.

So all you developers out there go home and start thinking of what could be connected next! Because with this system, all you need is a couple of ten-spots and an internet plug, and you have yourself a strong foundation to build on top of. The rest is up to you.

This open, connected device is [Eric's] entry for The Hackaday Prize. You can see his video demo after the break. We hope this inspires you to submit your own project to the contest!


Filed under: home hacks, The Hackaday Prize