Posts with «nrf24l01+» label

Hackaday Prize 2023: Bolt Bot Micro Servo Droids
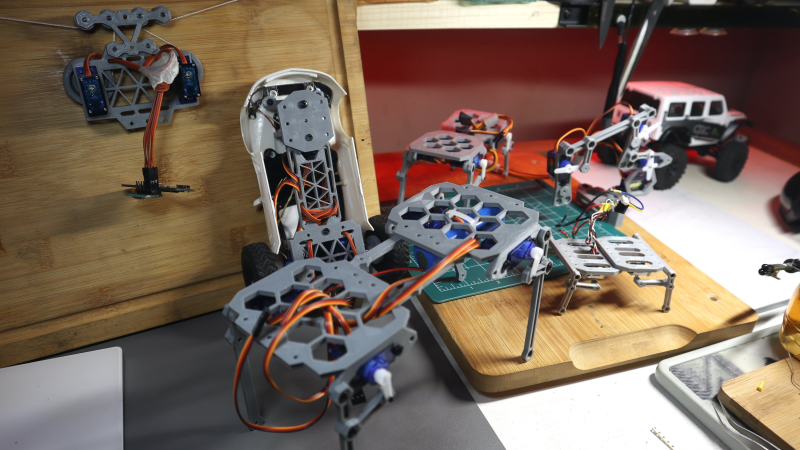
This Hackaday prize entry from [saul] is the beginning of a reconfigurable kit of 3D printed parts and servo motors for robotics learning. With just access to a printer, a few cheap-as-chips servo motors, an Arduino, and some nuts and bolts, you could be hacking together robot walkers within a few hours of starting!

Bolt Bots is very simple to understand, with all the mechanics and wiring out there in the breeze, but strictly for indoor use we reckon. If you want to add remote control to your application, then drop in one of the ubiquitous nRF24L01 boards and build yourself a copy of the remote control [saul] handily provides in this other project.
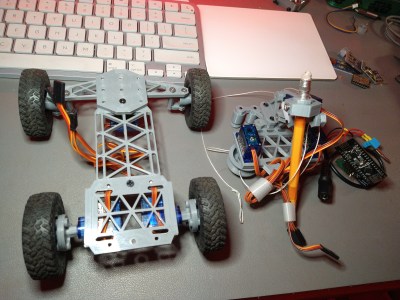
There really isn’t a great deal we can say about this, as it’s essentially a build kit with quite a few configuration options, and you just have to build with it and see what’s possible. We expect the number of parts to proliferate over time giving even more options. So far [saul] demonstrates a few flavors of ‘walkers’, a rudimentary ‘robot arm’, and even a hanging drawbot.

The bolt hardware can be found in this GitHub repo, and the remote control code in this second one.

Servo-based designs are sometimes sneered at due to their dubious accuracy and repeatability, but with a little of effort, this can be vastly improved upon. Also, multi-legged walkers need multiple servos and controllers to drive ’em. Or do they?

The HackadayPrize 2023 is Sponsored by:

Sending MIDI Wirelessly With The nRF24L01

MIDI is a standard known by musicians and instruments all over the world. The basic twist on regular serial has helped studios around the world to work more efficiently. [Kevin] wanted to try sending MIDI data wirelessly, but rather than the typical Bluetooth solution, decided to use the humble nRF24L01 instead.

The circuitry used is simple: [Kevin] simply wired up two Arduino Unos with nRF24L01 radio modules, which communicate over SPI. Alternatively, an even quicker solution is to use a Keywish Arduino RF Nano, which packs a nRF24L01 on board. One Arduino can then be hooked up to a MIDI OUT port on an instrument, and it will send out MIDI signals wirelessly. The second Arduino can then be plugged into a MIDI IN port and repeat out what it receives over the air.

The real work was in the firmware, which takes MIDI data and packages it in a suitable form to send out over the nRF24L01. The system can operate in a one-to-one mode, emulating a single MIDI cable, or a multicast mode, where one sender transmits information to many receivers.

It’s a neat hack and one we could imagine would be useful in some fun performance situations. We’ve seen others do work on wireless MIDI interfaces for Eurorack hardware, too. Video after the break.

Offline Dinosaur-Jumping Becomes a Real Workout

It’s great to see people are out there trying to find fun ways to exercise amid the current crisis. Although jumping up and down isn’t great for the knees, it does give decent cardio. But if you don’t have a rope or a puddle, we admit that jumping can lose its bounce pretty fast.

Quarantine has been a game-filled time for [fridaay]. Somewhere between a handful of FPS games, he decided to try to play Google’s offline dinosaur-based side scroller game by making the dinosaur spring over the saguaros whenever he physically jumps in the air. (Video, embedded below.)

Here’s how it works: [fridaay] holds a transmit circuit that consists of an Arduino UNO, an accelerometer module, and an nRF24L01 transceiver, all running on a 9 V battery. Whenever [fridaay] jumps, the accelerometer reads the change in Z and sends it to the receiving circuit, which is just another UNO and nRF. The receiving UNO is connected to a laptop and configured to press the space bar so the dinosaur canters over the cacti.

We’ve never been able to stay alive long enough in the game to see this happen, but apparently you need to crouch at some point in the game. [fridaay] has yet to implement a control for that, but we’re sure he’ll think of something. Jump past the break to see the video, and hit him up if you need the code.

If you have a lot of parts at your disposal, why not make a physical version?

Via r/duino

Cheating At Bowling, The Hacker Way

Anyone who has ever gone to a bowling alley will know the preferred (but ineffective) technique to telepathically control a bowling ball. [Mark Rober] and [James Bruton] decided to change that and hacked a bowling ball that can be steered remotely (and discreetly), simply by leaning your body.

They started with a standard bowling ball, that was cut in half and hollowed out on a lathe. A beam sits on the centre line of the ball, mounted on a bearing in each half to allow the ball to spin around it. Steering done by shifting the centre of mass, by moving a steel pendulum that hangs below the beam side to side with heavy-duty servo. The servo is controlled with an Arduino, and an IMU to detects the balls orientation. Power is provided by and RC Lipo battery. The wireless controller is a sneaky little device that is taped to [Mark]’s back and covered with clothing, and steers the ball by detecting how far he leans with an IMU module. The brain is an Arduino Mini and an NRF24L01 provides the RF link.

While it’s not an easy build, it’s a fairly simple system electronically, with off the shelf electronics modules and perfboard. The genius is in the implementation and its entertainment value. The look on the kids faces when [Mark] “telepathically” controls the ball, after showing off the fact that he has zero natural ability, is absolutely priceless. [Mark Rober], a former NASA engineer, has made a name for himself with viral Youtube videos on cool projects like a glitter booby trap for package thieves and a liquid sand hot tub. [James Bruton], a former toy designer is known for his robotics prowess that he has put on display with OpenDog and functional Star Wars robots.

For us this hack is a perfect example of one that entertains and inspires, a powerful combination for young and old alike. Check out the awesome video after the break.

Hack a Day 24 Nov 15:00

Haptic Glove Controls Robot Hand Wirelessly

[Miller] wanted to practice a bit with some wireless modules and wound up creating a robotic hand he could teleoperate with the help of a haptic glove. It lookes highly reproducible, as you can see the video, below the break.

The glove uses an Arduino’s analog to digital converter to read some flex sensors. Commercial flex sensors are pretty expensive, so he experimented with some homemade sensors. The ones with tin foil and graphite didn’t work well, but using some bent can metal worked better despite not having good resolution.

The wireless communications set up was pretty easy thanks to the NRF24L01 modules. The hard part was sewing the flex sensors into the glove. We thought some of the circuitry looked precarious on the glove, too.

For the robot hand, he used balsa wood and hinges for each joint. Flexible thread provided the return power like a spring. The hand was surprisingly artistic in a primitive sort of way.

While this is a cool demo, the hand isn’t likely to be practical for much as it is. Nerve impulses are better but harder. The glove reminded us a little of one we’d seen before.

Arduino RC Transmitter For Homebrew Projects

The field of radio control has benefited much from the onward march of technology. Where a basic 2-channel setup would once have cost hundreds of dollars, it’s now possible to get a high-end 2.4GHz 9-channel rig for well under $100, shipped to your door. However, the vast majority of these systems are closed-source and built for purpose. Sometimes, there are benefits to doing things your own way, and that’s precisely what this project does.

At its heart, it’s a simple combination. An Arduino Pro Mini talks to a NRF24L01 which handles the wireless communication. At that point, it’s up to you – throw in as few or as many controls as you like. For this build, [HowToMechatronics] has gone with a twin-stick setup, with a pair of potentiometers and twin toggle switches to round out the options.

The build comes in handy, as it’s possible to program in whatever features you may need for a given project. [HowToMechatronics] has used it to control a hexapod robot, among other projects. It’s a build that shows that with cheap and readily available parts, it’s possible to whip up a custom solution to suit your needs.

If this topic interests you.it’s worth saying that even those closed source radio control products can sometimes be hacked.

[Thanks to Baldpower for the tip!]

Glorious Body of Tracked ‘Mad Mech’ Started as Cardboard

[Dickel] always liked tracked vehicles. Taking inspiration from the ‘Peacemaker’ tracked vehicle in Mad Max: Fury Road, he replicated it as the Mad Mech. The vehicle is remote-controlled and the tank treads are partly from a VEX robotics tank tread kit. Control is via a DIY wireless controller using an Arduino and NRF24L01 modules. The vehicle itself uses an Arduino UNO with an L298N motor driver. Power is from three Li-Po cells.

The real artistic work is in the body. [Dickel] used a papercraft tool called Pepakura (non-free software, but this Blender plugin is an alternative free approach) for the design to make the body out of thin cardboard. The cardboard design was then modified to make it match the body of the Peacemaker as much as possible. It was coated in fiberglass for strength, then the rest of the work was done with body filler and sanding for a smooth finish. After a few more details and a good paint job, it was ready to roll.

There’s a lot of great effort that went into this build, and [Dickel] shows his work and process on his project page and in the videos embedded below. The first video shows the finished Mad Mech being taken for some test drives. The second is a montage showing key parts of the build process.

Paper and cardboard are very versatile and accessible materials for making things. It’s what was used to do some target practice with this working paper and cardboard gun. With the right techniques foam core can be worked into an astonishing variety of shapes, and we also made a case for the value of a desktop vinyl cutter on any well-equipped hacker’s workbench.

High-Effort Streaming Remote for Low-Effort Bingeing

There’s no limit to the amount of work some people will put into avoiding work. For instance, why bother to get up from your YouTube-induced vegetative state to adjust the volume when you can design and build a remote to do it for you?

Loath to interrupt his PC streaming binge sessions, [miroslavus] decided to take matters into his own hands. When a commercially available wireless keyboard proved simultaneously overkill for the job and comically non-ergonomic, he decided to build a custom streaming remote. His recent microswitch encoder is prominently featured and provides scrolling control for volume and menu functions, and dedicated buttons are provided for play controls. The device reconfigures at the click of a switch to support Netflix, which like YouTube is controlled by sending keystrokes to the PC through a matching receiver. It’s a really thoughtful design, and we’re sure the effort [miroslavus] put into this will be well worth the dozens of calories it’ll save in the coming years.

A 3D-printed DIY remote is neat, but don’t forget that printing can also save a dog-chewed remote and win the Repairs You Can Print contest.

Over The Air Updates For Your Arduino

An Arduino and a data radio can make a great remote sensor node. Often in such situations, the hardware ends up installed somewhere hard to get to – be it in a light fitting, behind a wall, or secreted somewhere outdoors. Not places that you’d want to squeeze a cable repeatedly into while debugging.

[2BitOrNot2Bit] decided this simply wouldn’t do, and decided to program the Arduinos over the air instead.

Using the NRF24L01 chip with the Arduino is a popular choice to add wireless communications to a small project. By installing one of these radios on both the remote hardware and a local Arduino connected to the programming computer, it’s possible to remotely flash the Arduino without any physical contact whatsoever using Optiboot.

The writeup is comprehensive and covers both the required hardware setup for both ends of the operation as well as how to install the relevant bootloaders. If you’re already using the NRF24L01 in your projects, this could be the ideal solution to your programming woes. Perhaps you’re using a different platform though – like an Arduino on WiFi? Don’t worry – you can do OTA updates that way, too.

Remotely Controlling a Not-So-Miniature Hot Air Balloon

Calling [Matt Barr]’s remote controlled hot air balloon a miniature is a bit misleading. Sure, it’s small compared with the balloons that ply cold morning skies with paying passengers and a bottle of champagne for the landing. Having been in on a few of those landings, we can attest to the size of the real thing. They’re impressively big when you’re up close to them.

While [Matt]’s balloon is certainly smaller, it’s not something you’d just whip together in an afternoon. Most of [Matt]’s build log concentrates mainly on the gondola and its goodies — the twin one-pound camp stove-style propane tanks, their associated plumbing, and the burner, a re-tasked propane weed torch from Harbor Freight. Remote control is minimal; just as in a full-size balloon, all the pilot can really do is turn the burner on or off. [Matt]’s approach is a high-torque RC servo to control the burner valve, which is driven by an Arduino talking to the ground over a 2.4-GHz RF link. The balloon is big enough to lift 30 pounds and appears to be at least 12 feet tall; we’d think such a craft would run afoul of some civil aviation rules, so perhaps it’s best that the test flight below was a tethered one.

Sadly, no instructions are included for making the envelope, which would be a great excuse for anyone to learn a little about sewing. And knowing how to roll your own hot air balloon might come in handy someday.


Filed under: misc hacks