Posts with «programming» label

Humble Arduino As PLC

On the surface, a programmable logic controller (PLC) might seem like nothing more than a generic microcontroller, perhaps outfitted to operate in industrial settings with things like high temperatures or harsh vibrations. While this is true to some extent, PLCs also have an international standard for their architecture and programming languages. This standard is maintained by the International Electrotechnical Commission, making it so that any device built under these specifications will be recognizable to control engineers and maintenance personnel worldwide. And, if you use this standard when working with certain Arduinos, this common platform can become a standard-compliant PLC as well.

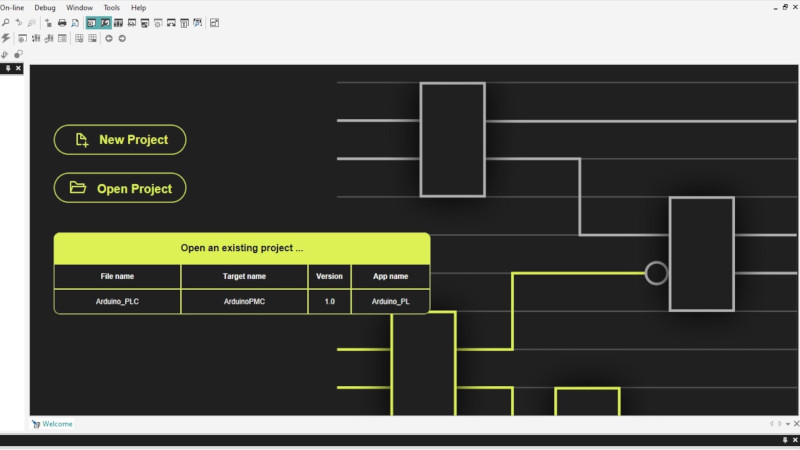
The IDE itself supports programming ladder diagrams, functional block diagrams, and other programming systems covered under the IEC 61131-3 standard. Not only that, it allows the combination of these types of PLC programming with Arduino sketches. The system offers many of the perks of PLC programming alongside the familiar Arduino platform, and supports a number of protocols as well including CANOpen, Modbus RTU, and Modbus TCP. It can also be used for monitoring a PLC system, essentially adding IoT capabilities to existing systems, enabling continuous monitoring, debugging, and program updates.

While not every Arduino is a great platform to build a PLC around, there are a few available for those looking for a system a little less proprietary and a little more user-friendly than typical PLC systems tend to be. There’s a reason that PLCs are built around an international standard and generally have certain hardware in mind to run it, though, and this comparison of a Raspberry Pi with an off-the-shelf PLC goes into detail about why certain components aren’t good choices for PLCs.

Blinking an Arduino LED, in Julia

The Julia programming language is a horrible fit for a no-frills microcontroller like the ATMega328p that lies within the classic Arduino, but that didn’t stop [Sukera] from trying, and succeeding.

All of the features that make Julia a cool programming language for your big computer make it an awful choice for the Arduino. It’s designed for interactivity, is dynamically typed, and leans heavily on its garbage collection; each of these features alone would tax the Mega to the breaking point. But in its favor, it is a compiled language that is based on LLVM, and LLVM has an AVR backend for C. Should just be a simple matter of stubbing out some of the overhead, recompiling LLVM to add an AVR target for Julia, and then fixing up all the other loose ends, right?

Well, it turns out it almost was. Leaning heavily on the flexibility of LLVM, [Sukera] manages to turn off all the language features that aren’t needed, and after some small hurdles like the usual problems with volatile and atomic variables, manages to blink an LED slowly. Huzzah. We love [Sukera’s] wry “Now THAT is what I call two days well spent!” after it’s all done, but seriously, this is the first time we’ve every seen even super-rudimentary Julia code running on an 8-bit microcontroller, so there are definitely some kudos due here.

By the time that Julia is wedged into the AVR, a lot of what makes it appealing on the big computers is missing on the micro, so we don’t really see people picking it over straight C, which has a much more developed ecosystem. But still, it’s great to see what it takes to get a language designed around a runtime and garbage collection up and running on our favorite mini micro.

Thanks [Joel] for the tip!

Matrix and Joystick

For the original tutorial, please visit: https://arduinobasics.blogspot.com


Project Description

In this project, we will use a little joystick to move a pixel around an 8x8 LED matrix. The joystick has a built-in button, such that when you press down onto the joystick, the colour of the pixel will change from red to blue to green. This is a very simple project, however, controlling the matrix adds a certain level of complexity. You will need to understand binary notation and bit-shifting techniques to grasp the concept of this tutorial.

All of the parts used in this project can be obtained from digitspace.com


Libraries

The SPI library is required for this project. However, this library is built into the current version of the Arduino IDE. No additional download is required. Just make sure to include it at the top of the sketch.


Arduino Code

The Arduino IDE can be downloaded from the official Arduino website: here.
Copy and paste the following code into your Arduino IDE and upload it to the Arduino UNO.


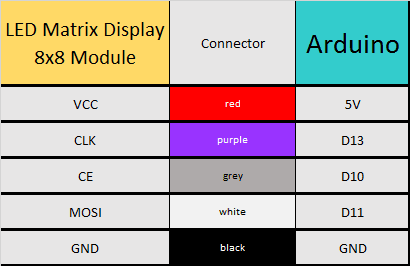
Connections


Project Video

As you can see from the video above, the pixel changes colour when the button is pressed. The position of the pixel relates to the position of the joystick. The lag between the joystick movement and pixel movement is minimal, and very satisfying.


Conclusion

This was a very fun and satisfying project that showcases the interaction between a joystick and a 8x8 LED matrix with the help of an Arduino UNO. This project was sponsored by the kind people at digitspace. Without their sponsorship, this tutorial would not have been possible. Please visit their website for some nice deals on Arduino related products.

If you found this tutorial helpful, please consider supporting me by buying me a virtual coffee/beer.

$3.00 AUD only

Social Media

You can find me on various social networks:

Follow me on Twitter: ScottC @ArduinoBasics.
I can also be found on Instagram, Pinterest, and YouTube.
And if all else fails, I have a server on Discord.


ScottC 09 Mar 07:41
8x8  arduino  ce  clk  fun  joystick  led  matrix  module  mosi  pixel  programming  spi  sw  tutorial  uno  x  y  

HeyTeddy is a conversation-based prototyping tool for Arduino

Programming an Arduino to do simple things like turn on an LED or read a sensor is easy enough via the official IDE. However, think back to your first experiences with this type of hardware. While rewarding, getting everything set up correctly was certainly more of a challenge, requiring research that you now likely take for granted.

To assist with these first steps of a beginner’s hardware journey, researchers at KAIST in South Korea have come up with HeyTeddy, a “conversational test-driven development [tool] for physical computing.” 

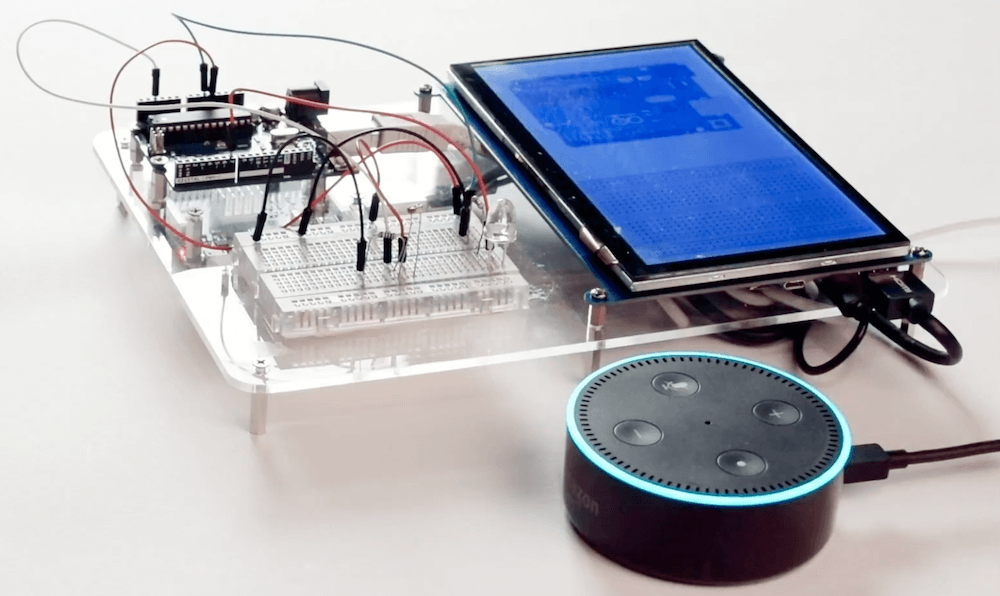
As seen in the video below, HeyTeddy’s voice input is handled by an Amazon Echo Dot, which passes these commands through the cloud to a Raspberry Pi. The system then interacts with the physical hardware on a breadboard using an Arduino Uno running Firmata firmware, along with a 7” 1024 x 600 LCD touchscreen for the GUI. Once programmed, code can be exported and used on the board by itself.

Those wishing to learn more can check out the entire research paper here

HeyTeddy is a conversational agent that allows users to program and execute code in real-time on an Arduino device without writing actual code but instead operating it through dialogue. This conversation can either be based on voice or text (through a Web chat). Commands spoken to HeyTeddy are parsed, interpreted, and executed in real-time, resulting in physical changes to the hardware. For example, the “write high” command configures an I/O pin to behave as a digital output with its internal state set to high (e.g., a 5V logic level), making driving an LED possible. Hence, the user does not need to write any code, compile it, deal with errors, and manually upload it on the hardware.

Furthermore, HeyTeddy supervises the user’s choices, preventing incorrect logic (e.g., writing an analog value to a digital pin), guiding the user through each step needed to assemble the circuit, and providing an opportunity to test individual components through separate unit tests without interrupting the workflow (i.e., TDD functionalities). Finally, the user has the option of exporting the issued commands as a written code for Arduino (i.e., an Arduino sketch in C++, ready for upload). 

The Ifs: Coding for kids, reading skills not required

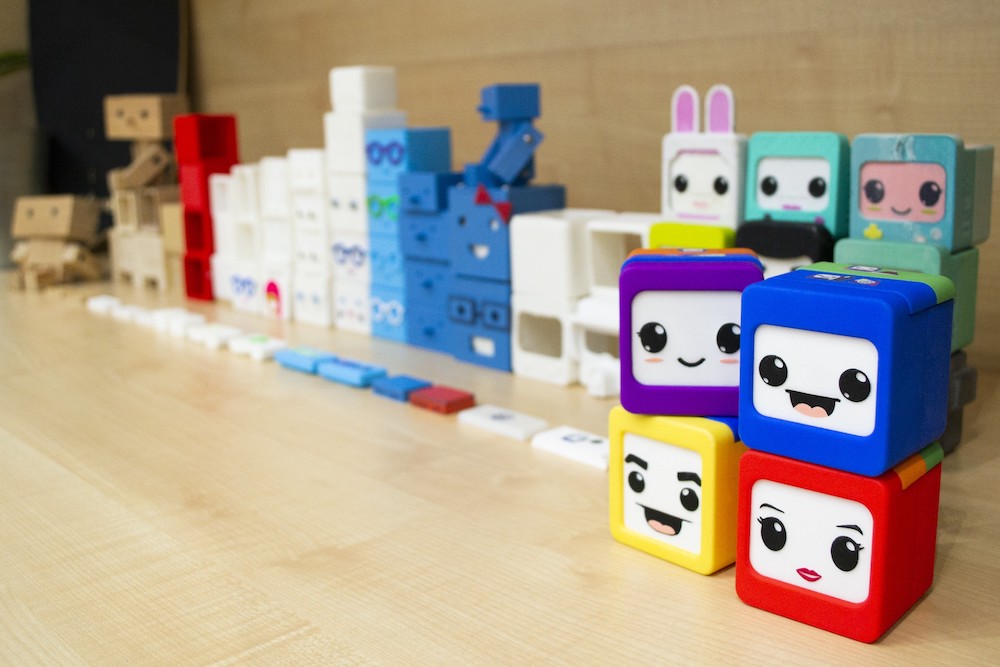
Learning about how computers work and coding skills will be important for future generations, and if you’d like to get your kids started on this task—potentially before they can even read—the Ifs present an exciting new option. 

The Ifs are a series of four character blocks each with their own abilities, such as reproducing sound, movement, or sensitivity to light and darkness.

Children can program the blocks to accomplish tasks based on instructions that snap onto the top of each using magnets, and the whole “family” can communicate and work together to accomplish more advanced actions as a team. 

As outlined in more detail on this project page, the devices were developed using Arduino technology, and you can sign up here to be notified when they’re ready for crowdfunding.

The Ifs are full of sensors and actuators but they need some instructions in order to function. 

Programming is as simple as placing physical blocks in their heads with the help of magnets. No screens are involved. Each block has a different image serving as an intuitive symbol to represent an instruction. This makes the game suitable for children from the age of three, even before learning to read or write.

We only need different color pieces that are placed on their heads. The different color pieces are instructions that are combined as if it were a code, from being able to light them when it’s dark to making them communicate with each other. This allows kids to play with loops, statements, algorithms while also inventing their own stories. Their imagination is the only limit.

Flowboard provides visual learning environment for coding

Embedded programming using the Arduino IDE has become an important part of STEM education, and while more accessible than ever before, getting started still requires some coding and basic electronics skills. To explore a different paradigm for starting out on this journey, researchers have developed Flowboard to facilitate visual flow-based programming.

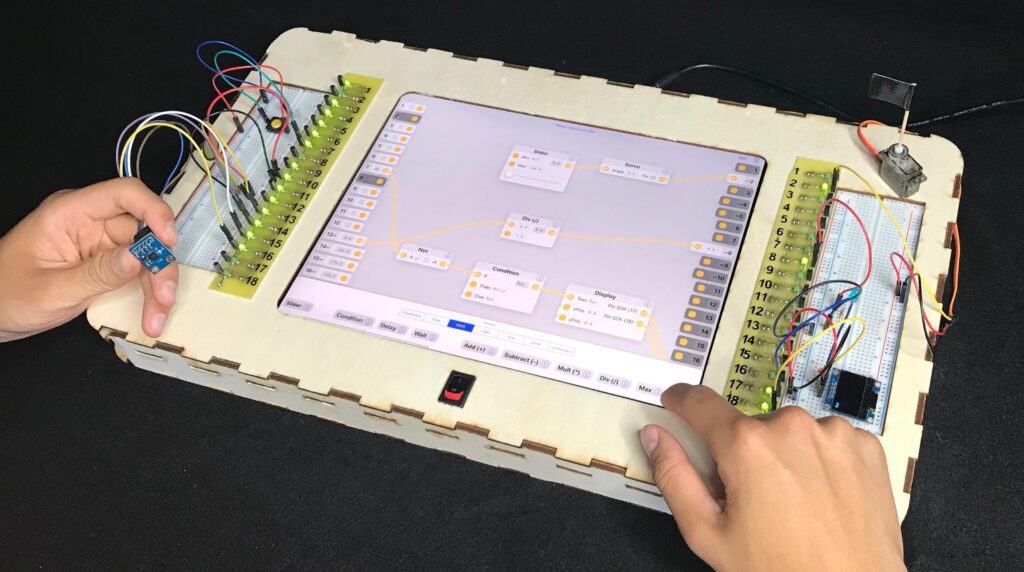
This device consists of an iPad Pro and a set of breadboards on either side. Users can arrange electrical components on these breadboards, changing the flow-based program on the screen as needed to perform the desired actions. Custom ‘switchboard’ hardware, along with an Arduino Uno running a modified version of Firmata, communicate with the iPad editor via Bluetooth.

With maker-friendly environments like the Arduino IDE, embedded programming has become an important part of STEM education. But learning embedded programming is still hard, requiring both coding and basic electronics skills. To understand if a different programming paradigm can help, we developed Flowboard, which uses Flow-Based Programming (FBP) rather than the usual imperative programming paradigm. Instead of command sequences, learners assemble processing nodes into a graph through which signals and data flow. Flowboard consists of a visual flow-based editor on an iPad, a hardware frame integrating the iPad, an Arduino board and two breadboards next to the iPad, letting learners connect their visual graphs seamlessly to the input and output electronics. Graph edits take effect immediately, making Flowboard a live coding environment.

Want to learn more? Check out the team’s research paper here

Play Tetris on a Transistor Tester, Because Why Not?

[Robson] had been using the same multimeter since he was 15. It wasn’t a typical multimeter, either. He had programmed it to also play the Google Chrome jumping dinosaur game, and also used it as a badge at various conferences. But with all that abuse, the ribbon cable broke and he set about on other projects. Like this transistor tester that was just asking to have Tetris programmed onto its tiny screen.

The transistor tester is a GM328A made for various transistor testing applications, but is also an LCR meter. [Robson]’s old meter didn’t even test for capacitance but he was able to get many years of use out of that one, so this device should serve him even better. Once it was delivered he set about adding more features, namely Tetris. It’s based on an ATmega chip, which quite easy to work with (it’s the same chip as you’ll find in the Arduino Uno but [Robson’s] gone the Makefile route instead of spinning up that IDE). Not only did he add more features, but he also found a mistake in the frequency counter circuitry that he fixed on his own through the course of the project.

If you’ve always thought that the lack of games on your multimeter was a total deal breaker, this project is worth a read. Even if you just have a random device lying around that happens to be based on an ATmega chip of some sort, this is a good primer of getting that device to do other things as well. This situation is a fairly common one to be in, too.

Machine Learning on Tiny Platforms Like Raspberry Pi and Arduino

Machine learning is starting to come online in all kinds of arenas lately, and the trend is likely to continue for the forseeable future. What was once only available for operators of supercomputers has found use among anyone with a reasonably powerful desktop computer. The downsizing isn’t stopping there, though, as Microsoft is pushing development of machine learning for embedded systems now.

The Embedded Learning Library (ELL) is a set of tools for allowing Arduinos, Raspberry Pis, and the like to take advantage of machine learning algorithms despite their small size and reduced capability. Microsoft intended this library to be useful for anyone, and has examples available for things like computer vision, audio keyword recognition, and a small handful of other implementations. The library should be expandable to any application where machine learning would be beneficial for a small embedded system, though, so it’s not limited to these example applications.

There is one small speed bump to running a machine learning algorithm on your Raspberry Pi, though. The high processor load tends to cause small SoCs to overheat. But adding a heatsink and fan is something we’ve certainly seen before. Don’t let your lack of a supercomputer keep you from exploring machine learning if you see a benefit to it, and if you need more power than just one Raspberry Pi you can always build a cluster to get your task done just a little bit faster, too.

Thanks to [Baldpower] for the tip!

Educational Robot for Under $100

While schools have been using robots to educate students in the art of science and engineering for decades now, not every school or teacher can afford to put one of these robots in the hands of their students. For that reason, it’s important to not only improve the robots themselves, but to help drive the costs down to make them more accessible. The CodiBot does this well, and comes in with a price tag well under $100.

The robot itself comes pre-assembled, and while it might seem like students would miss out on actually building the robot, the goal of the robot is to teach coding skills primarily. Some things do need to be connected though, such as the Arduino and other wires, but from there its easy to program the robot to do any number of tasks such as obstacle avoidance and maze navigation. The robot can be programmed using drag-and-drop block programming (similar to Scratch) but can also be programmed the same way any other Arduino can be.

With such a high feature count and low price tag, this might be the key to getting more students exposed to programming in a more exciting and accessible way than is currently available. Of course, if you have a little bit more cash lying around your school, there are some other options available to you as well.


Filed under: robots hacks

WALTER - The Arduino Photovore Insect Robot

Primary image

What does it do?

Navigate around and seeking light

[Please excuse my English]

Cost to build

Embedded video

Finished project

Complete

Number

Time to build

Type

URL to more information

Weight

read more