Posts with «quadruped» label

Little Quadruped Uses Many Servos

Walking robots were once the purview of major corporations spending huge dollars on research programs. Now, they’re something you can experiment with at home. [Technovation] has been doing just that with his micro quadruped build.

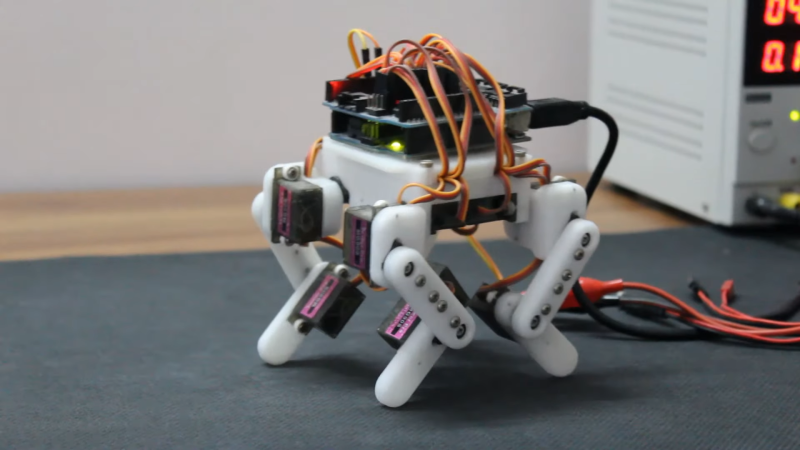
The build runs twelve servos – three per leg – to enable for a great range of movement for each limb. The servos are all controlled by an Arduino Uno fitted with an Arduino Sensor Shield. Everything is fitted together with a 3D printed chassis and limb segments that bolt directly on to the servo output shafts. This is a common way of building quick, easy, lightweight assemblies with servos, and it works great here. Inverse kinematics is used to calculate the required motions of each joint, and the robot can take steps from 1 to 4cm long in a variety of gaits.

We’d love to see a few sensors and a battery pack added on to allow the ‘bot to explore further in an untethered fashion. [Technovation] has left some provision to mount extra hardware, so we look forward to seeing what comes next.

We’ve seen bigger quadrupeds do great things, too. Video after the break.

Hack a Day 26 Jul 19:30

Spherical Quadruped Arduino Robot

[Greg06] started learning electronics the same way most of us did: buy a few kits, read a few tutorials, and try your hardest to put a few things together. Sound familiar? After a while, you noticed your skills started increasing, and your comfort level with different projects improved as well. Eventually, you try your hand at making your own custom projects and publishing your own tutorials.

Few are lucky to have a first-project as elaborate as [Greg06’s] quadruped robot. We don’t know about you, but for some of us, we were satisfied with blinking two LEDs instead of just one.

[Greg06’s] robot has a quadruped based, housed within a 3D printed spherical body. The legs are retractable and are actuated by tiny servo motors inside the body. [Greg06] even included an ultrasonic distance sensor for the obstacle avoidance mechanism. Honestly, if it weren’t for the ultrasonic distance sensor protruding from the spherical body, you might think that the entire robot was just a little Wiffle ball. This reminds us of another design we’ve seen before.

If that weren’t enough, the spherical head can rotate, widening the range of the ultrasonic distance sensor and obstacle avoidance mechanism. This is accomplished by attaching another servo motor to the head.

Pretty neat design if you ask us. Definitely one of the coolest quadrupeds we’ve seen.

Watch the Snappy, Insect-like Moves of this DIY Quadruped Robot

Some legged robots end up moving with ponderous deliberation, or wavering in unstable-looking jerks. A few unfortunates manage to do both at once. [MusaW]’s 3D Printed Quadruped Robot, on the other hand, moves in rapid motions that manage to look sharp and insect-like instead of unstable. Based on an earlier design he made for a 3D printable quadruped frame, [MusaW] has now released this step-by-step guide for building your own version. All that’s needed is the STL files and roughly $50 in parts from the usual Chinese resellers to have the makings of a great weekend project.

The robot uses twelve SG90 servos and an Arduino nano with a servo driver board to control them all, but there’s one additional feature: Wi-Fi control is provided thanks to a Wemos D1 Mini (which uses an ESP-8266EX) acting as a wireless access point to serve up a simple web interface through which the robot can be controlled with any web browser.

Embedded below is a brief video. The first half is assembly, and the second half demonstrates the robot’s fast, sharp movements.

We love it when robots show some personality, like this adorable little quadruped robot that can make small jumps.

Thanks to [Baldpower] for the tip!

Quad Walker

Primary image

What does it do?

Been working on a building a quad walker probably for a year now. What started of a coding project has now ended up with me learning how to 3d model and building a kit 3d printer.

Along with scope of the project, the size of walker also grew. It was originally planned to use small 9g servers and probably end up 20cm across in total. Though I moved to using standard r/c card servos and as a result each leg will be around 20cm. No idea how big the body will need to be to house everything else.

Cost to build

Embedded video

Finished project

Number

Time to build

Type

legs

URL to more information

Weight

read more

Quad Walker

Primary image

What does it do?

Been working on a building a quad walker probably for a year now. What started of a coding project has now ended up with me learning how to 3d model and building a kit 3d printer.

The size of walker also grew, it started of using little 9g servos and now using full-size r/c car servos.

At moment, I’ve only modelled the leg at the moment, though I’m reasonable confident this will be the near final version before starting the body.

Will post more soon

Cost to build

Embedded video

Finished project

Number

Time to build

Type

legs

URL to more information

Weight

Quad Walker

Primary image

What does it do?

Been working on a building a quad walker probably for a year now. What started of a coding project has now ended up with me learning how to 3d model and building a kit 3d printer.

Along with scope of the project, the size of walker also grew. It was originally planned to use small 9g servers and probably end up 20cm across in total. Though I moved to using standard r/c card servos and as a result each leg will be around 20cm. No idea how big the body will need to be to house everything else.

Cost to build

Embedded video

Finished project

Number

Time to build

Type

legs

URL to more information

Weight

read more

Quad Walker

Primary image

What does it do?

Been working on a building a quad walker probably for a year now. What started of a coding project has now ended up with me learning how to 3d model and building a kit 3d printer.

Along with scope of the project, the size of walker also grew. It was originally planned to use small 9g servers and probably end up 20cm across in total. Though I moved to using standard r/c card servos and as a result each leg will be around 20cm. No idea how big the body will need to be to house everything else.

Cost to build

Embedded video

Finished project

Number

Time to build

Type

legs

URL to more information

Weight

read more

Making a Vintage Star Wars AT-AT toy walk with an Arduino

Dave Stein is a software engineer during the day and a tinkerer on Arduino projects in his free time after work. He submitted on the blog his first Arduino project with the goal of powering his old AT-AT Walker toy (mid 1980s) with Arduino Uno and make it walk and perform some of the functions we see in the Star Wars movies.

AT-AT (All Terrain Armored Transport) are four-legged combat walkers 22.5mt (73.8ft) tall of the Galactic Empire, one of its most famous military symbols introduced  in “Star Wars V: The Empire strikes back”, and we may see them again in the next weeks on “Star Wars: The Force Awakens” the upcoming episode of the saga opening December 18th.

The AT-AT walker toy updated by Dave is controlled by a wired Xbox 360 controller that interfaces with a computer and transports a signal to the Arduino Uno for walker movement:

The left and right triggers move the walker forward and backward while the right stick moves the head horizontally. If you have ever played with this toy you may remember it was clumsy and difficult to move. In my project I wanted to learn about and conquer the difficulties of quadrupedal movement. The realization process for my project involved a massive amount of trial and error, research, and failures. I have to say that I failed many more times than I succeeded with configuring the servos with the Arduino. I went down many long roads to learn about prototyping with the breadboard, soldering, and redesigns of the final product. The most difficult part of the project aside from adjusting the gait of the walker for balance and movement was providing enough power to the servos without frying the microcontroller or any of the components. I was finally able to overcome these difficulties by implementing the Adafruit servo shield.

Check AtAt Project website for all info, parts list and upcoming tutorial!

Pico-Kubik Quadruped Fits in the Palm of your Hand

Most of the legged robots we see here are of the hexapod variety, and with good reason. Hexapods are very stable and can easily move even if one or more of the legs has been disabled. [Radomir] has taken this a step farther and has become somewhat of an expert on the more technically difficult quadruped robot, building smaller and smaller ones each time. He has been hard at work on his latest four-legged creation called the Pico-Kubik, and this one will fit in the palm of your hand.

The Pico-Kubik runs Micropython on a VoCore board, which allows for it to have a small software footprint to complement its small hardware footprint. It accomplishes the latter primarily through the use of HK-282A Ultra-Micro Servos, an Arduino Pro Mini, and a tiny lithium ion battery. It’s still a work in progress, but the robot can already crawl across the tabletop.

This isn’t [Radomir]’s first time at the tiny quadruped rodeo, either. He has already built the Nano-Kubik and the µKubik, all of which followed the first (aptly-named) Kubik quadruped. Based on the use of SI prefixes, we can only assume the next one will be the hella-Kubik!


Filed under: robots hacks

quadruped > awaiting rebuild :)

Primary image

What does it do?

navigated around ultrasonic

My first attempt to build and run a quadruped. Parts of laser cut acrylic. Powered with an arduino uno and sensorshield. Total of 12 micro- servo's, partially metal geared. It proved very difficult to align the servo's right. It walked, it turned. But was abandoned after I blew up most of the servo's by feeding them 7,4 Volts instead of 5 :P

Anyway, it's pretty much a copy of this one: http://letsmakerobots.com/node/34412

I had to use 3mm acrylic, because the lasercut firm had no 4 mm available.

Cost to build

$70,00

Embedded video

Finished project

Complete

Number

Time to build

30 hours

Type

URL to more information

Weight

450 grams

read more