Posts with «atmega32u4» label

USB-C Programmable Power Supply For Any Project

USB-C Power Delivery 3.0 (PD3.0) introduces a new Programmable Power Supply (PPS) mode, which allows a device to negotiate any supply of 3.3-21 V in 20 mV steps, and up to 5 A of current in 50 mA steps. To make use of this new standard, [Ryan Ma] create the PD Micro, an Arduino-compatible development board, and a self-contained software library to allow easy integration of PD3.0 and the older PD2.0 into projects.

The dev board is built around an ATMega32U4 microcontroller and FUSB302 USB-C PHY. The four-layer PCB is densely packed on both sides to fit in the Arduino Pro Micro Form factor. The board can deliver up to 100W (20 V at 5 A) from an appropriate power source and shows visual feedback on the PD status through a set of LEDs.

The primary goal of the project is actually in the software. [Ryan] found that existing software libraries for PD take up a lot of memory, and are difficult to integrate into small projects. Working from the PD specifications and PD PHY chip data sheet, he created a lighter weight and self-contained software library which consumes less than 8 K of flash and 1 K of RAM. This is less than half the Flash and RAM available on the ATmega32U4.

[Ryan] is running a Crowd Supply campaign (video after the break) to get some of these powerful boards out in the wild, and has released all the source code and schematics on GitHub. The PCB design files will be released during the last week of the campaign, around 25 January 2021.

USB-C and power delivery are not simple standards, but the ability to add a high-speed data interface and a programmable power supply into almost any project has real potential.

Turning A Desk Drawer Into A Flight Yoke

[Christofer Hiitti] found himself with the latest Microsoft Flight Simulator on his PC, but the joystick he ordered was still a few weeks out. So he grabbed an Arduino, potentiometers and a button and hacked together what a joke-yoke.

The genius part of this hack is the way [Christopher] used his desk drawer for pitch control. One side of a plastic hinge is attached to a potentiometer inside a drawer, while the other side is taped to the top of the desk. The second pot is taped to the front of the drawer for pitch control and the third pot is the throttle. It works remarkably well, as shown in the demo video below.

The linearity of the drawer mechanism probably isn’t great, but it was good enough for a temporary solution. The Arduino Leonardo he used is based on the ATmega32u4 which has a built-in USB, and with libraries like ArduinoJoystickLibrary the computer interface very simple. When [Christopher]’s real joystick finally arrived he augmented it with a button box built using the joke-yoke components.

We’ve seen There is no doubt that Microsoft Flight Simulator 2020 will spawn a lot of great controller and cockpit builds over the next few years. We’ve already covered a new joystick build, and a 3D printed frame to turn an Xbox controller into a joystick.

Robot Fights Fire With IR

Fighting fire with robots may take jobs away from humans, but it can also save lives. [Mell Bell Electronics] has built a (supervised) kid-friendly version of a firefighting robot that extinguishes flames by chasing them down and blowing them out.

This hyper-vigilant robot is always on the lookout for fire, and doesn’t waste movement on anything else. As soon as it detects the presence of a flame, it centers itself on the source and speeds over to snuff it out with a fan made from a propeller and a DC motor.

Here comes the science: fire emits infrared light, and hobbyist flame sensors use IR to, well, detect fire. This fire bot has three of these flame sensors across the front that output digital data to what has got to be the world’s smallest Arduino – the ATmega32U4-based PICO board that [Mell Bell] just so happens to sell. Cover your mouth and nose and crawl along the floor toward the break to see how responsive this thing is.

Firefighters aren’t the only brave humans involved in the process of keeping the forests standing, or who feel the rising pressure of automation. Hackaday’s own [Tom Nardi] wrote a piece on a dying breed called fire lookouts that will no doubt ignite your interest.

Micro-ATX Arduino is the Ultimate Breakout Board

If you’ve been hanging around microcontrollers and electronics for a while, you’re surely familiar with the concept of the breakout board. Instead of straining to connect wires and components to ever-shrinking ICs and MCUs, a breakout board makes it easier to interface with the device by essentially making it bigger. The Arduino itself, arguably, is a breakout board of sorts. It takes the ATmega chip, adds the hardware necessary to get it talking to a computer over USB, and brings all the GPIO pins out with easy to manage header pins.

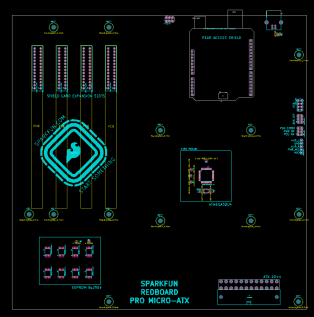
But what if you wanted an even bigger breakout board for the ATmega? Something that really had some leg room. Well, say no more, as [Nick Poole] has you covered with his insane RedBoard Pro Micro-ATX. Combining an ATmega32u4 microcontroller with standard desktop PC hardware is just as ridiculous as you’d hope, but surprisingly does offer a couple tangible benefits.

RedBoard PCB layout

The RedBoard is a fully compliant micro-ATX board, and will fit in pretty much any PC case you may have laying around in the junk pile. Everything from the stand-off placement to the alignment of the expansion card slots have been designed so it can drop right into the case of your choice.

That’s right, expansion slots. It’s not using PCI, but it does have a variation of the standard Arduino “shield” concept using 28 pin edge connectors. There’s a rear I/O panel with a USB port and ISP header, and you can even add water cooling if you really want (the board supports standard LGA 1151 socket cooling accessories).

While blowing an Arduino up to ATX size isn’t exactly practical, the RedBoard is not without legitimate advantages. Specifically, the vast amount of free space on the PCB allowed [Nick] to add 2Mbits of storage. There was even some consideration to making removable banks of “RAM” with EEPROM chips, but you’ve got to draw the line somewhere. The RedBoard also supports standard ATX power supplies, which will give you plenty of juice for add-on hardware that may be populating the expansion slots.

With as cheap and plentiful as the miniITX and microATX cases are, it’s no surprise people seem intent on cramming hardware into them. We’ve covered a number of attempts to drag other pieces of hardware kicking and screaming into that ubiquitous beige-box form factor.


Filed under: Arduino Hacks, computer hacks, Microcontrollers

Jenkins Given an Industrial Stack Light for Build Reporting

When working on software development in a team environment, it’s important to know the status of your build at all times. Jenkins can display build automation info on a screen but where’s the fun in that? A popular office project is to build some kind of visual display of a project’s status, and [dkt01] has done just that with this stack light build monitor.

In this day and age of online shopping, random bits of industrial hardware are just an eBay away, so it’s easy to find some cool lamps or indicators for any project. [dkt01] sourced a standard 24V stack light off the shelf. With its green, red, and yellow indicators, its perfect for showing the current status of their build server.

The project uses an Arduino Pro Micro combined with an ENC28J60 Ethernet adapter. We used to see that chip all the time but in 2017 it’s somewhat of a classic setup since the great unwashed masses largely migrating to the ESP8266. However, for the purposes of this project, it was perfect for connecting to the wired office network (after all, you want to know the status of your build and not of your WiFi). [dkt01] even managed to get a web configuration to work despite the relatively meager resources of the ATmega32u4.

The build is cleanly executed, with the microcontroller and Ethernet hardware tucked into a 3D printed base for the stack light’s enclosure. It’s far more likely to become a permanent office fixture if it’s a tidy build without wires hanging out everywhere so a custom PCB ties everything together neatly. In another nice touch, the stack lights flash on initialization to indicate if the DHCP lease was successful, which makes troubleshooting easier. There’s an overview of all different light combinations and meanings in the video after the break.

Overall it’s a solid build with some off-the-shelf components that serves a genuine purpose. For a similar project built on a smaller scale, check out the Indictron. For something bigger, show us how you’ve learned to output your server status on the city’s traffic lights. Ask first, though.


Filed under: peripherals hacks

Balancing Robot Needs Innovative Controller and Motor

A self-balancing robot is a great way to get introduced to control theory and robotics in general. The ability for a robot to sense its position and its current set of circumstances and then to make a proportional response to accomplish its goal is key to all robotics. While hobby robots might use cheap servos or brushed motors, for any more advanced balancing robot you might want to reach for a brushless DC motor and a new fully open-source controller.

The main problem with brushless DC motors is that they don’t perform very well at low velocities. To combat this downside, there are a large number of specialized controllers on the market that can help mitigate their behavior. Until now, all of these controllers have been locked down and proprietary. SmoothControl is looking to create a fully open source design for these motors, and they look like they have a pretty good start. The controller is designed to run on the ubiquitous ATmega32U4 with an open source 3-phase driver board. They are currently using these boards with two specific motors but plan to also support more motors as the project grows.

We’ve seen projects before that detail why brushless motors are difficult to deal with, so an open source driver for brushless DC motors that does the work for us seems appealing. There are lots of applications for brushless DC motors outside of robots where a controller like this could be useful as well, such as driving an airplane’s propeller.


Filed under: robots hacks

MalDuino — Open Source BadUSB

MalDuino is an Arduino-powered USB device which emulates a keyboard and has keystroke injection capabilities. It’s still in crowdfunding stage, but has already been fully backed, so we anticipate full production soon. In essence, it implements BadUSB attacks much like the widely known, having appeared on Mr. Robot, USB Rubber Ducky.

It’s like an advanced version of HID tricks to drop malicious files which we previously reported. Once plugged in, MalDuino acts as a keyboard, executing previous configured key sequences at very fast speeds. This is mostly used by IT security professionals to hack into local computers, just by plugging in the unsuspicious USB ‘Pen’.

[Seytonic], the maker of MalDuino, says its objective is it to be a cheaper, fully open source alternative with the big advantage that it can be programmed straight from the Arduino IDE. It’s based on ATmega32u4 like the Arduino Leonardo and will come in two flavors, Lite and Elite. The Lite is quite small and it will fit into almost any generic USB case. There is a single switch used to enable/disable the device for programming.

The Elite version is where it gets exciting. In addition to the MicroSD slot that will be used to store scripts, there is an onboard set of dip switches that can be used to select the script to run. Since the whole platform is open sourced and based on Arduino, the MicroSD slot and dip switches are entirely modular, nothing is hardcoded, you can use them for whatever you want. The most skilled wielders of BadUSB attacks have shown feats like setting up a fake wired network connection that allows all web traffic to be siphoned off to an outside server. This should be possible with the microcontroller used here although not native to the MalDuino’s default firmware.

For most users, typical feature hacks might include repurposing the dip switches to modify the settings for a particular script. Instead of storing just scripts on the MicroSD card you could store word lists on it for use in password cracking. It will be interesting to see what people will come up with and the scripts they create since there is a lot of space to tinker and enhanced it. That’s the greatness of open source.

You can watch the prototype in action in the video:


Filed under: Arduino Hacks, peripherals hacks, security hacks

Get your DDR on with an Arduino dance pad

Alex of the YouTube channel “Super Make Something” is a huge fan of Dance Dance Revolution (DDR), and still has to play the game whenever he steps foot into an arcade. However, with the number of arcades slowly declining, the Maker has decided to bring that experience into his living room with a USB DDR dance pad.

And yes, you could always buy a metal dance pad but rather than spend $300, why not build your own? That is exactly what Alex has done using some easy-to-find materials: a 35″ x 35” slab of plywood for the base, four 1” x 35” pieces of wood for the border, five 11” x 11” pieces of MDF for the stationary panels, four 9″ x 9” pieces of cardboard for the riser panels, 12 metal button contacts out of aluminum, four 11” x 11” MDF button pads, acrylic sheets for the dance surface, and plenty of paint and graphics for the finishing touch.

The dance pad itself is based on pull-up resistors and an Arduino Leonardo, which is housed inside a 3D-printed enclosure. The Arduino includes an ATmega32U4 chip that can be programmed to act as a USB input device. The working principle here is that the MCU sends out a keystroke every time a button panel is stepped on. Alex provides a more in-depth breakdown of how it works in the video below! Meanwhile, the Arduino code can be downloaded here.

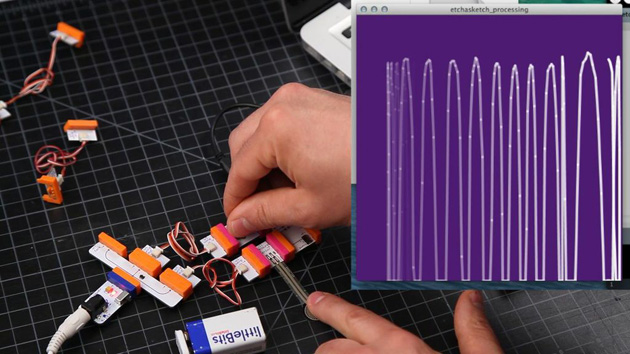
LittleBits' Arduino module puts the focus on programming, not wiring

Getting your feet wet with programmable hardware can be tricky; even if you're comfortable with coding, you may not want to break out the soldering iron just to build a usable device. LittleBits is aware of just how intimidating these make-it-yourself gadgets can be, so it has just launched its first software-programmable module, the Arduino at Heart. As the name implies, it's an Arduino core (the same as the Leonardo) designed to fit into LittleBits' simple, building block approach to circuit boards. If you want to attach a light, motor or sensor to the Arduino board, you just snap it on -- you can spend more of your time coding rather than dealing with wiring and other hardware hassles. %Gallery-slideshow193425%

Filed under: Household, Peripherals

Comments

Source: LittleBits

New Arduino Micro

Adafruit did a lovely job with the Arduino team on the new official Arduino Micro. Everything is tiny, with a smaller ATmega32u4 and parts on the top and bottom, some the smallest components available-- seriously micro! It's available now for $25.