Posts with «cooking hacks» label

Smart Coffee Replaces Espresso Machine Controller With Arduino, Sensors

A common hacker upgrade to an espresso machine is to improve stability and performance with a better temperature controller, but [Schematix]’s Smart Coffee project doesn’t stop there. It entirely replaces the machine’s controller and provides an optional array of improvements for a variety of single-boiler machines (which is most of them).

Smart Coffee isn’t free, it costs 16 NZD (about 10 USD) but there is a free demo version. There is no official support, but there are wiring guides and sources aplenty from which to purchase the various optional parts. It runs on an Arduino MEGA 2560 PRO (or similar microcontroller) and supports a wide array of additional hardware including pressure transducer, water level sensor, flow meter, OLED display, and more.

Modification of one’s espresso machine is a rewarding endeavor, but the Smart Coffee project provides a way for one to get straight to the hacking and function modifying, instead of figuring out the wiring hardware interfacing from scratch.

We’ve seen [Schematix]’s work before with a DIY induction heater which showed off thoughtful design, and it’s clear he takes his coffee at least as seriously. Check out the highly comprehensive overview and installation video for Smart Coffee, embedded just below the page break.

Thanks to [X-Cubed] for the tip!

Reflowduino: Put That Toaster Oven To Good Use

There are few scenes in life more moving than the moment the solder paste melts as the component slides smoothly into place. We’re willing to bet the only reason you don’t have a reflow oven is the cost. Why wouldn’t you want one? Fortunately, the vastly cheaper DIY route has become a whole lot easier since the birth of the Reflowduino – an open source controller for reflow ovens.

This Hackaday Prize entry by [Timothy Woo] provides a super quick way to create your own reflow setup, using any cheap means of heating you have lying around. [Tim] uses a toaster oven he paid $21 for, but anything with a suitable thermal mass will do. The hardware of the Reflowduino is all open source and has been very well documented – both on the main hackaday.io page and over on the project’s GitHub.

The board itself is built around the ATMega32u4 and sports an integrated MAX31855 thermocouple interface (for the all-important PID control), LiPo battery charging, a buzzer for alerting you when input is needed, and Bluetooth. Why Bluetooth? An Android app has been developed for easy control of the Reflowduino, and will even graph the temperature profile.

When it comes to controlling the toaster oven/miscellaneous heat source, a “sidekick” board is available, with a solid state relay hooked up to a mains plug. This makes it a breeze to setup any mains appliance for Arduino control.

We actually covered the Reflowduino last year, but since then [Tim] has also created the Reflowduino32 – a backpack for the DOIT ESP32 dev board. There’s also an Indiegogo campaign now, and some new software as well.

If a toaster oven still doesn’t feel hacky enough for you, we’ve got reflowing with hair straighteners, and even car headlights.

Automated Syrup System is Sweet Sweet Madness

Here at Hackaday we are big fans of the TV show, “How It’s Made”. It’s not much of a stretch to assume that, as somebody who is currently reading this site, you’ve probably seen it yourself. While it’s always interesting to see the behind the scenes process to create everyday products, one of the most fascinating aspects of the show is seeing how hard it is to make things. Seriously, it’s enough to make you wonder how companies are turning a profit on some of these products when you see just how much technology and manual work is required to produce them.

That’s precisely the feeling we got when browsing through this absolutely incredible overview of how [HDC3] makes his maple syrup. If that’s not a sentence you ever thought you’d see on Hackaday, you aren’t alone. But this isn’t a rusty old pail hanging off of a tap, this is a high-tech automated system that’s capable of draining 100’s of gallons of sap from whole groves of trees. We’ll never look at a bottle of syrup in the store the same away again.

It all starts with hundreds of tiny taps that are drilled into the trees and connected to a network of flexible hoses. The plumbing arrangement is so complex that, in certain, areas high tension support wires are necessary to hold up the weight of the hoses and their sweet contents. The main hose leads to an Arduino-powered collection station which maintains a 100 kPa (29 inHg) vacuum throughout the entire system.

The sap is temporarily held in a 250 gallon container, but at this point it’s still just that: sap. It needs to be refined into something suitable for putting on your pancakes. The first step of that process utilizes a reverse osmosis filtration system to pull the water out of the sap and increase its sugar concentration. [HDC3] says the filtration system is built from eBay scores and parts from the home improvement store, and it certainly looks the part of something that would be under a kitchen sink. This system is able to increase the sugar concentration of the sap from around 2% as it comes out of the trees to 8%. But it’s still a far way off from being ready to use.

Interestingly enough, the last steps of the process are about as old-school as they come. The semi-concentrated sap is placed in a long low metal pan, and heated over a wood fire to drive off more of the water. This process continues until the sap is roughly 60% sugar, at which point it is filtered and moved into the house to finish boiling on the stove.

All told, the syrup is boiled for eight hours to bring its sugar content up to 66%. Even with the improvements [HDC3] has made to the system, he reveals that all this hard work only results in slightly more than a half-gallon of final syrup. Talk about dedication.

It probably comes as no surprise that this is the first time Hackaday has ever run a story about producing maple syrup. However we’ve seen a number of automated beer brewing systems that seem to have been tackled with similar zeal. There’s probably a conclusion to be drawn there about the average hacker’s diet, but that’s a bit outside our wheelhouse.

[via /r/DIY]

Cocktail Machine Mixes Perfect Drinks Every Time

For many of us. the holiday season is coming up and that means hosting parties and mixing drinks, which can get tiresome. [GreatScott] has come up with a solution, what he calls a crude cocktail mixing machine. But don’t be fooled — it may look crude on the surface, and vibrate a bit while working, but the mechanism is plenty sound and functional.

The machine can mix three different liquids and does so using three peristaltic pumps. In typical [GreatScott] style, while he tears apart the pumps to replace the tubes, he gives us a good glimpse of just how they work. Using a knob and LCD screen, you can enter any quantity you want for the three liquids, though you’ll have to edit the Arduino code if you want to change the liquids’ names.

Load cell

How does the machine know when to stop pumping a certain liquid? Each pump is rated for a specific quantity per second, though he tests this for each liquid anyway and finds a slight variation which he accounts for in the code. After the machine turns a pump on, a load cell located under the glass tells it when liquid has started arriving at the glass. A simple calculation based on the pump’s quantity per second and the desired quantity tells it how long to leave the pump on for. When the times up, it stops the pump. The result is a machine that’s sure to be a centerpiece for any hacker-filled party. Check out his build and the pump in action in the video below.

But parties need more than just drinks, they also need cookies. So to that end, check out [Ben Krasnow]’s equally cool cookie making machine.


Filed under: cooking hacks

PID Controlled Charcoal BBQ – Put an Arduino on it!

At Maker Faire Milwaukee this past weekend, [basement tech]  was showing off his latest build, a PID controlled charcoal grill. While it hasn’t QUITE been tested yet with real food, it does work in theory.

PID (a feedback loop with some fancy math used to adjust the input to get a consistent output) controlled cooking is commonly used for sous vide, where one heats up a water bath to a controlled temperature to cook food in plastic bags. Maintaining water temperature is fairly easy. Controlling a charcoal barbecue is much more difficult. [basement tech] accomplishes this with controlled venting and fans. With the charcoal hot and the lid on, there are two ways to control temperature; venting to let hot air out, and blowing air on the coals to make them hotter. A thermocouple sensor stuck through the grill gives the reading of the air inside, and an Arduino nearby reads that and adjusts the vents and fans accordingly.

The video goes into extensive detail on the project, and describes some of the challenges he had along the way, such as preventing the electronics and servos from melting.

There’s not a lot of time left in the grilling season, so we hope [basement tech] gets an opportunity to enjoy the meats of his labor. Maybe he can trade food with [Jason] and his PID controlled meat smoker.


Filed under: cooking hacks

M&Ms and Skittles Sorting Machine is Both Entertainment and Utility

If you have OCD, then the worst thing someone could do is give you a bowl of multi-coloured M&M’s or Skittles — or Gems if you’re in the part of the world where this was written. The candies just won’t taste good until you’ve managed to sort them in to separate coloured heaps. And if you’re a hacker, you’ll obviously build a sorting machine to do the job for you.

Use our search box and you’ll find a long list of coverage describing all manner and kinds of sorting machines. And while all of them do their designated job, 19 year old [Willem Pennings]’s m&m and Skittle Sorting Machine is the bees knees. It’s one of the best builds we’ve seen to date, looking more like a Scandinavian Appliance than a DIY hack. He’s ratcheted up a 100k views on Youtube, 900k views on imgur and almost 2.5k comments on reddit, all within a day of posting the build details on his blog.

As quite often happens, his work is based on an earlier design, but he ends up adding lots of improvements to his version. It’s got a hopper at the top for loading either m&m’s or Skittles and six bowls at the bottom to receive the color sorted candies. The user interface is just two buttons — one to select between the two candy types and another to start the sorting. The hardware is all 3D printed and laser cut. But he’s put in extra effort to clean the laser cut pieces and paint them white to give it that neat, appliance look. The white, 3D printed parts add to the appeal.

Rotating the input funnel to prevent the candies from clogging the feed pipes is an ace idea. A WS2812 LED is placed above each bowl, lighting up the bowl where the next candy will be ejected and at the same time, a WS2812 strip around the periphery of the main body lights up with the color of the detected candy, making it a treat, literally, to watch this thing in action. His blog post has more details about the build, and the video after the break shows the awesome machine in action.

And if you’re interested in checking out how this sorter compares with some of the others, check out these builds — Skittles sorting machine sorts Skittles and keeps the band happy, Anti-Entropy Machine Satiates M&M OCD, Only Eat Red Skittles? We’ve Got You Covered, and Hate Blue M&M’s? Sort Them Using the Power of an iPhone!  As we mentioned earlier, candy sorting machines are top priority for hackers.

[via r/electronics]


Filed under: Arduino Hacks, cooking hacks

Arduino Controlled Micro Distillery

Booze, they say, is one of the major factors that shaped human history. And creating new and faster ways of making booze has always been a big engineering problem, so this project by [Goat Industries] is rather interesting. It’s a completely automated micro-distillery called the NanoStillery.

The whole thing can run unattended, but uploads data on the brewing process for remote monitoring and notification. Given that distilling involves explosive things like alcohol vapor, that’s a big plus. It is all home-made, including the boiler assembled from steel plate and an air-cooled condenser. It’s controlled by an Arduino Mega twinned with a couple of Adafruit boards that interface with the various sensors and pumps that control the flow of booze around the system. There is also an Adafruit FONA board that includes a cellular modem that uploads data to a database to monitor the progress and let you know when it is done.

The Instructable even includes the Arduino code that runs the process. It’s an impressive build from an engineering point of view, and the final touch has to be the creepy Cylon voice that the controller uses to narrate the process. There’s a video tour after the break.

If you are curious about the role of booze and other drinks in the development of technology, I recommend you read A History of the World in Six Glasses by Tom Standage, an excellent book that traces the history of civilization through the history of beer, wine, spirits, coffee, tea and cola.


Filed under: cooking hacks
Hack a Day 02 Dec 06:00

See a Cheap Smoker get an Automation Power Up

[Jason] learned a lot by successfully automating this meat smoker. This is just the first step in [Jason’s] smoker project. He decided to begin by hacking a cheaper charcoal-fed unit first, before setting his sights on building his own automatic pellet-fed smoker. With a charcoal smoker it’s all about managing the airflow to that hot bed of coals.

Custom mount for servo was actually one of the more challenging things to get just right.

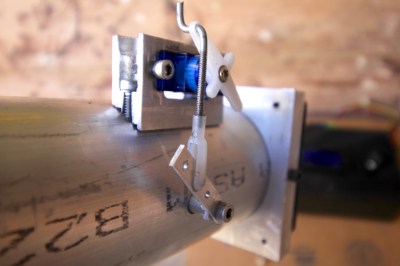
[Jason] started by making sure the bottom was sealed off from stray airflow, then he cut a hole into the charcoal pan and attached a length of steel pipe. The opposite end of the pipe has a fan. Inside the pipe there is a baffle separating the fan from the charcoal pan. The servo motor shown here controls that valve.

The pipe is how air is introduced into the smoker, with the fan and valve to control the flow rate. The more air, the higher the temperature. The hunk of pipe was left uncut and works fine but is much longer than needed; [Jason says] the pipe is perfectly cool to the touch only a foot and a half away from the smoker.

With the actuators in place he needed a feedback loop. A thermocouple installed into the lid of the smoker is monitored by an Arduino running a PID control loop. This predicts the temperature change and adjusts the baffle and fan to avoid overshooting the target temp. The last piece of hardware is a temperature probe inside the meat itself. With the regulation of the smoker’s temperature taken care of and the meat’s internal temperature being monitored, the learning (and cooking) process is well underway.

There are many, many smoker automation projects out there. Some smokers are home-made electric ones using flower pots, and some focus more on modifying off the shelf units. In a way, every PID controlled smoker is the same, yet they end up with different problems to solve during their creation. There is no better way to learn PID than putting it into practice, and this way to you get a tasty treat for your efforts.


Filed under: cooking hacks

Solar Powered Hydroponics

[Dan Bowen] describes the construction of a backyard hydroponics set-up in an angry third person tirade. While his friends assume more nefarious, breaking, and bad purposes behind [Dan]’s interest in hydroponics; he’d just like some herbs to mix into the occasional pasta sauce.

Feel particularly inspired one day after work, he stopped by the local hardware store and hydroponics supply. He purchases some PVC piping, hoses, fittings, pumps, accessories, and most importantly, a deck box to hide all the ugly stuff from his wife.

The design is pretty neat. He has an open vertical spot that gets a lot of light on his fence. So he placed three lengths of PVC on a slant. This way the water flows quickly and aerates as it goes. The top of the pipes have holes cut in them to accept net baskets.

The deck box contains a practically industrial array of sensors and equipment. The standard procedure for small-scale hydroponics is just to throw the water out on your garden and replace the nutrient solution every week or so. The hacker’s solution is to make a rubbermaid tote bristle with more sensors than the ISS.

We hope his hydroponics set-up approaches Hanging Gardens of Babylon soon.


Filed under: cooking hacks, green hacks, home hacks

Brasilia Espresso Machine PID Upgrade Brews Prefect Cup of Energy

Coffee, making and hacking addictions are just bound to get out of control. So did [Rhys Goodwin’s] coffee maker hack. What started as a little restoration project of a second-hand coffee machine resulted in a complete upgrade to state of the art coffee brewing technology.

The Brasilia Lady comes with a 300 ml brass boiler, a pump and four buttons for power, coffee, hot water and steam. A 3-way AC solenoid valve, wired directly to the buttons, selects one of the three functions, while a temperamental bimetal switch keeps the boiler roughly between almost there and way too hot.

To reduce the temperature swing, [Rhys] decided to add a PID control loop, and on the way, an OLED display, too. He designed a little shield for the Arduino Nano, that interfaces with the present hardware through solid state relays. Two thermocouples measure the temperature of the boiler and group head while a thermal cut-off fuse protects the machine from overheating in case of a malfunction.

Also, the Lady’s makeup received a complete overhaul, starting with a fresh powder coating. A sealed enclosure along with a polished top panel for the OLED display were machined from aluminum. [Rhys] also added an external water tank that is connected to the machine through shiny, custom lathed tube fittings. Before the water enters the boiler, it passes through a custom preheater, to avoid cold water from entering the boiler directly. Not only does the result look fantastic, it also offers a lot more control over the temperature and the amount of water extracted, resulting in a perfect brew every time. Enjoy [Rhys’s] video where he explains his build:

Thanks to [Pirate14] for the tip!


Filed under: cooking hacks, home hacks