Posts with «cooking hacks» label

There Is No Spoon; Automatic Self Stirring Mug

Sometimes it’s helpful to realize the truth that there is no spoon. At least, not with [Ronaldo]’s automatic self-stirring mug. At first it was just a small propeller in the bottom of the mug that turned on by pushing a button in the handle, but this wasn’t as feature-rich as [Ronaldo] hoped it could be, so he decided to see just how deep the automatic beverage-mixing rabbit hole goes.

The first thing to do was to get a microcontroller installed to handle the operation of the motor. The ATtiny13a was perfect for the job since it’s only using one output pin to control the motor, and can be configured to only draw 0.5 microamps in power-saving mode. This ensures a long life for the two AAA batteries that power the microcontroller and the motor.

As far as operation goes, the motor operates in different modes depending on how many times the button in the handle is pushed. It can be on continuously or it can operate at pre-determined intervals for a certain amount of time, making sure to keep the beverage thoroughly mixed for as long as the power lasts. Be sure to check out the video below for a detailed explanation of all of the operating modes. We could certainly see some other possible uses for more interesting beverages as well.


Filed under: cooking hacks
Hack a Day 24 Jan 21:00

Hack a Cake

What’s a hacker going to do with an oven? Reflow solder? Dry out 3D printing filament? If you are [Alicia Gibb] you’d be baking a cake. While complaining that projects aren’t a hack seems to be a favorite past time for Hackaday commentators, we think [Alicia] will be in the clear. Why? Because these cakes have Arduinos, LEDs, and motorized candles among other gizmos.

The Game Boy cake is undeniably cool, although we have to admit the cake that screams when cut got our attention (see video below), even if it would unnerve guests.

As you might expect, you can’t bake the electronics directly into the cake. [Alicia] uses Tupperware or parchment paper to create cavities for the electronics. Connections and other solder joints get professional grade Saran wrap to keep the lead and other awful chemicals out of the cake.

We’ve seen embedded electronics in cakes before, including some that tie into the Star Wars merchandising that seems unavoidable lately. If you aren’t much of a baker, you could always just forego the cake part.


Filed under: Arduino Hacks, cooking hacks
Hack a Day 25 Nov 06:01

Bread Online is a Bread Maker for the Internet of Things

An engineering student at the University of Western Macedonia has just added another appliance to the ever-growing list of Internet enabled things. [Panagiotis] decided to modify an off-the-shelf bread maker to enable remote control via the Internet.

[Panagiotis] had to remove pretty much all of the original control circuitry for this device. The original controller was replaced with an Arduino Uno R3 and an Ethernet shield. The temperature sensor also needed to be replaced, since [Panagiotis] could not find any official documentation describing the specifications of the original. Luckily, the heating element and mixer motor were able to be re-used.

A few holes were drilled into the case to make room for the Ethernet connector as well as a USB connector. Two relays were used to allow the Arduino to switch the heating element and mixer motor on and off. The front panel of the bread maker came with a simple LCD screen and a few control buttons. Rather than let those go to waste, they were also wired into the Arduino.

The Arduino bread maker can be controlled via a web site that runs on a separate server. The website is coded with PHP and runs on Apache. It has a simple interface that allows the user to specify several settings including how much bread is being cooked as well as the desired darkness of the bread. The user can then schedule the bread maker to start. Bread Online also comes with an “offline” mode so that it can be used locally without the need for a computer or web browser. Be sure to check out the video demonstration below.

[Thanks Minas]


Filed under: Arduino Hacks, cooking hacks

Tea-bagging an Arduino

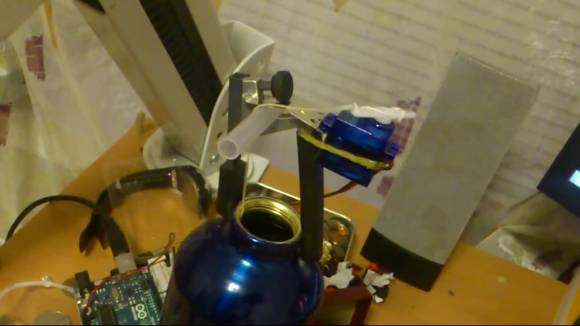
[Dmitry Narkevich] likes a strong cup of tea and his method of getting there is to oscillate the tea bag as it steeps. But why take the time to do this when you can make an Arduino brew your tea for you. As you can see, he rigged up a system to move the tea bag as it steeps in his metal bottle.

The motion is provided by a hobby servo connected to an Arduino. This makes timing the process very simple and we’d imaging it’s only a matter of time before he adds an alarm so he’ll know when it’s ready. But the real hack comes in the apparatus that connects the servo to the bottle. Since he’ll be drinking out of it the assembly needs to be easy to remove and should be able to stand up to the abuse of being clamped on and taken off a few times each day.

The base of the device is a guitar capo. This is meant to gently clamp to the finger board of a guitar using spring tension so it is already covered in rubber which gives it a firm grip on the bottle’s opening. The servo is connected to a metal part from a stapler, and the string drapes over the body of a disposable pen. Don’t miss this in action in the clip after the break.

If you don’t have a servo on hand you could try using the sled from an optical drive.

[via Reddit]


Filed under: cooking hacks
Hack a Day 17 Dec 17:03

Building a better PID smoker controller

[Matt] wanted to have more control over his meat smoker so he built this advanced PID smoker controller. It uses the solid state relay seen in the bottom-right of this image to switch the smoker’s heating element. But all of the other goodies that are included add several features not usually found in these builds.

This is a replacement for the commercial PID unit he used on the original build. That monitored the temperature in the smoker, using predictive algorithms to maintain just the right heat level. But this time around [Matt] is looking for extra feedback with a second sensor to monitor meat temperature. Using an Arduino with an SD shield he is able to data log the smoking sessions, and his custom code allows him to specify temperature profiles for resting the meat after it has hit the target temperature. It kind of reminds us of a reflow oven controller… but for food.


Filed under: cooking hacks
Hack a Day 11 Oct 20:01

Alarma DIY con Módulo 3G, Cámara, Ultrasonidos, Teclado Matricial & Led RGB


Arduteka lanza su último tutorial!

En él nos descubre el nuevo módulo 3G para Arduino de Cooking Hacks con el que podremos construir una divertida alarma que nos enviará la foto de nuestro intruso directamente a nuestro correo, además de avisarnos por un mensaje sms a nuestro teléfono móvil sin necesidad de tener conectado nuestro Arduino a internet constantemente, pues lo hace todo a través de la red móvil.

Vamos a construirnos una alarma totalmente casera, a través del sensor de ultrasonidos, escanearemos continuamente el espacio situado enfrente suyo con un radio aproximado de 30º, cuando algún objeto o persona se sitúe en su campo de actuación a una distancia inferior a la que establezcamos, haremos sonar una alarma, tomaremos una fotografía, el Led RGB que antes estaba verde, pasará a color azul y daremos 10 segundos para poder desactivar la alarma a través de nuestro teclado matricial, si la desactivamos, volverá de nuevo a escanear el campo, pero si no!! Reproducirá un sonido contundente y se dispondrá a mandarnos un sms a nuestro teléfono móvil y la fotografía a nuestro correo electrónico.

Via:[Arduteka]


Arduino Blog 15 May 13:16
3g  audio  cooking hacks  education  gps  gsm  hacks  hardware  home hacks  iphone  keyboard  keypad  led(s)  mms  mp3  ping  rgb  sms  urban hacks