Posts with «temperature» label

Remote Water Quality Monitoring

While it can be straightforward to distill water to high purity, this is rarely the best method for producing water for useful purposes. Even drinking water typically needs certain minerals in it, plants may need a certain pH, and wastewater systems have a whole host of other qualities that need to be measured. Measuring water quality is a surprisingly complex endeavor as a result and often involves a wide array of sensors, much like this water quality meter from [RowlesGroupResearch].

The water quality meters that they are putting to use are typically set up in remote locations, without power, and are targeting natural bodies of water and also wastewater treatment plants. Temperature and pH are simple enough to measure and grasp, but this device also includes sensors for total dissolved solids (TDS) and turbidity which are both methods for measuring various amounts and types of particles suspended in the water. The build is based around an Arduino so that it is easy for others to replicate, and is housed in a waterproof box with a large battery, and includes data logging to an SD card in order to make it easy to deploy in remote, outdoor settings and to gather the data at a later time.

The build log for this device also goes into detail about all of the steps needed to set this up from scratch, as well as a comprehensive bill of materials. This could be useful in plenty of professional settings such as community wastewater treatment facilities but also in situations where it’s believed that industrial activity may be impacting a natural body of water. For a water quality meter more focused on drinking water, though, we’d recommend this build that is trained on its own neural network.

Tutorial – LED Real Time Clock Temperature Sensor Shield for Arduino

In this tutorial we look at how to use the neat LED Real Time Clock Temperature Sensor Shield for Arduino from PMD Way. That’s a bit of a mouthful, however the shield does offer the following:

  • four digit, seven-segment LED display
  • DS1307 real-time clock IC
  • three buttons
  • four LEDs
  • a active buzzer
  • a light-dependent resistor (LDR)
  • and a thermistor for measuring ambient temperature

The shield also arrives fully-assembled , so you can just plug it into your Arduino Uno or compatible board. Neat, beginners will love that. So let’s get started, by showing how each function can be used – then some example projects. In no particular order…

The buzzer

A high-pitched active buzzer is connected to digital pin D6 – which can be turned on and off with a simple digitalWrite() function. So let’s do that now, for example:

void setup() {
  // buzzer on digital pin 6
  pinMode(6, OUTPUT);
}

// the loop function runs over and over again forever
void loop() {
  digitalWrite(6, HIGH);   // turn the buzzer on (HIGH is the voltage level)
  delay(1000);                       // wait for a second
  digitalWrite(6, LOW);    // turn the buzzer off by making the voltage LOW
  delay(1000);                       // wait for a second
}

If there is a white sticker over your buzzer, remove it before uploading the sketch. Now for a quick video demonstration. Turn down your volume before playback.

The LEDs

Our shield has four LEDs, as shown below:

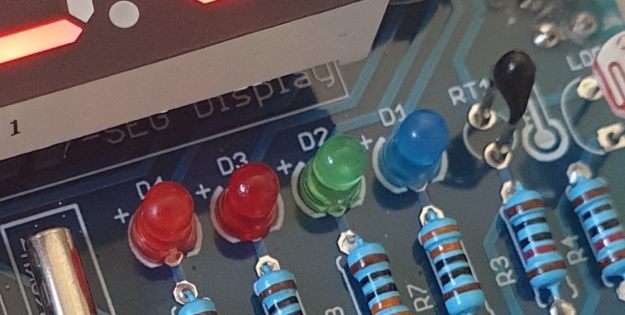
They’re labelled D1 through to D4, with D1 on the right-hand side. They are wired to digital outputs D2, D3, D4 and D5 respectively. Again, they can be used with digitalWrite() – so let’s do that now with a quick demonstration of some blinky goodness. Our sketch turns the LEDs on and off in sequential order. You can change the delay by altering the variable x:

void setup() {
  // initialize digital pin LED_BUILTIN as an output.
  pinMode(2, OUTPUT); // LED 1
  pinMode(3, OUTPUT); // LED 2
  pinMode(4, OUTPUT); // LED 3
  pinMode(5, OUTPUT); // LED 4
}

int x = 200;

void loop() {
  digitalWrite(2, HIGH);    // turn on LED1
  delay(x);
  digitalWrite(2, LOW);    // turn off LED1. Process repeats for the other three LEDs
  digitalWrite(3, HIGH);
  delay(x);
  digitalWrite(3, LOW);
  digitalWrite(4, HIGH);
  delay(x);
  digitalWrite(4, LOW);
  digitalWrite(5, HIGH);
  delay(x);
  digitalWrite(5, LOW);
}

And in action:

The Buttons

It is now time to pay attention to the three large buttons on the bottom-left of the shield. They look imposing however are just normal buttons, and from right-to-left are connected to digital pins D9, D10 and D11:

They are, however, wired without external pull-up or pull-down resistors so when initialising them in your Arduino sketch you need to activate the digital input’s internal pull-up resistor inside the microcontroller using:

pinMode(pin, INPUT_PULLUP);

Due to this, buttons are by default HIGH when not pressed. So when you press a button, they return LOW. The following sketch demonstrates the use of the buttons by lighting LEDs when pressed:

void setup() {
  // initalise digital pins for LEDs as outputs
  pinMode(2, OUTPUT); // LED 1
  pinMode(3, OUTPUT); // LED 2
  pinMode(4, OUTPUT); // LED 3

  // initalise digital pins for buttons as inputs
  // and initialise internal pullups
  pinMode(9, INPUT_PULLUP); // button K1
  pinMode(10, INPUT_PULLUP); // button K2
  pinMode(11, INPUT_PULLUP); // button K3
}

void loop()
{
  if (digitalRead(9) == LOW)
  {
    digitalWrite(2, HIGH);
    delay(10);
    digitalWrite(2, LOW);
  }

  if (digitalRead(10) == LOW)
  {
    digitalWrite(3, HIGH);
    delay(10);
    digitalWrite(3, LOW);
  }

  if (digitalRead(11) == LOW)
  {
    digitalWrite(4, HIGH);
    delay(10);
    digitalWrite(4, LOW);
  }
}

You can see these in action via the following video:

The Numerical LED Display

Our shield has a nice red four-digit, seven-segment LED clock display. We call it a clock display as there are colon LEDs between the second and third digit, just as a digital clock would usually have:

The display is controlled by a special IC, the Titan Micro TM1636:

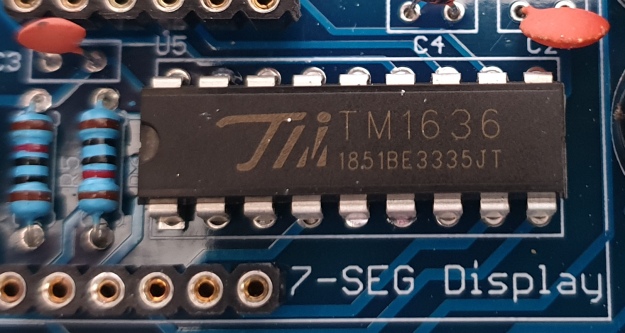
The TM1636 itself is an interesting part, so we’ll explain that in a separate tutorial in the near future. For now, back to the shield.

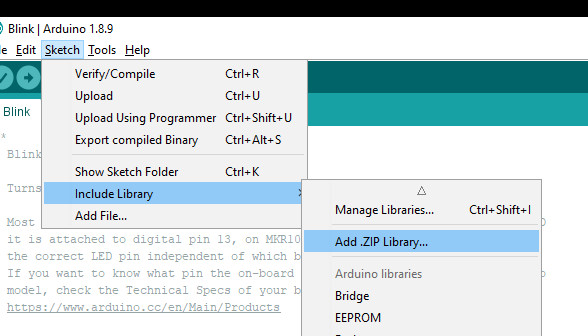
To control the LED display we need to install an Arduino library. In fact the shield needs four, so you can install them all at once now. Download the .zip file from here. Then expand that into your local download directory – it contains four library folders. You can then install them one at a time using the Arduino IDE’s Sketch > Include library > Add .zip library… command:

The supplied library offers five functions used to control the display.

.num(x);

…this displays a positive integer (whole number) between 0 and 9999.

.display(p,d);

… this shows a digit d in location p (locations from left to right are 3, 2, 1, 0)

.time(h,m)

… this is used to display time data (hours, minutes) easily. h is hours, m is minutes

.pointOn();
.pointOff();

… these turn the colon on … and off. And finally:

.clear();

… which clears the display to all off. At the start of the sketch, we need to use the library and initiate the instance of the display by inserting the following lines:

#include <TTSDisplay.h>
TTSDisplay rtcshield;

Don’t panic – the following sketch demonstrates the five functions described above:

#include <TTSDisplay.h>
TTSDisplay rtcshield;

int a = 0;
int b = 0;

void setup() {}

void loop()
{
  // display some numbers
  for (a = 4921; a < 5101; a++)
  {
    rtcshield.num(a);
    delay(10);
  }

  // clear display
  rtcshield.clear();

  // display individual digits
  for (a = 3; a >= 0; --a)
  {
    rtcshield.display(a, a);
    delay(1000);
    rtcshield.clear();
  }
  for (a = 3; a >= 0; --a)
  {
    rtcshield.display(a, a);
    delay(1000);
    rtcshield.clear();
  }

  // turn the colon and off
  for (a = 0; a < 5; a++)
  {
    rtcshield.pointOn();
    delay(500);
    rtcshield.pointOff();
    delay(500);
  }

  // demo the time display function
  rtcshield.pointOn();
  rtcshield.time(11, 57);
  delay(1000);
  rtcshield.time(11, 58);
  delay(1000);
  rtcshield.time(11, 59);
  delay(1000);
  rtcshield.time(12, 00);
  delay(1000);
}

And you can see it in action through the video below:

The LDR (Light Dependent Resistor)

LDRs are useful for giving basic light level measurements, and our shield has one connected to analog input pin A1. It’s the two-legged item with the squiggle on top as shown below:

The resistance of LDRs change with light levels – the greater the light, the less the resistance. Thus by measuring the voltage of a current through the LDR with an analog input pin – you can get a numerical value proportional to the ambient light level. And that’s just what the following sketch does:

#include <TTSDisplay.h>
TTSDisplay rtcshield;

int a = 0;

void setup() {}
void loop()
{
  // read value of analog input
  a = analogRead(A1);
  // show value on display
  rtcshield.num(a);
  delay(100);
}

The Thermistor

A thermistor is a resistor whose resistance is relative to the ambient temperature. As the temperature increases, their resistance decreases. It’s the black part to the left of the LDR in the image below:

We can use this relationship between temperature and resistance to determine the ambient temperature. To keep things simple we won’t go into the theory – instead, just show you how to get a reading.

The thermistor circuit on our shield has the output connected to analog input zero, and we can use the library installed earlier to take care of the mathematics. Which just leaves us with the functions.

At the start of the sketch, we need to use the library and initiate the instance of the thermistor by inserting the following lines:

#include <TTSTemp.h>
TTSTemp temp;

… then use the following which returns a positive integer containing the temperature (so no freezing cold environments):

.get();

For our example, we’ll get the temperature and show it on the numerical display:

#include <TTSDisplay.h>
#include <TTSTemp.h>

TTSTemp temp;
TTSDisplay rtcshield;

int a = 0;

void setup() {}

void loop() {

  a = temp.get();
  rtcshield.num(a);
  delay(500);
}

And our thermometer in action. No video this time… a nice 24 degrees C in the office:

The Real-Time Clock 

Our shield is fitted with a DS1307 real-time clock IC circuit and backup battery holder. If you insert a CR1220 battery, the RTC will remember the settings even if you remove the shield from the Arduino or if there’s a power blackout, board reset etc:

The DS1307 is incredibly popular and used in many projects and found on many inexpensive breakout boards. We have a separate tutorial on how to use the DS1307, so instead of repeating ourselves – please visit our specific DS1307 Arduino tutorial, then return when finished.

Where to from here? 

We can image there are many practical uses for this shield, which will not only improve your Arduino coding skills but also have some useful applications. An example is given below, that you can use for learning or fun.

Temperature Alarm

This projects turns the shield into a temperature monitor – you can select a lower and upper temperature, and if the temperature goes outside that range the buzzer can sound until you press it.

Here’s the sketch:

#include <TTSDisplay.h>
#include <TTSTemp.h>

TTSTemp temp;
TTSDisplay rtcshield;

boolean alarmOnOff = false;
int highTemp = 40;
int lowTemp = 10;
int currentTemp;

void LEDsoff()
{
  // function to turn all alarm high/low LEDs off
  digitalWrite(2, LOW);
  digitalWrite(4, LOW);
}

void setup() {
  // initalise digital pins for LEDs and buzzer as outputs
  pinMode(2, OUTPUT); // LED 1
  pinMode(3, OUTPUT); // LED 2
  pinMode(4, OUTPUT); // LED 3
  pinMode(5, OUTPUT); // LED 4
  pinMode(6, OUTPUT); // buzzer

  // initalise digital pins for buttons as inputs
  // and initialise internal pullups
  pinMode(9, INPUT_PULLUP); // button K1
  pinMode(10, INPUT_PULLUP); // button K2
  pinMode(11, INPUT_PULLUP); // button K3
}

void loop()
{
  // get current temperature
  currentTemp = temp.get();

  // if current temperature is within set limts
  // show temperature on display

  if (currentTemp >= lowTemp || currentTemp <= highTemp)
    // if ambient temperature is less than high boundary
    // OR if ambient temperature is grater than low boundary
    // all is well
  {
    LEDsoff(); // turn off LEDs
    rtcshield.num(currentTemp);
  }

  // if current temperature is above set high bounday, show red LED and
  // show temperature on display
  // turn on buzzer if alarm is set to on (button K3)

  if (currentTemp > highTemp)
  {
    LEDsoff(); // turn off LEDs
    digitalWrite(4, HIGH); // turn on red LED
    rtcshield.num(currentTemp);
    if (alarmOnOff == true) {
      digitalWrite(6, HIGH); // buzzer on }
    }
  }

  // if current temperature is below set lower boundary, show blue LED and
  // show temperature on display
  // turn on buzzer if alarm is set to on (button K3)

  if (currentTemp < lowTemp)
  {
    LEDsoff(); // turn off LEDs
    digitalWrite(2, HIGH); // turn on blue LED
    rtcshield.num(currentTemp);
    if (alarmOnOff == true)
    {
      digitalWrite(6, HIGH); // buzzer on }
    }
  }
  // --------turn alarm on or off-----------------------------------------------------
  if (digitalRead(11) == LOW) // turn alarm on or off
  {
    alarmOnOff = !alarmOnOff;
    if (alarmOnOff == 0) {
      digitalWrite(6, LOW); // turn off buzzer
      digitalWrite(5, LOW); // turn off alarm on LED
    }
    // if alarm is set to on, turn LED on to indicate this
    if (alarmOnOff == 1)
    {
      digitalWrite(5, HIGH);
    }
    delay(300); // software debounce
  }
  // --------set low temperature------------------------------------------------------
  if (digitalRead(10) == LOW) // set low temperature. If temp falls below this value, activate alarm
  {
    // clear display and turn on blue LED to indicate user is setting lower boundary
    rtcshield.clear();
    digitalWrite(2, HIGH); // turn on blue LED
    rtcshield.num(lowTemp);

    // user can press buttons K2 and K1 to decrease/increase lower boundary.
    // once user presses button K3, lower boundary is locked in and unit goes
    // back to normal state

    while (digitalRead(11) != LOW)
      // repeat the following code until the user presses button K3
    {
      if (digitalRead(10) == LOW) // if button K2 pressed
      {
        --lowTemp; // subtract one from lower boundary
        // display new value. If this falls below zero, won't display. You can add checks for this yourself :)
        rtcshield.num(lowTemp);
      }
      if (digitalRead(9) == LOW) // if button K3 pressed
      {
        lowTemp++; // add one to lower boundary
        // display new value. If this exceeds 9999, won't display. You can add checks for this yourself :)
        rtcshield.num(lowTemp);
      }
      delay(300); // for switch debounce
    }
    digitalWrite(2, LOW); // turn off blue LED
  }
  // --------set high temperature-----------------------------------------------------
  if (digitalRead(9) == LOW) // set high temperature. If temp exceeds this value, activate alarm
  {

    // clear display and turn on red LED to indicate user is setting lower boundary
    rtcshield.clear();
    digitalWrite(4, HIGH); // turn on red LED
    rtcshield.num(highTemp);

    // user can press buttons K2 and K1 to decrease/increase upper boundary.
    // once user presses button K3, upper boundary is locked in and unit goes
    // back to normal state

    while (digitalRead(11) != LOW)
      // repeat the following code until the user presses button K3
    {
      if (digitalRead(10) == LOW) // if button K2 pressed
      {
        --highTemp; // subtract one from upper boundary
        // display new value. If this falls below zero, won't display. You can add checks for this yourself :)
        rtcshield.num(highTemp);
      }
      if (digitalRead(9) == LOW) // if button K3 pressed
      {
        highTemp++; // add one to upper boundary
        // display new value. If this exceeds 9999, won't display. You can add checks for this yourself :)
        rtcshield.num(highTemp);
      }
      delay(300); // for switch debounce
    }
    digitalWrite(4, LOW); // turn off red LED
  }
}

Operating instructions:

  • To set lower temperature, – press button K2. Blue LED turns on. Use buttons K2 and K1 to select temperature, then press K3 to lock it in. Blue LED turns off.
  • To set upper temperature – press button K1. Red LED turns on. Use buttons K2 and K1 to select temperature, then press K3 to lock it in. Red LED turns off.
  • If temperature drops below lower or exceeds upper temperature, the blue or red LED will come on.
  • You can have the buzzer sound when the alarm activates – to do this, press K3. When the buzzer mode is on, LED D4 will be on. You can turn buzzer off after it activates by pressing K3.
  • Display will show ambient temperature during normal operation.

You can see this in action via the video below:

Conclusion

This is a fun and useful shield – especially for beginners. It offers a lot of fun and options without any difficult coding or soldering – it’s easy to find success with the shield and increase your motivation to learn more and make more.

You can be serious with a clock, or annoy people with the buzzer. And at the time of writing you can have one for US$14.95, delivered. So go forth and create something.

A little research has shown that this shield was based from a product by Seeed, who discontinued it from sale. I’d like to thank them for the library.

This post brought to you by pmdway.com – everything for makers and electronics enthusiasts, with free delivery worldwide.

To keep up to date with new posts at tronixstuff.com, please subscribe to the mailing list in the box on the right, or follow us on twitter @tronixstuff.

The No-Parts Temperature Sensor In Your Arduino

[Edward], creator of the Cave Pearl project, an underwater data logger, needed a way to measure temperature with a microcontroller. Normally, this problem is most easily solved by throwing a temperature sensor on the I2C bus — these sensors are cheap and readily available. This isn’t about connecting a temperature sensor in your Arduino. This build is about using the temperature sensor in your clock.

The ATMega328p, the chip at the heart of all your Arduino Uno clones, has within it a watchdog timer that clicks over at a rate of 110 kHz. This watchdog timer is somewhat sensitive to temperature, and by measuring this temperature sensor you can get some idea of the temperature of the epoxy blob that is a modern microcontroller. The trick is calibrating the watchdog timer, which was done with a homemade ‘calibration box’ in a freezer consisting of two very heavy ceramic pots with a bag of rice between them to add thermal mass (you can’t do this with water because you’re putting it in a freezer and antique crocks are somewhat valuable).

By repeatedly taking the microcontroller through a couple of freeze-thaw cycles, [Edward] was able to calibrate this watchdog timer to a resolution of about 0.0025°C, which is more than enough for just about any sensor application. Discussions of accuracy and precision notwithstanding, it’s pretty good.

This technique measures the temperature of the microcontroller with an accuracy of 0.005°C or better, and it’s using it with just the interrupt timer. That’s not to say this is the only way to measure the temperature of an ATMega; some of these chips have temperature sensors built right into them, and we’ve seen projects that use this before. However, this documented feature that’s clearly in the datasheet seems not to be used by many people.

Thanks [jan] for sending this in.

See the Weather at a Glance with this WiFi Wall Mounted Display

Whether you’re lodged in an apartment with a poor view of the sky like [Becky Stern] or are looking for an at-a-glance report of the current weather, you might consider this minimalist weather display instead of checking your computer or your phone every time you’re headed out the door.

The first order of business was to set up her Feather Huzzah ESP8266 module. [Becky] started with a blink test to ensure it was working properly. Once that was out of the way, she moved on to installing a few libraries. Temperature data fetched by an IFTTT feed is displayed on a seven-segment display, while additional feeds separately retrieve information for each basic weather type: sunny, overcast, rain, snow.

All it took to create the sleek display effect was a few pieces of cardboard inside a shadow box frame, a sheet of paper as a diffuser, and twelve Neopixel RGB LEDs hidden inside. Trimming and securing everything in place as well as notching out the back of the frame for the power cable finished the assembly. Check out the build video after the break.

Pair this weather frame with a shoe rack that spotlights the appropriate footwear depending on the weather to really streamline your exit.


Filed under: Arduino Hacks, misc hacks

Monitor All the Laundry Things with this Sleek IoT System

If like us you live in mortal fear of someone breaking into your house when you’re on vacation and starting a dryer fire while doing laundry, this full-featured IoT laundry room monitor is for you. And there’s a school bus. But don’t ask about the school bus.

In what [seasider1960] describes as “a classic case of scope creep,” there’s very little about laundry room goings on that escapes the notice of this nicely executed project. It started as a water sensor to prevent a repeat of a leak that resulted in some downstairs damage. But once you get going, why not go too far? [seasider1960] added current sensing to know when the washer and dryer are operating, as well as to tote up power usage. A temperature sensor watches the dryer vent and warns against the potential for the aforementioned tragedy by sounding an obnoxious local alarm — that’s where the school bus comes in. The whole system is also linked into Blynk for IoT monitoring, with an equally obnoxious alarm you can hear in the video below. Oh, and there are buttons for testing each alarm and for making an Internet note to reorder laundry supplies.

We’ve seen a spate of laundry monitoring projects lately, all of which have their relative merits. But you’ve got to like the fit and finish of [seasider1960]’s build. The stainless face plate and in-wall mount makes for a sleek, professional appearance which is fitting with the scope-creepy nature of the build.


Filed under: home hacks

Build a Dual Thermostat for Precise Preset Temperatures

You'd think there'd be something like a dual set point thermostat on the market already, but it doesn't look like there is. Guess you'll just have to make one.

Read more on MAKE

The post Build a Dual Thermostat for Precise Preset Temperatures appeared first on Make: DIY Projects, How-Tos, Electronics, Crafts and Ideas for Makers.

What’s an Arduino? Jimmy Fallon knows it…

An Arduino Uno appeared at The Tonight Show thanks to a project called Wildfire Warning System created by a 14 years old girl from California. Take a look at the video to discover how  you can detect fires  using a gas sensor and a temperature sensor.

And guess what? Jimmy Fallon knows what an Arduino is! Watch the video:

Temperature, Altitude, Pressure Display

During a recent trip to Bhutan, [electronut] wished for a device that would show the temperature and altitude at the various places he visited in the Kingdom. Back home after his trip, he built this simple Temperature, Altitude and Pressure Display Device using a few off the shelf parts.

Following a brief search, he zeroed in on the BMP 180 sensor which can measure temperature and pressure, and which is available in a break-out board format from many sources. He calculates altitude based on pressure. The main parts are an Arduino Pro Mini clone, a BMP180 sensor and a Nokia 5110 LCD module. A standard 9V battery supplies juice to the device. A push button interface allows him to read the current parameters when pressed, thus conserving battery life.

Standard libraries allow him to interface the LCD and sensor easily to the Arduino. He wrapped it all up by enclosing the hardware in a custom laser cut acrylic box. The result is bigger than he would like it to be, so maybe the next iteration would use a custom PCB and a LiPo battery to shrink it in size. While at it, we think it would be nice to add a RTC and some sort of logging capability to the device so it can store data for future analysis. The schematic, code and enclosure drawing are available via his Github repository.


Filed under: Arduino Hacks

Weather Reporter - Temboo, Ethernet and Arduino


Arduino is well known for the large variety of sensors / modules that can be connected. It is quite easy to hook up a temperature or humidity sensor to get instant feedback about the surrounding environmental conditions. However, sometimes you do not have a temperature sensor. Sometimes you have a sensor, but would like to know the temperature in other cities ! Or you would like to know what the temperature will be tomorrow?

Well now you can !!

All you need is a Temboo account, an internet connection and the following components:

Parts Required


Project Description


An Arduino UNO (and Ethernet Shield) queries Yahoo using a Temboo account, and retrieves weather information. The data is filtered and processed, and then passed on to another Arduino UNO to be displayed on a TFT LCD module. Two Arduino UNOs are used because the Ethernet library and the UTFT library are both memory hungry, and together consume more memory than one Arduino UNO can handle. Yes - I could have used a different board such as the Arduino MEGA, but where is the fun in that ?? This project will teach you many things:
  • How to use an Ethernet Shield with a Temboo account to retrieve internet data
  • How to use a TFT LCD module (ITDB02-1.8SP)
  • How to reduce memory consumption when using the UTFT library
  • How to power two Arduinos with a single USB cable
  • How to transmit data from one Arduino to another (via jumper wires)
All of this and a whole lot more !!


Video

Have a look at the following video to see the project in action.


You will need to create a Temboo account to run this project:

Temboo Account Creation

Step 1:

Visit the Temboo website : https://www.temboo.com/ Create an account by entering a valid email address. Then click on the Sign Up button.


Step 2:

Verify your email address by clicking on the link provided in the email sent by Temboo.


Step 3:

You will be directed to the account setup page: Create an Account Name, and Password for future access to your Temboo Account Check the terms of service and if you agree, then tick the box Press the Go! button


Step 4:

You will then encounter the "Welcome!" screen:


Step 5:

Navigate to the top right of the screen and select the LIBRARY tab


Step 6:

On the left hand side you will see a list of choreos. Type Yahoo into the search box on the top left of the screen. Navigate to the GetWeatherByAddress Choreo by clicking on...     Yahoo _ Weather _ GetWeatherByAddress


Step 7:

Turn the IoT Mode to ON (in the top right of screen)


Step 8:

What's your platform / device? : Arduino How is it connected? : Arduino Ethernet   The following popup box will appear:


Step 9:

Name: EthernetShield - you can choose any name. Letters and numbers only. No spaces. Shield Type: Arduino Ethernet MAC Address : You can normally find the MAC address of the Ethernet shield on the underside. Enter the MAC address without the hyphens. Then click SAVE.


Step 10:

Move to the INPUT section. Enter the Address of the place you want the Temperature for. Address = Perth, Western Australia Expand the Optional INPUT for extra functionality Units = c - If you want the temperature in Celcius.


Step 11:

This will automatically generate some Arduino CODE and a HEADER FILE. Don't worry about the Arduino code for now... because I will provide that for you. However, you will need the automatically generated HEADER file. I will show you what to do with that soon. So don't lose it !'


Temboo Library Install

The Temboo library will need to be installed before you copy the Arduino code in the sections below. To install the Temboo library into your Arduino IDE, please follow the link to their instructions:   Installing the Temboo Arduino Library


UTFT Library Install

Download the UTFT library from this site: http://www.henningkarlsen.com/electronics/library.php?id=51 Once downloaded and extracted. Go into the UTFT folder and look for the memorysaver.h file. Open this file in a text editor, and "uncomment" all of the TFT modules that are not relevant to this project. I disabled all of the TFT modules except the last 3 (which made reference to ST7735) - see picture below. The TFT module we are using in this project is the ITDB02-1.8SP from ITEAD Studio. Save the memorysaver.h file, and then IMPORT the library into the Arduino IDE as per the normal library import procedure.   If you do not modify the memorysaver.h file, the Arduino SLAVE sketch will not compile.


Arduino Code (MASTER)

  This project uses 2 Arduino UNOs. One will be the Master, and one will be the Slave. The following code is for the Arduino MASTER.   Open up the Arduino IDE. (I am using Arduino IDE version 1.6) Paste the following code into the Arduino IDE code window.   PLEASE NOTE: You may need to change some of the lines to accomodate your INPUTS from step 10. Have a look around line 36 and 37.  
  1
2
3
4
5
6
7
8
9
10
11
12
13
14
15
16
17
18
19
20
21
22
23
24
25
26
27
28
29
30
31
32
33
34
35
36
37
38
39
40
41
42
43
44
45
46
47
48
49
50
51
52
53
54
55
56
57
58
59
60
61
62
63
64
65
66
67
68
69
70
71
72
73
74
75
76
77
78
79
80
81
82
83
84
85
86
87
88
89
90
91
92
93
94
95
96
97
98
99
100
101
102
103
104
105
106
107
108
109
110
111
112
113
114
115
116
117
118
119
120
121
122
123
124
125
126
127
128
129
130
131
132
132
133
134
135
136
137
138
139
140
141
142
143
144
145
146
147
148
149
150
151
152
153
154
155
156
157
158
159
160
161
162
163
164
165
166
167
168
169
170
171
172
173
174
175
176
177
178
179
180
181
182
183
184
185
186
187


/* ===============================================================================
      Project: Weather Reporter: Temboo, Ethernet, Arduino
        Title: ARDUINO MASTER: Get temperature from Yahoo using Temboo
       Author: Scott C
      Created: 27th February 2015
  Arduino IDE: 1.6.0
      Website: http://arduinobasics.blogspot.com/p/arduino-basics-projects-page.html
  Description: The following sketch was designed for the Arduino MASTER device. 
               It will retrieve temperature/weather information from Yahoo using your
               Temboo account (https://www.temboo.com/), which will then be sent to the
               Arduino Slave device to be displayed on a TFT LCD module.
               
   Libraries : Ethernet Library (that comes with Arduino IDE)
               Temboo Arduino Library - https://www.temboo.com/sdk/arduino
               
   Temboo Library installation instructions for Arduino: 
               https://www.temboo.com/arduino/others/library-installation

  You will also need to copy your Temboo Account information into a new tab and call it TembooAccount.h.
  Please follow the instructions on the ArduinoBasics blog for more information.
---------------------------------------------------------------------------------- */

#include <SPI.h>
#include <Dhcp.h>
#include <Dns.h>
#include <Ethernet.h>
#include <EthernetClient.h>
#include <Temboo.h>
#include "TembooAccount.h" // Contains Temboo account information - in a new tab.
#include <Wire.h>

byte ethernetMACAddress[] = ETHERNET_SHIELD_MAC; //ETHERNET_SHIELD_MAC variable located in TembooAccount.h
EthernetClient client;

String Address = "Perth, Western Australia"; // Find temperature for Perth, Western Australia
String Units = "c"; // Display the temperature in degrees Celcius

String ForeCastDay[7]; //String Array to hold the day of the week
String ForeCastTemp[7]; //String Array to hold the temperature for that day of week.

int counter1=0; //Counters used in FOR-LOOPS.
int counter2=0;

boolean downloadTemp = true; // A boolean variable which controls when to query Yahoo for Temperature information.


void setup() {
  Wire.begin(); // join i2c bus : Used to communicate to the Arduino SLAVE device.
 
  // Ethernet shield must initialise properly to continue with sketch.
  if (Ethernet.begin(ethernetMACAddress) == 0) {
    while(true);
  }
  
  //Provide some time to get both Arduino's ready for Temperature Query.
    delay(2000);
}


void loop() {
  if (downloadTemp) {
    downloadTemp=false; //Stop Arduino from Querying Temboo repeatedly
    getTemperature();       //Retrieve Temperature data from Yahoo
    transmitResults();      //Transmit the temperature results to the Slave Arduino
  }
}


/* This function will Query Yahoo for Temperature information (using a Temboo account) */

void getTemperature(){
    TembooChoreo GetWeatherByAddressChoreo(client);

    // Invoke the Temboo client
    GetWeatherByAddressChoreo.begin();

    // Set Temboo account credentials
    GetWeatherByAddressChoreo.setAccountName(TEMBOO_ACCOUNT); //TEMBOO_ACCOUNT variable can be found in TembooAccount.h file or tab
    GetWeatherByAddressChoreo.setAppKeyName(TEMBOO_APP_KEY_NAME); //TEMBOO_APP_KEY_NAME variable can be found in TembooAccount.h file or tab
    GetWeatherByAddressChoreo.setAppKey(TEMBOO_APP_KEY); //TEMBOO_APP_KEY variable can be found in TembooAccount.h file or tab

    // Set Choreo inputs
    GetWeatherByAddressChoreo.addInput("Units", Units); // Set the Units to Celcius
    GetWeatherByAddressChoreo.addInput("Address", Address); // Set the Weather Location to Perth, Western Australia

    // Identify the Choreo to run
    GetWeatherByAddressChoreo.setChoreo("/Library/Yahoo/Weather/GetWeatherByAddress");

    // This output filter will extract the expected temperature for today
    GetWeatherByAddressChoreo.addOutputFilter("Temperature", "/rss/channel/item/yweather:condition/@temp", "Response");
    
    // These output filters will extract the forecasted temperatures (we need to know the day and temperature for that day)
    GetWeatherByAddressChoreo.addOutputFilter("ForeCastDay", "/rss/channel/item/yweather:forecast/@day", "Response");
    GetWeatherByAddressChoreo.addOutputFilter("ForeCastHigh", "/rss/channel/item/yweather:forecast/@high", "Response");

    // Run the Choreo;
    GetWeatherByAddressChoreo.run();

    //Reset our counters before proceeding
    counter1 = 0;
    counter2 = 0;
    
    while(GetWeatherByAddressChoreo.available()) {
      // This will get the first part of the output
      String name = GetWeatherByAddressChoreo.readStringUntil('\x1F');
      name.trim(); // get rid of newlines

      // This will get the second part of the output
      String data = GetWeatherByAddressChoreo.readStringUntil('\x1E');
      data.trim(); // get rid of newlines

      //Fill the String Arrays with the Temperature/Weather data
      if (name == "Temperature") {
        ForeCastDay[counter1] = "Today";
        ForeCastTemp[counter2] = data;
        counter1++;
        counter2++;
      }
      
      if(name=="ForeCastDay"){
        ForeCastDay[counter1] = data;
        counter1++;
      }
      
      if(name=="ForeCastHigh"){
        ForeCastTemp[counter2] = data;
        counter2++;
      }
    }
  
    //Close the connection to Temboo website
    GetWeatherByAddressChoreo.close();
  }


  /* This function is used to transmit the temperature data to the Slave Arduino */
  
  void transmitResults(){
    char tempData[10];
    int tempStringLength = 0;
    
    //Modify the current temp to "Now"
    ForeCastDay[0] = "Now";
    
    //Send * to Slave Arduino to prepare for Temperature Transmission
    Wire.beginTransmission(4); // Transmit to device #4 (Slave Arduino)
    Wire.write("*");
    delay(500);
    Wire.endTransmission();
    delay(500);
    
    //Send the temperatures on the Slave Arduino to be displayed on the TFT module.
    for (int j=0; j<20; j++){
      for (int i=0; i<6; i++){
        memset(tempData,0,sizeof(tempData));   //Clear the character array
        String tempString = String(ForeCastDay[i] + "," + ForeCastTemp[i] + ".");
        tempStringLength = tempString.length();
        tempString.toCharArray(tempData, tempStringLength+1);
        Wire.beginTransmission(4); // Transmit to device #4 (Slave Arduino)
        Wire.write(tempData);
        delay(1000);
        Wire.endTransmission();
        delay(4000);
      }
    }
    
    /* ----------------------------------------------------------------------
    // You can use this to send temperature results to the Serial Monitor.
    // However, you will need a Serial.begin(9600); statement in setup().
    
    Serial.println("The Current Temperature is " + ForeCastTemp[5] + " C");
    Serial.println();
    Serial.println("The Expected Temperature for");
    for (int i=0; i<5; i++){
      Serial.println(ForeCastDay[i] + " : " + ForeCastTemp[i] + " C");
    }
    ---------------------------------------------------------- */
  }


Select "New Tab" from the drop-down menu on the top right of the IDE. Name the file: TembooAccount.h

Paste the contents of the HEADER file from the Temboo webpage (Step 11 above) into the TembooAccount.h tab. If you do not have the TembooAccount.h tab with the contents of this HEADER file next to your Arduino Master sketch, then it will NOT work.  
Make sure to SAVE the Arduino Sketch and upload the code to the Arduino (MASTER)


Arduino Code (SLAVE)

  This project uses 2 Arduino UNOs. One will be the Master, and one will be the Slave. The following code is for the Arduino SLAVE.   Make sure to disconnect the Arduino MASTER from your computer, and keep it to one side. Connect the Arduino SLAVE to your computer, and upload the following code to it. Make sure to create a new sketch for this code (File _ New).  
  1
2
3
4
5
6
7
8
9
10
11
12
13
14
15
16
17
18
19
20
21
22
23
24
25
26
27
28
29
30
31
32
33
34
35
36
37
38
39
40
41
42
43
44
45
46
47
48
49
50
51
52
53
54
55
56
57
58
59
60
61
62
63
64
65
66
67
68
69
70
71
72
73
74
75
76
77
78
79
80
81
82
83
84
85
86
87
88
89
90
91
92
93
94
95
96
97
98
99
100
101
102
103
104
105
106
107
108
109
110
111
112
113
114
115
116
117
118
119
120
121
122
123
124
125
126
127
128
129
130
131
132
133
134
135
136
137
138
139
140
141
142
143
144
145
146
147
148
149
150
151
152
153
154
155
156
157
158
159
160
161
162
163
164
165
166
167
168
169
170
171
172
173
174
175
176
177
178
179
180
181
182
183
184
185
186
187
188
189
190
191
192
193
194
195
196
197


/* ===============================================================================
      Project: Weather Reporter: Temboo, Ethernet, Arduino
        Title: ARDUINO SLAVE: Display temperature on TFT LCD Module
       Author: Scott C
      Created: 27th February 2015
  Arduino IDE: 1.6.0
      Website: http://arduinobasics.blogspot.com/p/arduino-basics-projects-page.html
  Description: The following sketch was designed for the Arduino SLAVE device. 
               It will receive temperature information from the Arduino MASTER
               and then display this information on the ITDB02-1.8SP TFT LCD 
               Module. Please read the important notes below.

----------------------------------------------------------------------------------
NOTES:
This sketch makes use of the UTFT.h library from : 
http://www.henningkarlsen.com/electronics/library.php?id=51
Please note: You will need to modify the memorysaver.h file in the UTFT folder 
with a text editor to disable any unused TFT modules. This will save memory, 
and allow you to run this sketch on an Arduino UNO. I disabled all TFT modules in
that file except the last 3 (which made reference to ST7735).
I used a ITDB02-1.8SP TFT LCD Module from ITEAD Studio.
PinOut:

Arduino SLAVE      ITDB02-1.8SP TFT
         3.3V ---- VDD33
 Digital9 (D9)---- CS
 Digital8 (D8)---- SCL
 Digital7 (D7)---- SDA
 Digital6 (D6)---- RS
 Digital5 (D5)---- RST
          GND ---- GND
           5V ---- VIN

Usage: UTFT myGLCD(<model code>, SDA, SCL, CS, RST, RS);
Example: UTFT myGLCD(ITDB18SP,7,8,9,5,6);

-----------------------------------------------------------------------------------
This sketch also makes use of the Wire.h library. 
The Wire.h library comes with the Arduino IDE.
This enables communication between Arduino Master and Arduino Slave.
PinOut:

Arduino MASTER      Arduino SLAVE
   Analog4(A4) ---- Analog4 (A4) 
   Analog5(A5) ---- Analog5 (A5) 
           GND ---- GND

-----------------------------------------------------------------------------------
The Arduino Slave is powered by the Arduino Master:
PinOut:

Arduino MASTER      Arduino SLAVE
            5V ---- VIN

==================================================================================
*/

#include <UTFT.h>
#include <Wire.h>

//Declare all of the fonts
extern uint8_t SmallFont[];
extern uint8_t BigFont[];
extern uint8_t SevenSegNumFont[];

// Usage: UTFT myGLCD(<model code>, SDA, SCL, CS, RST, RS);
UTFT myGLCD(ITDB18SP,7,8,9,5,6);

boolean tempDisplay = false; //Helps with processing the data from the Arduino MASTER
boolean readTemp = false; //Helps to differentiate the day from the temperature values
String dayOfWeek=""; //Variable used to hold the Day of the Week
String tempReading=""; //Variable used to hold the Temperature for that day

String Units = "'C "; //Display Temperature in Celcius
String Address = "Perth, WA"; //Address to show at top of Display


void setup(){
  // Initialise the TFT LCD
  myGLCD.InitLCD();
  initialiseLCD();
  delay(5000);
  
  //Setup the Serial communication between the Arduino MASTER and SLAVE
  Wire.begin(4); // join i2c bus with address #4
  Wire.onReceive(receiveEvent); // register event
}


void loop(){
  delay(50);
}


/*
  This function initialises the TFT LCD, and draws the initial screen.
*/
void initialiseLCD(){
  //Clear the screen
  myGLCD.clrScr();
  
  //Draw the borders (top and bottom)
  myGLCD.setColor(25, 35, 4);
  myGLCD.fillRect(0, 0, 159, 13);
  myGLCD.fillRect(0, 114, 159, 127);
  myGLCD.drawLine(0,18,159,18);
  myGLCD.drawLine(0,109,159,109);
  
  //Header and Footer Writing
  myGLCD.setColor(255, 255, 255);
  myGLCD.setBackColor(25, 35, 4);
  myGLCD.setFont(SmallFont);
  myGLCD.print("arduinobasics", CENTER, 1);
  myGLCD.print("blogspot.com", CENTER, 114);
}


/* This function executes whenever data is received from Arduino master
   It will ignore all data from the Master until it receives a '*' character.
   Once this character is received, it will call the receiveTemp() function
   in order to receive Temperature data from the Arduino Master.
*/
void receiveEvent(int howMany){
  if(tempDisplay){
    receiveTemp();
  }else{
    while(0 < Wire.available()){
      char c = Wire.read(); // receive byte as a character
      if(c=='*'){ // Searching for a '*' character
        tempDisplay=true; // If '*' received, then call receiveTemp() function
      }
    }
  }
}


/* This function is used to receive and process the Temperature data 
   from the Arduino Master and pass it on to the  displayTemp() funtion.
*/
void receiveTemp(){
  tempReading="";
  dayOfWeek = "";
  
  while(0 < Wire.available()){
    char c = Wire.read(); // receive byte as a character
    if(readTemp){
      if(c=='.'){ // If a . is detected. It is the end of the line.
        readTemp=false;
      }else{
        tempReading=tempReading+c;
      }
    }else{
      if(c==','){
      } else {
        dayOfWeek=dayOfWeek+c;
      }
    }
    if(c==','){
      readTemp=true;
    }
  }
  displayTemp();
}


/*
  Display the Temperature readings on the TFT LCD screen.
*/
void displayTemp(){
  //Clear the writing on top and bottom of screen
  myGLCD.setColor(25, 35, 4);
  myGLCD.fillRect(0, 0, 159, 13);
  myGLCD.fillRect(0, 114, 159, 127);
  
  //Small writing on top and bottom of screen
  myGLCD.setColor(255, 255, 255);
  myGLCD.setBackColor(25, 35, 4);
  myGLCD.setFont(SmallFont);
  myGLCD.print(Address, CENTER, 1);
  myGLCD.print(dayOfWeek, CENTER, 114);
  
  //Write the big temperature reading in middle of screen
  myGLCD.setBackColor(0, 0, 0);
  myGLCD.setFont(SevenSegNumFont);
  myGLCD.print(tempReading, CENTER, 40);
  
  //Write the Units next to the temperature reading
  myGLCD.setFont(BigFont);
  myGLCD.print(Units, RIGHT, 40);
}


Wiring it up

Once the code has been uploaded to both Arduinos (Master and Slave), I tend to label each Arduino so that I don't mix them up. You will notice an 'S' marked on the SLAVE in some of the photos/videos. Then it is time to piggy-back the shields onto the Arduinos and wire them up. Make sure you disconnect the USB cable from the Arduinos before you start doing this.


Step 1: Ethernet Shield

Place the Ethernet shield onto the Arduino MASTER. Connect an Ethernet cable (RJ45) to the Ethernet shield. The other end will connect to your internet router.


Step 2: Arduino SLAVE and TFT LCD module

 
You can either wire up the TFT LCD module on a breadboard, or you can use a ProtoShield with mini-breadboard. It doesn't really matter how you hook it up, but make sure you double check the connections and the TFT specifications before you power it up. I have powered the Arduino Slave by connecting it to the Arduino Master (see fritzing sketch below).  
There is no reason why you couldn't just power the slave seperately. In fact this is probably the safer option. But I read that this power-sharing setup was ok, so I wanted to give it a go. I have no idea whether it would be suitable for a long term power project... so use it at your own risk. I tried using 4 x AA batteries to power this circuit, but found that the LCD screen would flicker. So then I tried a 9V battery, and noticed that the 5V voltage regulator was heating up more than I felt comfortable with. In the end, I settled with the USB option, and had no further issues. I am sure there are other possible options, and feel free to mention them in the comments below.  
Use the following fritzing sketch and tables to help you wire this circuit up.


Fritzing sketch


Arduino MASTER to SLAVE connection table


Arduino SLAVE to ITDB02-1.8SP TFT LCD


ITDB02-1.8SP TFT LCD Module Pictures


Project Pictures


If you like this page, please do me a favour and show your appreciation :

 
Visit my ArduinoBasics Google + page.
Follow me on Twitter by looking for ScottC @ArduinoBasics.
Have a look at my videos on my YouTube channel.


However, if you do not have a google profile...
Feel free to share this page with your friends in any way you see fit.

Know Your Speed on Rollerblades

[Anurag] is a computer engineering student with a knack for rollerblading. Rollerblades are not a transportation device that are often fitted with speedometers, so [Anurag] took that more as a challenge and designed this Arduino-powered computer to give him more information on his rollerblade rides.

The device uses an Arduino as the brain, and counts wheel revolutions (along with doing a little bit of math) in order to calculate the speed of the rider. The only problem with using this method is that the wheels aren’t on the ground at all times, and slow down slightly when the rider’s foot is off the ground. To make sure he gets accurate data, the Arduino uses an ultrasonic rangefinder to determine the distance to the ground and deduce when it should be taking speed measurements.

In addition to speed, the device can also calculate humidity and temperature, and could be configured to measure any number of things. It outputs its results to a small screen, but it could easily be upgraded with Bluetooth for easy data logging. If speed is truly your goal, you might want to have a look at these motorized rollerblades too.


Filed under: transportation hacks