Posts with «monitor» label

Latency Meter For Accurate Gaming

The gaming world experienced a bit of a resurgence in 2020 that is still seen in the present day. Even putting aside the effects from the pandemic, the affordability and accessibility has arguably never been better. Building a gaming PC can have its downsides, though, and a challenging issue to troubleshoot is input lag or input latency. This is something that’s best measured with standalone hardware, and if this is an issue on your setup you may want to take a look at this latency meter.

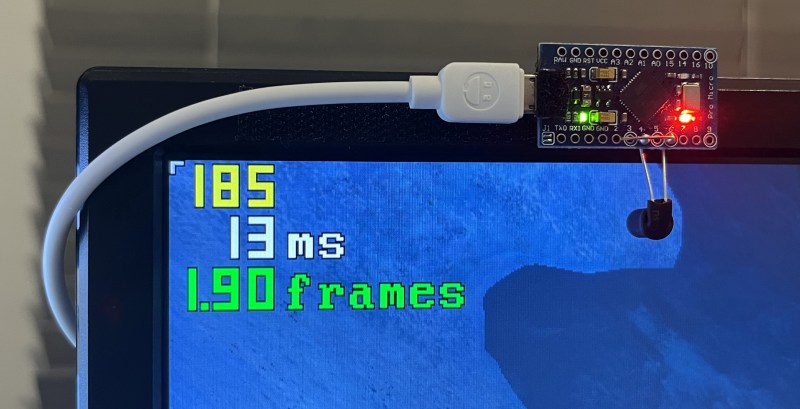
Unlike other measurement devices that use the time between a mouse button input and the monitor’s display of a bullet or shooting event, this one looks at mouse movement and the change in the scene instead. This makes it much more versatile than other methods since it’s independent of specific actions, and can be used in any game without any specific events needed to perform the measurement. A camera is placed on the monitor’s top edge and the Arduino-based device sends mouse commands to the computer while measuring the time between those commands and the shift in the image on the monitor.

The project is open source, so with the right hardware it’s possible to build one to troubleshoot latency issues or just to learn more about a particular hardware configuration’s behavior. Arduinos and other microcontrollers have been doing all kinds of things by pretending to be human interface devices like this for a while now. One of our favorites of late was this effects pedal that replicates musical effects on mice and keyboards.

Landscape to Portrait at the Click of a Mouse

Modern 16:9 aspect ratio monitors may be great for watching a widescreen movie on Netflix, but for most PDFs, Word documents, and certain web pages, landscape just won’t do. But if you’re not writing the next great American novel and aren’t willing to commit to portrait mode, don’t — build an auto-rotating monitor to switch your aspect ratio on the fly.

Like many of us, [Bob] finds certain content less than suitable for the cinematic format that’s become the standard for monitors. His fix is simple in concept, but a little challenging to engineer. Using a lazy susan as a giant bearing, [Bob] built a swivel that can be powered by a NEMA 23 stepper and a 3D-printed sector of a ring gear. Due to the narrow clearance between the top and bottom of the lazy susan, [Bob] had to do considerable finagling to get through holes for the mounting hardware located, but in the end the whole thing worked great.

Our only quibble would be welding galvanized pipe for the stand, which always gives us the willies. But we will admit the tube notching turned out great with just a paper template. We doubt it would have been much better if he used an amped-up plasma-powered tubing notcher.


Filed under: misc hacks
Hack a Day 05 Apr 12:01

Monitor All the Laundry Things with this Sleek IoT System

If like us you live in mortal fear of someone breaking into your house when you’re on vacation and starting a dryer fire while doing laundry, this full-featured IoT laundry room monitor is for you. And there’s a school bus. But don’t ask about the school bus.

In what [seasider1960] describes as “a classic case of scope creep,” there’s very little about laundry room goings on that escapes the notice of this nicely executed project. It started as a water sensor to prevent a repeat of a leak that resulted in some downstairs damage. But once you get going, why not go too far? [seasider1960] added current sensing to know when the washer and dryer are operating, as well as to tote up power usage. A temperature sensor watches the dryer vent and warns against the potential for the aforementioned tragedy by sounding an obnoxious local alarm — that’s where the school bus comes in. The whole system is also linked into Blynk for IoT monitoring, with an equally obnoxious alarm you can hear in the video below. Oh, and there are buttons for testing each alarm and for making an Internet note to reorder laundry supplies.

We’ve seen a spate of laundry monitoring projects lately, all of which have their relative merits. But you’ve got to like the fit and finish of [seasider1960]’s build. The stainless face plate and in-wall mount makes for a sleek, professional appearance which is fitting with the scope-creepy nature of the build.


Filed under: home hacks

Spit Out VGA with Non-Programmable Logic Chips

It’s not uncommon to bitbang a protocol with a microcontroller in a pinch. I2C is frequently crunched from scratch, same with simple serial protocols, occasionally complex systems like Ethernet, and a whole host of other communication standards. But VGA gets pretty tricky because of the timing requirements, so it’s less common to bitbang. [Sven] completely threw caution to the wind. He didn’t just bitbang VGA on an Arduino, but he went one step further and configured an array of 7400 logic chips to output a VGA signal.

[Sven]’s project is in two parts. In part one, he discusses choosing a resolution and setting up the timing signal. He proceeds to output a simple(-ish) VGA signal that can be displayed on a monitor using a single gate. At that point only a red image was displayed, but getting signal lock from the monitor is a great proof of concept and [Sven] moved on to more intricate display tricks.

With the next iteration of the project [Sven] talks about adding in more circuitry to handle things like frame counting, geometry, and color. The graphics that are displayed were planned out in a simulator first, then used to design the 7400 chip configuration for that particular graphic display. It made us chuckle that [Sven] reports his monitor managed to survive this latest project!

We don’t remember seeing non-programmable integrated circuits used for VGA generation before. But bitbanging the signal on an Arduino or from an SD card slot is a great test of your ability to calculate and implement precise timings with an embedded system. Give it a try!


Filed under: video hacks
Hack a Day 16 Oct 00:01

Bluetooth Enabled Fuel Consumption Monitor

[Malebuffy] bought himself a used boat last year. Fuel isn’t exactly cheap where he lives, so he wanted a way to monitor his fuel consumption. He originally looked into purchasing a Flowscan off the shelf, but they were just too expensive. In the interest of saving money, [Malebuffy] decided to build his own version of the product instead.

To begin, [Malebuffy] knew he would need a way to display the fuel data once it was collected. His boat’s console didn’t have much room though, and cutting holes into his recently purchased boat didn’t sound like the best idea. He decided he could just use his smart phone to display the data instead. With that in mind, [Malebuffy] decided to use Bluetooth to transmit the data from the fuel sensors to his smart phone.

The system uses an older Arduino for the brain. The Arduino gets the fuel consumption readings from a Microstream OF05ZAT fuel flow sensor. The Arduino processes the data and then transmits it to a smart phone via a Bluetooth module. The whole circuit is powered from the boat battery using a DC adapter. The electronics are protected inside of a waterproof case.

[Malebuffy’s] custom Android apps are available for download from his website. He’s also made the Arduino code available in case any one wants to copy his design.


Filed under: Arduino Hacks