Posts with «smartphone» label

The Engadget guide to the best midrange smartphones

A great smartphone doesn’t have to cost a fortune. Years of commoditization have brought features once exclusive to high-end devices – including big batteries, multi-camera arrays and high refresh rate displays – down to their more affordable siblings. As one of Engadget’s resident mobile geeks, I’ve reviewed dozens of midrange devices. So I’m here to help you figure out what features to prioritize when trying to find a phone for less than $600.

What is a midrange phone, anyway?

While the term shows up frequently in articles and videos, there isn’t an agreed-upon definition for “midrange” beyond a phone that isn’t a flagship or an entry-level option. For this guide, our recommendations cost between $400 and $600. Any less and you should expect significant compromises. If your budget is higher, though, you should consider flagships like the iPhone 13 and Galaxy S22.

What factors should you consider when buying a midrange smartphone?

Buying a new device can be intimidating, but a few questions can help guide you through the process. First: what platform do you want to use? If the answer is iOS, that narrows your options down to exactly one phone. (Thankfully, it’s great.) And if you’re an Android fan, there’s no shortage of compelling options. Both platforms have their strengths, so you shouldn’t rule either out.

Obviously, also consider how much you’re comfortable spending. Even spending $100 more can get you a dramatically better product. And manufacturers tend to support their more expensive devices for longer. It’s definitely worth buying something toward the top limit of what you can afford.

Having an idea of your priorities will help inform your budget. Do you want a long-lasting battery? Do you value speedy performance above all else? Or would you like the best possible cameras? While they continue to improve every year, midrange phones still involve some compromises, and knowing what’s important to you will make choosing one easier.

Lastly, pay attention to wireless bands and network compatibility. If you don’t want to worry about that, your best bet is to buy directly from your carrier. To make things easier, all the phones we recommend are compatible with every major US wireless provider and can be purchased unlocked. 

What won’t you get from a midrange smartphone?

Every year, the line between midrange and flagship phones gets blurrier as more upmarket features trickle down. When we first published this guide in 2020, it was difficult to find $500 devices with waterproofing or 5G. Now, the biggest thing you might miss out on is wireless charging. Just remember to budget for a power adapter too – many companies have stopped including them. Performance has improved in recent years, but can still be hit or miss as most midrange phones use slower processors that can struggle with multitasking. Thankfully, their cameras have improved dramatically, and you can typically expect at least a dual-lens system on most handsets below $600.

Engadget picks

The best midrange Android phone: Pixel 5a with 5G

Terrence O'Brien / Engadget

It may look dull, but there’s a lot to like about Google’s $450 Pixel 5a. For one, it features the best cameras at this price. It may not have as many lenses as some of the other options on this list, but thanks to Google’s expertise in computational photography, the 5a delivers pictures that are on par with phones that cost hundreds more.

The Pixel 5a has a few other things going for it. Thanks to its large 4,680mAh battery and efficient chipset, you won’t have to worry about running out of juice. In fact, Engadget managing editor Terrence O’Brien found he could easily get a full day of use. The 5a also supports 5G and is certified IP67 for water and dust-proofing. Plus, as a Pixel phone, the 5a will receive the latest updates and security fixes from Google weeks and months before other Android phones.

Of course, no $450 phone is perfect. The Pixel 5a has an aging Snapdragon 765G chipset, and you can find plenty of midrange phones with more responsive displays.

One thing to note: The Pixel 6a is right around the corner and will go on sale on July 28th for $449. I suggest waiting until Engadget gets a review unit so you have details on things like battery life and performance before you make a decision.

Buy Pixel 5a 5G at Amazon - $450

The best (and only) iPhone under $600: iPhone SE

Cherlynn Low / Engadget

If you can get past its dated design and small 5.4-inch display, the iPhone SE is the fastest phone you can buy for less than $600. No other device on this list has a processor that comes close to the SE’s A15 Bionic. What’s more, you can expect Apple to support the 2022 model for years to come. The company is only just ending support for the first-generation SE after six years. The company hasn’t said how long it intends to furnish the latest SE with new software, but it’s likely to support the device for a similar length of time.

For all its strengths, the iPhone SE is held back by a dated display. Not only is the SE’s screen small and slow, but it also uses an IPS panel instead of an OLED, meaning it can’t deliver deep blacks. Additionally, that screen is surrounded by some of the largest bezels you’ll find on a modern phone. That’s not surprising. The SE uses the design of the iPhone 6, which will be a decade old in two years. And if the SE looks dated now, it will only feel more tired in a few years.

Shop iPhone SE at Apple

The midrange phone with the best screen: Samsung Galaxy A53 5G

Igor Bonifacic / Engadget

For the best possible display at this price, look no further than Samsung’s $450 Galaxy A53 5G. It features a 6.5-inch Super AMOLED display that is ideal for watching TV shows and movies. Plus the 120Hz panel is the fastest on this list. Other standout features include a 5,000mAh battery and versatile camera system. The A53’s three cameras may not deliver photos with the same detail and natural colors as the Pixel 5a, but it can capture bigger scenes with its two wide-angle lenses.

Like the other Android phones on this list, the A53 isn’t the fastest performer. At best, Samsung’s Exynos 1280 is a lateral move from the Snapdragon 750G found in the Galaxy A52 5G. And though the A53 is $50 cheaper than its predecessor, it no longer comes with a power adapter and headphone jack, so the difference may not end up being much.

Buy Galaxy A53 5G at Samsung - $450

An ultra-budget 5G option: OnePlus Nord N200 5G

Brian Oh / Engadget

If you only have around $200 to spend on your next phone, you could do a lot worse than the OnePlus Nord N200 To start, it features a big 5,000mAh battery that will easily last you a full day. The N200 also has a 90Hz display and 5G connectivity, which are tricky to find at this price. Best of all, it doesn’t look like a budget product.

But the N200 is also a good illustration of why you should spend more if you can. I the slowest device on this list, due to its Snapdragon 480 chipset and paltry 4GB of RAM. Its triple main camera system is serviceable during the day but struggles in low light and doesn’t offer much versatility beyond a disappointing macro lens. OnePlus also doesn’t plan to update the phone beyond the soon-to-be-outdated Android 12. In short, the N200 is unlikely to last you as long as any of the other recommendations on this list.

Buy OnePlus Nord N200 at Amazon - $240

Chris Velazco contributed to this report.

AvoRipe Takes A Firm Grip On The Ultimate First World Food Problem

You don’t have to be an extinct mammal or a Millennial to enjoy the smooth, buttery taste of an avocado. Being psychic on the other hand is definitely an advantage to catch that small, perfect window between raw and rotten of this divaesque fruit. But don’t worry, as modern problems require modern solutions, [Eden Bar-Tov], [Elan Goldberg], and [Mizpe Ramon] built the AvoRipe, a device to notify you when your next avocado has reached that window.

Taking both the firmness and color of an avocado as indicators of its ripeness into account, the team built a dome holding a TCS3200 color sensor as stand for the avocado itself, and 3D printed a servo-controlled gripper with a force sensor attached to it. Closing the gripper’s arms step by step and reading the force sensor’s value will determine the softness the avocado has reached. Using an ESP8266 as centerpiece, the AvoRipe is turned into a full-blown IoT device, reporting the sensor readings to a smartphone app, and collecting the avocado’s data history on an Adafruit.IO dashboard.

There is unfortunately one big drawback: to calibrate the sensors, a set of nicely, ripe avocados are required, turning the device into somewhat of a chicken and egg situation. Nevertheless, it’s a nice showcase of tying together different platforms available for widescale hobbyist projects. Sure, it doesn’t hurt to know how to do each part from scratch on your own, but on the other hand, why not use the shortcuts that are at our disposal to remove some obstacles — which sometimes might include programming itself.

Control model trains wirelessly with your smartphone

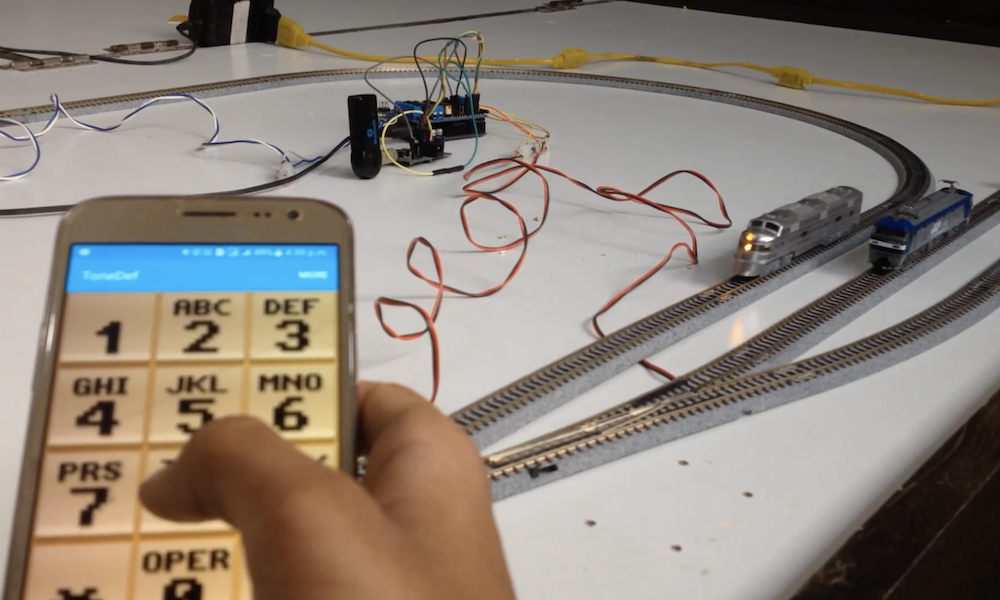
Model trains have been a staple of DIY hobbiysts for generations, and while wireless control options can be purchased, KushagraK7’s hack lets you use your phone instead.

The setup consists of an Arduino Uno, along with a motor driver shield to vary the trains’s peed and direction, as well as flip turnouts to allow for different sections of track to be used.

The system employs a novel interface system, where an off-the-shelf Bluetooth receiver passes DTMF (telephone dial tones) to a decoder board, which then sends this decoded data on to the Arduino. While some might opt for an HC-05 Bluetooth module or similar, this enables control with a standard tone generator app, and the phone could even be physically connected via a stereo cable if convenient.

InfiniTouch: Interact with both sides of your smartphone

Besides, perhaps a longer battery life, what would make your smartphone experience better? If you said a more versatile interaction method than poking one side with your thumb, researchers in Germany may have just the thing.

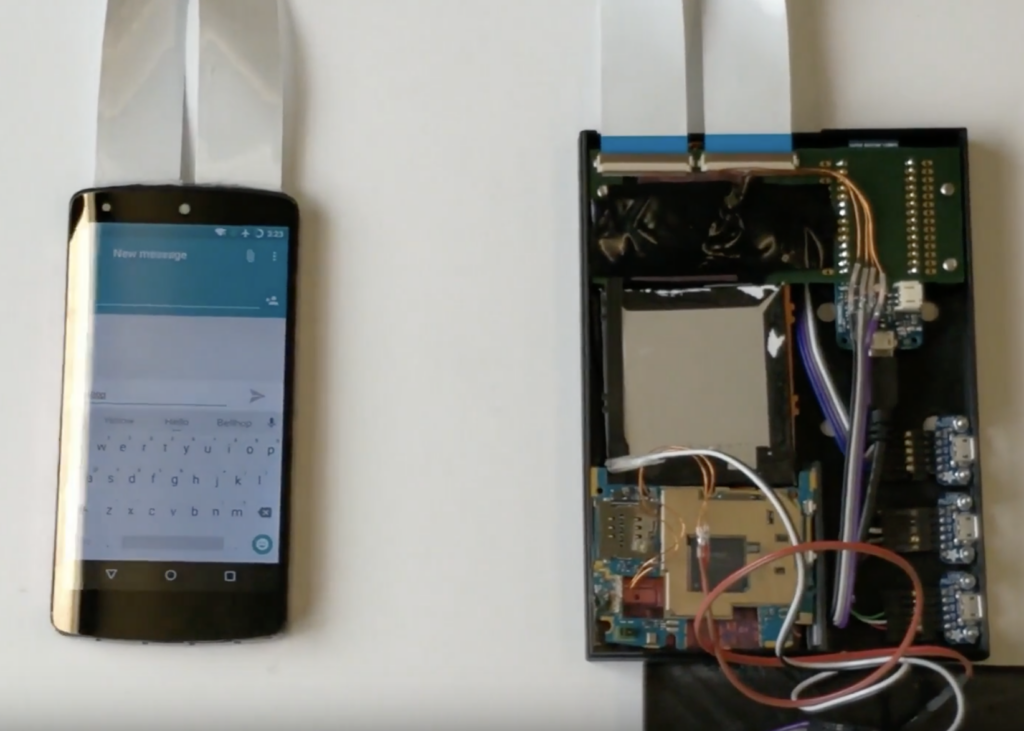
InfiniTouch morphs two LG Nexus 5 phones into one, with their touchscreens stacked back-to-back. This allows for not only thumb interaction, but also program control with the four fingers that normally only grip the device. It can even tell what finger your using via a convolutional neural network. 

In order to save space, most of the electronics are housed in a separate hardware container, including the phone boards as well as an Arduino MKR1000. 

More info is available in the project’s research paper, and a short demo can be seen in the video below.

An Affordable Phone Controlled Rover

A while back Jason made a phone controlled rover using the MotorAir. He wanted to revisit the basic idea but using cheaper, more widely available parts. Also since this is Arduino based, it is a great springboard for more than just a rover that drives around. You could add sensors, servos, etc. to really drive this project in any direction you want.

https://youtu.be/Qx0tvpr2DNw

read more

Let's Make Robots 19 Feb 22:38

Hacking Robotic Arm using Controllino and Cayenne


Description

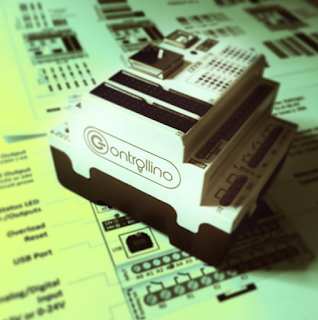
This tutorial will show you how to take over the controls of the OWI Robotic Arm with the help of an Arduino compatible, open-source PLC called the Controllino MAXI, together with Cayenne (my go-to iOT application for remote connection to my Arduino projects). The Controllino MAXI will provide the physical connections to the OWI robotic arm, and Cayenne will allow me to control the arm via my web browser or via the Cayenne app on my phone.


Arduino Libraries and IDE

  1. The Arduino IDE can be used to program the Controllino. You can dowload the Arduino IDE from here: https://www.arduino.cc/en/main/software.
  2. You will also need to read the Cayenne Ethernet library installation instructions in order to install the Cayenne Ethernet Library.
  3. The Controllino will connect to the internet via the Ethernet port onboard.
  4. You do not need the Controllino library for this project, however, if you have a Controllino, you might as well install the library. You can read the Controllino library installation instructions from their GitHub webpage here: https://github.com/CONTROLLINO-PLC/CONTROLLINO_Library.
  5. You will need to notify the Arduino IDE of the Controllino MAXI board by pasting the supplied URL into the "Additional Boards Manager URLs" in the Arduino IDE.
  6. This is located under: FILE - PREFERENCES - Additional Boards Manager URLs.
  7. The URL that you need to paste is in STEP 3 of the Controllino Library installation instructions on their GitHub page.
  8. The video at the top of this tutorial may help clarify the process.


ARDUINO CODE:

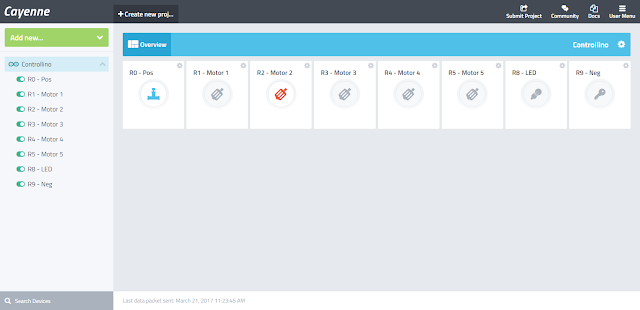
The code above is very simple, however you will need to create a dashboard of widgets from within your Cayenne account in order to control the OWI robotic Arm from your phone or via the Dashboard webpage.


Setting up Cayenne Dashboard

Once you have created your Cayenne account, you will be presented with a webpage to choose a board to connect to. Controllino is an Arduino compatible PLC, so make sure to follow these instructions for setting up the Controllino in your Cayenne Account.

  1. Select Arduino from the available list of boards.
  2. Make sure to install the necessary libraries if your have not done so already.
  3. Select Arduino MEGA from the avaliable list of Arduino boards
  4. Select Ethernet Shield W5100
  5. Copy and paste the Arduino code that pops up on screen into your Arduino IDE and upload to the Controllino.
  6. Alternatively, copy and paste the code from above, however you will need to insert your Authentication token to get it to work

After you upload the code to the Controllino, and providing it has an ethernet cable connected to the internet router (and has access to the internet), and is powered on, it will connect to your Cayenne Dashboard. You can now add widgets to the dashboard in real time to interact with the Controllino, and without uploading any more code to the open source PLC.


Adding Widgets

We need to add a number of widgets in order to activate the relays on the Controllino. The relavent digital pins that we will need to know about can be found on the Controllino website here: https://controllino.biz/downloads/.

Here is the direct link to the PINOUT file for the Controllino MAXI.

"Armed" with that knowledge, we can now create the widgets which are necessary to control the relays on the Controllino. From within the Cayenne dashboard, please follow these instructions to create a widget:

  1. Select - ADD NEW
  2. Select - DEVICE/WIDGET
  3. Select - ACTUATORS
  4. Then - RELAY from the dropdown box
  5. Select - RELAY SWITCH
  6. Give the widget a descriptive name to differentiate it from the other widgets and a name that is somewhat informative (eg. R0 - Pos)
  7. I gave the first widget the name "R0 - Pos", because it will connect to Relay R0, and that relay will be connected to the Positive (POS) terminal of the OWI robotic arm.
  8. Select the device you would like to connect to. Be aware that you can change the name of the device in the settings. If you followed this tutorial, it should have the name "Arduino MEGA", but I changed the name of the device to "Controllino" to be more accurate.
  9. We will be using a digital pin to control the relay, therefore select "Digital" as the Connectivity option
  10. For this specific widget, we will be controlling R0, which is activated by digital pin D22 on the Controllino. Therefore select "D22" from the "Pin" dropdown box.
  11. Choose a "Button" as the widget type
  12. Choose an icon from the dropdown box that makes sense to you
  13. Skip Step 1
  14. Select Step 2: Add actuator

You should now see your new widget on the dashboard. Select the widget to enable or activate that relay. If you do this, and if everything goes to plan, you will see the LED for R0 illuminate on the Controllino. You now have to add the rest of the widgets to the dashboard in order to control the rest of the relays on the Controllino.


Widget Dashboard

Here is a table to show you how I setup my dashboard.


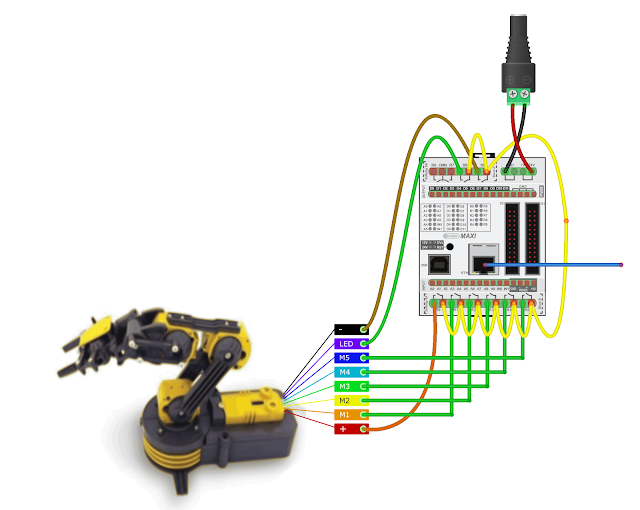
Fritzing diagram


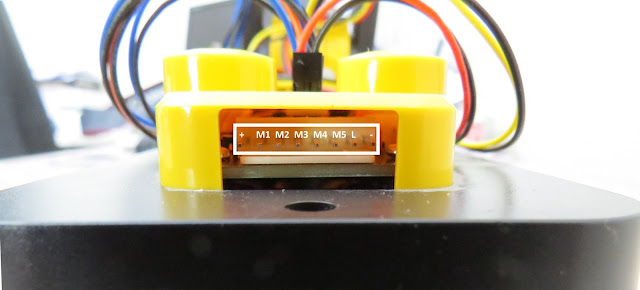
OWI Robotic Arm Pins


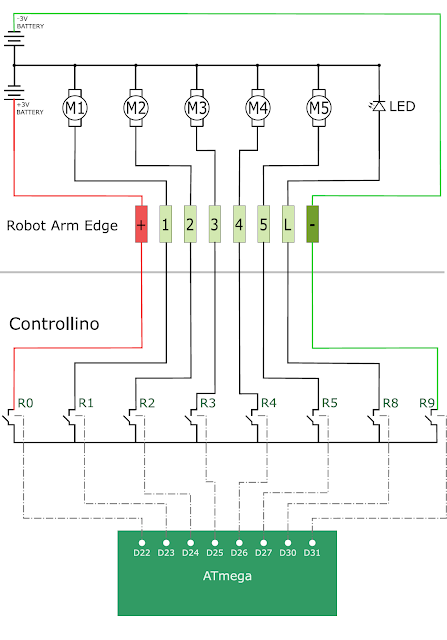
Normal OWI Robotic Arm Circuit

The following circuit diagram will show you how the wired control box is normally connected to the OWI Robotic arm. This is the circuit diagram of the OWI robotic arm under normal operating contidtions.


OWI Robotic Arm Circuit when connected to Controllino

The following circuit diagram will show you how the OWI Robotic Arm will be controlled by the relays of the Controllino. This is the circuit diagram of the OWI robotic arm when it is connected to the Controllino.


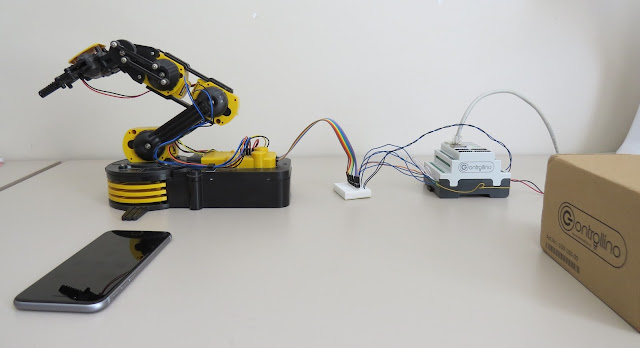
All connected

The OWI Robotic Arm is connected to a breadboard using the female-to-male jumper wires. Solid core wire is then fed through to the relay terminals of the Controllino. You could just wire it up so that the robotic arm is connected directly to the Controllino, however, I did not have the right connectors for this purpose.
The Controllino is also connected to my internet router via a normal RJ-45 ethernet cable, and is powered by a 12V DC power adapter.


Summary

Now that you have all the physical connections made, uploaded the code to the Controllino, and have created your dashboard in Cayenne, you should be able to control your OWI Robotic arm from anywhere in the world. As demonstrated in the video at the start of this tutorial, the robotic arm has quite a bit of give on each of the joints, which makes it difficult to achieve certain tasks that require an element of precision. There goes that idea of being able to perform surgery with this thing !!! At least you can get it to make you a cup of tea, and if you are patient enough, you might even get a grape once in a while.

Thank you to Controllino and Cayenne for making this tutorial possible. If you would like your product featured in my tutorials, please contact me on my contact page.


If you like this page, please do me a favour and show your appreciation :

 
Visit my ArduinoBasics Google + page.
Follow me on Twitter by looking for ScottC @ArduinoBasics.
I can also be found on Pinterest and Instagram.
Have a look at my videos on my YouTube channel.


Hand Waving Unlocks Door

Who doesn’t like the user interface in the movie Minority Report where [Tom Cruise] manipulates a giant computer screen by just waving his hands in front of it? [AdhamN] wanted to unlock his door with hand gestures. While it isn’t as seamless as [Tom’s] Hollywood interface, it manages to do the job. You just have to hold on to your smartphone while you gesture.

The project uses an Arduino and a servo motor to move a bolt back and forth. The gesture part requires a 1sheeld board. This is a board that interfaces to a phone and allows you to use its capabilities (in this case, the accelerometer) from your Arduino program.

The rest should be obvious. The 1sheeld reads the accelerometer data and when it sees the right gesture, it operates the servo. It would be interesting to do this with a smart watch, which would perhaps look a little less obvious.

We covered the 1sheeld board awhile back. Of course, you could also use NFC or some other sensor technology to trigger the mechanism. You can find a video that describes the 1sheeld below.


Filed under: Arduino Hacks

Google Science Journal studies the world through your phone

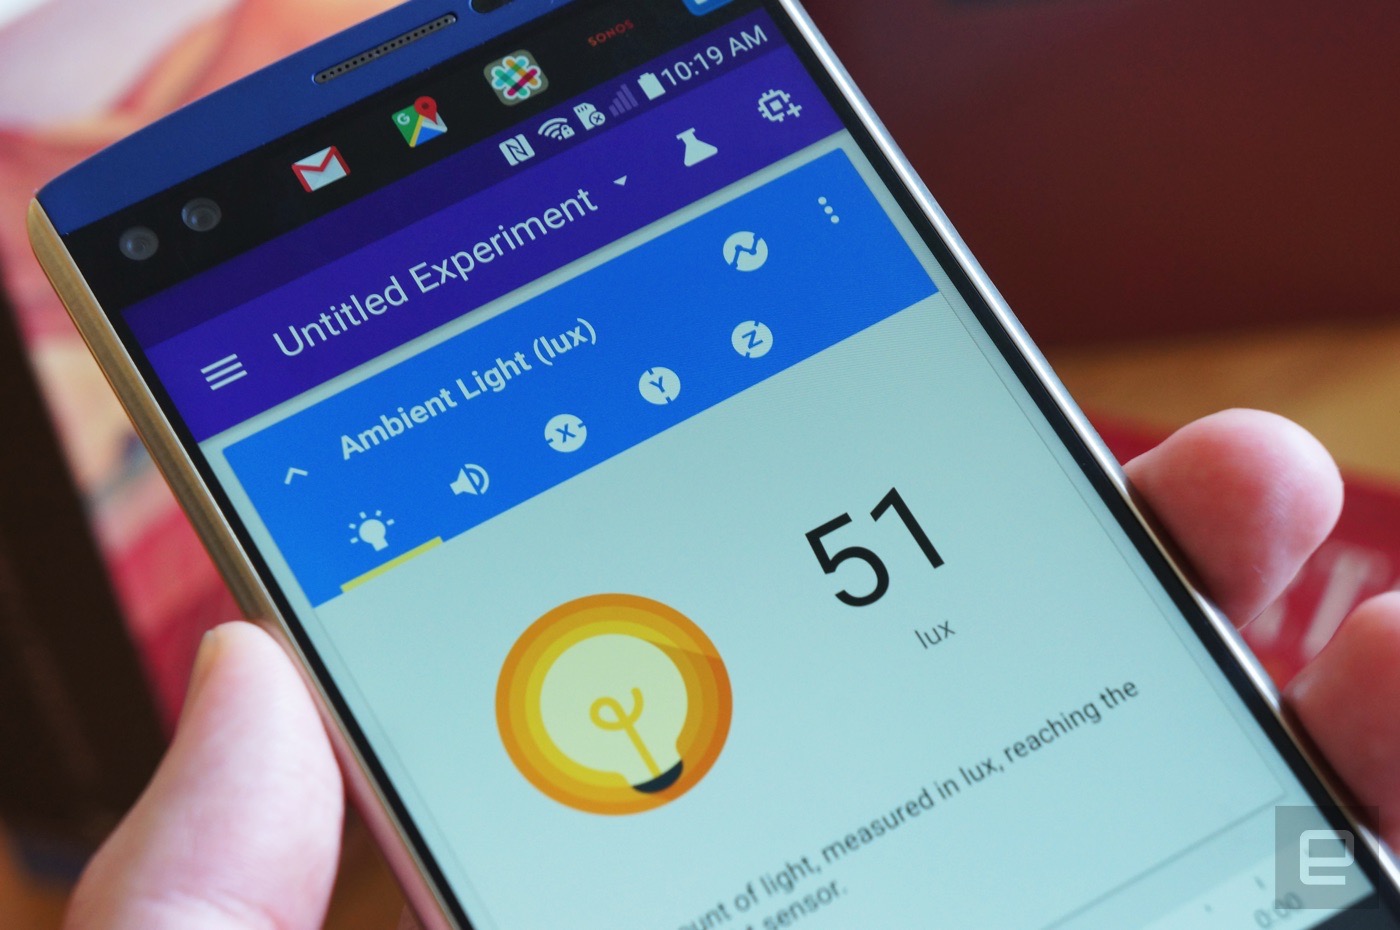
Are you (or your kid) curious about the world around you? Google wants to help. It just launched Science Journal, an Android app that helps you perform (and comment on) simple science experiments. The app can record light, motion and sound levels using only your phone's sensors, letting you study everything from a light bulb's brightness to the acceleration in a jump. It's easy to kick things up a notch, though. You can connect Arduino-powered sensors, and Google is partnering with Exploratorium to offer starter kits to help budding scientists. Science Journal is free, so there's no harm in giving it a try -- even if you're a full-fledged adult, you might learn something.

Via: Android Police

Source: Google Play, Google for Education

Google Science Journal studies the world through your phone

Are you (or your kid) curious about the world around you? Google wants to help. It just launched Science Journal, an Android app that helps you perform (and comment on) simple science experiments. The app can record light, motion and sound levels using only your phone's sensors, letting you study everything from a light bulb's brightness to the acceleration in a jump. It's easy to kick things up a notch, though. You can connect Arduino-powered sensors, and Google is partnering with Exploratorium to offer starter kits to help budding scientists. Science Journal is free, so there's no harm in giving it a try -- even if you're a full-fledged adult, you might learn something.