Posts with «leds» label

1D LED PONG, Arduino-Style

Maybe it’s just us, but isn’t it kind of amazing that in a world of pretty darn realistic games, PONG is still thrilling to play? This 1D implementation by [newsonator] is about as exciting as it gets.

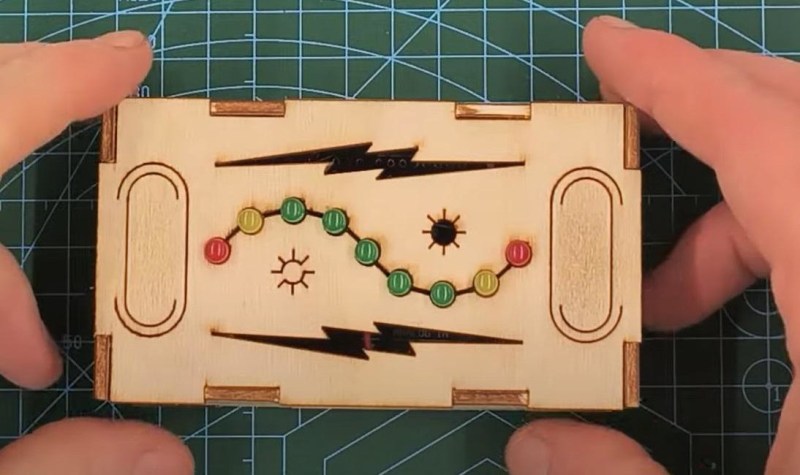
It works like you’d probably expect — the light moves back and forth between the two players. Keep it in the green and you have a nice, gentle volley going. Let it hit your red LED and you’ve lost a point. But if you can push your button while your yellow LED is lit, the light speeds up tremendously until the next button press in the green.

Our only wish is that subsequent yellow-light button presses would make it speed up even more. But there are really just the two speeds with the current programming.

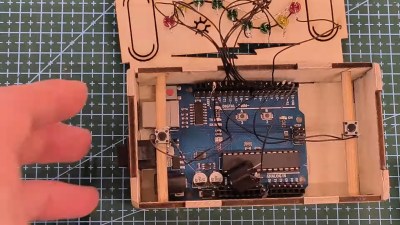
Inside the cool laser-cut box is an Arduino Uno and a 9V battery, plus a current-limiting resistor and the all-important buzzer. We like how [newsonator] wired up the LEDs to the Arduino by soldering them to a row of header pins and sticking that into the Arduino so it can be used in other projects down the line. We also like how [newsonator] shoved a couple of dowels through the box to ultimately support the two buttons.

Check out the intro video after the break for the overall details. The build is done over a few different short videos which follow.

Although this is pretty small, it isn’t quite the minimum viable.


Hack a Day 16 Dec 00:00

2023 Halloween Hackfest: Treat Trough of Terror Is Actually Pretty Cute

Even though it seems the worst of COVID has passed, October generally kicks off cold and flu season, so why not continue to pass out Halloween treats in a socially-distanced fashion?

That is, of course the idea behind [Gord Payne]’s Halloween Treat Trough of Terror. Lay a treat at the top of the trough and it will activate the LED strips that follow the treat down to the end, as well as some spooky sounds. The treat in question is detected by an SR-04 ultrasonic distance sensor connected to an Arduino Nano.

All in all this was a highly successful build as far as neighborhood entertainment value goes. Toddlers stared in awe at the blinkenlights, teenagers proclaimed it ‘sick’, and we can only assume that the adults were likely happy to see something aimed at kids that’s not scary.

[Gord] has a nice how-to if you want to build your own, and of course, the Arduino sketch is available. Be sure to check it out in action after the break.

Don’t have room to build a treat slide? Here’s a socially-distanced dispenser that lets them stomp a giant button.


Wood and Brass Drink Temperature Monitor Looks Good, Has Class

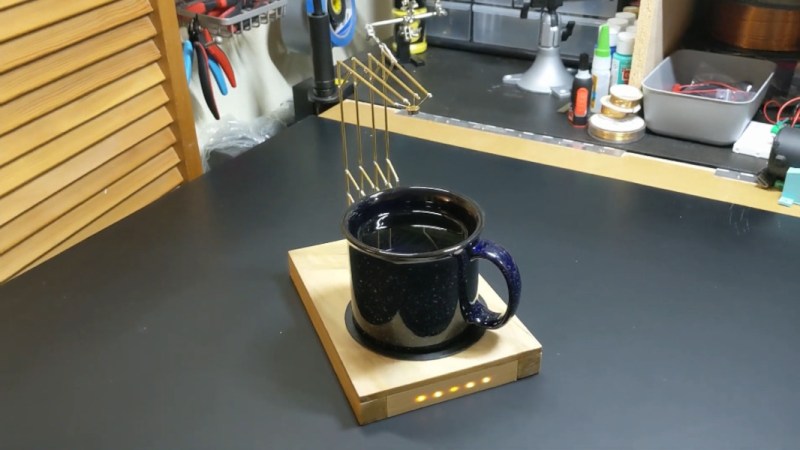
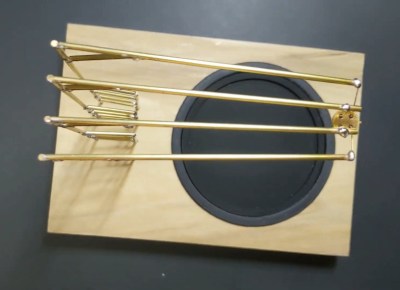
We’ve all been there. Your current project has hit a wall, or the next step will take days to complete, and you need something to do in the meantime. So you start a project that you envision will fit nicely in the gap, and then, inevitably, it doesn’t. Maybe it even takes so long that the original project gets finished first. So what? There’s nothing wrong with that, especially when the filler project turns out as well as this drink temperature monitor disguised as a circuit sculpture (video, embedded below). Just put your mug on the coaster, and the weight of it activates a hidden switch, which causes the sculpture to display its secret LEDs.

[MakeFunStuff] wanted to make something that looked less like a circuit and more like art, while building a tool that could determine the relative hotness of a beverage. Such a a useful circuit sculpture sounds like a tall order to us, but [MakeFunStuff] pulled it off with finesse and style.

The circuit is based around this Sputnik-looking standalone IR temperature sensor which, as [MakeFunStuff] aptly describes, is “a single-pixel infrared camera that picks up everything in a 90° cone starting at the sensor.”

[MakeFunStuff] paired this easy-to-use sensor with an Arduino Nano and five LEDs that show how hot a beverage is on a scale from 1 to 5. The sensor is hidden in plain sight, suspended from the top of the brass rod sculpture and blending in perfectly. We love that the LEDs are hidden behind a thin layer of carefully-drilled wood and agree that a drill press would have been much easier.

The code is set up for just about every temperature scale from Celsius to Rømer, so that solves that argument. [MakeFunStuff] went with the Kelvin scale because science. Our favorite thing about this video is that [MakeFunStuff] shared their failures and fixes as they built their way toward answering the questions of how to suspend the sensor over the drink, and how best to display the heat level while hiding the electronics. Go grab a hot cup of something and check it out after the break while you let it cool off the normie way.

We admit that we would likely zone out while waiting for the LEDs to disappear. Here’s a smart coaster that uses an ESP8266 to send a message to Discord when your beverage has reached the perfect drinking temperature.

Thanks for the hot tip, [Perry]!

Cheap, Expandable Floor Piano Plays with Heart and Soul

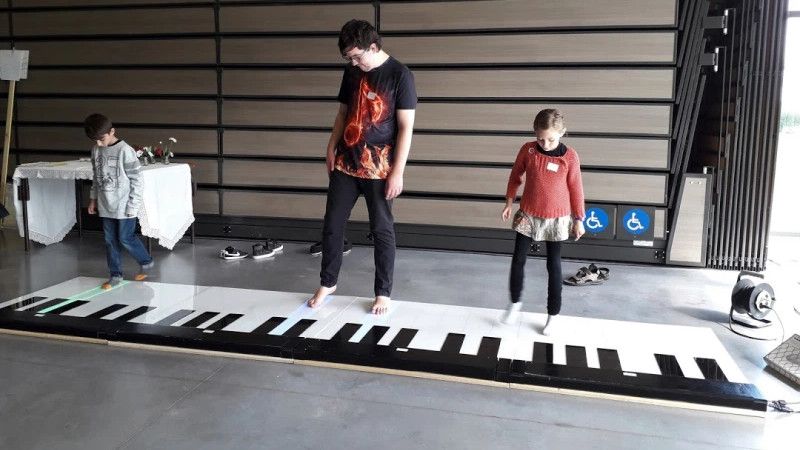
Ever since we saw the movie Big, we’ve wanted a floor piano. Still do, actually. We sometimes wonder how many floor pianos that movie has sold. It’s definitely launched some builds, too, but perhaps none as robust as this acrylic and wooden beauty by [FredTSL]. If you want more technical detail, check out the project on IO.

The best part is that this piano is modular and easily expands from 1 to 8 octaves. Each octave runs on an Arduino Mega, with the first octave set up as a primary and the others as secondaries. When [FredTSL] turns it on, the primary octave sends a message to find out how many octaves are out there, and then it assigns each one a number. Whenever a note is played via conductive fabric and sensor, the program fetches the key number and octave number and sends the message back to the primary Mega, which plays the note through a MIDI music shield.

We think this looks fantastic and super fun to dance around on. Be sure to check out the build log in photos, and stick around after the break, because you’d better believe they busted out some Heart and Soul on this baby. After all, it’s pretty much mandatory at this point.

Wish you could build a floor piano but don’t have the space or woodworking skills? Here’s a smaller, wireless version that was built in 24 hours.

Portrait of a Digital Weapon

Over the years, artists have been creating art depicting weapons of mass destruction, war and human conflict. But the weapons of war, and the theatres of operation are changing in the 21st century. The outcome of many future conflicts will surely depend on digital warriors, huddled over their computer screens, punching on their keyboards and maneuvering joysticks, or using devious methods to infect computers to disable or destroy infrastructure. How does an artist give physical form to an unseen, virtual digital weapon? That is the question which inspired [Mac Pierce] to create his latest Portrait of a Digital Weapon.

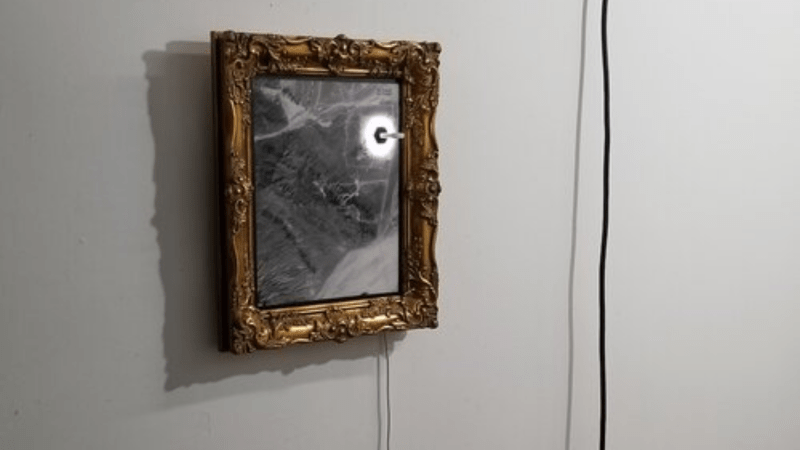
[Mac]’s art piece is a physical depiction of a virtual digital weapon, a nation-state cyber attack. When activated, this piece displays the full code of the Stuxnet virus, a worm that partially disabled Iran’s nuclear fuel production facility at Natanz around 2008.

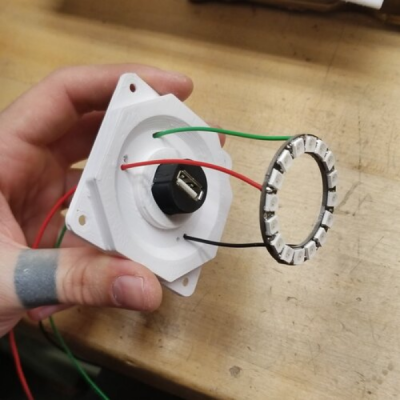
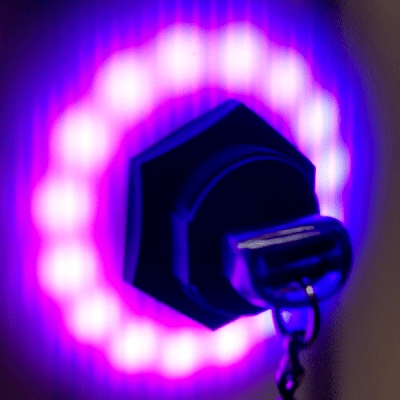
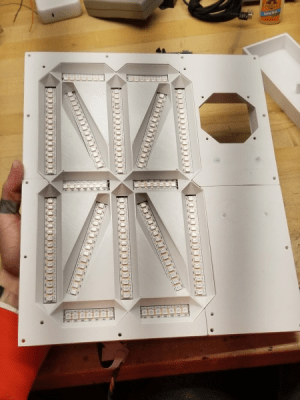
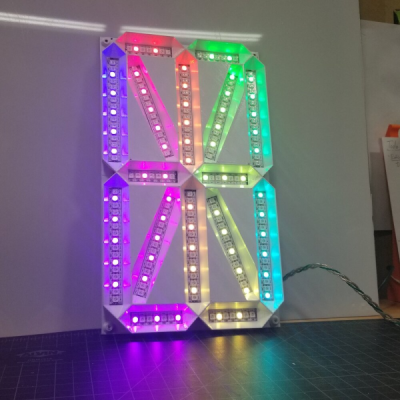
It took a while for [Mac] to finalize the plan for his design. He obtained a high resolution satellite image of the Iranian Natanz facility via the Sentinel Hub satellite imagery service. This was printed on a transparent vinyl and glued to a translucent poly-carbonate sheet. Behind the poly-carbonate layer, he built a large, single digit 16-segment display using WS2812 addressable LED strips, which would be used to display the Stuxnet code. A bulkhead USB socket was added over the centrifuge facility, with a ring of WS2812 LEDs surrounding the main complex. When a USB stick is plugged in, the Stuxnet code is displayed on the 16-segment display, one character at a time. At random intervals, the LED ring around the centrifuge building lights up spinning in a red color to indicate centrifuge failure.

The 16-segment display was built on an aluminum base plate, with 3D printed baffles to hold the LED strips. To hold the rest of the electronics, he built a separate 3D printed frame which could be added to the main art frame. Since this was too large to be printed in one piece on the 3D printer, it was split in parts, which were then joined together using embedded metal stud reinforcement to hold the parts together. Quite a nice trick to make large, rigid parts.
An Adafruit Feather M0 micro-controller board, with micro SD-card slot was the brains of the project. To derive the 5 V logic data signal from the 3.3 V GPIO output of the Feather, [Mac] used two extra WS2812 LEDs as level shifters before sending the data to the LED strips. Driving all the LEDs required almost 20 W, so he powered it using USB-C, adding a power delivery negotiation board to derive the required juice.

The Arduino code is straightforward. It reads the characters stored on the SD-card, and sends them sequentially to the 16-segment display. The circular ring around the USB bulkhead also lights up white, but at random intervals it turns red to simulate the speeding up of the centrifuges. Detecting when the USB stick gets plugged in is another nice hack that [Mac] figured out. When a USB stick is plugged in, the continuity between the shell (shield) and the GND terminal was used to trigger a GPIO input.

Cyber warfare is here to stay. We are already seeing increasing attacks on key infrastructure installations by state as well as non-state actors around the world. Stuxnet was one of the first in this growing category of malicious, weaponized code. Acknowledging its presence using such a physical representation can offer a reminder on how a few lines of software can wreak havoc just as much as any other physical weapon. Check out the brief project video after the break.
Transmit Your Gaze to This Fiber Optic LED Lamp

Call us easily amused, but we think it’s pretty amazing what can be done with a microcontroller, some RGB LEDs, and a little bit of plastic. Case in point is [andrei.erdei]’s beautiful and quite approachable fiber optic LED lamp. It’s a desktop-friendly version of a similar piece [andrei] made that is roughly nine times the size of this one and hangs on the wall. The build may be simple, but the product is intricately lovely.

We really like the visual density of this lamp — it’s just the right amount of tubes and strikes a balance between being too sparse and too chaotic. As you might expect, there’s an Arduino and some RGB LED strips involved. But the key to this build is in the 16 pieces of side-glow plastic fiber optic tubing. Side-glow is designed to let light escape along the length of the tube as opposed to end-glow, which is made to minimize light loss from one end to the other like a data pipe. This allows for all sorts of fun effects, and you can watch [andrei.erdei] go slowly and soothingly through the different colors and modes in the demo video after the break. Make sure you watch long enough to see the tubes move like the old Windows 3D pipes screensaver

Already have too many knickknacks and wall hangings? You’re missing out on prime real estate — the ceiling. Check out this fiber optic ceiling installation that reacts to music.

LED Lit Felted Mushrooms

Practice “slow making” and mindfulness while needle-felting, then sew on a light to complete the magical experience

Read more on MAKE

The post LED Lit Felted Mushrooms appeared first on Make: DIY Projects and Ideas for Makers.

POV LED Staff Takes Art for a Spin

The human body does plenty of cool tricks, but one of the easiest to take advantage of is persistence of vision (POV). Our eyes continue to see light for a fraction of a second after the light goes off, and we can leverage this into fun blinkenlight toys like POV staffs. Sure, you can buy POV staffs and other devices, but they’re pretty expensive and you won’t learn anything that way. Building something yourself is often the more expensive route, but that’s not the case with [shurik179]’s excellent open-source POV staff.

There’s a lot to like about this project, starting with the detailed instructions. It’s based on the ItsyBitsyM4 Express and Adafruit’s Dotstar LED strips. You could use the Bluetooth version, but it’s already quite easy to load images to the staff because it shows up as a USB mass storage device. We like that [shurik179] added an IMU and coded the staff so that the images look consistent no matter how fast the staff is spinning. In the future, [shurik179] might make a Bluetooth version that’s collapsible. That sounds like quite the feat, and we can’t wait to see it in action.

As cool as it is to wave a POV staff around, there’s no real practical application. What’s more practical than a clock?

Parking Assistant Helps Back Up the Car Without Going Too Far

Sure, [Ty Palowski] could have just hung a tennis ball from the ceiling, but that would mean getting on a ladder, testing the studfinder on himself before locating a ceiling joist, and so on. Bo-ring. Now that he finally has a garage, he’s not going to fill it with junk, no! He’s going to park a big ol’ Jeep in it. Backwards.

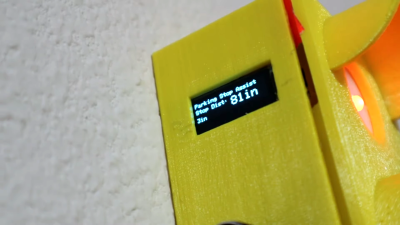
The previous owner was kind enough to leave a workbench in the rear of the garage, which [Ty] has already made his own. To make sure that he never hits the workbench while backing into the garage, [Ty] made an adorable stoplight to help gauge the distance to it. Green mean’s he’s good, yellow means he should be braking, and red of course means stop in the name of power tools.

Inside the light is an Arduino Nano, which reads from the ultrasonic sensor mounted underneath the enclosure and lights up the appropriate LED depending on the car’s distance. All [Ty] has to do is set the distance that makes the red light come on, which he can do with the rotary encoder on the side and confirm on the OLED. The distance for yellow and green are automatically set from red — the yellow range begins 24″ past red, and green is another 48″ past yellow. Floor it past the break to watch the build video.

The humble North American traffic signal is widely recognized, so it’s a good approach for all kinds of applications. Teach your children well: start them young with a visual indicator of when it’s okay to get out of bed in the morning.

Seven-Segment Single-Steps Through the Time

Have you ever looked at the time, and then had to look again because it just didn’t register? This phenomenon seems more prevalent with phone timepieces, but it’s been known to happen with standard wall clocks, too. This latest offering in a stream of unusual clocks fashioned by [mircemk] solves that problem by forcing the viewer to pay attention as the time flashes by in a series of single digits, separated by a hyphen.

Inside the boxy blue base is an Arduino Nano, a DS3231 real-time clock module, and a perfboard full of transistors for switching the LED strips inside the segments. There’s an LED on the front that blinks the seconds, and honestly, we’re kind of on the fence about this part. It would be nice if it faded in and out, or was otherwise a little less distracting, but it did grow on us as we watched the demo.

We love the way this clock celebrates the seven-segment display, and only wish it were much bigger. The STLs and code are available if you want to make one, though they only cover the 7-segment part — the base is made of foam board. Check out the demo and build video after the break.

Would you rather hear the time go by in gentle chimes? Here’s chime clock that uses old hard drive actuators.