Posts with «leds» label

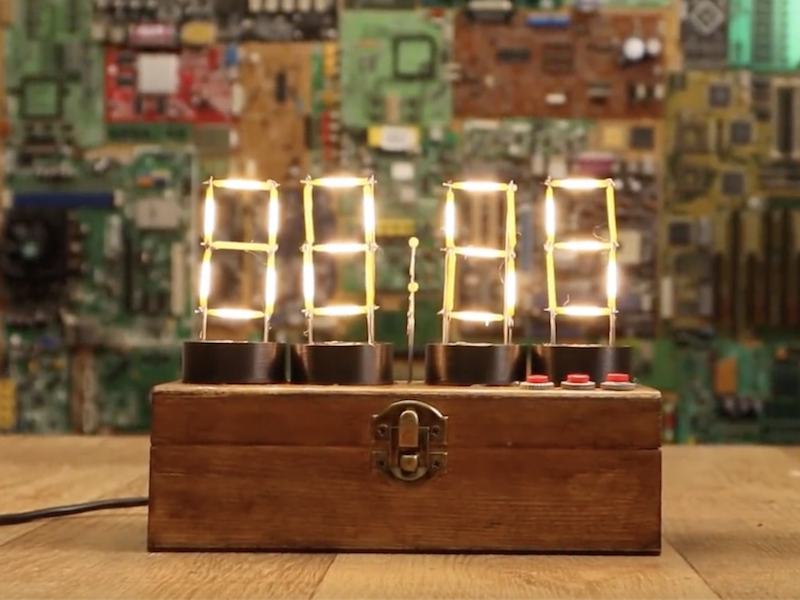
Vintage-style clock made from individual LEDs

If you’ve ever wanted a vintage-style timepiece, or to test your soldering abilities, this clock by YouTuber Electronoobs will let you do both at once. 

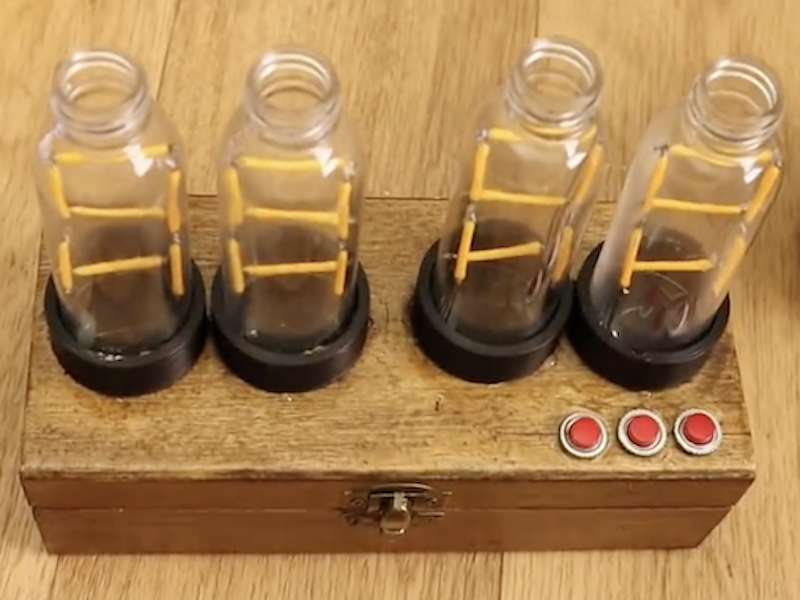
It features four display modules that resemble Nixie tubes, each made out of LED filaments soldered onto a steel wire frame. If you find soldering enjoyable and relaxing, this is likely a good project for you; though if not, there are of course other options. 

The device is controlled by an Arduino Nano, along with a MAX7219 display driver to power the LEDs as needed. An RTC module keeps things “ticking” at the correct pace, and a pair of buttons on top of the wooden enclose allow the time to be adjusted as needed.

I’ve made some “Nixie” tubes. These are actually 7-segment displays made with filament LEDs but placed in a plastic bottle so it will have a more vintage nixie look. To control the LEDs I’m using the MAX7219 driver that could control 4 x 7-segment displays. To get the real time, I’m using the DS3231 module that works with an I2C communication so it’s easy to use. The project also has 2 push buttons to set the hour and minute. All is inside a wood case painted with varnish so it will look more vintage.

Check it out in the video below, or see the build write-up for more info.

Watch The World Spin With The Earth Clock

With the June solstice right around the corner, it’s a perfect time to witness first hand the effects of Earth’s axial tilt on the day’s length above and beyond 60 degrees latitude. But if you can’t make it there, or otherwise prefer a more regular, less deprived sleep pattern, you can always resort to simulations to demonstrate the phenomenon. [SimonRob] for example built a clock with a real time rotating model of Earth to visualize its exposure to the sun over the year.

The daily rotating cycle, as well as Earth’s rotation within one year, are simulated with a hand painted plastic ball attached to a rotating axis and mounted on a rotating plate. The hand painting was done with a neat trick; placing printed slivers of an atlas inside the transparent orb to serve as guides. Movement for both axes are driven by a pair of stepper motors and a ring of LEDs in the same diameter as the Earth model is used to represent the Sun. You can of course wait a whole year to observe it all in real time, or then make use of a set of buttons that lets you fast forward and reverse time.

Earth’s rotation, and especially countering it, is a regular concept in astrophotography, so it’s a nice change of perspective to use it to look onto Earth itself from the outside. And who knows, if [SimonRob] ever feels like extending his clock with an aurora borealis simulation, he might find inspiration in this northern lights tracking light show.

This is a spectacular showpiece and a great project you can do with common tools already in your workshop. Once you’ve mastered earth, put on your machinists hat and give the solar system a try.

Hack a Day 18 Jun 16:31

Strike a Chord With This LED Ukulele

You may laugh off the ukulele as a toy or joke instrument, and admittedly, their starting price tag and the quality that usually comes with such a price tag doesn’t help much to get a different opinion on that. But it also makes it the perfect instrument for your next project. After all, they’re easy to handle, portable, and cheap enough to use a drill and other tools on them without too much regret. Plus, a little knowledge to play can get you far, and [Elaine] can teach you the essential, “all the pop songs use it”, four chords with her Arduino powered LED Ukulele.

As first step, [Elaine] drilled holes in her ukulele’s fingerboard to place some LEDs at all the positions required to play the four chords C, G, Am, and F. Connected to an Arduino attached to the ukulele’s back, each chord will light up its associated LEDs to indicate the finger positions required to play the chord itself. Taking the teaching part a step further, her next step is to extend each LED with a second, light sensing one, and read back if the fingers are placed at the correct position.

[Elaine] has already plans to turn the ukulele into an interactive game next. And if four chords are eventually not enough for you anymore, have a look at another LED based project teaching to play any major, minor and major seventh chord on the ukulele.

This Unique Take on LED Cubes Uses Glass

LED cubes, while fascinating, aren't particularly new. We've seen quite a few of them. However, this one, made by Instructibles user mosivers, adds a new twist.

Read more on MAKE

The post This Unique Take on LED Cubes Uses Glass appeared first on Make: DIY Projects and Ideas for Makers.

There’s More To MIDI Than Music – How About A Light Show?

MIDI instruments and controllers are fun devices if you want to combine your interest in music and electronics in a single project. Breaking music down into standardized, digital signals can technically turn anything with a button or a sensor into a musical instrument or effect pedal. On the other hand, the receiving end of the MIDI signal is mostly overlooked.

[FuseBerry], a music connoisseur with a background in electronics and computer science, always wanted to build a custom MIDI device, but instead of an instrument, he ended up with a MIDI controlled light show in the shape of an exploded truncated icosahedron ([FuseBerry]’s effort to look up that name shouldn’t go unnoticed). He designed and 3D-printed all the individual geometric shapes, and painstakingly equipped them with LEDs from a WS2818B strip. An Arduino Uno controls those LEDS, and receives the MIDI signals through a regular 5-pin DIN MIDI connector that is attached to the Arduino’s UART interface.

The LEDs are mapped to pre-defined MIDI notes, so whenever one of them is played, and their NoteOn message is received, the LEDs light up accordingly. [FuseBerry] uses his go-to DAW to create the light patterns, but any software / device that can send MIDI messages should do the trick. In the project’s current state, the light pattern needs to be created manually, but with some adjustments to the Arduino code, that could be more automated, something along the lines of this MIDI controlled Christmas light show.

An LED Effect for Every Occasion

Quality software development examples can be hard to come by. Sure, it’s easy to pop over to Google and find a <code> block with all the right keywords, but having everything correctly explained can be hit or miss. And the more niche the subject, the thinner the forum posts get. Bucking the downward trend [HansLuijten] provides an astoundingly thorough set of LED strip patterns in his comprehensive post titled Arduino LED strip effects.

Don’t let the unassuming title lead you astray from the content, because what’s on offer goes beyond your average beginner tutorial on how to setup a strand of NeoPixels. [HansLuijten] is thorough to a fault; providing examples for everything from simple single color fades and classic Cylon eyes to effects that look like meteors falling from the sky. Seriously! Check out the video after the break. Those chasing lights you see around theater signs? Check. Color twinkle and sparkle? Check. Color wipes and rainbow fades? Check, and check.

At this point, an average forum post would be a jumbled mess of source which only works on an authentic Arduino Duemilanove running at 3.3v sitting on top of the 2nd printing of the author’s favorite issue of Make. But not here! These samples work with Adafruit’s easy to use NeoPixel library as well as FastLED, the quickest pixel in the West. On top of that the examples are clear and concise and explanation is plentiful. But the best part is definitely that each effect has a video clearly showing what it looks like.

If only everything were this easy to use, the open source revolution would already be here.

An Arduino-powered backlit Clemson Tiger Paw

Most people support their school or favorite sports team by buying a shirt or tuning into games. Jacob Thompson, however, took things one step further and created his own Arduino-powered, backlit Clemson Tiger Paw.

Thompson’s “WallPaw,” as he calls it, uses an Arduino Uno to receive signals from an infrared remote and to pick up sounds with a small microphone. This information is passed on to an Arduino Mega, which controls a five-meter-long strip of WS2812 LEDs to provide lighting effects.

He notes that it would be possible to use only one Arduino board for everything, but patterned his code after this tutorial that included two. The paw itself is cut out of wood and clear acrylic, allowing the lights underneath to shine through nicely.

You can see the build in action below and find more details on Thompson’s website here.

Hack Your Car into the Future with an LED Heads-Up Display

This LED heads-up display is a simple modification for your car, but it makes your car look very futuristic.

Read more on MAKE

The post Hack Your Car into the Future with an LED Heads-Up Display appeared first on Make: DIY Projects and Ideas for Makers.

An interactive LED floor to get the dance party started

If you want a light-up dance floor for your next wedding or other special event, you can rent one; however, that can be quite expensive. On the other hand, you and your hacker friends can always build one. How hard can that be?

Turns out, very hard. While it may be simple to get one translucent panel to illuminate with LEDs, this 17-square-foot interactive dance floor used 64 panels with four lighting cells in each, for a total of 256 lighting arrays and 7,680 RGBs arranged as 2,560 addressable pixels.

Even with some advanced tools like a pick-and-place machine for PCB manufacturing, as well as a laser cutter, it still took volunteers many hours over the course of 11 months to get it working. LED control is accomplished via a Teensy 3.1, while 256 pressure switches under the surface are read by an Arduino Mega.

You can see more details of the impressive project in the video below (including a round of multi-player Dance Dance Revolution) and a few more technical details in AvBrand’s write-up here.