Posts with «glass» label

Vacuum Chamber Gets Automation

[Nick] does a lot of custom work with vacuum tubes. So much so that he builds his own vacuum tubes of various shapes, sizes, and functions right on his own workbench. While the theory of vacuum tubes is pretty straightforward, at least to those of us who haven’t only been exposed to semiconductors, producing them requires some specialized equipment. A simple vacuum won’t get you all the way there, and the complexity of the setup that’s needed certainly calls for some automation.

The vacuum system that [Nick] uses involves three sections separated by high-vacuum valves in order to achieve the pressures required for vacuum tube construction. There’s a rough vacuum section driven by one pump, a high vacuum section driven by a second pump, and a third section called the evac port where the tube is connected. Each second must be prepared properly before the next section can be engaged or disengaged. An Arduino Pro is tasked with all of this, chosen for its large amount of ADC inputs for the instrumentation monitoring the pressures in each section, as well as the digital I/O to control the valves and switches on the system.

The control system is built into a 19-inch equipment rack with custom faceplates which outline the operation of the vacuum system. A set of addressable LEDs provide the status of the various parts of the system, and mechanical keyboard switches are used to control everything, including one which functions as an emergency stop. The automation provided by the Arduino reduces the chances for any mistakes to be caused by human error, allows the human operator to focus on other tasks like forming the glass, and can also react much faster to any potentially damaging situations such as the high-pressure pump being exposed to atmospheric pressure.

[Nick] might look a little familiar to some of us as well. If you can’t quite place him, he did a talk at Hackaday Supercon 2022 detailing all of the intricacies of building one’s own vacuum tubes. Since getting into the somewhat niche field of constructing vacuum tubes, he’s gone on to produce all kinds of specialty devices and his YouTube channel is definitely worth a watch.

Thanks to [M] for the tip!

The Precise Science Of Whacking A Wine Glass

It’s common knowledge that tapping a wine glass produces a pitch which can be altered by adjusting the level of the tipple of choice inside. By filling twelve glasses with different amounts of liquid and tuning them to the twelve notes of the scale, it’s possible to make a one-octave instrument – though the speed and polyphony are bottle-necked by the human operator. If you think it sounds like a ripe project for automation, you’re correct: [Bitluni’s lab] has done what needed to be done, and created a MIDI instrument which plays the glasses using mallets.

Electronically it’s a simple build – some 12 V solenoids driven by MOSFETs, with an Arduino in charge. For the mechanical build, a 3D printer proved very useful, as each mallet could be made identical, ensuring a consistent tone across all glasses. Rubber covers printed in flexible filament were fitted to reduce the overtones and produce a clearer sound. [Bitluni] also utilised different types of glasses for the low and high pitches, which also helped to improve the clarity of the tone.

MIDI is of course the perfect protocol for this application; simple, lightweight and incredibly widely used, it’s the hacker’s delight for projects like this. The instrument can perform pre-programmed sequences, or be played live with a MIDI controller. Both of these are shown in the video after the break – stick around for a unique rendition of Flight Of The Bumblebee. For a more compact wine glass based music creation solution, we recommend this nifty project, which alters pitch using a water balloon raised and lowered into the glass by a servo. 

Hack a Day 31 Jul 16:00

This Unique Take on LED Cubes Uses Glass

LED cubes, while fascinating, aren't particularly new. We've seen quite a few of them. However, this one, made by Instructibles user mosivers, adds a new twist.

Read more on MAKE

The post This Unique Take on LED Cubes Uses Glass appeared first on Make: DIY Projects and Ideas for Makers.

Pong In Real Life, Mechanical Pong

[Daniel Perdomo] and two of his friends have been working on a mechanical version of Pong for the past two years. We can safely say that the final result is beautiful. It’s quite ethereal to watch the pixe–cube move back and forth on the surface.

[Daniel] has worked in computer graphics for advertising for more than 20 years. However, he notes that neither he nor his friends had any experience in mechanics or electronics when they began. Thankfully, the internet (and, presumably, sites like Hackaday) provided them with the information needed.

The pong paddles and and pixel (ball?) sit onto of a glass surface. The moving parts are constrained to the mechanics with magnets. Underneath is a construction not unlike an Etch A Sketch for moving the ball while the paddles are just on a rail with a belt. The whole assembly is made from V-groove extrusion.

Our favorite part of the build is the scroll wheel for moving the paddle back and forth. For a nice smooth movement with some mass behind it, what’s better than a hard-drive platter? They printed out an encoder wheel pattern and glued it to the surface. The electronics are all hand-made. The brains appear to be some of the larger Arduinos. The 8-bit segments, rainbow LEDs, etc were build using strips glued in place with what looks like copper foil tape connecting buses. This is definitely a labor of love.

It really must be seen to be understood. The movement is smooth, and our brains almost want to remove a dimension when watching it. As for the next steps? They are hoping to spin it up into an arcade machine business, and are looking for people with money and experience to help them take it from a one-off prototype to a product. Video after the break.


Filed under: classic hacks, Virtual Reality

Crystal doorbell helps class up the joint

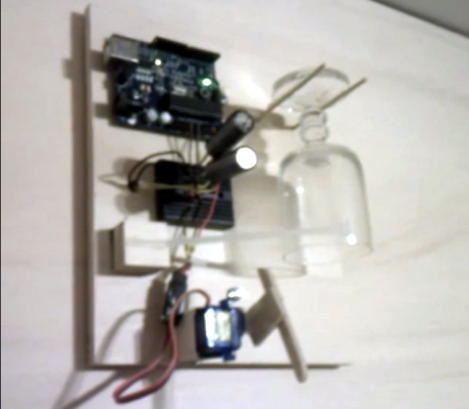
Even if you live in a dump this quick build will make your doorbell sound high-class. The new rig uses a crystal goblet to alter you of guests at the door. We suppose the room-silencing sound of flatware on a wine glass does make a great attention getter.

For [Tobias] the hardest part of the build was getting his wife to sign off on it. But he says the 1970′s era original was looking pretty shabby, which kind of made his argument for him. It took just two hours to develop and install the replacement. It uses a servo motor with an articulated striker to ping the glass which is hanging inverted between two pegs. The original AC transformer (which are most often 16V) was used to power the Arduino. He built a simple rectifier along with a big smoothing capacitor to make sure the Arduino doesn’t reset when voltage dips. Although it’s not mentioned in his comments, we’d bet the doorbell wire has been rerouted to connect directly to the Arduino, rather than remain patched into the power loop.

Don’t miss the clip after the break to hear how great this thing really does sound.


Filed under: arduino hacks, home hacks
Hack a Day 26 Sep 17:01

Hipster chandelier

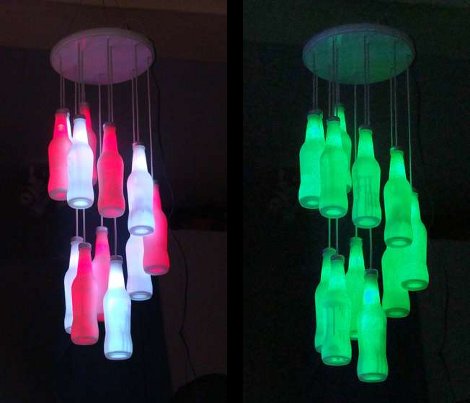
This chandelier is something we’d expect to see on sale in the local gallery store. [Starkec] made it a couple of years back and we just love the look. The materials are pretty common, and you can throw it together in an afternoon.

The diffuser are made from clear glass soda bottles. After removing the labels and giving them a good cleaning, they were each set upside down and sprayed with some glass frosting spray. A four-conductor telephone wire serves both as the support for the bottle and electrical path for the RGB LED inside of each. The original screw cap for the bottles makes it a twist to install them after the soldering is done. There are two common color buses so that alternating colors can be shown at the same time. After seeing the video we think you’ll agree that the wiring scheme makes for some great animated effects.

[Thanks Craig]


Filed under: led hacks
Hack a Day 28 May 19:01
arduino  bottle  chandelier  glass  lamp  led hacks  light  rgb