Posts with «atari» label

Vintage Atari Becomes Modern Keyboard

The modern keyboard enthusiast is blessed with innumerable choices when it comes to typing hardware. There are keyboards designed specifically for gaming, fast typing, ergonomics, and all manner of other criteria. [iot4c] undertook their own build for no other reason than nostalgia – which sounds plenty fun to us.

An Arduino Leonardo is pressed into service for this hack. With its USB HID capabilities, it’s perfectly suited for custom keyboard builds. It’s built into a working Atari 65XE computer, and connected to the keyboard matrix. The Keypad and Keyboard libraries are pressed into service to turn keypresses on the 80s keyboard into easily digseted USB data.

There’s plenty of room inside the computer for the added hardware, with the USB cable neatly sneaked out the rear. [iot4c] notes that everything still works and the added hardware does not cause any problems, as long as it’s not used as a computer and a keyboard at the same time.

It’s possible to do a similar hack on the Commodore 64, too. If you’re doing tricky keyboard builds yourself, you know where to send ’em.

Racing the Beam and Dropping Some Beats

The heart of the Atari 2600 wasn’t the 6502 (or the 6507 for the pedants), it was the TIA chip. This is the chip responsible for drawing graphics on the display, racing the beam, and extremely limited support for sound generation. We haven’t seen many attempts of using the Atari 2600 for chiptunes, but that doesn’t mean it can’t be done. [John Sutley]’s Syndrum, a take on an Atari 2600 drum machine is nearly a work of art. It’s a custom cartridge for the wood-paneled Atari, and an impressive input device that turns this classic console into a beat machine

Did the Atari 2600 ever come with a drum machine cartridge? Maybe. Probably not. [John] originally built this project to experiment with the TIA chip, but found it was less tonal than a kazoo. That struck ‘Atari synthesizer’ off the list and replaced it with an ‘Atari drum machine’. There are two key parts of the build here, the first being a repurposed Asteroids cartridge that had the PROM replaced with a ZIF socket. This allows [John] to easily burn new code to an EEPROM, stuff it in the socket, and run it on the Atari. All the code was developed with batari Basic, a BASIC-inspired language that spits out .bin files for the Atari.

But running code on the Atari is just one half of this build. To do a drum machine, you somehow need to tell the Atari when to play each sound. Given the lack of expansion capabilities for the Atari, [John] turned to the controller port. The Syndrum uses Arduino Nano to bridge the DE9 controller connector to a MIDI port. Yes, it’s real MIDI, on a machine that could probably never do MIDI natively (although we’d love to see someone try).

Need a video of this mind-blowing hack in action? Here you go:

Pong In Real Life, Mechanical Pong

[Daniel Perdomo] and two of his friends have been working on a mechanical version of Pong for the past two years. We can safely say that the final result is beautiful. It’s quite ethereal to watch the pixe–cube move back and forth on the surface.

[Daniel] has worked in computer graphics for advertising for more than 20 years. However, he notes that neither he nor his friends had any experience in mechanics or electronics when they began. Thankfully, the internet (and, presumably, sites like Hackaday) provided them with the information needed.

The pong paddles and and pixel (ball?) sit onto of a glass surface. The moving parts are constrained to the mechanics with magnets. Underneath is a construction not unlike an Etch A Sketch for moving the ball while the paddles are just on a rail with a belt. The whole assembly is made from V-groove extrusion.

Our favorite part of the build is the scroll wheel for moving the paddle back and forth. For a nice smooth movement with some mass behind it, what’s better than a hard-drive platter? They printed out an encoder wheel pattern and glued it to the surface. The electronics are all hand-made. The brains appear to be some of the larger Arduinos. The 8-bit segments, rainbow LEDs, etc were build using strips glued in place with what looks like copper foil tape connecting buses. This is definitely a labor of love.

It really must be seen to be understood. The movement is smooth, and our brains almost want to remove a dimension when watching it. As for the next steps? They are hoping to spin it up into an arcade machine business, and are looking for people with money and experience to help them take it from a one-off prototype to a product. Video after the break.


Filed under: classic hacks, Virtual Reality

Atari 2600 Hackback?

I've had a clean 1980 Atari VCS CX2600A for a dozen years or so, with joysticks, paddles, power brick, and cartridges, but the video output was always terrible, and I couldn't get any useful image out for a few years.

I followed (one of) Ben Heck's instructions on getting composite video out, but while everything checks out circuit-wise, and I get some video output, it was dirty and I couldn't stabilize it. Not a surprise since it wasn't working well to begin with!

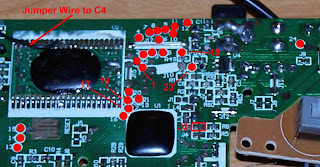
Reading about the Flashback 2 from a few years ago, it turns out there's a way to add a cartridge port to it for playing old games. Instead of using the Flashback to make something even smaller, I wonder about going the other way: transplanting the Flashback 2 into the original 4-switch VCS, using as much original hardware as possible. It doesn't look like anybody has gone in this direction, but thankfully the VCS is well documented online; even the original service manual in PDF. "Atari Hackback" seems like an appropriate project name. Thanks to Craigslist, it took a day to find a clean Flashback 2, and this handy reference shows where the cartridge pins go. There are a LOT of signals to reroute, but I'd like to preserve the hardware's connection to the PCB, so will need to find other solder points for attaching leads.
Jeff's Arduino Blog 20 Jan 22:32
2600  atari  flashback 2  vcs