When attempting to secure something, whether it’s a computer, sensitive data, or valuables, there’s always going to be a way to break that security. It might be impossibly hard, like taking centuries to brute-force an encryption algorithm, but it’s weakness is still there. And, like the future might make certain encryption obsolete, modern electronics has made security of the past somewhat obsolete as well. [Startup Chuck] has been using tools the creators of safes from the late 1800s could probably not have imagined.
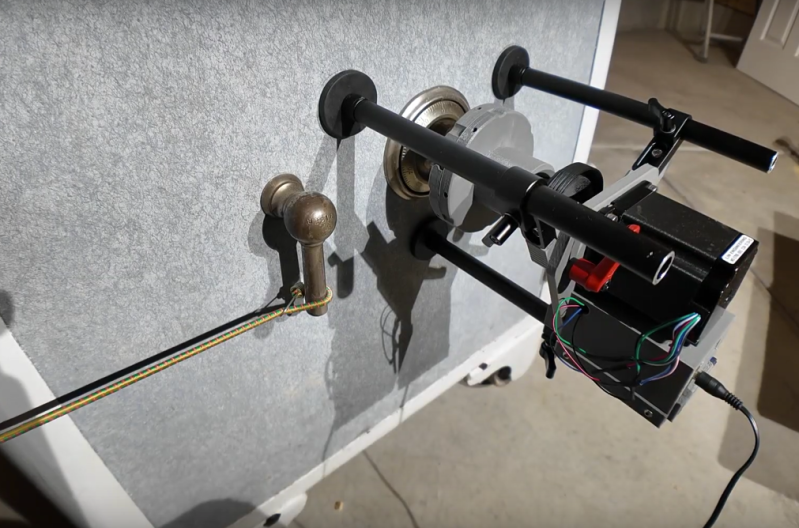
The tool that [Startup Chuck] has come up with is known as an autodialer in the safe-cracking world, and as its name suggests it automates the process of opening the safe by trying as many combinations as possible. The autodialer attaches to the safe with three magnetic feet and couples to the dial through a chuck attached to a magnetic clutch, which allows the autodialer to disengage as soon as the correct combination is found. It’s driven with a stepper motor which can test out combinations so fast that [Startup Chuck] needed to take 240 fps video and slow it down to make sure that the mechanism was behaving properly.
The autodialer itself can’t actually open the safe, though. The last step of the process is taken care of by a bungie cord, attached to the safe handle to pre-tension it enough so that when the correct combination is finally entered the safe pops open automatically. For anyone looking to duplicate the project, [Startup Chuck] has added the program code to a GitHub page. If you’re looking at a more modern safe, though, there are of course ways to crack their security systems as well.
Over the years, artists have been creating art depicting weapons of mass destruction, war and human conflict. But the weapons of war, and the theatres of operation are changing in the 21st century. The outcome of many future conflicts will surely depend on digital warriors, huddled over their computer screens, punching on their keyboards and maneuvering joysticks, or using devious methods to infect computers to disable or destroy infrastructure. How does an artist give physical form to an unseen, virtual digital weapon? That is the question which inspired [Mac Pierce] to create his latest Portrait of a Digital Weapon.
[Mac]’s art piece is a physical depiction of a virtual digital weapon, a nation-state cyber attack. When activated, this piece displays the full code of the Stuxnet virus, a worm that partially disabled Iran’s nuclear fuel production facility at Natanz around 2008.
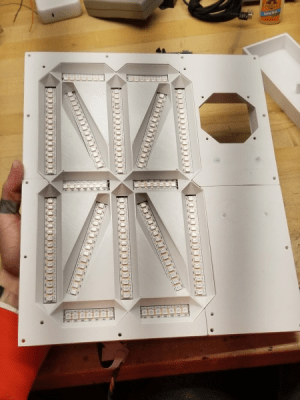
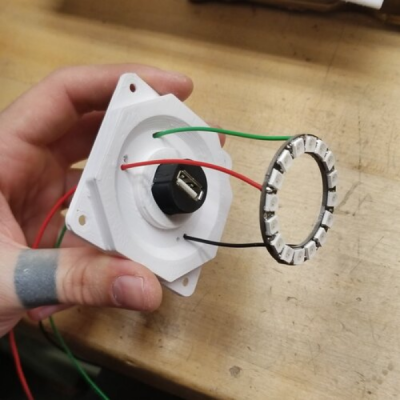
It took a while for [Mac] to finalize the plan for his design. He obtained a high resolution satellite image of the Iranian Natanz facility via the Sentinel Hub satellite imagery service. This was printed on a transparent vinyl and glued to a translucent poly-carbonate sheet. Behind the poly-carbonate layer, he built a large, single digit 16-segment display using WS2812 addressable LED strips, which would be used to display the Stuxnet code. A bulkhead USB socket was added over the centrifuge facility, with a ring of WS2812 LEDs surrounding the main complex. When a USB stick is plugged in, the Stuxnet code is displayed on the 16-segment display, one character at a time. At random intervals, the LED ring around the centrifuge building lights up spinning in a red color to indicate centrifuge failure.
The 16-segment display was built on an aluminum base plate, with 3D printed baffles to hold the LED strips. To hold the rest of the electronics, he built a separate 3D printed frame which could be added to the main art frame. Since this was too large to be printed in one piece on the 3D printer, it was split in parts, which were then joined together using embedded metal stud reinforcement to hold the parts together. Quite a nice trick to make large, rigid parts.
An Adafruit Feather M0 micro-controller board, with micro SD-card slot was the brains of the project. To derive the 5 V logic data signal from the 3.3 V GPIO output of the Feather, [Mac] used two extra WS2812 LEDs as level shifters before sending the data to the LED strips. Driving all the LEDs required almost 20 W, so he powered it using USB-C, adding a power delivery negotiation board to derive the required juice.
The Arduino code is straightforward. It reads the characters stored on the SD-card, and sends them sequentially to the 16-segment display. The circular ring around the USB bulkhead also lights up white, but at random intervals it turns red to simulate the speeding up of the centrifuges. Detecting when the USB stick gets plugged in is another nice hack that [Mac] figured out. When a USB stick is plugged in, the continuity between the shell (shield) and the GND terminal was used to trigger a GPIO input.
Cyber warfare is here to stay. We are already seeing increasing attacks on key infrastructure installations by state as well as non-state actors around the world. Stuxnet was one of the first in this growing category of malicious, weaponized code. Acknowledging its presence using such a physical representation can offer a reminder on how a few lines of software can wreak havoc just as much as any other physical weapon. Check out the brief project video after the break.
Spending an hour or two around any consumer-level padlock or house deadbolt lock with a simple lockpicking kit will typically instil a good amount of panic and concern about security. While it’s true that any lock can be defeated, it’s almost comically easy to pick basic locks like this. So, if you’re looking for a level of security that can’t be defeated in two minutes with a tiny piece of metal, you might want to try something a little more advanced.
This project stemmed from an idea to use a YubiKey, a USB hardware token typically used for two-factor authentication, for physical locks instead. The prototype was built around an Arduino UNO, and all of the code and build instructions are available on the project’s site. The creator, [rprinz08], does not have one built inside of a secure enclosure so that would remain an exercise for the reader, but the proof-of-concept is interesting and certainly useful.
While digital keys like this can have their own set of problems (as all locks do), this would be a great solution for anyone needing to lock up anything where physical keys are a liability or a nuisance, where logging is important, or where many people need access to the same lock. The open source code and well-known platform make it easy for anyone to build, too.
The Ford Securicode, or the keyless-entry keypad available on all models of Ford cars and trucks, first appeared on the 1980 Thunderbird. Even though it’s most commonly seen on the higher-end models, it is available as an option on the Fiesta S — the cheapest car Ford sells in the US — for $95. Doug DeMuro loves it. It’s also a lock, and that means it’s ready to be exploited. Surely, someone can build a robot to crack this lock. Turns out, it’s pretty easy.
The electronics and mechanical part of this build are pretty simple. An acrylic frame holds five solenoids over the keypad, and this acrylic frame attaches to the car with magnets. There’s a second large protoboard attached to this acrylic frame loaded up with an Arduino, character display, and a ULN2003 to drive the resistors. So far, everything you would expect for a ‘robot’ that will unlock a car via its keypad.
The real trick for this build is making this electronic lockpick fast and easy to use. This project was inspired by [Samy Kamkar]’s OpenSesame attack for garage door openers. In this project, [Samy] didn’t brute force a code the hard way by sending one code after another; (crappy) garage door openers only look at the last n digits sent from the remote, and there’s no penalty for sending the wrong code. In this case, it’s possible to use a De Bruijn sequence to vastly reduce the time it takes to brute force every code. Instead of testing tens of thousands of different codes sequentially, this robot only needs to test 3125, something that should only take a few minutes.
Right now the creator of this project is putting the finishing touches on this Ford-cracking robot. There was a slight bug in the code that was solved by treating the De Bruijn sequence as circular, but now it’s only a matter of time before a 1993 Ford Taurus wagon becomes even more worthless.
Of all the ways to open up a lock, there are some tried and true methods. Keys, combinations, RFIDs, picks, and explosives have all had their time and place, but now someone else wants to try something new. [Erik] has come up with a lock that opens when it is shown a pattern of colors.
The lock in question uses a set of color coded cards as the “keys”. When the cards are inserted in the lock, a TCS230 color sensor interprets the pattern on the cards and sends the information over to an Arduino Uno. From there, the Arduino can command the physical lock to open if the pattern is a match, although [Erik] is still waiting on the locking mechanism to arrive while he continues to prototype the device.
This is a fairly unique idea with a number of upsides. First, the code can’t be “stolen” from inside a wallet like RFID cards can. (Although if you can take a picture of the card all bets are off.) If you lose your key, you can simply print another one, and the device is able to handle multiple different keys and log the usage of each one. Additionally, no specialized equipment is needed to create the cards, unlike technologies that rely on magnetic strips. Of course, there’s always this classic way of opening doors if you’d rather go old school with your home locks.
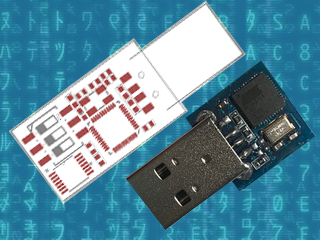
A while back, I wrote an article about Malduino, an Arduino-based, open-source BadUSB device. I found the project interesting so I signed up for an Elite version and sure enough, the friendly postman dropped it off in my mail box last Friday, which means I got to play around with it over the weekend. For those who missed the article, Malduino is USB device which is able to emulate a keyboard and inject keystrokes, among other things. When in a proper casing, it will just look like a USB flash drive. It’s like those things you see in the movies where a guy plugs in a device and it auto hacks the computer. It ships in two versions, Lite and Elite, both based on the ATmega32U4.
The Lite version is really small, besides the USB connector it only contains a switch, which allows the user to choose between running and programming mode, and a LED, which indicates when the script has finished running.
Original Malduino Elite sketch and Lite prototype
The Elite version is bigger, comes with a Micro-SD card reader and four DIP switches, which allow the user to choose which script to run from the card. It also has the LED, which indicates when a script has finished to run. This allows the user to burn the firmware only once and then program the keystroke injection scripts that stored in the Micro-SD card, in contrast to the Lite version which needs to be flashed each time a user wants to run a different script.
These are the two Malduinos and because they are programmed straight from the Arduino IDE, every feature I just mentioned can be re-programmed, re-purposed or dropped all together. You can buy one and just choose to use it like a ‘normal’ Arduino, although there are not a lot of pins to play around with. This freedom was one the first things I liked about it and actually drove me to participate in the crowd-funding campaign. Read on for the full review.
The Hardware
Malduino Elite vs USB flash drive
So the Elite board arrived as schedule and I found myself some time to look an it. Despite being longer than the Lite version, it’s still quite small, measuring roughly 4.6 cm x 1.1 cm (around 1.8 in x 0.43 in), which you can easily adapt to an old USB case, although you’ll have to cut some holes for the DIP switches and the Micro-SD card. In the crowd-funding campaign, the original sketch was for a 3 DIP switch version but the final Elite has four, which I found nice. I plugged it in to an old computer, after some consideration about which firmware it could ship with and what it could do to my laptop, and sure enough a red LED appeared. And that was it. Nothing else.
After playing around with the switches and exercising some RTFM, I realised that the firmware it ships with is probably some sort of Q.C. test for the dips, which makes the Malduino output the numbers 1 to 4 (actually simulating a keypress 1 to 4), depending on which switches are ON. So far so good, it works and I’ve seen worse PCB boards than this one. The board has holes for six pins, which I did not trace to the micro-controller and I don’t know what they are for.
The Setup
Setting up the Malduino requires that you have the Arduino IDE installed and up to date. You’ll need to open up the board manager and install the Sparkfun boards since the Elite is programmed as a ‘Sparkfun Pro Micro’ running at 3.3 V and 8 MHz. Then you need to go the Malduino Script Converter website which serves several purposes:
It allows to convert scripts between the Lite and Elite versions
It allows you to choose your keyboard layout language
It auto generates the Arduino project for you to import to the IDE
For the Elite version, just create a simple or even empty script to download the project, since when in ‘normal’ operation you will just flash the Malduino once and then use the Micro-SD card to store new scripts.
A note on flashing, if you are using a Debian-based distribution you might come across some problems like I did and not be able to flash the device. Like the user on this most useful post, my modem-manager was trying to talk with the Malduino after every reset and confused AVRDUDE to death. The solution is to add udev rules to “/etc/udev/rules.d/77-mm-usb-device-blacklist-local.rules”, kudos to [socrim]:
Since I’m running Linux, a quick shortcut to run a command is the ALT-F2 combination. So I script that into a file and save it to 1111.txt. The Elite searches the Micro-SD card for a file corresponding to the current dip switch state. Lets say the dip switch 2 and 4 are ON. In this case, the software tries to find the file named 0101.txt and parse its contents (as in dip switch order 1,2,3,4 and not the binary representation of the number 2 and 4) . When it finishes, the red LED starts flashing quickly. My simple script was:
DELAY 2000
ALT F2
DELAY 1000
STRING xterm
DELAY 1000
ENTER
DELAY 1000
STRING id
DELAY 1000
ENTER
But it was not working. Almost all commands worked but the ALT-F2 combo was not functioning properly. Close, but no cigar. No ALT-F2, no run command window. I’ve already lazy-browsed the source code a bit because I really didn’t have a lot of time on my hands but I needed to figure this out. The offending code was this:
A custom equals function was receiving size 3 for the strings of the Function keys, like “F2”. It was ok for “F10”, “F11” and “F12”, but failed for the rest of the keys. Changing 3 to 2 did the trick, but my Portuguese keyboard layout started to interfere with other test scripts. So I changed the code to include PT and UK layouts, changing them in a #define at compile time.
It would be cool if it was possible to access the SD card from the computer as a regular USB volume. I don’t know exactly how feasible that is, but it does not come with the current firmware. I still wanted to be able to output the content of an arbitrary file on the SD card to the screen, so I added another script function called ECHOFILEHEX that outputs the content of a file in the SD card as escape characters. For example, if the file a.txt contains “AAA”, the script command ECHOFILEHEX a.txt would output “\x41\x41\x41”. This can be useful to echo binary files into printf or echo -e, in Linux hosts at least.
Meanwhile, I had some trouble reading the original code. You know, we all have different programming styles. Don’t get me wrong, I’ve been known to write some messed-up spaghetti code. I sometimes browse old projects looking for some libs or classes I coded and wonder ‘who the heck wrote this steaming pile of code?’ Me, it was me. Anyway, I started to change a bit here and there and ended up changing pretty much the entire code. That’s the beauty and the curse of open-source. If you’re curious you can check it out here.
Conclusion
All in all, and despite some bumps, I’m quite pleased with Malduino. It is what I expected: an open platform for BadUSB attacks that’s in its infancy. It’s awesome that we can all tinker with it, modify it, make it better or just make it suit our needs. I hope a real community can start so we can see its full potential emerge. My short list includes simulating other USB devices, better SD card management, and expanding the device via the unused pins. What would you add?
It’s a long way to go and a lot can go wrong, so good luck with the project [Seytonic]!
MalDuino is an Arduino-powered USB device which emulates a keyboard and has keystroke injection capabilities. It’s still in crowdfunding stage, but has already been fully backed, so we anticipate full production soon. In essence, it implements BadUSB attacks much like the widely known, having appeared on Mr. Robot, USB Rubber Ducky.
It’s like an advanced version of HID tricks to drop malicious files which we previously reported. Once plugged in, MalDuino acts as a keyboard, executing previous configured key sequences at very fast speeds. This is mostly used by IT security professionals to hack into local computers, just by plugging in the unsuspicious USB ‘Pen’.
[Seytonic], the maker of MalDuino, says its objective is it to be a cheaper, fully open source alternative with the big advantage that it can be programmed straight from the Arduino IDE. It’s based on ATmega32u4 like the Arduino Leonardo and will come in two flavors, Lite and Elite. The Lite is quite small and it will fit into almost any generic USB case. There is a single switch used to enable/disable the device for programming.
The Elite version is where it gets exciting. In addition to the MicroSD slot that will be used to store scripts, there is an onboard set of dip switches that can be used to select the script to run. Since the whole platform is open sourced and based on Arduino, the MicroSD slot and dip switches are entirely modular, nothing is hardcoded, you can use them for whatever you want. The most skilled wielders of BadUSB attacks have shown feats like setting up a fake wired network connection that allows all web traffic to be siphoned off to an outside server. This should be possible with the microcontroller used here although not native to the MalDuino’s default firmware.
For most users, typical feature hacks might include repurposing the dip switches to modify the settings for a particular script. Instead of storing just scripts on the MicroSD card you could store word lists on it for use in password cracking. It will be interesting to see what people will come up with and the scripts they create since there is a lot of space to tinker and enhanced it. That’s the greatness of open source.
You can watch the prototype in action in the video:
We’ve been waiting for this one. A worm was written for the Internet-connected Arduino Yun that gets in through a memory corruption exploit in the ATmega32u4 that’s used as the serial bridge. The paper (as PDF) is a bit technical, but if you’re interested, it’s a great read.
The crux of the hack is getting the AVR to run out of RAM, which more than a few of us have done accidentally from time to time. Here, the hackers write more and more data into memory until they end up writing into the heap, where data that’s used to control the program lives. Writing a worm for the AVR isn’t as easy as it was in the 1990’s on PCs, because a lot of the code that you’d like to run is in flash, and thus immutable. However, if you know where enough functions are located in flash, you can just use what’s there. These kind of return-oriented programming (ROP) tricks were enough for the researchers to write a worm.
In the end, the worm is persistent, can spread from Yun to Yun, and can do most everything that you’d love/hate a worm to do. In security, we all know that a chain is only as strong as its weakest link, and here the attack isn’t against the OpenWRT Linux system running on the big chip, but rather against the small AVR chip playing a support role. Because the AVR is completely trusted by the Linux system, once you’ve got that, you’ve won.
Will this amount to anything in practice? Probably not. There are tons of systems out there with much more easily accessed vulnerabilities: hard-coded passwords and poor encryption protocols. Attacking all the Yuns in the world wouldn’t be worth one’s time. It’s a very cool proof of concept, and in our opinion, that’s even better.
What do you do with an RFID chip implanted in your body? If you are [gmendez3], you build a bike lock that responds to your chip. The prototype uses MDF to create a rear wheel immobilizer. However, [gmendez3] plans on building a version using aluminum.
For the electronics, of course, there’s an Arduino. There’s also an RC522 RFID reader. We couldn’t help but think of the Keyduino for this application. When the system is locked, the Arduino drives a servo to engage the immobilizer. To free your rear wheel, simply read your implanted chip. The Arduino then commands the servo to disengage the immobilizer. You can see the system in operation in the video below.
We’ve talked about RFID implants before. Using them as keys for your preferred transportation isn’t a unique idea, of course. Is this is the killer application that makes you want to get chipped? We doubt it, but we admit it is a matter of personal preference.
Spritz itself is a neat cipher. Instead of taking in fixed blocks of data and operating on them, it allows you to process it in (almost) whatever chunks it comes in naturally, and then extract out the encrypted results piecewise. It works both as a two-way cipher and as a one-way hash function. It looks like Spritz is a one-stop-shop for all of your encryption needs, and now you can run it on your Arduino.
In case you are afraid of new implementations of new ciphers (and you should be), Spritz’s pedigree should help to put you at ease: it was developed by [Ron Rivest] to be a successor to his RC4 algorithm, and it incorporates a lot of the lessons learned about that algorithm over the past. This doesn’t exclude subtle flaws in the implementation of the library (no offence, [Abderraouf]!) or your work downstream, but at least the underlying algorithm seems to be the real deal.
[Abderraouf] links it in his writeup, but just for completeness, here’s the Spritz paper (PDF). What crypto libraries do you currently use for Arduino or microcontroller projects? We’ve been fans of XXTEA for ages, but more because it’s simple and small than because it’s secure. Spritz may be simple enough to implement easily, and still more secure. Sweet.


 The electronics and mechanical part of this build are pretty simple. An acrylic frame holds five solenoids over the keypad, and this acrylic frame attaches to the car with magnets. There’s a second large protoboard attached to this acrylic frame loaded up with an Arduino, character display, and a ULN2003 to drive the resistors. So far, everything you would expect for a ‘robot’ that will unlock a car via its keypad.