Posts with «switch» label

Custom Calculator Brings Us Back To The 70s

There are certain design aesthetics from every era that manage to survive the fads of their time and live throughout history. Ancient Greek architecture is still drawn upon for design inspiration in modern buildings, the mid-century modern style from the 60s still inspires various designs of consumer goods, and the rounded, clean looking cars from the 90s are still highly desirable qualities in automotive design. For electronics, though, we like this 70s-inspired calculator that [Aaron] recently built.

The calculator hearkens back to the days of calculators like the HP-29C with its large buttons and dot-matrix display. [Aaron] built the case out of various woods with a screen angled towards the user, and it uses a LCD display similar to those found in antique calculators. The brain of the calculator is an Arduino which fits easily into the case, and [Aaron] also built the keyboard from scratch with Cherry MX-style mechanical keys soldered together into a custom shape.

The software to run the calculator is fairly straightforward, but we are most impressed with the woodworking, styling, and keyboard design in this build. [Aaron] is also still ironing out some bugs with the power supply as it uses a DC-DC converter to power the device from a single lithium battery. For those who are more fond of early 2000s graphing calculators instead, be sure to take a look at this graphing calculator arcade cabinet.

Custom Macro Keyboard With Sweet Backlighting

From the smallest 60% keyboards for those with no desk space to keyboards with number pads for those doing data entry all day, there’s a keyboard size and shape for just about everyone. The only problem, even with the largest keyboards, is that they’re still fairly limited in what they can do. If you find yourself wishing for even more functionality, you might want to build something like this custom macro keyboard with built-in LED backlighting.

Rather than go with a standard mechanical keyboard switch like a Cherry MX, this build is based around TS26-2 pushbuttons with built-in LED lighting. [atkaper] only really needed one button for managing the mute button on MS Teams, but still built a total of eight switches into this keyboard which can all be individually programmed with different functions. The controller is an Arduino Leonardo and the enclosure was 3D printed.

Paired with the classic IBM Model M keyboard, this new macro keyboard adds plenty of functionality while also having control over LED backlighting. Macro keyboards are incredibly useful, especially with their ability to easily change function with control over the software that runs on them. The key to most builds is the 32U4 chip found in some Atmel microcontrollers which allows it to easily pass keyboard (and mouse) functionality to any computer its plugged in to.

Custom Macro Keyboard With RGB Lighting

From the smallest 60% keyboards for those with no desk space to keyboards with number pads for those doing data entry all day, there’s a keyboard size and shape for just about everyone. The only problem, even with the largest keyboards, is that they’re still fairly limited in what they can do. If you find yourself wishing for even more functionality, you might want to build something like this custom macro keyboard with built-in LED backlighting.

Rather than go with a standard mechanical keyboard switch like a Cherry MX, this build is based around TS26-2 pushbuttons with built-in LED lighting. [atkaper] only really needed one button for managing the mute button on MS Teams, but still built a total of eight switches into this keyboard which can all be individually programmed with different functions. The controller is an Arduino Leonardo and the enclosure was 3D printed.

Paired with the classic IBM Model M keyboard, this new macro keyboard adds plenty of functionality while also having control over LED backlighting. Macro keyboards are incredibly useful, especially with their ability to easily change function with control over the software that runs on them. The key to most builds is the 32U4 chip found in some Atmel microcontrollers which allows it to easily pass keyboard (and mouse) functionality to any computer its plugged in to.

The best Nintendo Switch accessories you can buy

It’s shaping up to be a good year for the Nintendo Switch, with games like New Pokémon Snap, The Great Ace Attorney Chronicles and Famicom Detective Club giving us plenty of reasons to keep playing the now four year old console. The new OLED version might add a bit of extra pep to your game graphics, but a better Switch experience doesn’t have to cost $350. You can upgrade your setup with the right accessories, and we’ve got a few recommendations for different uses.

For Switches that stay at home

Devindra Hardawar

The first thing you’ll want to pick up for your Switch or Switch Lite is a microSD card. After all, there are a lot of great games to download and your system has limited storage space. It’s also the only way you’ll get screen captures off your console if you haven’t connected it to Facebook or Twitter. Samsung's EVO Select line is recommended for its speed and reliability, but it’s the price that you’re likely to find most appealing, with a 256GB card running only $36 and the more spacious 512GB costing $70.

Buy Samsung Evo microSD card (256GB) at Amazon - $36Buy Samsung Evo microSD card (512GB) at Amazon - $70

It might be tempting to pick up a third-party dock for your Switch. Don’t. There have been reports of Switches getting bricked by non-Nintendo docks, which means you’re stuck with the official $100 model. However, if all you’re looking for is a change in look, you can buy a skin for your dock (and the Joy-Cons too) that will liven things up. Dbrand offers a range of bold, vibrant colors, and the skins won’t damage your Switch if removed. If you’d prefer something with a design, Slickwraps offers marble and camo patterns as well some attractive Super Nintendo and Super Famicom-themed skins.

If your Switch gets a lot of use, chances are you may have picked up some extra Joy-Cons and a Pro Controller. It’s a real pain to have to charge multiple pairs of Joy-Cons on one Switch, however, so a charging dock can be a great buy. PowerA’s Pro Controller charging dock has room for one pair of Joy-Cons and a Pro Controller, keeping them tidy and powered up. If you don’t need a place to put your Pro Controller, the regular charging dock can accommodate two sets of Joy-Cons. You can also use them for other controllers that slide onto your Switch’s rails like the official NES-style controllers or Hori’s Split Pad Pro.

Buy Dbrand skins starting at $8Buy Slickwraps starting at $35Buy PowerA charging dock at Amazon - $36

Kris Naudus / Engadget

I wasn’t a huge fan of the Labo VR kit from 2019, mostly due to its price and a lack of game support. But if you’re interested in trying out the virtual reality modes in games like Super Mario Odyssey and Legend of Zelda: Twilight Princess, the VR starter kit is a good purchase. It comes with the basic headset and the blaster, which was easily the most fun of all the various Labo VR projects. It usually costs around $40, but Best Buy often puts it on sale for half that amount so be sure to keep an eye out.

Buy Labo VR starter kit at Amazon - $76

For Switches that travel often

Kris Naudus / Engadget

You’re going to need a case, that’s certain. It doesn’t need to be fancy, just enough to protect your Switch from getting bumped around in your bag. The AmazonBasics model is cheap, has 10 slots to hold additional Switch cards and a mesh pocket to store an extra charging cord or set of Joy-Cons. If you’re planning to take your entire setup, dock and all, Amazon also makes a larger storage case that can fit all the cords and controller accessories. If you need something smaller for your Switch Lite, the official case from Nintendo is incredibly slim and even comes with a screen protector. But it’s not made for carrying a lot of games. For that, we recommend TomToc’s line of Switch Lite cases, which are waterproof and come in a wide variety of colors to match your handheld for under $20.

Buy AmazonBasics case at Amazon - $10Buy AmazonBasics large case at Amazon - $27Buy TomToc case at Amazon - $18

Kris Naudus / Engadget

You probably already have a bag that you’re carrying around all your stuff in, but if you were looking for one specifically made for your Switch, how about this backpack from HORI? It’s specifically designed to hold a Nintendo Switch and all its accessories, and comes in Pokémon, Mario and Zelda designs. The company also makes less overtly nerdy bags, but where’s the fun in that?

If Animal Crossing is more your aesthetic, Target sells a charming collection of bags emblazoned with leaf or character patterns. The backpacks have a special pocket just for your Nintendo Switch, while the clutch purses are perfectly sized for the consoles while being super stylish to boot.

Buy HORI Backpack at Amazon - $45Buy Leaf Collection Mini Backpack at Target - $30Buy Animal Crossing messenger bag at Target - $50

Whether you hate the speakers on your Switch or just don’t want to bother those around you, you’re going to need a pair of headphones to listen to your games. Ideally you want something that doesn’t cost too much and can survive a beating in your bag, so if you don’t mind wires we’re still big fans of Turtle Beach’s Recon 70, which offers great sound in an affordable, lightweight form factor. However, if you just can’t stand cords and don’t mind dropping a bit of extra cash, check out the SteelSeries Arctis 1 or Razer’s Barracuda X headsets. They both come with a USB-C receiver you can plug directly into your console for a solid wireless connection, and the sound quality of either is among the best you’ll find in any gaming headset, especially for under $150.

If you already have a pair of wireless headphones you’re particularly attached to, you can use those with your Switch or Switch Lite by plugging HomeSpot’s 5.0 Audio Transmitter Adapter into the USB-C port. It’s rather diminutive and can slip into your case easily, and very affordable at only $30.

Buy Turtle Beach Recon 70 at Amazon - $40Buy SteelSeries Arctis 1 at Amazon - $100Buy Barracuda X at Razer - $100Buy HomeSpot’s 5.0 Audio Adapter at Amazon - $30

Kris Naudus / Engadget

One thing you definitely have to worry about if you game on the go often is battery life, and in those cases you’ll want to carry around an extra power bank. For your Switch there are two features you need to focus on, and that’s the ability to use a USB-C cord to connect, and a slim profile so it’ll fit inside your Switch case. The RavPower 26,800mAh power bank fits both those criteria perfectly, is rather affordable at $61, and can even charge your device as you play.

Occasionally you might want to make use of the Switch’s kickstand and play with a standard gamepad. The official Pro Controller is generally accepted to be the best available, but it’s also kind of cumbersome to lug around in your bag. If you’re trying to travel a little lighter and don’t mind a slightly smaller version, PowerA’s Enhanced Nano controller can do the job. In my testing I found it’s susceptible to electrical interference, but when you’re sitting right in front of the Switch on a table it should handle the task just fine. It even comes with a little cloth bag to protect the controller from dings and scratches.

Buy 26,800mAh power bank at RavPower - $48Buy PowerA Enhanced Nano controller at Amazon - $55

Maker Display to Ubidots MQTT button


See the original project on the ArduinoBasics Blog


Description

This tutorial will show you how to create a simple MQTT connection to Ubidots. You will also learn to configure the necessary MQTT subscription to a button on the Ubidots dashboard, and control a Maker Display (ESP-12E compitible board) from anywhere in the world. The process may seem a bit daunting at first, but hopefully by the end of this tutorial, you will feel comfortable creating your own Ubidots MQTT subscriptions.


Parts Required

  1. Maker Display 2 or Node MCU (ESP-12E) module
  2. NOVA programmer
  3. USB mini-B cable
  4. WiFi internet connection
  5. Ubidots account (free)

The Maker display 2 has an inbuilt ESP8266MCD WiFi module which will be used to create the MQTT connection to the Ubidots broker (online).


Ubidots Setup

This tutorial requires a FREE Ubidots account.
Go to this site to sign up: https://ubidots.com/education/
Once signed up, you will need to configure Ubidots using the following instructions.

Create a device

  1. Select: Devices > Devices
  2. Select: Create a Device (button)
  3. Select: Blank (from the available device list)
  4. Enter the "Maker Display" into the "Device name" field, "maker-display" into the "Device label" field, and click on "Create" button
  5. Select: the "Maker Display" device

Create a variable

  1. Select: "Add Variable" button, then select "Raw" from the two available options.
  2. Select: the "New Variable" to edit it
  3. Change the name to "Button 1", the description to "button1 variable" and the API label to "button1"

Create a dashboard

  1. Select: Data > Dashboard
  2. Select: Add new dashboard
  3. Change the Name to "Maker Display Dashboard", and update the date format to a suitable format. (press tick)

Add a Widget

  1. Select: "Add new Widget"
  2. Select: Switch (from the available widgets)
  3. Select: Add Variables
  4. Select: Maker Display > Button1 > tick
  5. Accept the default values for the Switch (Off=0, On=1), and press the tick
  6. You should now have a button called "Button1" associated with the "Maker Display" device, visible on the "Maker Display Dashboard"
  7. The button is "off".

Create a Ubidots TOKEN

  1. Select: "API Credentials" from the profile drop-down box in the top right corner.
  2. Click the blue "More" - located below the Tokens section
  3. Click on the round blue (+) button to create a NEW TOKEN.
  4. Change the name to "Maker Display Token" - and keep a record of TOKEN value. There is an icon which will allow you copy the TOKEN value to the clipboard.

Take note of key information

Now that the Ubidots Dashboard is set up, you will need to ensure you have 3 sets of information to insert into the code.

  1. Maker Display Token Value
  2. Button1 API label: "button1"
  3. Maker Display Device API Label: "maker-display"


Ubidots slideshow of the setup process

Slide Set created by Scott C with GoConqr


Arduino IDE

While there are many Arduino IDE alternatives out there, I would recommend that you use the official Arduino IDE for this project. I used the official Arduino IDE app (v1.8.5) for Windows 10.
Make sure to get the most up-to-date version for your operating system here.

Additional Boards Manager URLS

Make sure to add the following URLs to your "additional boards manager URL" setting:
  • File > Preferences > Additional Boards Manager URLS:
    • http://arduino.esp8266.com/stable/package_esp8266com_index.json
    • https://dl.espressif.com/dl/package_esp32_index.json

Select Tools > Board: "NodeMCU 1.0 (ESP-12E Module)" board.
Then check that you have the following settings:

  • Board:"NodeMCU 1.0 (ESP-12E Module)"
  • Flash Size:"4M(no SPIFFS)"
  • Debug port:"Disabled"
  • Debug Level:"None"
  • IwIP Variant:"v2 Lower Memory"
  • VTables:"Flash"
  • CPU Frequency:"80 MHz"
  • Exceptions:"Disabled"
  • Upload Speed:"115200"
  • Erase Flash:"Only Sketch"
  • Port: (Select your port)
  • Get Board Info
  • Programmer:"AVRISP mkII"


Libraries required

This tutorial makes use of two libraries: ESP8266WiFi.h and PubSubClient.h.

  • ESP8266WiFi.h : This library is required for the WiFi connection to the internet. More info.
  • PubSubClient.h : Is used to create an MQTT Client to handle the communication between the Ubidots MQTT broker and the Maker Display2 (or ESP-12E).

Both libraries can be installed via the library manager: Sketch > Include library > Manage Libraries


Arduino Code

Connect the NOVA programmer to the Maker Display 2

Remember that you will need to insert the 3 bits of information from the "Ubidots" section, into the code. You will also need to know your WiFI SSID name, and password. Copy the code below into the Arduino IDE, make the necessary changes in the sketch to reflect the API labels and tokens from your Ubidots account. Connect the USB cable to the computer, select the correct COM port (Tools > Port), then upload the code to the Maker display board.

The code is available on my GitHub repository. Or you can have a look at the fully commented code below.


Open the Serial monitor (ctrl + shift + M), ensure the Baud is set to 9600, and then press the button on the Ubidots Maker Display Dashboard. You should see messages appear in the Serial monitor that correspond with the state of the button.


Code Explained

A number of different information sources were utilised to construct the code above. These sources were acknowledged within. As noted before, the code uses two libraries, one to simplify the WiFi connection to the internet, and the other to simplify the connection of the Maker Display to the Ubidots MQTT broker.

setup()

The setup() function is used to establish the WiFi connection, set the MQTT broker, and define the callback function - which will be called each time the button on the Ubidots dashboard is pressed.

loop()

The loop() function is responsible for connecting to the MQTT broker, and polling for messages from the MQTT broker using the client.loop() function.

callback()

The callback() function first checks the "topic" message coming from the MQTT broker, and compares it to the buttonTopic variable. The buttonTopic variable in this sketch is equal to "/v1.6/devices/maker-display/button1/lv". You will notice that the variable is constructed using the "device API label", and the "button API label". The other components of the buttonTopic are always the same. eg.

"/v1.6/devices/{device label}/{variable label}/lv"

This comparison allows us to differentiate this particular button from other potential components on the Ubidots dashboard. The value of the button (on=1/off=0), is transmitted from the MQTT broker each time the button is pressed on the Ubidots Maker Display dashboard. It is captured by the "payload" variable in the callback function. If the payload variable is equal to 1 (on), then a Serial message will be transmitted "BUTTON ON". If the payload variable is equal to 0 (off), then a Serial message will be transmitted "BUTTON OFF". You will be able to see this message come through by opening the Serial Monitor (ctrl+shift+M) within the Arduino IDE.

MQTTconnect()

The MQTTconnect() function is responsible for connecting to the MQTT broker. It requires a Ubidots TOKEN, a unique MQTT client name and a pre-defined port (1883). In order to receive messages from the button on the Ubidots Maker Display dashboard, we need to subscribe to button. But first we need to construct the string location of the button variable.  
 
We do this using the sprintf() function.  
 
If you would like to learn more about the sprintf function have a look at my tutorial here.  
 
The sprintf function is used to construct the string in a specific format, and in this case it uses the DEVICE_LABEL, and VARIABLE_LABEL1, and assigns the string to the buttonTopic variable. Once constructed the buttonTopic variable is used to subscribe to the button on the Ubidots dashboard.

The program is instructed to retry the connection attempt every 2 seconds if it fails to connect for any reason.


Project in Action


Conclusion

Setting up the Ubidots dashboard and the Arduino IDE takes up the majority of the time in this project. Once all the configurations are made, the rest is pretty simple. I hope by the end of this tutorial, you will have learnt how to create a button on a Ubidots dashboard, and interface it with a Maker Display (ESP-12 compatible board).

While there are plenty of examples on the Ubidots website that will show you how to push data to the dashboard, I found that the opposite was not true. There are limited examples that show you how to control your device from a Ubidots widget. I know that this example is not that exciting, but hopefully, you understand the significance of the information, and understand how easy it would be to modify the sketch above to make it more exciting. However, I did not want to over-complicate the tutorial with other complexities. Perhaps in the next tutorial we will use the information gained here, to do something a bit more thrilling. But at least now you know the basics. We can now:

  • Program a Maker Display
  • Add widgets to a Ubidots dashboard
  • Control the Maker Display using widgets from a Ubidots dashboard (using MQTT)

If you found this tutorial helpful, please consider supporting me by buying me a virtual coffee/beer.

$3.00 AUD only
 

Social Media

You can find me on various social networks:

Follow me on Twitter: ScottC @ArduinoBasics.
I can also be found on Instagram, Pinterest, and YouTube.
And if all else fails, I have a server on Discord.


Arduino code - switch statement

Hi, I code a program for my autonomous robot. I am sending numbers from 0 to 8 from Raspberry pi to Arduino through Serial communication. I have Rasp code. But arduino code has some problems. Please can you tell me how to write it best? I want to use switch statement to choose direction for my robot/motors. But when I compile that code to arduino on robot - my robot start doing only default commands. Please why????


read more

Let's Make Robots 29 Dec 23:39

Arduino Boombox

Add sound or music to your project using the "Grove Serial MP3 Player".

An Arduino UNO will be used to control the Grove Serial MP3 player by sending it specific serial commands. The Grove Base Shield allows for the easy connection of Grove sensor modules to an Arduino UNO without the need for a breadboard. A sliding potentiometer, switch and button will be connected to the Base shield along with the Serial MP3 player. A specific function will be assigned to each of the connected sensor modules to provide a useful interface:

  • Sliding Potentiometer – Volume control
  • Button – Next Song
  • Switch – On/Off (toggle)
Once the MP3 module is working the way we want, we can then build a simple enclosure for it. Grab a shoe-box, print out your favourite design, and make your very own Arduino BOOMBOX!


Video

Watch the following video to see the project in action


Parts Required:

Optional components (for the BoomBox Enclosure):
  • Empty Shoe Box
  • Paper
  • Printer
  • Glue
If I had a 3D printer - I would have printed my own enclosure, but a shoebox seems to work just fine.


Putting it Together

Place the Grove Base shield onto the Arduino UNO,
and then connect each of the Grove Modules as per the table below.


If you do not have a Grove Base shield,
you can still connect the modules directly to the Arduino as per the table below:


When you are finished connecting the modules, it should look something like this:
  (ignore the battery pack):
 

As you can see from the picture above. You can cut holes out of the shoebox and stick the modules in place. Please ignore the battery pack, because you won't use it until after you have uploaded the Arduino code.


Arduino Sketch


  1
2
3
4
5
6
7
8
9
10
11
12
13
14
15
16
17
18
19
20
21
22
23
24
25
26
27
28
29
30
31
32
33
34
35
36
37
38
39
40
41
42
43
44
45
46
47
48
49
50
51
52
53
54
55
56
57
58
59
60
61
62
63
64
65
66
67
68
69
70
71
72
73
74
75
76
77
78
79
80
81
82
83
84
85
86
87
88
89
90
91
92
93
94
95
96
97
98
99
100
101
102
103
104
105
106
107
108
109
110
111
112
113
114
115
116
117
118
119
120
121
122
123
124
125
126
127
128
129
130
131
132
133
134
135
136
137
138
139
140
141
142
143
144
145
146
147
148
149
150
151
152
153
154
155
156
157
158
159
160
161
162
163
164
165
166
167
168
169
170
171
172
173
174
175
176
177
178
179
180
181
182
183
184
185
186
187
188
189
190
191
192
193


/* ===============================================================================
      Project: Grove Serial MP3 Player overview
       Author: Scott C
      Created: 9th March 2015
  Arduino IDE: 1.6.0
      Website: http://arduinobasics.blogspot.com/p/arduino-basics-projects-page.html

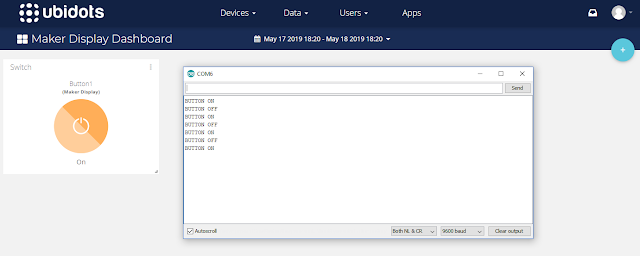
  Description: The following Arduino sketch will allow you to control a Grove Serial MP3 player
               with a Grove Sliding Potentiometer (volume), a Grove button (next song), 
               and a Grove Switch (on/off). It will also show you how to retrieve some useful information from the player. 
               Some functions are not used in this sketch,but have been included for your benefit. 
               
               Additional features and functionality can be found on the WT5001 voice chip datasheet 
               which I retrieved from here: http://goo.gl/ai6oQ9
               
               The Seeedstudio wiki was a very useful resource for getting started with the various Grove modules:
               http://goo.gl/xOiSCl
=============================================================================== */

#include <SoftwareSerial.h>
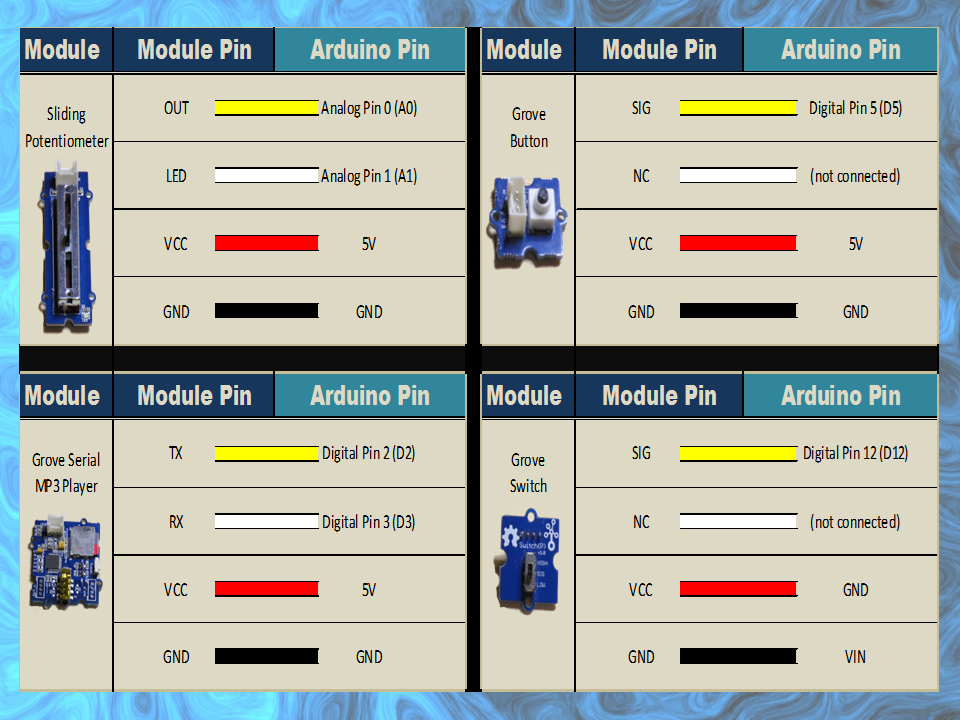
SoftwareSerial mp3(2, 3); // The Grove MP3 Player is connected to Arduino digital Pin 2 and 3 (Serial communication)
int potPin = A0; // The Sliding Potentiometer is connected to AnalogPin 0
int potVal = 0; // This is used to hold the value of the Sliding Potentiometer
byte mp3Vol = 0; // mp3Vol is used to calculate the Current volume of the Grove MP3 player
byte oldVol = 0; // oldVol is used to remember the previous volume level
int ledPin = A1; // The Grove sliding potentiometer has an onboard LED attached to Analog pin 1.

int switchPin = 12; // The Grove Switch(P) is connected to digital Pin 12
int switchStatus = 0; // This is used to hold the status of the switch
int switchChangeStatus = 0; // Used to identify when the switch status has changed

int buttonPin = 5; // The Grove Button is connected to digital pin 5
int buttonStatus = 0; // This is used to hold the status of the button


void setup(){
  //Initialise the Grove MP3 Module
  delay(2500);
  mp3.begin(9600);
  
        
  // initialize the pushbutton and switch pin as an input:
  pinMode(buttonPin, INPUT);
  pinMode(switchPin, INPUT);
  
  // set ledPin on the sliding potentiometer to OUTPUT
  pinMode(ledPin, OUTPUT);
  
  //You can view the following demostration output in the Serial Monitor
  demonstrate_GET_FUNCTIONS();     
}


void loop(){
  switchStatus = digitalRead(switchPin);
  if(switchStatus==HIGH){
    if(switchChangeStatus==LOW){ // When Arduino detects a change in the switchStatus (from LOW to HIGH) - play song
      setPlayMode(0x02);                     // Automatically cycle to the next song when the current song ends
      playSong(00,01);                       // Play the 1st song when you switch it on
      switchChangeStatus=HIGH;
    }
    
    potVal = analogRead(potPin); // Analog read values from the sliding potentiometer range from 0 to 1023
    analogWrite(ledPin, potVal/4); // Analog write values range from 0 to 255, and will turn LED ON once potentiometer reaches about half way (or more).
    mp3Vol = map(potVal, 0, 1023, 0,31); // Convert the potentometer reading (0 - 1023) to fit within the MP3 player's Volume range (0 - 31)
    if((mp3Vol>(oldVol+1))|(mp3Vol<(oldVol-1))){ // Only make a change to the Volume on the Grove MP3 player when the potentiometer value changes
      oldVol = mp3Vol;
      setVolume(mp3Vol);
      delay(10); // This delay is necessary with Serial communication to MP3 player
    }

    buttonStatus = digitalRead(buttonPin);
    if(buttonStatus==HIGH){ // When a button press is detected - play the next song
      playNextSong();
      delay(200); // This delay aims to prevent a "skipped" song due to slow button presses - can modify to suit.
    }
  } else {
    if(switchChangeStatus==HIGH){ // When switchStatus changes from HIGH to LOW - stop Song.
      stopSong();
      switchChangeStatus=LOW;
    }
  } 
}


// demonstrate_GET_FUNCTIONS  will show you how to retrieve some useful information from the Grove MP3 Player (using the Serial Monitor).
void demonstrate_GET_FUNCTIONS(){
        Serial.begin(9600);
        Serial.print("Volume: ");
        Serial.println(getVolume());
        Serial.print("Playing State: ");
        Serial.println(getPlayingState());
        Serial.print("# of Files in SD Card:");
        Serial.println(getNumberOfFiles());
        Serial.println("------------------------------");
}


// writeToMP3: is a generic function that aims to simplify all of the methods that control the Grove MP3 Player

void writeToMP3(byte MsgLEN, byte A, byte B, byte C, byte D, byte E, byte F){
  byte codeMsg[] = {MsgLEN, A,B,C,D,E,F};
  mp3.write(0x7E); //Start Code for every command = 0x7E
  for(byte i = 0; i<MsgLEN+1; i++){
    mp3.write(codeMsg[i]); //Send the rest of the command to the GROVE MP3 player
  }
}


/* The Following functions control the Grove MP3 Player : see datasheet for additional functions--------------------------------------------*/

void setPlayMode(byte playMode){
  /* playMode options:
        0x00 = Single song - played only once ie. not repeated.  (default)
        0x01 = Single song - cycled ie. repeats over and over.
        0x02 = All songs - cycled 
        0x03 = play songs randomly                                           */
        
  writeToMP3(0x03, 0xA9, playMode, 0x7E, 0x00, 0x00, 0x00);  
}


void playSong(byte songHbyte, byte songLbyte){ // Plays the selected song
  writeToMP3(0x04, 0xA0, songHbyte, songLbyte, 0x7E, 0x00, 0x00);            
}


void pauseSong(){ // Pauses the current song
  writeToMP3(0x02, 0xA3, 0x7E, 0x00, 0x00, 0x00, 0x00);
}


void stopSong(){ // Stops the current song
  writeToMP3(0x02, 0xA4, 0x7E, 0x00, 0x00, 0x00, 0x00);
}


void playNextSong(){ // Play the next song
  writeToMP3(0x02, 0xA5, 0x7E, 0x00, 0x00, 0x00, 0x00);
}


void playPreviousSong(){ // Play the previous song
  writeToMP3(0x02, 0xA6, 0x7E, 0x00, 0x00, 0x00, 0x00);
}


void addSongToPlayList(byte songHbyte, byte songLbyte){
  //Repeat this function for every song you wish to stack onto the playlist (max = 10 songs)
  writeToMP3(0x04, 0xA8, songHbyte, songLbyte, 0x7E, 0x00, 0x00);
}


void setVolume(byte Volume){ // Set the volume
  byte tempVol = constrain(Volume, 0, 31);
  //Volume range = 00 (muted) to 31 (max volume)
  writeToMP3(0x03, 0xA7, tempVol, 0x7E, 0x00, 0x00, 0x00); 
}


/* The following functions retrieve information from the Grove MP3 player : see data sheet for additional functions--------------*/

// getData: is a generic function to simplifly the other functions for retieving information from the Grove Serial MP3 player
byte getData(byte queryVal, int dataPosition){
  byte returnVal = 0x00;
  writeToMP3(0x02, queryVal, 0x7E, 0x00, 0x00, 0x00, 0x00);
  delay(50);
  for(int x = 0; x<dataPosition; x++){
    if(mp3.available()){
      returnVal = mp3.read();
      delay(50);
    }
  }
  return(returnVal);
}

byte getVolume(){ //Get the volume of the Grove Serial MP3 player
  //returns value from 0 - 31
  return(getData(0xC1, 4));
}

byte getPlayingState(){ //Get the playing state : Play / Stopped / Paused
  //returns 1: Play, 2: Stop, 3:Paused
  return(getData(0xC2, 2));
}


byte getNumberOfFiles(){ //Find out how many songs are on the SD card
  //returns the number of MP3 files on SD card
  return(getData(0xC4, 3));
}

You will notice from the code, that I did not utilise every function. I decided to include them for your benifit. This Serial MP3 module makes use of a high quality MP3 audio chip known as the "WT5001". Therefore, you should be able to get some additional features and functionality from this document. Plus you may find some extra useful info from the Seeedstudio wiki.
 
IMPORTANT: You need to load your MP3 sounds or songs onto the SDHC card before you install it onto the Serial MP3 player.
 
Once the SDHC card is installed, and your code is uploaded to the Arduino, all you have to do now is connect the MP3 player to some headphones or a powered speaker. You can then power the Arduino and modules with a battery pack or some other portable power supply.
 
You can design and decorate the shoebox in any way you like. Just print out your picture, glue them on, and before you know it, you will have your very own Arduino Boombox.


Comments

I was very surprised by the quality of the sound that came from the MP3 module. It is actually quite good.

This tutorial was an introduction to the Grove Serial MP3 module in it's most basic form. You could just as easily use some other sensor to trigger the MP3 module. For example, you could get it to play an alert if a water leak was detected, or if a door was opened, or if the temperature got too high or too low. You could get it to play a reminder when you walk into your room. The possibilities are endless.

I really liked this module, and I am sure it will appear in a future tutorial.


If you like this page, please do me a favour and show your appreciation :

 
Visit my ArduinoBasics Google + page.
Follow me on Twitter by looking for ScottC @ArduinoBasics.
I can also be found on Pinterest and Instagram.
Have a look at my videos on my YouTube channel.


However, if you do not have a google profile...
Feel free to share this page with your friends in any way you see fit.

Arduino Selfie


My attention is drawn towards the noise behind me....
I cannot believe it.
There it is.

  The Arduino is taking a SELFIE !!


How did this happen?
 
Well actually, it is not that difficult for an Arduino.
 
I found out that my Canon Powershot SX50 HS camera has a port on the side for a remote switch. In the "Optional Accessories" section of the camera brochure, it identifies the remote switch model as RS-60E3. I then looked up the model number on this website to find out the size of the jack (3 core, 2.5mm), and the pinout (Ground, focus and shutter) required to emulate the remote switch. Once I had this information, I was able to solder some really long wires to the jack and connect up the circuit (as described below).
 

And before I knew it, the Arduino was taking Selfies !!!


Warning : Any circuit you build for your camera (including this one) is at your own risk. I will not take responsibility for any damage caused to any of your equipment.
 

Parts Required:


Fritzing Sketch


Connection Table


Three core, 2.5 mm jack


Camera Connection to Relays


Jack pinout


Completed Circuit


Arduino Sketch


  1
2
3
4
5
6
7
8
9
10
11
12
13
14
15
16
17
18
19
20
21
22
23
24
25
26
27
28
29
30
31
32
33
34
35
36
37
38

/* ===============================================================
      Project: Arduino Selfie
       Author: Scott C
      Created: 14th Sept 2014
  Arduino IDE: 1.0.5
      Website: http://arduinobasics.blogspot.com/p/arduino-basics-projects-page.html
  Description: Arduino takes selfie every 30 seconds
================================================================== */

 /*
  Connect 5V on Arduino to VCC on Relay Module
  Connect GND on Arduino to GND on Relay Module */
 
 #define CH1 8   // Connect Digital Pin 8 on Arduino to CH1 on Relay Module
 #define CH3 7   // Connect Digital Pin 7 on Arduino to CH3 on Relay Module
 
 void setup(){
   //Setup all the Arduino Pins
   pinMode(CH1, OUTPUT);
   pinMode(CH3, OUTPUT);
   
   //Turn OFF any power to the Relay channels
   digitalWrite(CH1,LOW);
   digitalWrite(CH3,LOW);
   delay(2000); //Wait 2 seconds before starting sequence
 }
 
 void loop(){
   digitalWrite(CH1, HIGH); //Focus camera by switching Relay 1
   delay(2000);
   digitalWrite(CH1, LOW); //Stop focus
   delay(100);
   digitalWrite(CH3, HIGH); //Press shutter button for 0.5 seconds
   delay(500);
   digitalWrite(CH3,LOW); //Release shutter button
   delay(30000); //Wait 30 seconds before next selfie
 }


By connecting up the camera to an Arduino, the camera just got smarter !!
The Arduino connects to 2 different channels on the relay board in order to control the focus and the shutter of the camera. The relays are used to isolate the camera circuit from that of the Arduino. I have also included a couple of diodes and resistors in the circuit as an extra precaution, however they may not be needed.

Warning : Any circuit you build for your camera (including this one) is at your own risk. I will not take responsibility for any damage caused to any of your equipment. Do your research, and take any precautions you see fit.


The Video


If you like this page, please do me a favour and show your appreciation :

  Visit my ArduinoBasics Google + page.
Follow me on Twitter by looking for ScottC @ArduinoBasics.
Have a look at my videos on my YouTube channel.


However, if you do not have a google profile...
Feel free to share this page with your friends in any way you see fit.

Relay Module

WARNING: Mishandling or incorrect or improper use of relays could result in

  • serious personal injury or DEATH
  • possible physical damage of the product
  • faulty operation
  • or create serious/dangerous hazards.

Please make sure that you read and understand how your relay/relay module board works, the voltage and current it is rated for, and the risks involved in your project BEFORE you even attempt to start putting it together. Seek professional and qualified assistance BEFORE you undertake ANY high power projects.

If you choose to follow the instructions in this tutorial, you do so at your own risk. I am not an electrician, and am not a qualified electrical engineer - so please do your research and seek advice BEFORE undertaking a project using a relay. Please check your connections and test them BEFORE turning the power on.

I accept no responsibility for your project, or the risk/damage/fire/shock/injury/death/loss that it causes. You take full responsibility for your actions/project/creation, and do so at YOUR OWN RISK !!!

Please note: It is illegal in some countries to wire up a high power project without an electrician. Please check your country's rules/laws/regulations before you undertake your project. If you have any doubts - don't do it.


What is a relay

A Relay is an electrically operated switch. Many relays use an electromagnet to mechanically operate the switch and provide electrical isolation between two circuits. In this project there is no real need to isolate one circuit from the other, but we will use an Arduino UNO to control the relay. We will develop a simple circuit to demonstrate and distinguish between the NO (Normally open) and NC (Normally closed) terminals of the relay. We will then use the information gained in this tutorial to make a much more exciting circuit. But we have to start somewhere. So let's get on with it.

Parts Required:

Fritzing Sketch


Table of Connections


Arduino Sketch


  1
2
3
4
5
6
7
8
9
10
11
12
13
14
15
16
17
18
19
20
21
22
23
24
25
26
27
28
29
30
31
32
33
34
35
36
37
38
39
40
41
42
43
44
45
46


/* ===============================================================
      Project: 4 Channel 5V Relay Module
       Author: Scott C
      Created: 7th Sept 2014
  Arduino IDE: 1.0.5
      Website: http://arduinobasics.blogspot.com.au
  Description: Explore the difference between NC and NO terminals.
================================================================== */

 /*
  Connect 5V on Arduino to VCC on Relay Module
  Connect GND on Arduino to GND on Relay Module 
  Connect GND on Arduino to the Common Terminal (middle terminal) on Relay Module. */
 
 #define CH1 8   // Connect Digital Pin 8 on Arduino to CH1 on Relay Module
 #define CH3 7   // Connect Digital Pin 7 on Arduino to CH3 on Relay Module
 #define LEDgreen 4 //Connect Digital Pin 4 on Arduino to Green LED (+ 330 ohm resistor) and then to "NO" terminal on relay module
 #define LEDyellow 12 //Connect Digital Pin 12 on Arduino to Yellow LED (+ 330 ohm resistor) and then to "NC" terminal on relay module
 
 void setup(){
   //Setup all the Arduino Pins
   pinMode(CH1, OUTPUT);
   pinMode(CH3, OUTPUT);
   pinMode(LEDgreen, OUTPUT);
   pinMode(LEDyellow, OUTPUT);
   
   //Provide power to both LEDs
   digitalWrite(LEDgreen, HIGH);
   digitalWrite(LEDyellow, HIGH);
   
   //Turn OFF any power to the Relay channels
   digitalWrite(CH1,LOW);
   digitalWrite(CH3,LOW);
   delay(2000); //Wait 2 seconds before starting sequence
 }
 
 void loop(){
   digitalWrite(CH1, HIGH); //Green LED on, Yellow LED off
   delay(1000);
   digitalWrite(CH1, LOW); //Yellow LED on, Green LED off
   delay(1000);
   digitalWrite(CH3, HIGH); //Relay 3 switches to NO
   delay(1000);
   digitalWrite(CH3,LOW); //Relay 3 switches to NC
   delay(1000);
 }


The Red light on the Relay board turns on when power is applied (via the VCC pin). When power is applied to one of the Channel pins, the respective green light goes on, plus the relevant relay will switch from NC to NO. When power is removed from the channel pin, the relay will switch back to NC from NO. In this sketch we see that power is applied to both LEDs in the setup() method. When there is no power applied to the CH1 pin, the yellow LED will be on, and the Green LED will be off. This is because there is a break in the circuit for the green LED. When power is applied to CH1, the relay switches from NC to NO, thus closing the circuit for the green LED and opening the circuit for the yellow LED. The green LED turns on, and the yellow LED turns off.

I also show what happens when you apply power to a channel (eg. CH3) when there is nothing connected to the relay terminals. The respective onboard LED illuminates. This is useful for troubleshooting the relays, and knowing what state the relay is in (NC or NO). NC stands for Normally closed (or normally connected) NO stands for Normally open (or normally disconnected)

Here is a circuit diagram for two of the relays on the relay module (CH1 and CH2).
This was taken from the iteadstudio site.


The Video


This tutorial will become very useful in the future. I now have an easy way of switching a circuit electronically. Yes, I could do this with a transistor, but sometimes it is nice to hear that mechanical click. I am not sure why I like relays, but I find them to be quite fun !!

If you liked this tutorial - please show your support :


Andrew - First robot

Primary image

What does it do?

Change direction when meet wall

Hi all! First robot ever, saying it's not great would be an euphemism, nevertheless I would be very glad to get some feedback from you.

How it works : two switches on the front, when it meets a wall, andrew goes backwards and turn, then turn the other direction and goes forward again (see video - about the video, sorry for the poor quality, I had to use a phone, I can post a better one next weekend)

Cost to build

$35,00

Embedded video

Finished project

Complete

Number

Time to build

15 hours

Type

wheels

URL to more information

Weight

read more