Posts with «trigger» label

Simple Photo Flash Trigger for Water Balloon Photography

There have been countless projects to make custom photo flash trigger circuits. Usually the circuits react to sound, triggering the camera flash at the moment a certain sound is triggered. That type of trigger can be used to detect the popping of a balloon or shattering of glass. Other triggers detect motion, like a projectile crossing a laser beam for example. [Udo's] friend had a fun idea to take photos of water balloons popping. Unfortunately neither of those trigger methods would be well suited for this situation. That’s when [Udo] had to get creative.

[Udo] built a unique trigger circuit that uses the water inside the balloon as the trigger. The core component of the circuit is an Arduino. One of the Arduino’s analog pins is configured to enable the internal pull-up resistor. If nothing else is connected to the pin, the Arduino will read 5 volts there. The pin is connected to a needle on the end of a stick. There is a second needle on the same stick, just a short distance away from the first. When these needles pierce the balloon’s skin, the water inside allows for a brief moment of conductivity between the two pins. The voltage on the analog pin then drops slightly, and the Arduino can detect that the balloon has popped.

[Udo] already had a flash controller circuit. He was able to trigger it with the Arduino by simply trying the flash controller’s trigger pin to one of the Arduino’s pins. If the Arduino pulls the pin to ground, it closes the switch on the flash controller and the flash is triggered. Both circuits must share a common ground in order for this to work.

All of the code for [Udo's] project is freely available. With such spectacular photographs, it’s only a matter of time before we see more of these floating around.


Filed under: Arduino Hacks
Hack a Day 02 Oct 21:00

Arduino Selfie


My attention is drawn towards the noise behind me....
I cannot believe it.
There it is.

  The Arduino is taking a SELFIE !!


How did this happen?
 
Well actually, it is not that difficult for an Arduino.
 
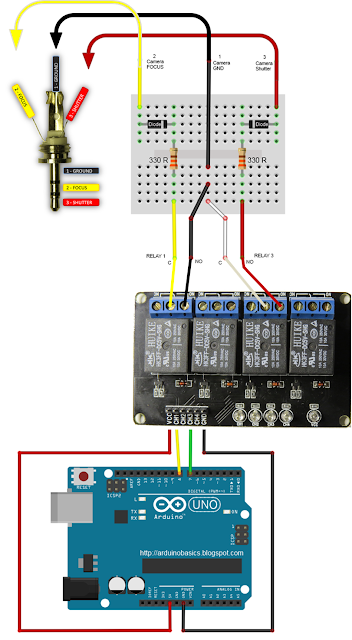
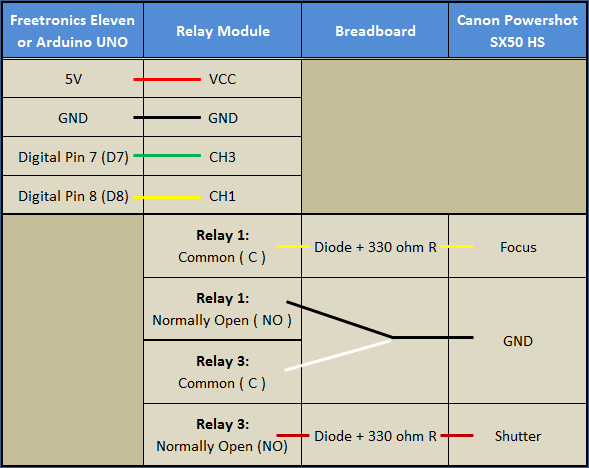
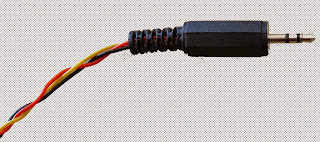
I found out that my Canon Powershot SX50 HS camera has a port on the side for a remote switch. In the "Optional Accessories" section of the camera brochure, it identifies the remote switch model as RS-60E3. I then looked up the model number on this website to find out the size of the jack (3 core, 2.5mm), and the pinout (Ground, focus and shutter) required to emulate the remote switch. Once I had this information, I was able to solder some really long wires to the jack and connect up the circuit (as described below).
 

And before I knew it, the Arduino was taking Selfies !!!


Warning : Any circuit you build for your camera (including this one) is at your own risk. I will not take responsibility for any damage caused to any of your equipment.
 

Parts Required:


Fritzing Sketch


Connection Table


Three core, 2.5 mm jack


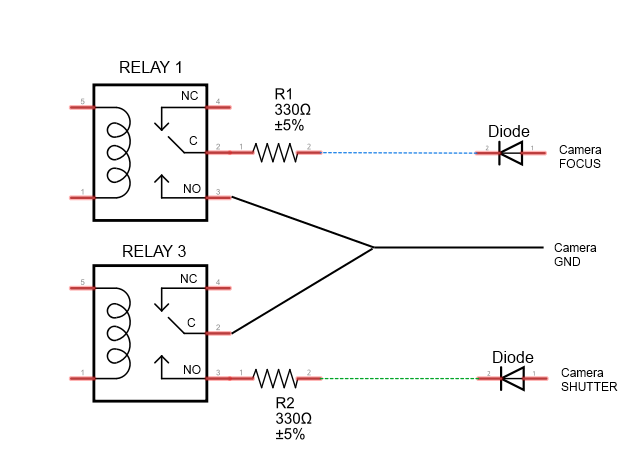
Camera Connection to Relays


Jack pinout


Completed Circuit


Arduino Sketch


  1
2
3
4
5
6
7
8
9
10
11
12
13
14
15
16
17
18
19
20
21
22
23
24
25
26
27
28
29
30
31
32
33
34
35
36
37
38

/* ===============================================================
      Project: Arduino Selfie
       Author: Scott C
      Created: 14th Sept 2014
  Arduino IDE: 1.0.5
      Website: http://arduinobasics.blogspot.com/p/arduino-basics-projects-page.html
  Description: Arduino takes selfie every 30 seconds
================================================================== */

 /*
  Connect 5V on Arduino to VCC on Relay Module
  Connect GND on Arduino to GND on Relay Module */
 
 #define CH1 8   // Connect Digital Pin 8 on Arduino to CH1 on Relay Module
 #define CH3 7   // Connect Digital Pin 7 on Arduino to CH3 on Relay Module
 
 void setup(){
   //Setup all the Arduino Pins
   pinMode(CH1, OUTPUT);
   pinMode(CH3, OUTPUT);
   
   //Turn OFF any power to the Relay channels
   digitalWrite(CH1,LOW);
   digitalWrite(CH3,LOW);
   delay(2000); //Wait 2 seconds before starting sequence
 }
 
 void loop(){
   digitalWrite(CH1, HIGH); //Focus camera by switching Relay 1
   delay(2000);
   digitalWrite(CH1, LOW); //Stop focus
   delay(100);
   digitalWrite(CH3, HIGH); //Press shutter button for 0.5 seconds
   delay(500);
   digitalWrite(CH3,LOW); //Release shutter button
   delay(30000); //Wait 30 seconds before next selfie
 }


By connecting up the camera to an Arduino, the camera just got smarter !!
The Arduino connects to 2 different channels on the relay board in order to control the focus and the shutter of the camera. The relays are used to isolate the camera circuit from that of the Arduino. I have also included a couple of diodes and resistors in the circuit as an extra precaution, however they may not be needed.

Warning : Any circuit you build for your camera (including this one) is at your own risk. I will not take responsibility for any damage caused to any of your equipment. Do your research, and take any precautions you see fit.


The Video


If you like this page, please do me a favour and show your appreciation :

  Visit my ArduinoBasics Google + page.
Follow me on Twitter by looking for ScottC @ArduinoBasics.
Have a look at my videos on my YouTube channel.


However, if you do not have a google profile...
Feel free to share this page with your friends in any way you see fit.

Insert Coin: A look back at ten top projects from 2011

2011 has been a tremendous year for tech -- Amazon launched a $200 Android tablet, AT&T and Verizon continued their LTE expansion, Apple killed off the Mac mini's SuperDrive and Samsung introduced a well-received killer 5.3-inch smartphone. But tiny tech startups made their mark as well, proving that you don't need an enormous R&D budget to spur innovation. Still, development isn't free, and unless your social circle includes eager investors, seed money has been traditionally hard to come by.

For many of this year's indie devs, crowdfunding sites have been the answer, with Kickstarter leading the pack. We've seen an enormous variety of projects -- including a deluge of duds and plenty more semi-redundant iPhone accessories -- but a few treasures soared above the swill to be featured in our Insert Coin series, with many of those meeting their funding goals and even making their way into the hands of consumers. Now, as 2011 draws to a close, we've gone through this past year's projects to single out our top ten, and they're waiting for your consideration just past the break.

Continue reading Insert Coin: A look back at ten top projects from 2011

Insert Coin: A look back at ten top projects from 2011 originally appeared on Engadget on Sat, 31 Dec 2011 16:00:00 EST. Please see our terms for use of feeds.

Permalink | Email this | Comments

n/a
Let's Make Robots 01 Jan 00:00
12  32  altoids  arduino  array  buttons  cable  cat5  cieling  computer  encoder  equalizer  foot  frequency  key  lcd  leds  lights  power  push  rca  register  rotary  screen  shift  supply  switch  tin  trigger  ultra  uv  violet  visualizer  wire