Posts with «code» label

Pocket Radio Powered By Tiny Microcontroller
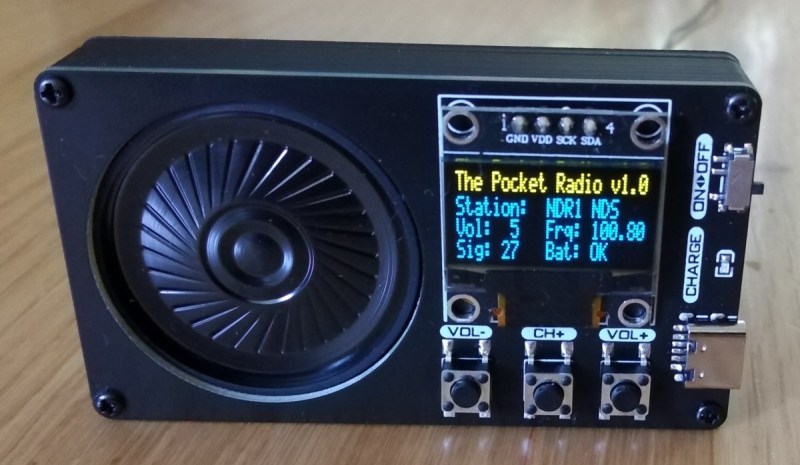
Before the days of MP3 players and smartphones, and even before portable CD players, those of us of a certain age remember that our cassette players were about the only way to take music on-the-go. If we were lucky, they also had a built-in radio for when the single tape exhausted both of its sides. Compared to then, it’s much easier to build a portable radio even though cassettes are largely forgotten, as [wagiminator] shows us with this radio design based on an ATtiny.

The build is about as compact as possible, with the aforementioned ATtiny 402/412 as its core, it also makes use of an integrated circuit FM tuner,  an integrated audio amplifier with its own single speaker, and a small OLED display. The unit also boasts its own lithium-polymer battery charger and its user interface consists of only three buttons, plenty for browsing radio stations and controlling volume.

The entire build fits easily in the palm of a hand and is quite capable for a mobile radio, plus all of the schematics and code is available on the project page. While it doesn’t include AM capability, just the fact that FM is this accessible nowadays when a few decades ago it was cutting-edge technology is quite remarkable. If you’re looking for an even smaller FM receiver without some of the bells and whistles of this one, take a look at this project too.

Hack a Day 06 Jul 21:00
arduino  attiny  audio  code  fm  oled  radio  radio hacks  schematics  speaker  

Honey, I Shrunk the Arduino Core

High-level programming languages do a great job of making a programmer’s job easier, but these languages often leave a lot of efficiency on the table as a compromise. While a common thought is to move into a lower-level language like assembly to improve on a program’s speed or memory use, there’s often a lot that can be done at the high level before resorting to such extremes. This, of course, is true of the Arduino platform as well, as [NerdRalph] demonstrates by shrinking the size of the Arduino core itself.

[NerdRalph] had noticed that the “blink” example program actually includes over 1 kB of extraneous code, and that more complicated programs include even more cruft. To combat this issue, he created ArduinoShrink, which seeks to make included libraries more modular and self-contained. It modifies the some of the default registers and counters to use less memory and improve speed, and is also designed to improve interrupt latency as well by changing when the Arduino would otherwise disable interrupts.

While there are some limits to ArduinoShrink, such as needing to know specifics about the pins at compile time, for anyone writing programs for Arduinos that are memory-intensive or need improvements in timing this could be a powerful new tool. If you’d prefer to go in the opposite direction to avoid ever having to learn C or assembly, though, you can always stick with running Python on your embedded devices.

Coding A Dynamic Menu For Character LCDs on Arduino

These days, there’s a huge variety of screens on the market for use with microcontrollers. OLEDs and graphic LCDs abound, while e-ink devices tempt the user with their clean look and low energy consumption. However, for many purposes, the humble HD44780 character LCD does the job just fine. If you’re using such a device, you might want to implement a simple menu system, and in that case, [MyHomeThings] has you covered.

The menu code is simple to modify and implement. It allows the user to define a certain number of menu items, along with button labels and functions to be executed with button presses. By default, it’s set up to work with  left and right function buttons, with up and down buttons to toggle through the menu’s various entries. This suits the commonly available Arduino shields which combine a 16×2 character LCD with a set of four tactile buttons in a cross formation. However, modifying the code to use an alternate button scheme would be simple for those eager to tweak things to their liking.

For the absolute beginner to programming, it’s a great way to put together a simple interface for your microcontroller projects. It’s the sort of thing you might use if you’d built a do-everything Arduino handheld device, as we’ve seen built before. If you find text menus too archaic for your purposes, though, be sure to sound off with your favourite solutions in the comments.

Hack a Day 18 Feb 16:30

Daisy is a tiny $29 computer for building custom musical instruments

Coding your own musical instruments just got a lot more convenient. Music tech company Electrosmith has launched the Daisy, an open source microcomputer packed with everything you need to code your own pedals, synth, modules and instruments -- and it's the size of a stick of gum.

Source: Kickstarter

Daisy is a tiny $29 computer for building custom musical instruments

Coding your own musical instruments just got a lot more convenient. Music tech company Electrosmith has launched the Daisy, an open source microcomputer packed with everything you need to code your own pedals, synth, modules and instruments -- and it's the size of a stick of gum.

Stator Library Makes Your Arduino Code Easier To Read

The readability of your code can make the difference between your project being a joy to work on, or an absolute headache. This goes double when collaborating with others. Having easily parsed code reduces your cognitive load and makes solving problems easier. To try and help with this, [PTS93] developed the Stator library to make certain common tasks simpler to read.

The aim of the library is to get rid of piles of state tracking variables and endless if/else statements – hence the name. It’s designed primarily for the Arduino IDE but doesn’t have any dependencies on the API, so can be used in other C++ environments. It comes with a variety of neat tools for common jobs, such as reading an analog sensor with hysteresis around a trigger point, as well as easy ways to track state changes across multiple variables. By using basic English terms instead of condition checks and mathematical operators, it can make things more readable and easier to follow.

The power of the Arduino platform has always been in its easy to use libraries that make everything easier, from interfacing LCDs to working with Amazon Dash buttons.

Digital Rain Cloud


Description

This is a very simple project that turns a Rainbow Cube Kit from Seeedstudio, into a digital rain cloud. It features a relaxing rain animation which is ruined by a not-so-relaxing yet somewhat realistic lightning effect. The animation has a very random pattern, and is quite satisfying to watch. The strategically placed cotton wool on the top of the cube makes all the difference to the project, and is sure to impress all of your friends. Luckily, I have done all of the hard work for you. You will find the full source code for the animation sequence below. You just have to provide the Rainbow Cube Kit and the cotton wool. Have fun !!


Weather Station Is A Tutorial in Low Power Design

Building your own weather station is a fun project in itself, but building it to be self-sufficient and off-grid adds another set of challenges to the mix. You’ll need a battery and a solar panel to power the station, which means adding at least a regulator and charge controller to your build. If the panel and battery are small, you’ll also need to make some power-saving tweaks to the code as well. (Google Translate from Italian) The tricks that [Danilo Larizza] uses in his build are useful for more than just weather stations though, they’ll be perfect for anyone trying to optimize their off-grid projects for battery and solar panel size.

When it comes to power conservation, the low-hanging fruit is plucked first. [Danilo] set the measurement intervals to as long as possible and put the microcontroller (a NodeMCU) to sleep in between. Removing the power from the sensors when the microcontroller was asleep was another easy step, but the device was still crashing overnight. Then he turned to a hardware solution and added a more efficient battery charger to the setup, which saved even more power. This is all the more impressive because the station communicates via WiFi which is notoriously difficult to run in low-power applications.

Besides the low power optimizations, the weather station itself is interesting for its relative simplicity. It could be built with things most of us have knocking around. Best of all, [Danilo] published the source code on his site, so most of the hard work has been done already. If you’re thinking he seems a little familiar, it’s because we’ve featured some of his projects before, like his cheap WiFi extender antenna and his homemade hybrid tube amplifier.

Educational Robot for Under $100

While schools have been using robots to educate students in the art of science and engineering for decades now, not every school or teacher can afford to put one of these robots in the hands of their students. For that reason, it’s important to not only improve the robots themselves, but to help drive the costs down to make them more accessible. The CodiBot does this well, and comes in with a price tag well under $100.

The robot itself comes pre-assembled, and while it might seem like students would miss out on actually building the robot, the goal of the robot is to teach coding skills primarily. Some things do need to be connected though, such as the Arduino and other wires, but from there its easy to program the robot to do any number of tasks such as obstacle avoidance and maze navigation. The robot can be programmed using drag-and-drop block programming (similar to Scratch) but can also be programmed the same way any other Arduino can be.

With such a high feature count and low price tag, this might be the key to getting more students exposed to programming in a more exciting and accessible way than is currently available. Of course, if you have a little bit more cash lying around your school, there are some other options available to you as well.


Filed under: robots hacks

WALTER - The Arduino Photovore Insect Robot

Primary image

What does it do?

Navigate around and seeking light

[Please excuse my English]

Cost to build

Embedded video

Finished project

Complete

Number

Time to build

Type

URL to more information

Weight

read more