Posts with «sound» label

Spice Up Your Bench With 3D Printed Dancing Springs

Not all projects are made equal. Some are designed to solve a problem while others are just for fun. Entering the ranks of the most useless machines is a project by [Vladimir Mariano] who created the 3D Printed Dancing Springs. It is a step up from 3D printing a custom slinky and will make a fine edition to any maker bench.

The project uses 3D printed coils made of transparent material that is mounted atop geared platforms and attached to a fixed frame. The gears are driven by a servo motor. The motor rotates the gears and the result is a distortion in the spring. This distortion is what the dancing is all about. To add to the effect, [Vladimir Mariano] uses RGB LEDs controlled by an ATmega32u4.

You can’t dance without music. So [Vladimir] added a MEMs microphone to pick up noise levels which are used to control the servo and lights. The code, STL files and build instructions are available on the website for you to follow along. If lights and sound are your things, you must check out the LED Illuminated Isomorphic Keyboard from the past.


Filed under: musical hacks
Hack a Day 30 Jul 06:00
arduino  diy  led  musical hacks  neopixel  slinky  sound  toy  

Revive Old Drive-In Speakers with a Modern LED Twist

Ever used a drive-in movie speaker? Build your own and listen to your tunes in retro style.

Read more on MAKE

The post Revive Old Drive-In Speakers with a Modern LED Twist appeared first on Make: DIY Projects and Ideas for Makers.

Tiny Pipe Organ Needs Tiny Church

There are a lot of unusual listings on eBay. If you’re wondering why someone would have a need for shredded cash, or a switchblade comb, or some “unicorn meat” (whatever that is), we’re honestly wondering the same thing. Sometimes, though, a listing that most people would consider bizarre finds its way to the workbench of someone with a little imagination. That was the case when [tinkartank] found three pipe organ pipes on eBay, bought them, and then built his own drivers.

The pipes have pitches of C, D, and F# (which make, as far we can tell, a C add9 flat5 no3 chord). [tinkartank] started by firing up the CNC machine and creating an enclosure to mount the pipes to. He added a church-like embellishment to the front window, and then started working on the controls for the pipes. Each pipe has its own fan, each salvaged from a hot air gun. The three are controlled with an Arduino. [tinkartank] notes that the fan noise is audible over the pipes, but there does seem to be an adequate amount of air going to each pipe.

This project is a good start towards a fully functional organ, provided [tinkartank] gets lucky enough to find the rest of the pipes from the organ. He’s already dreaming about building a full-sized organ of sorts, but in the meantime it might be interesting to use his existing pipes to build something from Myst.


Filed under: musical hacks
Hack a Day 01 Oct 12:01
air  arduino  fan  heat gun  music  musical hacks  organ  pipe  sound  

Listen to the hypnotic sound of a red crystal


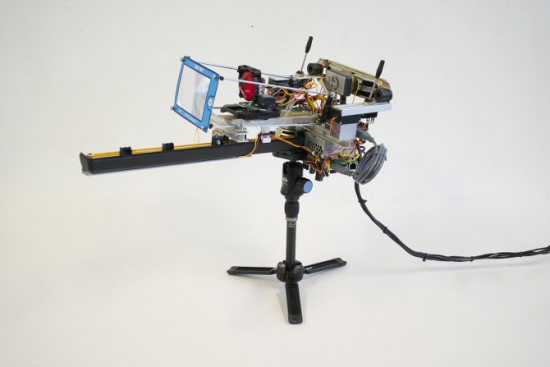
Red is an optic-sound electronic object that uses simple light sources and optical elements to create audiovisual performance. The machine was named as a color because at the center of the work there is a red glass crystal and a flexible Fresnel lens. Dmitry Morozov aka :: vtol: : created it using Arduino with pure data and python scripts:

The project includes many reworked electronic devices – a CD-rom, an old scanner, reused electric motors. Multiple moving elements provide wide variability for rather primitive optical elements. It is accomplished by constant change of focal length between the light source, crystal and lens, as well as by changing the crystal’s tilt angle and mechanical distortion of the lens. The object works autonomously, by algorithm with many accidental events tied to feedback, with sensors defining the position of various mechanical elements in relation to the range of their movement. The sound part has up to 4 voices which depend on the activity of various elements. The sound is also in direct interaction with actual position of those elements, and basically is voicing the process of movement, brightness of light, and intensity of the piece.

Watch how it works in this hypnotic video:

Arduino Blog 11 Apr 21:59

Discover what sound is made of with Sound Blocks

Sound Blocks is a tool to teach children and adults what sound is made of. The project was shortlisted in the Expression category of the IXDA Interaction Awards and it was developed by John Ferreira, Alejandra Molina, Andreas Refsgaard at the CIID using Arduino.

The device allows people to learn how, with a few parameters, it’s possible to create new sounds and, also, imitate real world sounds. Users can control waveform, sound decay or wave length and volume of three channels, all mixed together:

Sound blocks first and foremost was created as a tool to experiment with sound, it is playful and engaging.

Watch the video interview to discover more about the project and hear some noise:

Listening to the sound of a 300-million-year-old disc

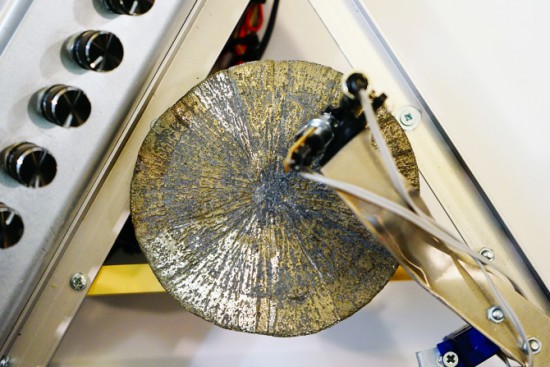
There’s a mineral called pyrite with a interesting nickname, fool’s gold, because it has a superficial resemblance to gold and it’s by far the most frequently mineral mistaken for gold. Even if it’s pretty abundant, there’s a rare form of pyrite which is crystallised in radial shape (as unusual disc spherulites), taking the shape of a disc. The amazing fact is that the only deposit where pyrites of such morphology are found is in Illinois (USA) and the discs are dated around 300 million years ago!

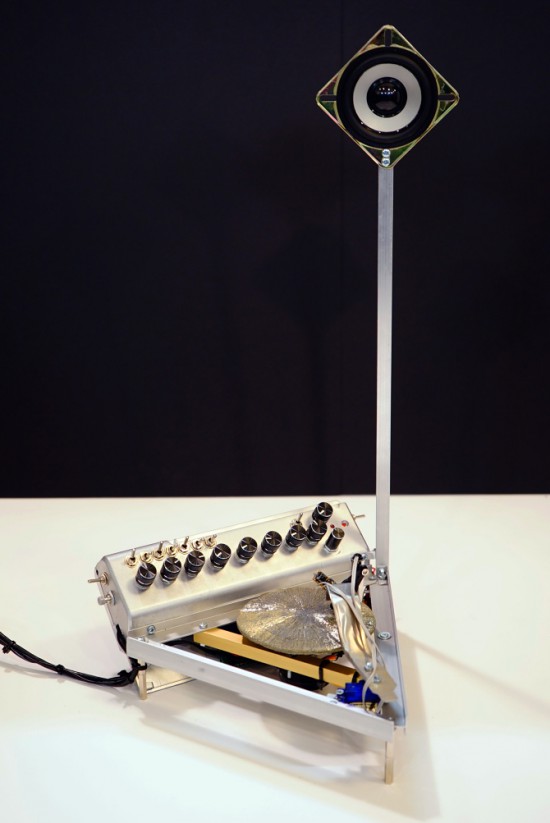
Dmitry Morozov (aka ::vtol::), a media artist living in Moscow, had the chance to use a pyrite disc and created Ra,  a sound object / synthesizer running on Arduino Nano. Ra uses laser for scanning the irregularities of the surface of the disc and further transforms this data to produce sound:

This project originated as a result of an interesting set of circumstances – a pyrite disc was given to me as a gift by a mineral seller in Boulder city (USA). Upon hearing about my works, she asked to do something with such crystal, and refused to take payment for getting it. In the same period, I was reading articles on various ways of archiving and preservation of sounds from the first, historical sources of the recorded sound – wax discs and other fragile carriers. All technologies were based on the usage of lasers. Inspired by these projects, I set out to create a self-made laser sound reader which would be able to produce sound from various uneven surfaces, using minimal resources to achive it. Thus emerged the idea to construct an instrument using the pyrite disc and a self-made laser sound reader.

The production of the object was possible thanks to the commission of the Sound Museum in St.-Petersburg which now has Ra in its collection.

Check the bill of materials and other details on Dmitry’s website. Explore other projects by Dmitry featured on Arduino Blog.

Arduino Blog 05 Oct 12:54

Arduino BeatBox

Create your very own Arduino BeatBox !

Home-made capacitive touch sensors are used to trigger the MP3 drum sounds stored on the Grove Serial MP3 player. I have used a number of tricks to get the most out of this module, and I was quite impressed on how well it did. Over 130 sounds were loaded onto the SDHC card. Most were drum sounds, but I added some farm animal noises to provide an extra element of surprise and entertainment. You can put any sounds you want on the module and play them back quickly. We'll put the Grove Serial MP3 module through it's paces and make it into a neat little BeatBox !!


Key learning objectives

  • How to make your own beatbox
  • How to make capacitive drum pad sensors without using resistors
  • How to speed up Arduino's Analog readings for better performance
  • How to generate random numbers on your Arduino


Parts Required:

Making the drum pads


Fritzing Sketch


Grove Connections


Grove Connections (without base shield)


Arduino Sketch


  1
2
3
4
5
6
7
8
9
10
11
12
13
14
15
16
17
18
19
20
21
22
23
24
25
26
27
28
29
30
31
32
33
34
35
36
37
38
39
40
41
42
43
44
45
46
47
48
49
50
51
52
53
54
55
56
57
58
59
60
61
62
63
64
65
66
67
68
69
70
71
72
73
74
75
76
77
78
79
80
81
82
83
84
85
86
87
88
89
90
91
92
93
94
95
96
97
98
99
100
101
102
103
104
105
106
107
108
109
110
111
112
113
114
115
116
117
118
119
120
121
122
123
124
125
126
127
128
129
130
131
132
133
134
135
136
137
138
139
140
141
142
143
144
145
146
147
148
149
150
151
152
153
154
155
156
157
158
159
160
161
162
163
164
165
166
167
168
169
170
171
172
173
174
175
176
177
178
179
180
181
182
183
184
185
186
187
188
189
190
191
192
193
194
195
196
197
198
199
200
201
202
203
204
205
206
207
208
209
210
211
212
213
214
215
216
217
218
219
220
221
222
223
224
225
226
227
228
229
230
231
232
233
234
235
236
237
238
239

/* =================================================================================================
      Project: Arduino Beatbox
       Author: Scott C
      Created: 9th April 2015
  Arduino IDE: 1.6.2
      Website: http://arduinobasics.blogspot.com/p/arduino-basics-projects-page.html
  Description: This project uses home made capacitive sensors to trigger over 130 MP3 sounds
               on the Grove Serial MP3 player. 
               
               The ADCTouch library is used to eliminate the resistors from the Capacitive sensing circuit. 
               The code used for capacitive sensing was adapted from the ADCTouch library example sketches. 
               You can find the ADCTouch library and relevant example code here:
               http://playground.arduino.cc/Code/ADCTouch
               
               "Advanced Arduino ADC" is used to improve the analogRead() speed, and enhance the
               drum pad or capacitive sensor response time. The Advanced Arduino ADC code 
               was adapted from this site:
               http://www.microsmart.co.za/technical/2014/03/01/advanced-arduino-adc/
               
               
=================================================================================================== */
  #include <ADCTouch.h>
  #include <SoftwareSerial.h>
  
  
  //Global variables
  //===================================================================================================
  int potPin = A4; //Grove Sliding potentiometer is connected to Analog Pin 4
  int potVal = 0;
  byte mp3Vol = 0; //Variable used to control the volume of the MP3 player
  byte oldVol = 0;
  
  int buttonPin = 5; //Grove Button is connected to Digital Pin 5
  int buttonStatus = 0;
  
  byte SongNum[4] = {0x01,0x02,0x03,0x04}; //The first 4 songs will be assigned to the drum pads upon initialisation
  byte numOfSongs = 130; //Total number of MP3 songs/sounds loaded onto the SDHC card
  
  long randNumber; //Variable used to hold the random number - used to randomise the sounds.
  
  int ledState[4]; //Used to keep track of the status of all LEDs (on or off)
  int counter = 0;
  
  SoftwareSerial mp3(3, 4); // The Grove MP3 Player is connected to Arduino digital Pin 3 and 4 (Serial communication)
       
  int ref0, ref1, ref2, ref3; //reference values to remove offset
  int threshold = 100;
      
  // Define the ADC prescalers
  const unsigned char PS_64 = (1 << ADPS2) | (1 << ADPS1);
  const unsigned char PS_128 = (1 << ADPS2) | (1 << ADPS1) | (1 << ADPS0);


  //Setup()
  //===================================================================================================
  void setup(){
    //Initialise the Grove MP3 Module
    delay(2500); //Allow the MP3 module to power up
    mp3.begin(9600); //Begin Serial communication with the MP3 module
    setPlayMode(0x00);                        //0x00 = Single song - played once ie. not repeated. (default)
    
    //Define the Grove Button as an INPUT
    pinMode(buttonPin, INPUT);
    
    //Define the 4 LED Pins as OUTPUTs
    pinMode(8, OUTPUT); //Green LED
    pinMode(9, OUTPUT); //Blue LED
    pinMode(10, OUTPUT); //Red LED
    pinMode(11, OUTPUT); //Yellow LED
    
    //Make sure each LED is OFF, and store the state of the LED into a variable.
    for(int i=8;i<12;i++){
      digitalWrite(i, LOW);
      ledState[i-8]=0;
    } 
    
    //Double our clock speed from 125 kHz to 250 kHz
    ADCSRA &= ~PS_128;   // set up the ADC
    ADCSRA |= PS_64;    // set our own prescaler to 64
    
    //Create reference values to account for the capacitance of each pad.
    ref0 = ADCTouch.read(A0, 500);
    ref1 = ADCTouch.read(A1, 500); //Take 500 readings
    ref2 = ADCTouch.read(A2, 500);
    ref3 = ADCTouch.read(A3, 500);
    
     //This helps to randomise the drum pads.
     randomSeed(analogRead(0));
  }


  // Loop()
  //===================================================================================================
  void loop(){
     
    //Take a reading from the Grove Sliding Potentiometer, and set volume accordingly
    potVal = analogRead(potPin);
    mp3Vol = map(potVal, 0, 1023, 0,31); // Convert the potentometer reading (0 - 1023) to fit within the MP3 player's Volume range (0 - 31)
    if((mp3Vol>(oldVol+1))|(mp3Vol<(oldVol-1))){ // Only make a change to the Volume on the Grove MP3 player when the potentiometer value changes
      oldVol = mp3Vol;
      setVolume(mp3Vol);
      delay(10); // This delay is necessary with Serial communication to MP3 player
    }
    
    //Take a reading from the Pin attached to the Grove Button. If pressed, randomise the MP3 songs/sounds for each drum pad, and make the LEDs blink randomly.
    buttonStatus = digitalRead(buttonPin);
    if(buttonStatus==HIGH){
      SongNum[0]=randomSongChooser(1, 30);
      SongNum[1]=randomSongChooser(31, 60);
      SongNum[2]=randomSongChooser(61, 86);
      SongNum[3]=randomSongChooser(87, (int)numOfSongs);
      randomLEDBlink();
    }
    
    //Get the capacitive readings from each drum pad: 50 readings are taken from each pad. (default is 100)
    int value0 = ADCTouch.read(A0,50); // Green drum pad
    int value1 = ADCTouch.read(A1,50); // Blue drum pad
    int value2 = ADCTouch.read(A2,50); // Red drum pad
    int value3 = ADCTouch.read(A3,50); // Yellow drum pad
    
    //Remove the offset to account for the baseline capacitance of each pad.
    value0 -= ref0;       
    value1 -= ref1;
    value2 -= ref2;
    value3 -= ref3;
    
    
    //If any of the values exceed the designated threshold, then play the song/sound associated with that drum pad.
    //The associated LED will stay on for the whole time the drum pad is pressed, providing the value remains above the threshold.
    //The LED will turn off when the pad is not being touched or pressed.
    if(value0>threshold){
      digitalWrite(8, HIGH);
      playSong(00,SongNum[0]);
    }else{
      digitalWrite(8,LOW);
    }
    
    if(value1>threshold){
      digitalWrite(9, HIGH);
      playSong(00,SongNum[1]);
    }else{
      digitalWrite(9,LOW);
    }
    
    if(value2>threshold){
      digitalWrite(10, HIGH);
      playSong(00,SongNum[2]);
    }else{
      digitalWrite(10,LOW);
    }
    
    if(value3>threshold){
      digitalWrite(11, HIGH);
      playSong(00,SongNum[3]);
    }else{
      digitalWrite(11,LOW);
    }
  }
      
   
  // writeToMP3:
  // a generic function that simplifies each of the methods used to control the Grove MP3 Player
  //===================================================================================================
  void writeToMP3(byte MsgLEN, byte A, byte B, byte C, byte D, byte E, byte F){
    byte codeMsg[] = {MsgLEN, A,B,C,D,E,F};
    mp3.write(0x7E); //Start Code for every command = 0x7E
    for(byte i = 0; i<MsgLEN+1; i++){
      mp3.write(codeMsg[i]); //Send the rest of the command to the GROVE MP3 player
    }
  }
  
  
  //setPlayMode: defines how each song is to be played
  //===================================================================================================
  void setPlayMode(byte playMode){
    /* playMode options:
          0x00 = Single song - played only once ie. not repeated.  (default)
          0x01 = Single song - cycled ie. repeats over and over.
          0x02 = All songs - cycled 
          0x03 = play songs randomly                                           */
    writeToMP3(0x03, 0xA9, playMode, 0x7E, 0x00, 0x00, 0x00);  
  }
  
  
  //playSong: tells the Grove MP3 player to play the song/sound, and also which song/sound to play
  //===================================================================================================
  void playSong(byte songHbyte, byte songLbyte){
    writeToMP3(0x04, 0xA0, songHbyte, songLbyte, 0x7E, 0x00, 0x00);            
    delay(100);
  }
  
  
  //setVolume: changes the Grove MP3 player's volume to the designated level (0 to 31)
  //===================================================================================================
  void setVolume(byte Volume){
    byte tempVol = constrain(Volume, 0, 31); //Volume range = 00 (muted) to 31 (max volume)
    writeToMP3(0x03, 0xA7, tempVol, 0x7E, 0x00, 0x00, 0x00); 
  }
  
  
  //randomSongChooser: chooses a random song to play. The range of songs to choose from
  //is limited and defined by the startSong and endSong parameters.
  //===================================================================================================
  byte randomSongChooser(int startSong, int endSong){
    randNumber = random(startSong, endSong);
    return((byte) randNumber);
  }
  
  
  //randomLEDBlink: makes each LED blink randomly. The LEDs are attached to digital pins 8 to 12.
  //===================================================================================================
  void randomLEDBlink(){
   counter=8;
   for(int i=0; i<40; i++){
     int x = constrain((int)random(8,12),8,12);
     toggleLED(x);
     delay(random(50,100-i));
   }
     
    for(int i=8;i<12;i++){
      digitalWrite(i, HIGH);
    }
    delay(1000);
    for(int i=8;i<12;i++){
      digitalWrite(i, LOW);
      ledState[i-8]=0;
    }
  }
  
  
  //toggleLED: is used by the randomLEDBlink method to turn each LED on and off (randomly).
  //===================================================================================================
  void toggleLED(int pinNum){
    ledState[pinNum-8]= !ledState[pinNum-8];
    digitalWrite(pinNum, ledState[pinNum-8]);
  }


Arduino Code Discussion

You can see from the Arduino code above, that it uses the ADCTouch library. This library was chosen over the Capacitive Sensing Library to eliminate the need for a high value resistor which are commonly found in Capacitive Sensing projects).
 
To increase the speed of the Analog readings, I utilised one of the "Advanced Arduino ADC" techniques described by Guy van den Berg on this Microsmart website.
 
The readings are increased by modifying the Arduino's ADC clock speed from 125kHz to 250 kHz. I did notice an overall better response time with this modification. However, the Grove Serial MP3 player is limited by it's inability to play more than one song or sound at a time. This means that if you hit another drum pad while the current sound is playing, it will stop playing the current sound, and then play the selected sound. The speed at which it can perform this task was quite impressive. In fact it was much better than I thought it would be. But if you are looking for polyphonic playability, you will be dissapointed.
 
This Serial MP3 module makes use of a high quality MP3 audio chip known as the "WT5001". Therefore, you should be able to get some additional features and functionality from this document. Plus you may find some extra useful info from the Seeedstudio wiki. I have re-used some code from the Arduino Boombox tutorial... you will find extra Grove Serial MP3 functions on that page.
 
I will warn you... the Grove Serial MP3 player can play WAV files, however for some reason it would not play many of the sound files in this format. Once the sounds were converted to the MP3 format, I did not look back. So if you decide to take on this project, make sure your sound files are in MP3 format, you'll have a much better outcome.
 
I decided to introduce a random sound selection for each drum pad to extend the novelty of this instrument, which meant that I had to come up with a fancy way to illuminate the LEDs. I demonstrated some of my other LED sequences on my instagram account. I sometimes use instagram to show my work in progress.
 
Have a look at the video below to see this project in action, and putting the Grove Serial MP3 player through it's paces.
 

The Video


First there was the Arduino Boombox, and now we have the Arduino Beatbox..... who knows what will come next !
 
Whenever I create a new project, I like to improve my Arduino knowledge. Sometimes it takes me into some rather complicated topics. There is a lot I do not know about Arduino, but I am enjoying the journey. I hope you are too !! Please Google plus one this post if it helped you in any way. These tutorials are free, which means I survive on feedback and plus ones... all you have to do is just scroll a little bit more and click that button :)


If you like this page, please do me a favour and show your appreciation :

 
Visit my ArduinoBasics Google + page.
Follow me on Twitter by looking for ScottC @ArduinoBasics.
I can also be found on Pinterest and Instagram.
Have a look at my videos on my YouTube channel.


However, if you do not have a google profile...
Feel free to share this page with your friends in any way you see fit.

Arduino Boombox

Add sound or music to your project using the "Grove Serial MP3 Player".

An Arduino UNO will be used to control the Grove Serial MP3 player by sending it specific serial commands. The Grove Base Shield allows for the easy connection of Grove sensor modules to an Arduino UNO without the need for a breadboard. A sliding potentiometer, switch and button will be connected to the Base shield along with the Serial MP3 player. A specific function will be assigned to each of the connected sensor modules to provide a useful interface:

  • Sliding Potentiometer – Volume control
  • Button – Next Song
  • Switch – On/Off (toggle)
Once the MP3 module is working the way we want, we can then build a simple enclosure for it. Grab a shoe-box, print out your favourite design, and make your very own Arduino BOOMBOX!


Video

Watch the following video to see the project in action


Parts Required:

Optional components (for the BoomBox Enclosure):
  • Empty Shoe Box
  • Paper
  • Printer
  • Glue
If I had a 3D printer - I would have printed my own enclosure, but a shoebox seems to work just fine.


Putting it Together

Place the Grove Base shield onto the Arduino UNO,
and then connect each of the Grove Modules as per the table below.


If you do not have a Grove Base shield,
you can still connect the modules directly to the Arduino as per the table below:


When you are finished connecting the modules, it should look something like this:
  (ignore the battery pack):
 

As you can see from the picture above. You can cut holes out of the shoebox and stick the modules in place. Please ignore the battery pack, because you won't use it until after you have uploaded the Arduino code.


Arduino Sketch


  1
2
3
4
5
6
7
8
9
10
11
12
13
14
15
16
17
18
19
20
21
22
23
24
25
26
27
28
29
30
31
32
33
34
35
36
37
38
39
40
41
42
43
44
45
46
47
48
49
50
51
52
53
54
55
56
57
58
59
60
61
62
63
64
65
66
67
68
69
70
71
72
73
74
75
76
77
78
79
80
81
82
83
84
85
86
87
88
89
90
91
92
93
94
95
96
97
98
99
100
101
102
103
104
105
106
107
108
109
110
111
112
113
114
115
116
117
118
119
120
121
122
123
124
125
126
127
128
129
130
131
132
133
134
135
136
137
138
139
140
141
142
143
144
145
146
147
148
149
150
151
152
153
154
155
156
157
158
159
160
161
162
163
164
165
166
167
168
169
170
171
172
173
174
175
176
177
178
179
180
181
182
183
184
185
186
187
188
189
190
191
192
193


/* ===============================================================================
      Project: Grove Serial MP3 Player overview
       Author: Scott C
      Created: 9th March 2015
  Arduino IDE: 1.6.0
      Website: http://arduinobasics.blogspot.com/p/arduino-basics-projects-page.html

  Description: The following Arduino sketch will allow you to control a Grove Serial MP3 player
               with a Grove Sliding Potentiometer (volume), a Grove button (next song), 
               and a Grove Switch (on/off). It will also show you how to retrieve some useful information from the player. 
               Some functions are not used in this sketch,but have been included for your benefit. 
               
               Additional features and functionality can be found on the WT5001 voice chip datasheet 
               which I retrieved from here: http://goo.gl/ai6oQ9
               
               The Seeedstudio wiki was a very useful resource for getting started with the various Grove modules:
               http://goo.gl/xOiSCl
=============================================================================== */

#include <SoftwareSerial.h>
SoftwareSerial mp3(2, 3); // The Grove MP3 Player is connected to Arduino digital Pin 2 and 3 (Serial communication)
int potPin = A0; // The Sliding Potentiometer is connected to AnalogPin 0
int potVal = 0; // This is used to hold the value of the Sliding Potentiometer
byte mp3Vol = 0; // mp3Vol is used to calculate the Current volume of the Grove MP3 player
byte oldVol = 0; // oldVol is used to remember the previous volume level
int ledPin = A1; // The Grove sliding potentiometer has an onboard LED attached to Analog pin 1.

int switchPin = 12; // The Grove Switch(P) is connected to digital Pin 12
int switchStatus = 0; // This is used to hold the status of the switch
int switchChangeStatus = 0; // Used to identify when the switch status has changed

int buttonPin = 5; // The Grove Button is connected to digital pin 5
int buttonStatus = 0; // This is used to hold the status of the button


void setup(){
  //Initialise the Grove MP3 Module
  delay(2500);
  mp3.begin(9600);
  
        
  // initialize the pushbutton and switch pin as an input:
  pinMode(buttonPin, INPUT);
  pinMode(switchPin, INPUT);
  
  // set ledPin on the sliding potentiometer to OUTPUT
  pinMode(ledPin, OUTPUT);
  
  //You can view the following demostration output in the Serial Monitor
  demonstrate_GET_FUNCTIONS();     
}


void loop(){
  switchStatus = digitalRead(switchPin);
  if(switchStatus==HIGH){
    if(switchChangeStatus==LOW){ // When Arduino detects a change in the switchStatus (from LOW to HIGH) - play song
      setPlayMode(0x02);                     // Automatically cycle to the next song when the current song ends
      playSong(00,01);                       // Play the 1st song when you switch it on
      switchChangeStatus=HIGH;
    }
    
    potVal = analogRead(potPin); // Analog read values from the sliding potentiometer range from 0 to 1023
    analogWrite(ledPin, potVal/4); // Analog write values range from 0 to 255, and will turn LED ON once potentiometer reaches about half way (or more).
    mp3Vol = map(potVal, 0, 1023, 0,31); // Convert the potentometer reading (0 - 1023) to fit within the MP3 player's Volume range (0 - 31)
    if((mp3Vol>(oldVol+1))|(mp3Vol<(oldVol-1))){ // Only make a change to the Volume on the Grove MP3 player when the potentiometer value changes
      oldVol = mp3Vol;
      setVolume(mp3Vol);
      delay(10); // This delay is necessary with Serial communication to MP3 player
    }

    buttonStatus = digitalRead(buttonPin);
    if(buttonStatus==HIGH){ // When a button press is detected - play the next song
      playNextSong();
      delay(200); // This delay aims to prevent a "skipped" song due to slow button presses - can modify to suit.
    }
  } else {
    if(switchChangeStatus==HIGH){ // When switchStatus changes from HIGH to LOW - stop Song.
      stopSong();
      switchChangeStatus=LOW;
    }
  } 
}


// demonstrate_GET_FUNCTIONS  will show you how to retrieve some useful information from the Grove MP3 Player (using the Serial Monitor).
void demonstrate_GET_FUNCTIONS(){
        Serial.begin(9600);
        Serial.print("Volume: ");
        Serial.println(getVolume());
        Serial.print("Playing State: ");
        Serial.println(getPlayingState());
        Serial.print("# of Files in SD Card:");
        Serial.println(getNumberOfFiles());
        Serial.println("------------------------------");
}


// writeToMP3: is a generic function that aims to simplify all of the methods that control the Grove MP3 Player

void writeToMP3(byte MsgLEN, byte A, byte B, byte C, byte D, byte E, byte F){
  byte codeMsg[] = {MsgLEN, A,B,C,D,E,F};
  mp3.write(0x7E); //Start Code for every command = 0x7E
  for(byte i = 0; i<MsgLEN+1; i++){
    mp3.write(codeMsg[i]); //Send the rest of the command to the GROVE MP3 player
  }
}


/* The Following functions control the Grove MP3 Player : see datasheet for additional functions--------------------------------------------*/

void setPlayMode(byte playMode){
  /* playMode options:
        0x00 = Single song - played only once ie. not repeated.  (default)
        0x01 = Single song - cycled ie. repeats over and over.
        0x02 = All songs - cycled 
        0x03 = play songs randomly                                           */
        
  writeToMP3(0x03, 0xA9, playMode, 0x7E, 0x00, 0x00, 0x00);  
}


void playSong(byte songHbyte, byte songLbyte){ // Plays the selected song
  writeToMP3(0x04, 0xA0, songHbyte, songLbyte, 0x7E, 0x00, 0x00);            
}


void pauseSong(){ // Pauses the current song
  writeToMP3(0x02, 0xA3, 0x7E, 0x00, 0x00, 0x00, 0x00);
}


void stopSong(){ // Stops the current song
  writeToMP3(0x02, 0xA4, 0x7E, 0x00, 0x00, 0x00, 0x00);
}


void playNextSong(){ // Play the next song
  writeToMP3(0x02, 0xA5, 0x7E, 0x00, 0x00, 0x00, 0x00);
}


void playPreviousSong(){ // Play the previous song
  writeToMP3(0x02, 0xA6, 0x7E, 0x00, 0x00, 0x00, 0x00);
}


void addSongToPlayList(byte songHbyte, byte songLbyte){
  //Repeat this function for every song you wish to stack onto the playlist (max = 10 songs)
  writeToMP3(0x04, 0xA8, songHbyte, songLbyte, 0x7E, 0x00, 0x00);
}


void setVolume(byte Volume){ // Set the volume
  byte tempVol = constrain(Volume, 0, 31);
  //Volume range = 00 (muted) to 31 (max volume)
  writeToMP3(0x03, 0xA7, tempVol, 0x7E, 0x00, 0x00, 0x00); 
}


/* The following functions retrieve information from the Grove MP3 player : see data sheet for additional functions--------------*/

// getData: is a generic function to simplifly the other functions for retieving information from the Grove Serial MP3 player
byte getData(byte queryVal, int dataPosition){
  byte returnVal = 0x00;
  writeToMP3(0x02, queryVal, 0x7E, 0x00, 0x00, 0x00, 0x00);
  delay(50);
  for(int x = 0; x<dataPosition; x++){
    if(mp3.available()){
      returnVal = mp3.read();
      delay(50);
    }
  }
  return(returnVal);
}

byte getVolume(){ //Get the volume of the Grove Serial MP3 player
  //returns value from 0 - 31
  return(getData(0xC1, 4));
}

byte getPlayingState(){ //Get the playing state : Play / Stopped / Paused
  //returns 1: Play, 2: Stop, 3:Paused
  return(getData(0xC2, 2));
}


byte getNumberOfFiles(){ //Find out how many songs are on the SD card
  //returns the number of MP3 files on SD card
  return(getData(0xC4, 3));
}

You will notice from the code, that I did not utilise every function. I decided to include them for your benifit. This Serial MP3 module makes use of a high quality MP3 audio chip known as the "WT5001". Therefore, you should be able to get some additional features and functionality from this document. Plus you may find some extra useful info from the Seeedstudio wiki.
 
IMPORTANT: You need to load your MP3 sounds or songs onto the SDHC card before you install it onto the Serial MP3 player.
 
Once the SDHC card is installed, and your code is uploaded to the Arduino, all you have to do now is connect the MP3 player to some headphones or a powered speaker. You can then power the Arduino and modules with a battery pack or some other portable power supply.
 
You can design and decorate the shoebox in any way you like. Just print out your picture, glue them on, and before you know it, you will have your very own Arduino Boombox.


Comments

I was very surprised by the quality of the sound that came from the MP3 module. It is actually quite good.

This tutorial was an introduction to the Grove Serial MP3 module in it's most basic form. You could just as easily use some other sensor to trigger the MP3 module. For example, you could get it to play an alert if a water leak was detected, or if a door was opened, or if the temperature got too high or too low. You could get it to play a reminder when you walk into your room. The possibilities are endless.

I really liked this module, and I am sure it will appear in a future tutorial.


If you like this page, please do me a favour and show your appreciation :

 
Visit my ArduinoBasics Google + page.
Follow me on Twitter by looking for ScottC @ArduinoBasics.
I can also be found on Pinterest and Instagram.
Have a look at my videos on my YouTube channel.


However, if you do not have a google profile...
Feel free to share this page with your friends in any way you see fit.

A collective instrument capturing breathe with paper windmills

Cata Sopros is interactive sound installation running on Arduino Uno and created by Elas Duas, a multidisciplinary studio based in the city of Guimarães (Portugal). If you translate the title from portuguese it means: Breathe Catchers. In fact the project is a collective musical instrument made with paper windmills transforming the users’ breathe into sounds:

The windmills have inbuilt electret microphones that were connected to an Arduino Uno. The sensor data was then sent to MaxMSP and the sounds were played with Ableton Live. The video was shot at the cloister of the beautiful Alberto Sampaio museum in Guimarães, Portugal.

Enjoy the video: