Posts with «radio hacks» label

Off-Grid Radio Also Repairable Off-Grid

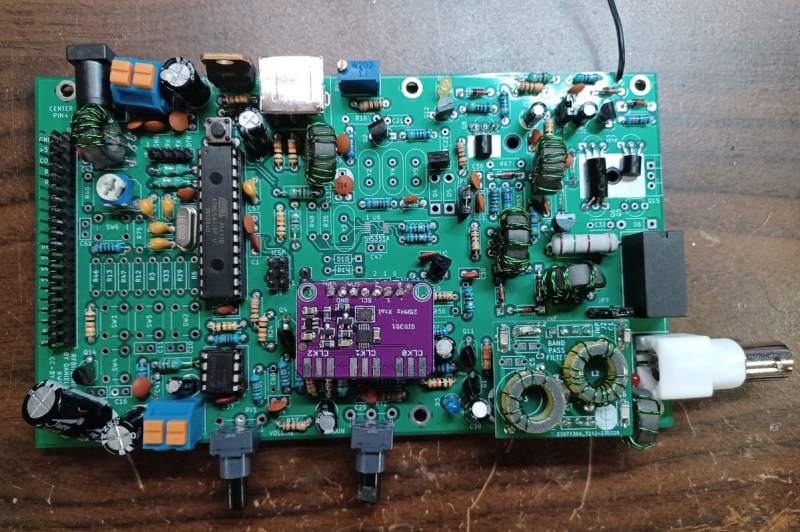
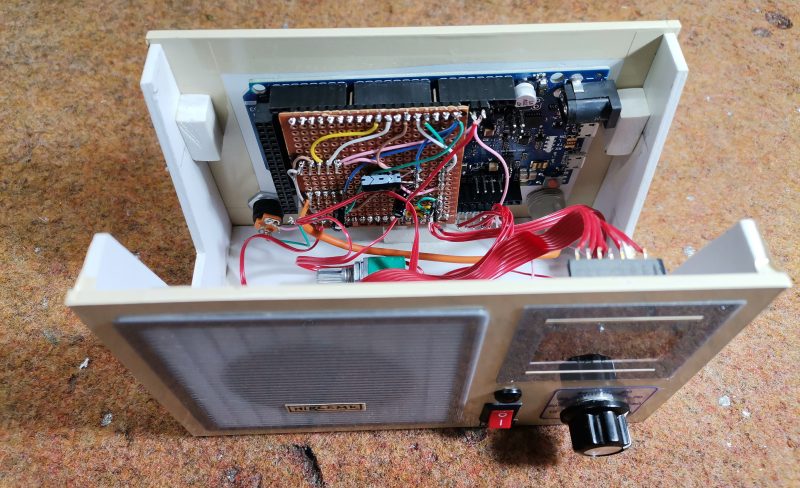
Low-power radios, often referred to in the amateur radio community as QRP radios, have experienced a resurgence in popularity lately. Blame it on certain parts of the hobby become more popular, like Parks on the Air (POTA) or Summits on the Air (SOTA). These are events where a radio operator operates off-grid at remote parks or mountaintops. These QRP rigs are a practical and portable way to make contacts. You would think that a five- or ten-watt rig running on batteries would be simple. Surprisingly, they can be enormously complex and expensive. That’s why [Stephen] built the RFBitBanger, a QRP radio designed to not only be usable off-grid but to be built and maintained off-grid as well.

The radio accomplishes this goal by being built out of as many standard off-the-shelf components as possible. It eschews modern surface-mount components in favor of the much more accessible through-hole parts, including the ATMEGA328P at the center of the build. A PCB design is also available, but it can be built on perf board nearly as easily. The radio supports any mode a QRP operator might use, including CW, SSB, RTTY, and a new mode designed explicitly for this radio called SCAMP which is a low bandwidth, low SNR digital mode built into the Arduino-based firmware. It’s a single-band radio, but any band between 20 and 80 meters can be selected with pluggable filters.

As far as bomb-proof radios go, we can’t imagine a better way to live out an apocalypse than with a radio like this. As long as there’s a well-stocked parts drawer around, this radio could theoretically reach around the world without worrying about warranty claims, expensive parts, or even a company going out of business or not stocking parts for old radios anymore. There’s also more information about this build at the Open Research Institute for those interested. And, if you’re wondering how useful any radio could be using only five watts of transmitter power, take a look at this in-depth look at QRP radio operation.

RF Remote Made Easy

The 433 MHz spectrum is a little bit of an oddball. It’s one of the few areas of the radio spectrum which is nearly universally unlicensed, meaning as long as devices using it adhere to the power restrictions and other guidelines about best practices, it’s essentially an open playground. IoT devices operate here, as well as security systems and, of course, remote controls. And, using a few off-the-shelf parts [hesam.moshiri] shows us how to take advantage of this piece of spectrum by designing and building a programmable and versatile 4-channel 433 MHz remote control.

Built around an ATmega8 microcontroller, making it easy to work with Arduino sketches, and with a 2×8 character LCD for ease-of-use when not connected to a computer, the wireless switching device can store up to 80 remote control codes in its EEPROM memory. This was one of the harder parts for [hesam] to sort out, but using structures to store the data for the codes eventually solved the problems. A simple GUI makes using it with whatever remote happens to be on hand fairly straightforward, including the ability to record codes from existing remotes on the fly and also to associate those codes with specific actions.

Schematics and a bill of materials are available on the project’s page, making this fairly accessible to those looking to add some wireless connectivity to a project, home automation system, or IoT device. It’s mainly set up as a switching device, but with some modifications could be put to work doing more complex tasks. The 433 MHz spectrum is an exciting place to be, too, and things like setting up entire security systems using it are not too far removed from a switching device like this.

Bringing a Baofeng into the Cyberpunk 2077 Universe

You’ve got to love the aesthetics of dystopian cyberpunk video games, where all the technology looks like it’s cobbled together from cast-off bits of the old world’s remains. Kudos go to those who attempt to recreate these virtual props and bring them into the real world, but our highest praise goes to those who not only make a game-realistic version of a prop, but make it actually work.

Take the Nokota Manufacturing radio from Cyberpunk 2077, for instance. [Taylor] took one look at that and knew it would be the perfect vessel for a Baofeng UV-5R, the dual-band transceiver that amateur radio operators love to hate. The idea is to strip the PCB out of a Baofeng — no worries, the things cost like $25 — and install it in a game-accurate 3D printed case. But this is far from just a case mod, since [Taylor]’s goal is to replace the radio’s original controls with something closer to what’s in the game.

To that end, [Taylor] is spinning up an interface to the stock radio’s keypad using some 7400-series bilateral analog switches. Hooked to the keypad contacts and controlled by a Mini MEGA 2560 microcontroller, the interface is able to send macros that imitate the keypresses necessary to change frequencies and control the radio’s settings, plus display the results on the yellow OLED screen that seems a dead-ringer for the in-game display. The video below shows some early testing of the interface.

While very much still a work in progress, we’ve been following [Taylor]’s project for a week or so and he’s really gaining some ground. We’ve encouraged him to enter this one in the Cyberdeck Challenge we’ve got going on now; it might not have much “deck” going for it, but it sure does have a lot of “cyber.”

DIY Arduino Due TEA5767 FM Radio

Older hackers will remember that a crystal set radio receiver was often one of the first projects attempted.  Times have changed, but there’s still something magical about gathering invisible signals from the air and listening to the radio on a homemade receiver. [mircemk] has brought the idea right up to date by building an FM radio with an OLED display, controlled with a rotary encoder.

The design is fairly straightforward, based as it is on another project that [mircemk] found on a Chinese site, but the build looks very slick and would take pride of place on any hacker’s workbench. An Arduino Due forms the heart of the project, controlling a TEA5767 module, an SH1106 128×64 pixel OLED display and a rotary encoder. The sound signal is passed through an LM4811 headphone amplifier for private listening, and a PAM8403 Class D audio amplifier for the built-in loudspeaker. The enclosure is made from PVC panels, and accented with colored adhesive tape for style.

It’s easier than ever before to quickly put together projects like this by connecting pre-built modules and downloading code from the Internet, but that doesn’t mean it’s not a worthwhile way to improve your skills and make some useful devices like this one. There are so many resources available to us these days and standing on the shoulders of giants has always been a great way to see farther.

We’ve shown some other radio projects using Arduinos and the TEA5767 IC in the past, such as this one on a tidy custom PCB, and this one built into an old radio case.

Hack a Day 09 Oct 06:00

Impatience is a Virtue When Testing This Old Maritime Teleprinter

[Larry Wall], inventor of Perl, once famously said that programmers have three key virtues: sloth, hubris, and impatience. It’s safe to say that these personality quirks are also present in some measure in most hardware hackers, too, with impatience being perhaps the prime driver of great hacks. Life’s too short to wait for someone else to build it, whatever it may be.

Impatience certainly came into play for [Sebastian (AI5GW)] while hacking a NAVTEX receiver. The NAVTEX system allows ships at sea to receive text broadcast alerts for things like changes in the weather or hazards to navigation. The trouble is, each NAVTEX station only transmits once every four hours, making tests of the teleprinter impractical. So [Sebastian]’s solution was to essentially create his own NAVTEX transmitter.

Job one was to understand the NAVTEX protocol, which is a 100-baud, FSK-modulated signal with characters encoded in CCIR 476. Since this encoding is also used in amateur radio teletype operations, [Sebastian] figured there would surely be an Arduino library for encoding and decoding it. Surprisingly, there wasn’t, but there is now, allowing an Arduino to produce the correct sequence of pulses for a CCIR 476-encoded message. Fed into a function generator, the mini-NAVTEX station’s signal was easily received and recorded by the painfully slow teleprinter. There’s that impatience again.

We thought this was a neat hack, and we especially appreciate that [Sebastian]’s efforts resulted in a library that could be useful to hams and other radio enthusiasts in the future. We’ve talked about some more modern amateur radio digital modes, like WSPR and FT8, but maybe it’s time to look at some other modes, too.

Pocket Radio Powered By Tiny Microcontroller

Before the days of MP3 players and smartphones, and even before portable CD players, those of us of a certain age remember that our cassette players were about the only way to take music on-the-go. If we were lucky, they also had a built-in radio for when the single tape exhausted both of its sides. Compared to then, it’s much easier to build a portable radio even though cassettes are largely forgotten, as [wagiminator] shows us with this radio design based on an ATtiny.

The build is about as compact as possible, with the aforementioned ATtiny 402/412 as its core, it also makes use of an integrated circuit FM tuner,  an integrated audio amplifier with its own single speaker, and a small OLED display. The unit also boasts its own lithium-polymer battery charger and its user interface consists of only three buttons, plenty for browsing radio stations and controlling volume.

The entire build fits easily in the palm of a hand and is quite capable for a mobile radio, plus all of the schematics and code is available on the project page. While it doesn’t include AM capability, just the fact that FM is this accessible nowadays when a few decades ago it was cutting-edge technology is quite remarkable. If you’re looking for an even smaller FM receiver without some of the bells and whistles of this one, take a look at this project too.

Hack a Day 06 Jul 21:00
arduino  attiny  audio  code  fm  oled  radio  radio hacks  schematics  speaker  

Ham Radio Gets Brain Transplant

Old radios didn’t have much in the way of smarts. But as digital synthesis became more common, radios often had as much digital electronics in them as RF circuits. The problem is that digital electronics get better and better every year, so what looked like high-tech one year is quaint the next. [IMSAI Guy] had an Icom IC-245 and decided to replace the digital electronics inside with — among other things — an Arduino.

He spends a good bit of the first part of the video that you can see below explaining what the design needs to do. An Arduino Nano fits and he uses a few additional parts to get shift registers, a 0-1V digital to analog converter, and an interface to an OLED display.

Unless you have this exact radio, you probably won’t be able to directly apply this project. Still, it is great to look over someone’s shoulder while they design something like this, especially when they explain their reasoning as they go.

The PCB, of course, has to be exactly the same size as the board it replaces, including mounting holes and interface connectors. It looks like he got it right the first time which isn’t always easy. Does it work? We don’t know by the end of the first video. You’ll have to watch the next one (also below) where he actually populates the PCB and tests everything out.

Hack a Day 27 Nov 18:01

Arduino + Ham Radio = Texting

Over on the Spectrum web site, [Dale] — a relatively new ham radio operator — talks about his system for sending text messaging over VHF radios called HamMessenger. Of course, hams send messages all the time using a variety of protocols, but [Dale] wanted a self-contained and portable unit with a keyboard, screen, and a GPS receiver. So he built one. You can find his work on GitHub.

At the heart of the project is MicroAPRS, an Arduino firmware for packet radio. Instead of using a bigger computer, he decided to dedicate another Arduino to do everything but the modem function.

You can probably figure out the rest. A $10 GPS, a battery pack, a charge controller, and a few user interface parts like an OLED screen and a keyboard. In addition, there’s an SD card to store messages.

Of course, we couldn’t help but notice that our cell phone has a keyboard, screen, GPS, and storage. We might have been tempted to work out a way to connect the radio to it by Bluetooth. But we have to admit the little HamMessenger setup is cool-looking and probably lasts longer on a charge than our phone, too.

Detect Lightning Strikes with an Arduino

Lightning is a powerful and seemingly mysterious force of nature, capable of releasing huge amounts of energy over relatively short times and striking almost at random. Lightning obeys the laws of physics just like anything else, though, and with a little bit of technology some of its mysteries can be unraveled. For one, it only takes a small radio receiver to detect lightning strikes, and [mircemk] shows us exactly how to do that.

When lightning flashes, it also lights up an incredibly wide spectrum of radio spectrum as well. This build uses an AM radio built into a small integrated circuit to detect some of those radio waves. An Arduino Nano receives the signal from the TA7642 IC and lights up a series of LEDs as it detects strikes in closer and closer proximity to the detector. A white LED flashes when a strike is detected, and some analog circuitry supports an analog galvanometer which moves during lightning strikes as well.

While this project isn’t the first lightning detector we’ve ever seen, it does have significantly more sensitivity than most other homemade offerings. Something like this would be a helpful tool to have for lifeguards at a pool or for a work crew that is often outside, but we also think it’s pretty cool just to have around for its own sake, and three of them networked together would make triangulation of strikes possible too.

FM Radio from Scratch using an Arduino

Building radio receivers from scratch is still a popular project since it can be done largely with off-the-shelf discrete components and a wire long enough for the bands that the radio will receive. That’s good enough for AM radio, anyway, but you’ll need to try this DIY FM receiver if you want to listen to something more culturally relevant.

Receiving frequency-modulated radio waves is typically more difficult than their amplitude-modulated cousins because the circuitry necessary to demodulate an FM signal needs a frequency-to-voltage conversion that isn’t necessary with AM. For this build, [hesam.moshiri] uses a TEA5767 FM chip because of its ability to communicate over I2C. He also integrated a 3W amplifier into this build, and everything is controlled by an Arduino including a small LCD screen which displays the current tuned frequency. With the addition of a small 5V power supply, it’s a tidy and compact build as well.

While the FM receiver in this project wasn’t built from scratch like some AM receivers we’ve seen, it’s still an interesting build because of the small size, I2C capability, and also because all of the circuit schematics are available for all of the components in the build. For those reasons, it could be a great gateway project into more complex FM builds.

Hack a Day 05 Dec 00:00