Posts with «small» label

A Mega-Tiny Arduino

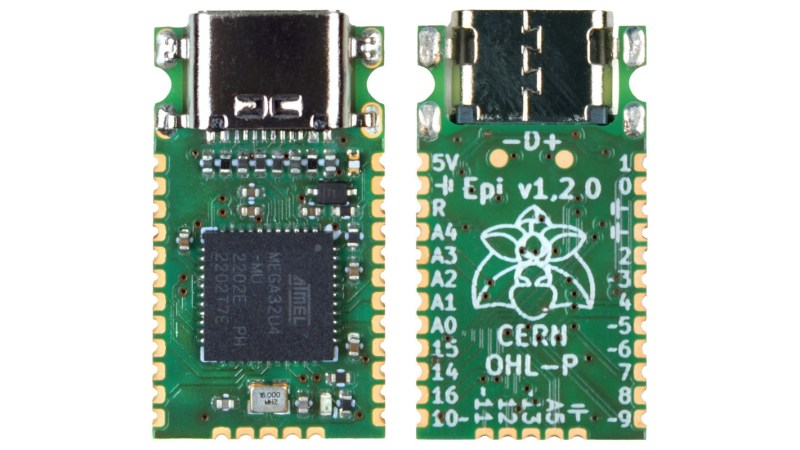
Integrated circuits, chipsets, memory modules, and all kinds of other transistor-based technology continues to get smaller, cheaper, and more energy efficient as time moves on. Not only are the components themselves smaller, but their supporting infrastructure is as well. Computers like the Raspberry Pi are about the size of a credit card and have computing power on the order of full-sized PCs from a few decades ago. The Arduino is no exception to this trend, either, and this new dev board called the Epi 32U4 might be the smallest ATmega platform we’ve seen so far.

As the name suggests, the board is based around the ATmega32U4 which is somewhat unique among Atmel chips in that it includes support for USB within the chip itself rather than relying on external translating circuitry. This makes it an excellent choice for any project which involves sending keyboard, mouse, or other peripheral information to a computer. This goes a few steps further with eliminating “bloat” compared to other boards, too. There’s no on-board voltage regulator, no LEDs except for a single one on pin 13, and even the pins and screw terminals are hemispherical rather than through-hole to save space.

One of the other features this board boasts over other small form factor boards is on-board USB-C, which is definitely a perk as more and more devices switch away from the various forms of older USB-type plugs. The project’s specifications are also available on this GitHub page for anyone that wants to produce their own. And, if you don’t have a 32U4 on hand and still want to build a keyboard project, it’s possible to get some other Arduinos to support these features but it’ll take a little more work.

Thanks to [Rasmus L] for the tip!

Hack a Day 03 Mar 00:00

FM Radio from Scratch using an Arduino

Building radio receivers from scratch is still a popular project since it can be done largely with off-the-shelf discrete components and a wire long enough for the bands that the radio will receive. That’s good enough for AM radio, anyway, but you’ll need to try this DIY FM receiver if you want to listen to something more culturally relevant.

Receiving frequency-modulated radio waves is typically more difficult than their amplitude-modulated cousins because the circuitry necessary to demodulate an FM signal needs a frequency-to-voltage conversion that isn’t necessary with AM. For this build, [hesam.moshiri] uses a TEA5767 FM chip because of its ability to communicate over I2C. He also integrated a 3W amplifier into this build, and everything is controlled by an Arduino including a small LCD screen which displays the current tuned frequency. With the addition of a small 5V power supply, it’s a tidy and compact build as well.

While the FM receiver in this project wasn’t built from scratch like some AM receivers we’ve seen, it’s still an interesting build because of the small size, I2C capability, and also because all of the circuit schematics are available for all of the components in the build. For those reasons, it could be a great gateway project into more complex FM builds.

Hack a Day 05 Dec 00:00

Many Uses For A Single Button

When building projects with a simple goal in mind, it’s not unheard of for us to add more and more switches, buttons, and complexity as the project goes through its initial prototyping stages. Feature creep like this tends to result in a tangled mess rather than a usable project. With enough focus, though, it’s possible to recognize when it’s happening and keep to the original plans. On the other hand, this single-button project with more than one use seems to be the opposite of feature creep. (YouTube, embedded below.)

[Danko]’s project has one goal: be as useful as possible while only using a single button and a tiny screen. Right now the small handheld device can be used as a stopwatch, a counter, and can even play a rudimentary version of flappy bird. It uses an Arduino Pro Mini, a 64×48 OLED screen running on I2C, and has a miniscule 100 mAh 3.7V battery to power everything. The video is worth watching if you’ve never worked with this small of a screen before, too.

Getting three functions out of a device with only one button is a pretty impressive feat, and if you can think of any other ways of getting more usefulness out of something like this be sure to leave it in the comments below. [Danko] is no stranger to simple projects with tiny screens, either. We recently featured his homebrew Arduino calculator that uses an even smaller screen.

Tiny, Wearable 8-Bit VT100 Terminal

In the modern era of computing, the end-user is often quite far removed from the machine they’re using. At least in terms of abstraction levels, the user experience of most computers, smart phones, and the like are very far away from the zeros and ones. If you need to get down to that level though, you’ll have to make your way to a terminal somehow, and reminisce fondly about the days when everything was accessed through a serial line.

Nowadays, some harmless nostalgia is often accompanied by a challenge as well, as [Nick] demonstrated with his tiny serial terminal. It mimics the parsing and rendering of a VT100 console using an Arduino Uno and a 1″x1″ TFT screen. His goal was to make it wearable like a wristwatch would be, using two buttons as an HID device. With the size and simple interface, [Nick] also explores the possibility of mounting such a terminal to a pair of glasses.

While not everyone may want to interact with a serial terminal with only two buttons, it’s certainly a great demonstration of what is possible when it comes to implementing retro software in unique ways. There have been serial terminals implemented in many other unique places as well, such as old oscilloscopes and replicas from popular video games.


Filed under: Arduino Hacks

Parakeet Platoon Maze Platform

Primary image

What does it do?

Solves Just About Any Maze (When Completed)

Looking back on how I entered the world of robotics, I wished that I had a sturdy, easy to program Arduino shield and platform. Well, I made what I wished I had. It turned out to be my best looking robot ever! I made the shield in Fritzing (to attach to the Arduino Uno and the robot). The PCB image is attached (it is double sided, the darker wires are on the bottom). I know I have some empty space and rough edges on the pcb, but it still works flawlessly. I will create a library for the functions of the shield, greatly simplifying the programming aspect.

Cost to build

$85,00

Embedded video

Finished project

Number

Time to build

25 hours

Type

wheels

URL to more information

Weight

read more

Micro Magician robot controller - I can finally tick the project complete box!

I started designing this controller in December 2011. After 4 months and 2 previous revisions it will finally be shipping out April 2012. I think this is DAGU's best Arduino compatible robot controller yet!

Designed for small robots using small batteries, the Micro Magician is a 3.3V controller running at 8MHz.
Working from 3.6V to 9V means this constroller can run from a single LiPo cell or 3x NiMh batteries.
Reverse polarity protection means no blue smoke if you get your power wires crossed (reverse polarity diode rated at 3A).

read more

n/a