Posts with «pocket» label

Pocket Computer Reminds Us of PDAs

Before smartphones exploded on the scene in the late 00s, there was still a reasonable demand for pocket-sized computers that could do relatively simple computing tasks. Palm Pilots and other PDAs (Personal Digital Assistants) were all the rage in the ’90s and early ’00s, although for cutting-edge tech from that era plenty of these devices had astronomical price tags. This Arduino-based PDA hearkens back to that era, albeit with a much more accessible parts list.

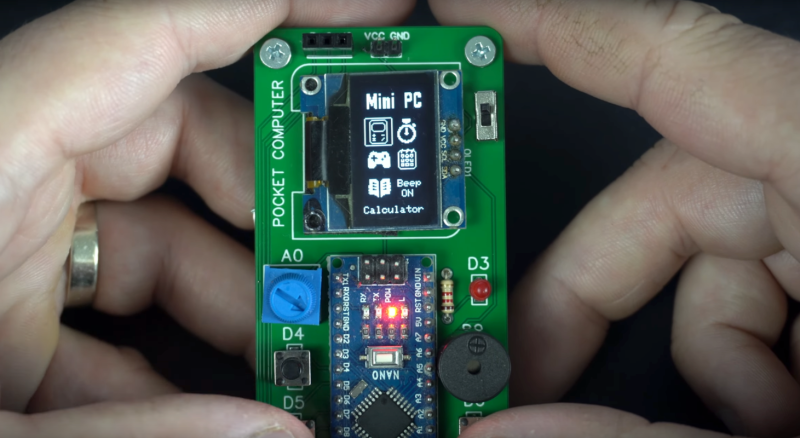
The build is based around an Arudino Nano with an OLED screen and has the five necessary functions for a PDA: calculator, stopwatch, games, phonebook, and a calendar. With all of these components on such a small microcontroller, memory quickly became an issue when using the default libraries. [Danko] uses his own custom libraries in order to make the best use of memory which are all available on the project’s GitHub page. The build also includes a custom PCB to keep the entire pocket computer pocket-sized.

There are some other features packed into this tiny build as well, like the breakout game that can be played with a potentiometer. It’s an impressive build that makes as much use of the microcontroller’s capabilities as is possible, and if you enjoy projects where a microcontroller is used as if it is a PC take a look at this Arduino build with its own command-line interface.

Hack a Day 23 Jun 21:00

Send Old-Fashioned Pager Messages with New-Fashioned Hardware

In a world of always-connected devices and 24/7 access to email and various social media and messaging platforms, it’s sometimes a good idea to take a step away from the hustle and bustle for peace of mind. But not too big of a step. After all, we sometimes need some limited contact with other humans, so that’s what [EverestX] set out to do with his modern, pocket-sized communication device based on pager technology from days of yore.

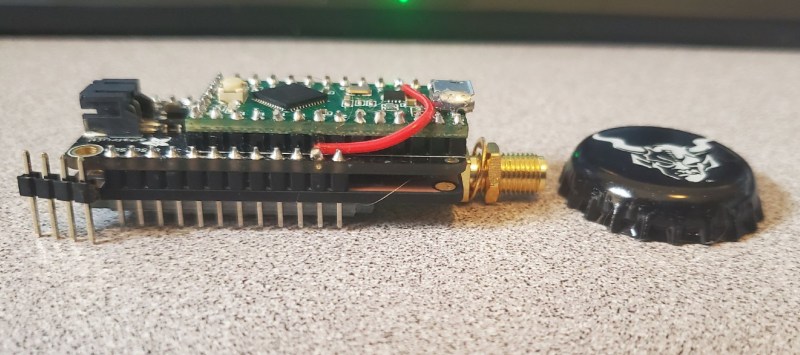
The device uses the POCSAG communications protocol, a current standard for pager communications that allows for an SMS-like experience for those still who still need (or want) to use pagers. [EverestX] was able to adapt some preexisting code and port it to an Atmel 32u4 microcontroller. With a custom PCB, small battery, an antenna, and some incredibly refined soldering skills, he was able to put together this build with an incredibly small footprint, slightly larger than a bottle cap.

Once added to a custom case, [EverestX] has an excellent platform for sending pager messages to all of his friends and can avoid any dreaded voice conversations. Pager hacks have been a favorite around these parts for years, and are still a viable option for modern communications needs despite also being a nostalgic relic of decades past. As an added bonus, the 32u4 microcontroller has some interesting non-pager features that you might want to check out as well.

Thanks to [ch0l0man] for the tip!

Hack a Day 18 May 21:00

Many Uses For A Single Button

When building projects with a simple goal in mind, it’s not unheard of for us to add more and more switches, buttons, and complexity as the project goes through its initial prototyping stages. Feature creep like this tends to result in a tangled mess rather than a usable project. With enough focus, though, it’s possible to recognize when it’s happening and keep to the original plans. On the other hand, this single-button project with more than one use seems to be the opposite of feature creep. (YouTube, embedded below.)

[Danko]’s project has one goal: be as useful as possible while only using a single button and a tiny screen. Right now the small handheld device can be used as a stopwatch, a counter, and can even play a rudimentary version of flappy bird. It uses an Arduino Pro Mini, a 64×48 OLED screen running on I2C, and has a miniscule 100 mAh 3.7V battery to power everything. The video is worth watching if you’ve never worked with this small of a screen before, too.

Getting three functions out of a device with only one button is a pretty impressive feat, and if you can think of any other ways of getting more usefulness out of something like this be sure to leave it in the comments below. [Danko] is no stranger to simple projects with tiny screens, either. We recently featured his homebrew Arduino calculator that uses an even smaller screen.

Kit Review – Altronics Pocket Oscillator

Introduction

In this review we examine the Pocket Oscillator Kit from Altronics, based on an design from (the now defunct) February and March 1989 editions of Electronics Australia magazine. The purpose of this oscillator is to give you a high quality, portable square or sine wave generator that can be used to test audio equipment, speaker response, fool about with oscilloscopes (!), and so on. The prototype basic specifications are as follows:

  • Frequency range: 41~1082 Hz and 735 Hz~18.1 kHz
  • Output: 1.27V RMS sine, 1.45V peak square
  • Load: 1.0V RMS sine into 330 Ω
  • Distortion: 0.16% THD at 1 kHz

Assembly

The kit is packaged in typical form, without any surprises:

In the usual Altronics fashion, the instructions are accompanied with a neat “electronics reference sheet” which covers many useful topics such as resistor colour codes, various formulae, PCB track widths, pinouts and more. The kit instructions are based on the original magazine article and include a small addendum which isn’t any problem.

Unlike some kits, everything is included to create a finished product (except for the IC socket):

… including a nice enclosure which has the control instructions screen-printed on the lid…

However at this point I think the definition of a “pocket” is the same used by Sir Clive Sinclair when he had those pocket televisions. At this time I won’t use the enclosure as my drill press is in storage, however look forward to fitting the kit within at a later point. The PCB has a neat solder mask and silk screen:

Assembly was pretty straight forward, the original design has tried to minimise PCB real-estate, so all the resistors are mounted vertically. The signal diodes take this a step further – each pair needs to be soldered together:

… then the pair is also mounted vertically:

However it all works in the end. The rest of the circuit went together well, and we used our own IC socket for the opamp:

From this point you need to wire up the power, switches and potentiometers:

… and consider mounting the whole lot in the enclosure (or before assembly!):

However as mentioned earlier, I just went for the open octopus method for time being:

How it works

The oscillator is based around the Texas Instruments TL064 opamp, and due to copyright I can’t give you the schematic. For complete details on the oscillator, either purchase the kit or locate the February and March 1989 edition of Electronics Australia magazine. However the waveforms from the oscillator looked good (as far as they can on a DSO):

Conclusion

The oscillator works well, however the PCB layout could have been a little lot easier on the end-user. It’s time for a redesign, possibly put all the contacts for external switches around the perimeter – and allow space for the diodes to lay normally. Nevertheless – this is a neat kit, and still quite popular after all these years. For the price you get a few hours of kit fun and a useful piece of test equipment. So if you’re into audio or experimenting, check it out. Full-sized images are available on flickr.

And while you’re here – are you interested in Arduino? Check out my new book “Arduino Workshop” from No Starch Press – also shortly available from Altronics.

In the meanwhile have fun and keep checking into tronixstuff.com. Why not follow things on twitterGoogle+, subscribe  for email updates or RSS using the links on the right-hand column? And join our friendly Google Group – dedicated to the projects and related items on this website. Sign up – it’s free, helpful to each other –  and we can all learn something.

[Note – kit purchased without notifying the supplier]

The post Kit Review – Altronics Pocket Oscillator appeared first on tronixstuff.
Tronixstuff 07 Nov 04:08