Posts with «memory» label

Pocket Computer Reminds Us of PDAs

Before smartphones exploded on the scene in the late 00s, there was still a reasonable demand for pocket-sized computers that could do relatively simple computing tasks. Palm Pilots and other PDAs (Personal Digital Assistants) were all the rage in the ’90s and early ’00s, although for cutting-edge tech from that era plenty of these devices had astronomical price tags. This Arduino-based PDA hearkens back to that era, albeit with a much more accessible parts list.

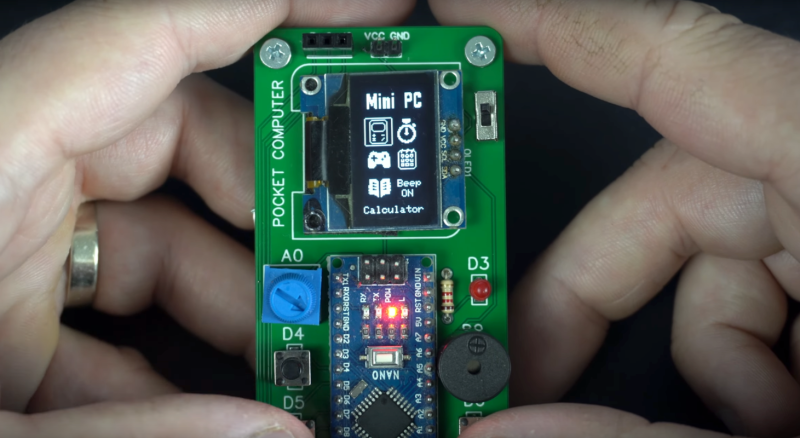
The build is based around an Arudino Nano with an OLED screen and has the five necessary functions for a PDA: calculator, stopwatch, games, phonebook, and a calendar. With all of these components on such a small microcontroller, memory quickly became an issue when using the default libraries. [Danko] uses his own custom libraries in order to make the best use of memory which are all available on the project’s GitHub page. The build also includes a custom PCB to keep the entire pocket computer pocket-sized.

There are some other features packed into this tiny build as well, like the breakout game that can be played with a potentiometer. It’s an impressive build that makes as much use of the microcontroller’s capabilities as is possible, and if you enjoy projects where a microcontroller is used as if it is a PC take a look at this Arduino build with its own command-line interface.

Hack a Day 23 Jun 21:00

Stress-Testing An Arduino’s EEPROM

Every time one of us flashes an Arduino’s internal memory, a nagging thought in the backs of our minds reminds us that, although everything in life is impermanent, nonvolatile re-writable memory is even more temporary. With a fixed number of writes until any EEPROM module fails, are we wasting writes every time we upload code with a mistake? The short answer is that most of us shouldn’t really be concerned with this unless we do what [AnotherMaker] has done and continually write data until the memory in an Arduino finally fails.

The software for this is fairly simple. He simply writes the first 256 ints with all zeros, reads them to make sure they are all there, and then repeats the process with ones. After iterating this for literally millions of times continuously over the course of about a month he was finally able to get his first read failure. Further writes past this point only accelerated the demise of the memory module. With this method he was able to get nearly three million writes before the device failed, which is far beyond the tens or hundreds of thousands typically estimated for a device of this type.

To prove this wasn’t an outlier, [AnotherMaker] repeated the test, and did a few others while writing to a much smaller amount of memory. With this he was able to push the number of cycles to over five million. Assuming the Arduino Nano clone isn’t using an amazingly high-quality EEPROM we can safely assume that most of us have nothing to worry about and our Arduinos will be functional for decades to come. Unless a bad Windows driver accidentally bricks your device.

Thanks to [morgan] for the tip!

Hack a Day 08 Apr 03:00

Four Servo Fingers Play Simon Better Than You Ever Could

Remember Simon? We sure do. Simon — as in “Simon says…” — from the leading edge of electronic games in the 1970s, which used four buttons, colored lights, and simple tones as the basis for a memory game. Players had to remember the specific sequence of lights and replay the pattern in order to advance to the next round. It was surprisingly addictive, at least for the era.

For those who never quite got into the Simon groove, fear not — the classic game has now been fully automated. While there were plenty of approaches that could have taken to interfacing to the game, [ido roseman] went with the obvious — and best, in our opinion — technique and simulated a human player’s finger presses with servo-controlled arms. Each arm carries a light-dependent resistor that registers the light coming from the key it’s poised above; the sequence of lights is sensed and recorded by an Arduino, which then drives the servo fingers’ replay attack. The fingers aren’t exactly snappy in their response, which might cause problems — if we recall correctly, Simon is somewhat picky about the speed with which the keys are pressed, at least at higher levels of play.

On the whole, we really like this one, not least for the nostalgia factor. We’ve had a lot of recreations of Simon over the years, including a Dance Dance Revolution version, but few attempts to automate it. And a crazy idea: wouldn’t it be fun to replace the replay attack with a machine learning system that figures out how to play Simon by randomly pressing keys and observing the results?

Hack a Day 11 May 00:00
arduino  cds  game  games  ldr  memory  replay  simon  

Arduino Plays NES Games

Watching the advancement of technology is interesting enough by looking at improved specifications for various components as the years go by. But clock speeds, memory size, and power consumption are all fairly intangible compared to actual implementation of modern technology when compared to days of yore. For example, this $40 microcontroller can do what a video game console was able to do in the 80s for a tenth of the (inflation adjusted) price.

The NESDUE is an emulator for NES games which runs completely on an Arduino Due. The Arduino does have some limitations that have to be worked around to get the Nintendo to work, though. For one, it needs to be overclocked to be playable and it also needs a workaround to get past the memory limit of 96 kB of RAM. From there, a small screen is wired up along with a controller (from a Super Nintendo) and the gaming can begin.

This is an impressive feat for an Arduino platform to accomplish, especially with the amount of memory tweaking that has to happen. This might be the most advanced gaming system available that runs everything on an Arduino, right up there with the Arduinocade which can provide an arcade-like experience straight from the Arduino as well.

The King of All Game Genies In An Arduino

While Nintendo is making a killing on nostalgic old consoles, there is a small but dedicated group of hackers still working with the original equipment. Since the original NES was rolled out in the 80s, though, there are a few shortcomings with the technology. Now, though, we have Arduinos, cheap memory, and interesting toolchains. What can we do with this? Absolutely anything we want, like playing modern video games on this antiquated system. [uXe] added dual-port memory to his ancient NES console, opening up the door to using the NES as a sort of video terminal for an Arduino. Of course, this is now also the King of All Game Genies and an interesting weekend project to boot.

Most NES cartridges have two bits of memory, the PRG and CHR ROMs. [uXe] is breaking out the cartridge connector onto an exceptionally wide rainbow ribbon cable, and bringing it into a custom Arduino Mega shield loaded up with two 16K dual-port RAM chips. These RAM chips effectively replace the PRG and CHR ROMs Since these are dual-port RAM chips, they can be written to by the Arduino and read by the NES simultaneously.

The NES sees one port of the RAM and can read and write from it while the Arduino still has access to make changes to the other post while that’s happening. A trick like this opens up a whole world of possibilities, most obviously with tiling and other graphics tricks that can push beyond the console’s original capabilities. [uXe] is currently playing Arduboy games on the NES — a really neat trick to pull off. Well done [uXe]!

Be sure to check out the video below of the NES running some games from the Arduboy system. It seems to integrate seamlessly into the hardware, so if you’ve always had a burning desire to fix crappy graphics on some of your favorite games, or run some special piece of software on an NES, now might just be your time to shine.


Filed under: nintendo hacks
Hack a Day 20 Nov 16:31

Chest of Drawers Stores Audio Memories

Some people collect stamps, some collect barbed wire, and some people even collect little bits of silicon and plastic. But the charmingly named [videoschmideo] collects memories, mostly of his travels around the world with his wife. Trinkets and treasures are easy to keep track of, but he found that storing the audio clips he collects a bit more challenging. Until he built this audio memory chest, that is.

Granted, you might not be a collector of something as intangible as audio files, and even if you are, it seems like Google Drive or Dropbox might be the more sensible place to store them. But the sensible way isn’t always the best way, and we really like this idea. Starting with what looks like an old card catalog file — hands up if you’ve ever greedily eyed a defunct card catalog in a library and wondered if it would fit in your shop for parts storage — [videoschmideo] outfitted 16 drawers with sensors to detect when they’re opened. Two of the drawers were replaced by speaker grilles, and an SD card stores all the audio files. When a drawer is opened, a random clip from that memory is played while you look through the seashells, postcards, and what-have-yous. Extra points for using an old-school typewriter for the drawer labels, and for using old card catalog cards for the playlists.

This is a simple idea, but a powerful one, and we really like the execution here. This one manages to simultaneous put us in the mood for some world travel and a trip to a real library.


Filed under: misc hacks
Hack a Day 18 Sep 12:00

New Project: Two Player Simon Memory Game With External Switches

I designed a two player version of Simon that runs on Arduino, letting you play head to head.

Read more on MAKE