Posts with «atmega2560» label

An Open Hardware Automatic Spinning Machine
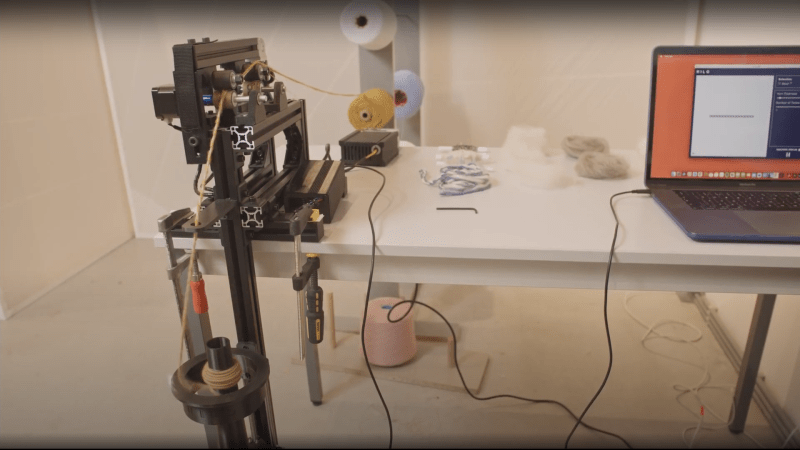
The team at the Berlin-based Studio HILO has been working on ideas and tools around developing a more open approach to small-scale textile production environments. Leveraging open-source platforms and tools, the team has come up with a simple open hardware spinning machine that can be used for interactive yarn production, right on the desktop. The frame is built with 3030 profile aluminium extrusions, with a handful of 3D printed, and a smidge of laser cut parts. Motion is thanks to, you guessed it, NEMA 17 stepper motors and the once ubiquitous Arduino Mega 2560 plus RAMPS 1.4 combination that many people will be very familiar with.

The project really shines on the documentation side of things, with the project GitLab positively dripping with well-organised information. One minor niggle is that you’ll need access to a polyjet or very accurate multi-material 3D printer to run off the drive wheel and the associated trailing wheel. We’re sure there’s a simple enough way to do it without those tools, for those sufficiently motivated.

We liked the use of Arduino for the firmware, keeping things simple, and in the same vein, Processing for the user interface. That makes sending values from the on-screen slider controls over the USB a piece of cake. Processing doesn’t seem to pop up on these pages too often, which is a shame as it’s a great tool to have at one’s disposal. On the subject of the user interface, it looks like for now only basic parameters can be tweaked on the fly, with some more subtle parameters needing fixing at firmware compilation time. With a bit more time, we’re sure the project will flesh out a bit more, and that area will be improved.

Of course, if you only have raw fibers, that are not appropriately aligned, you need a carder, like this one maybe?

Thanks [Daniel] for the tip!

Debugging with Serial Print at 5333333 Baud

Debugging with printf is something [StorePeter] has always found super handy, and as a result he’s always been interested in tweaking the process for improvements. This kind of debugging usually has microcontrollers sending messages over a serial port, but in embedded development there isn’t always a hardware UART, or it might already be in use. His preferred method of avoiding those problems is to use a USB to Serial adapter and bit-bang the serial on the microcontroller side. It was during this process that it occurred to [StorePeter] that there was a lot of streamlining he could be doing, and thanks to serial terminal programs that support arbitrary baud rates, he’s reliably sending debug messages over serial at 5.3 Mbit/sec, or 5333333 Baud. His code is available for download from his site, and works perfectly in the Arduino IDE.

The whole thing consists of some simple, easily ported code to implement a bare minimum bit-banged serial communication. This is output only, no feedback, and timing consists of just sending bits as quickly as the CPU can handle, leaving it up to the USB Serial adapter and rest of the world to handle whatever that speed turns out to be. On a 16 MHz AVR, transmitting one bit can be done in three instructions, which comes out to about 5333333 baud or roughly 5.3 Mbit/sec. Set a terminal program to 5333333 baud, and you can get a “Hello world” in about 20 microseconds compared to 1 millisecond at 115200 baud.

He’s got additional tips on using serial print debugging as a process, and he’s done a followup where he stress-tests the reliability of a 5.3 MBit/sec serial stream from an ATMega2560 at 16 MHz in his 3D printer, and found no missed packets. That certainly covers using printf as a debugger, so how about a method of using the debugger as printf?

The King of All Game Genies In An Arduino

While Nintendo is making a killing on nostalgic old consoles, there is a small but dedicated group of hackers still working with the original equipment. Since the original NES was rolled out in the 80s, though, there are a few shortcomings with the technology. Now, though, we have Arduinos, cheap memory, and interesting toolchains. What can we do with this? Absolutely anything we want, like playing modern video games on this antiquated system. [uXe] added dual-port memory to his ancient NES console, opening up the door to using the NES as a sort of video terminal for an Arduino. Of course, this is now also the King of All Game Genies and an interesting weekend project to boot.

Most NES cartridges have two bits of memory, the PRG and CHR ROMs. [uXe] is breaking out the cartridge connector onto an exceptionally wide rainbow ribbon cable, and bringing it into a custom Arduino Mega shield loaded up with two 16K dual-port RAM chips. These RAM chips effectively replace the PRG and CHR ROMs Since these are dual-port RAM chips, they can be written to by the Arduino and read by the NES simultaneously.

The NES sees one port of the RAM and can read and write from it while the Arduino still has access to make changes to the other post while that’s happening. A trick like this opens up a whole world of possibilities, most obviously with tiling and other graphics tricks that can push beyond the console’s original capabilities. [uXe] is currently playing Arduboy games on the NES — a really neat trick to pull off. Well done [uXe]!

Be sure to check out the video below of the NES running some games from the Arduboy system. It seems to integrate seamlessly into the hardware, so if you’ve always had a burning desire to fix crappy graphics on some of your favorite games, or run some special piece of software on an NES, now might just be your time to shine.


Filed under: nintendo hacks
Hack a Day 20 Nov 16:31

How to use a new electronics board for dummies: MegaPi example

How to use a new electronics board for dummies: MegaPi example

How to use a new electronics board for dummies: MegaPi example

How to use a new electronics board for dummies: MegaPi example