Posts with «usb to serial» label

Debugging with Serial Print at 5333333 Baud

Debugging with printf is something [StorePeter] has always found super handy, and as a result he’s always been interested in tweaking the process for improvements. This kind of debugging usually has microcontrollers sending messages over a serial port, but in embedded development there isn’t always a hardware UART, or it might already be in use. His preferred method of avoiding those problems is to use a USB to Serial adapter and bit-bang the serial on the microcontroller side. It was during this process that it occurred to [StorePeter] that there was a lot of streamlining he could be doing, and thanks to serial terminal programs that support arbitrary baud rates, he’s reliably sending debug messages over serial at 5.3 Mbit/sec, or 5333333 Baud. His code is available for download from his site, and works perfectly in the Arduino IDE.

The whole thing consists of some simple, easily ported code to implement a bare minimum bit-banged serial communication. This is output only, no feedback, and timing consists of just sending bits as quickly as the CPU can handle, leaving it up to the USB Serial adapter and rest of the world to handle whatever that speed turns out to be. On a 16 MHz AVR, transmitting one bit can be done in three instructions, which comes out to about 5333333 baud or roughly 5.3 Mbit/sec. Set a terminal program to 5333333 baud, and you can get a “Hello world” in about 20 microseconds compared to 1 millisecond at 115200 baud.

He’s got additional tips on using serial print debugging as a process, and he’s done a followup where he stress-tests the reliability of a 5.3 MBit/sec serial stream from an ATMega2560 at 16 MHz in his 3D printer, and found no missed packets. That certainly covers using printf as a debugger, so how about a method of using the debugger as printf?

KeyMouSerial Solves Your Raspberry Pi Keyboard Problems

All laptops have a working keyboard and mouse built into them, the only problem is that you can’t use these tools on other computers that don’t have them. At least, until now. [Peter] has created the KeyMouSerial in order to use his laptop’s keyboard and mouse as physical devices on his Raspberry Pi, finally freeing the bonds holding our laptops’ human interface devices back.

The software for KeyMouSerial copies keystroke and mouse information and sends this out via a serial port on his laptop (using a USB to serial adapter). From there the information is translated by an Arduino into HID commands which are sent via USB to the target computer, in this case a Raspberry Pi. It’s a pretty elegant solution to carrying a bulky keyboard and mouse along just for a Raspberry Pi, or for any computer that might not have access to a network and SSH.

[Peter] has also been working on using his iPod as a serial-to-USB converter, so if you’re a Rockbox developer and want to help out then drop him a line. All of the software is available (for Windows, Mac, or Linux) including the Arduino sketch if you want to try this software out for yourself. And, if you don’t want to turn a computer into a keyboard and want to go the other direction and turn a keyboard into a computer, that is also an option.


Filed under: laptops hacks

Kickstarter Monitor Will Brighten Your Day

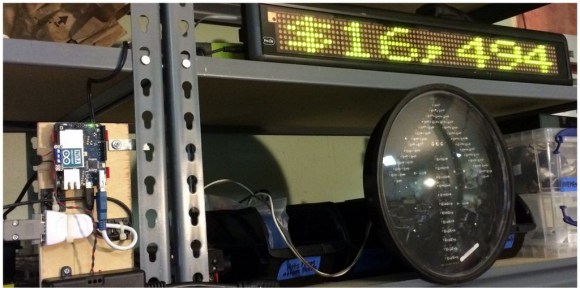
Keeping up with a kickstarter campaign can be quite a task, especially if your project is real (looking at you, Scribble Pen!) and you’re trying to keep up with product fabrication and all the other logistics involved in bringing a product to market. [macetech] are currently in the middle of a campaign themselves and built a loud, bright alert system to notify them of any new kickstarter backers.

The project uses a LED marquee to display the current number of backers, but every time a new backer contributes to the project, a blindingly bright green arrow traffic signal is illuminated and a piezo speaker plays a celebration tune. All of these devices are controlled by an Arduino Yun which, with its built-in Atheros chipset, easily connects to the network and monitors the kickstarter page for changes.

[macetech] used some interesting hardware to get everything to work together. They used a USB-to-RS232 cable with and FTDI chip to drive the LED marquee and a PowerSwitchTail 2 from Adafruit to drive the power-hungry traffic signal. Everything was put together in a presentable way for their workshop and works great! All of the source code is available on their project page, and you can check out their RGB LED Shades kickstarter campaign too.


Filed under: Arduino Hacks