Posts with «controller» label

An Open-Source Ebike Motor Controller

DIY e-bikes are often easy to spot. If they’re not built out of something insane like an old washing machine motor, the more subtle kits that are generally used still stand out when compared to a non-assisted bike. The motors tend to be hub- or mid-drive systems with visible wires leading to a bulky battery, all of which stand out when you know what to look for. To get a stealthy ebike that looks basically the same as a standard bicycle is only possible with proprietary name-brand solutions that don’t lend themselves to owner repair or modification, but this one has at least been adapted for use with an open source motor controller.

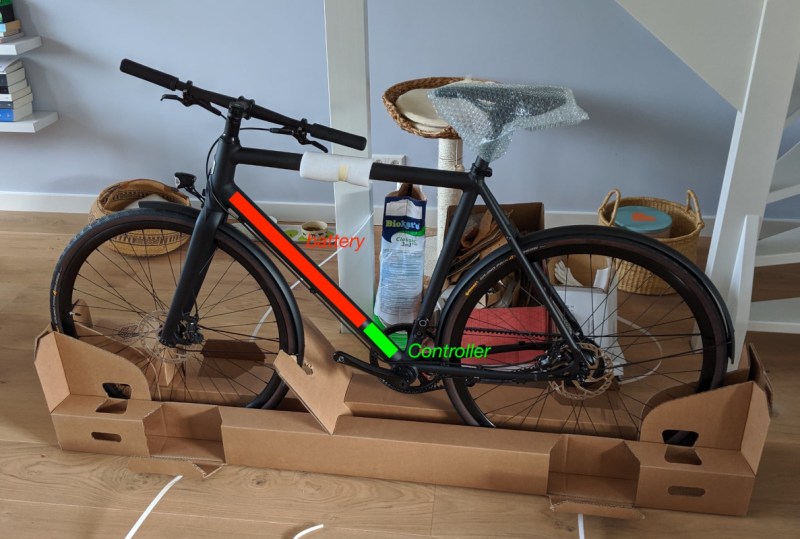
The bike in use here is a model called the Curt from Estonian ebike builder Ampler, which is notable in that it looks indistinguishable from a regular bicycle with the exception of the small 36-volt, 350-watt hub motor somewhat hidden in the rear wheel. [BB8] decided based on no reason in particular to replace the proprietary motor controller with one based on VESC, an open-source electric motor controller for all kinds of motors even beyond ebikes. Installed on a tiny Arduino, it fits inside the bike’s downtube to keep the stealthy look and can get the bike comfortably up to around 35 kph. It’s also been programmed to turn on the bike’s lights if the pedals are spun backwards, and this method is also used to change the pedal assist level, meaning less buttons and other user-interface devices on the handlebars.

[BB8] has been working on this for a while, and although the bulk of a working ebike controller is there, it still doesn’t support the torque sensing pedals included with this bike. We’re presuming that this is still a work-in-progress as the Arduino and associated code easily interfaces with all the other sensors available on this bike. Hopefully this open-source motor controller finds its way into other proprietary systems as well, since a lot of these ebikes can turn into massive paperweights if the companies who originally built them go out of business or simply decide to stop supporting older models. Of course, you can avoid this issue entirely by building your own ebike from spare parts.

Thanks to [Arnoud] for the tip!

Smart Coffee Replaces Espresso Machine Controller With Arduino, Sensors

A common hacker upgrade to an espresso machine is to improve stability and performance with a better temperature controller, but [Schematix]’s Smart Coffee project doesn’t stop there. It entirely replaces the machine’s controller and provides an optional array of improvements for a variety of single-boiler machines (which is most of them).

Smart Coffee isn’t free, it costs 16 NZD (about 10 USD) but there is a free demo version. There is no official support, but there are wiring guides and sources aplenty from which to purchase the various optional parts. It runs on an Arduino MEGA 2560 PRO (or similar microcontroller) and supports a wide array of additional hardware including pressure transducer, water level sensor, flow meter, OLED display, and more.

Modification of one’s espresso machine is a rewarding endeavor, but the Smart Coffee project provides a way for one to get straight to the hacking and function modifying, instead of figuring out the wiring hardware interfacing from scratch.

We’ve seen [Schematix]’s work before with a DIY induction heater which showed off thoughtful design, and it’s clear he takes his coffee at least as seriously. Check out the highly comprehensive overview and installation video for Smart Coffee, embedded just below the page break.

Thanks to [X-Cubed] for the tip!

Physical Control Panel Elevates Flight Sim Experience

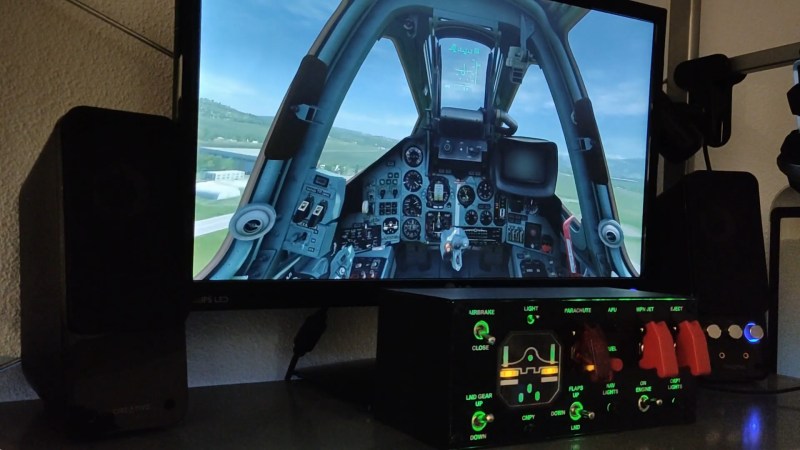
Like so many of us, [pgsanchez] has been bitten by the flight simulator bug. It’s a malady that can only be treated, but never cured — and like so many hobbies, it has a nasty tendency to spawn more hobbies. A software developer by trade, [pgsanchez] is also adept with Arduino and electronics, and his blog post about the PGS-2 Flight Simulator Control Panel demonstrates his fine abilities well, as does the video below the break.

A player of Digital Combat Simulator, he grew tired of having to remember awkward key combinations to control the simulator. Flying a jet, even in a simulator, can require quick thinking bound with quick reflexes, so having a button to press, a switch to flip, or a knob to turn can be vastly superior to even the simplest keyboard based command.

An Arduino interfaces the buttons to the computer, and a white acrylic case is employed to keep all the parts flying in formation. Yes, a white case — with great care taken to allow the case to be backlit. The effect is excellent, and it looks like the panel would be right at home in the Sukhoi Su-25T that it’s designed to control in the game.

We appreciated the attention to detail in the panel, as even the gear status lights and flap indicators match those in the simulator, a nice touch! What more could [pgsanchez] build? We’d like to see! If you’re into flight sims and the like, you might be interested in this fully 3D printed flight sim controller.

Understanding Custom Signal Protocols with Old Nintendos

For retro gaming, there’s really no substitute for original hardware. As it ages, though, a lot of us need to find something passable since antique hardware won’t last forever. If a console isn’t working properly an emulator can get us some of the way there, but using an original controller is still preferred even when using emulators. To that end, [All Parts Combined] shows us how to build custom interfaces between original Nintendo controllers and a PC.

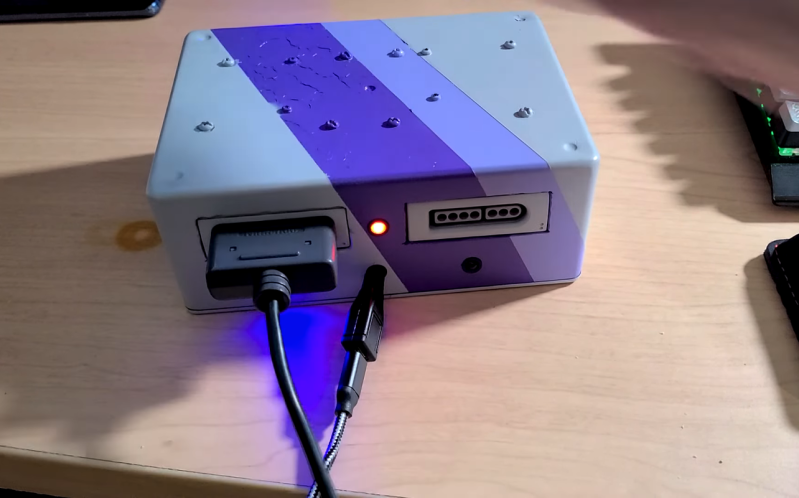
The build starts by mapping out the controller behavior. Buttons on a SNES controller don’t correspond directly to pins, rather a clock latches all of the button presses at a particular moment all at once during each timing event and sends that information to the console. To implement this protocol an Adafruit Trinket is used, and a thorough explanation of the code is given in the video linked below. From there it was a simple matter of building the device itself, for which [All Parts Combined] scavenged controller ports from broken Super Nintendos and housed everything into a tidy box where it can be attached via USB to his PC.

While it might seem like a lot of work to get a custom Nintendo controller interface running just because he had lost his Mega Man cartridge, this build goes a long way to understanding a custom controller protocol. Plus, there’s a lot more utility here than just playing Mega Man; a method like this could easily be used to interface other controllers as well. We’ve even seen the reverse process where USB devices were made to work on a Nintendo 64.

Rhythm Game Controller Can’t Be Beat

There’s this whole class of vertically scrolling rhythm games that take both hands and look really fun to play, albeit hard on the joints. You can buy specialized controllers for them, but they’re ridiculously expensive for what they are — just a handful of switches and two knobs. It’s exactly the kind of thing you should build to your taste for far less money.

Inspired by a pocket version of the Voltex controller that is also pretty darned expensive, [OmniSaiRen] set out to make their own on the cheap by building an awesome little macro keyboard that’s smaller and easier to use than the specialized controller. Inside there’s an Arduino Pro Micro taking input from eight Cherry MX switches and two optical encoders. The game treats the encoders as vertical and horizontal mouse movements, so [OmniSaiRen]’s code scans the encoders for their positions.

[OmniSaiRen] wrote their own matrix code and says it’s ugly, but it works well enough to play the game. What more can you ask for? A cool sticker to go on the top? Done. It’s too cold outside to paint, anyway. If it’s a one-handed game pad you need, check out this sweet little thing.

Via r/duino

Control a Motor With a Touchpad

There are a surprising wealth of parts inside of old laptops that can be easily scavenged, but often these proprietary tidbits of electronics will need a substantial amount of work to make them useful again. Obviously things such as hard drives and memory can easily be used again, but it’s also possible to get things like screens or batteries to work with other devices with some effort. Now, there’s also a way to reuse the trackpad as well.

This build uses a PS/2 touchpad with a Synaptics chip in it, which integrates pretty smoothly with an Arduino after a few pins on the touchpad are soldered to. Most of the work is done on the touchpad’s built in chip, so once the Arduino receives the input from the touchpad it’s free to do virtually anything with it. In this case, [Kushagra] used it to operate a stepper motor in a few different implementations.

If you have this type of touchpad lying around, all of the code and schematics to make it useful again are available on the project page. An old laptop in the parts bin is sure to have a lot of uses even after you take the screen off, but don’t forget that your old beige PS/2 mouse from 1995 is sure to have some uses like this as well.

Hack a Day 11 Jun 06:00

Simulate Climate With An Arduino

There are usually two ways to go about any task: the easy way and the hard way. Sometimes we might not know there are two options, but once we see someone else’s solution we might feel differently. When running a greenhouse or small farm, for example, we might decide to set up dozens of sensors to measure temperature, humidity, soil moisture, dew point, sunlight, or any number of other variables. That’s the hard way. The easy way is to use the Arduino-powered Norman climate simulator from [934Virginia].

Rather than relying on an array of sensors, any of which could fail or provide erroneous data for any number of reasons, Norman relies on a simple input of data about the current location – target coordinates, specified date ranges, and minimum/maximum values for temperature and humidity – in order to learn and predict the weather conditions in that location. It makes extensive use of the Dusk2Dawn library, and models other atmospheric conditions using mathematical modeling methods in order to make relatively accurate estimates of the climate it is installed in. There are some simulations on the project’s Plotly page which show its successes as well.

Presumably anyone using this device could run a greenhouse relatively well on only $10 worth of electronics rather than relying on a suite of sensors and input data, which is helpful for anyone strapped for cash (especially in developing areas of the world). The project is named after Norman Borlaug, a famous soil scientist and someone worth reading about. The first (and possibly only) sensor we might want to add to this project is a soil moisture sensor, since yearly estimates won’t tell us whether it has just rained or not.

Images courtesy of Wikimedia Commons.

Hack a Day 03 Aug 06:00

Wireless Controllers For Retro Gaming

There’s no limit to the amount of nostalgia that can be minted through various classic platforms such as the NES classic. The old titles are still extremely popular, and putting them in a modern package makes them even more accessible. On the other hand, if you still have the original hardware things can start getting fussy. With modern technology it’s possible to make some changes, though, as [PJ Allen] did by adding wireless capabilities to his Commodore 64.

Back when the system was still considered “modern”, [PJ] tried to build a wireless controller using DTMF over FM radio. He couldn’t get it to work exactly right and ended up shelving the project until the present day. Now, we have a lot more tools at our disposal than analog radio, so he pulled out an Arduino and a few Bluetooth modules. There’s a bit of finesse to getting the old hardware to behave with the modern equipment, though, but once [PJ] worked through the kinks he was able to play his classic games like Defender without the limitations of wired controllers.

The Commodore 64 was incredibly popular in the ’80s and early ’90s, and its legacy is still seen today. People are building brand new machines, building emulators for them, or upgrading their hardware.

Don’t Forget Your Mints When Using This Synthesizer

While synthesizers in the music world are incredibly common, they’re not all keyboard-based instruments as you might be imagining. Especially if you’re trying to get a specific feel or sound from a synthesizer in order to mimic a real instrument, there might be a better style synth that you can use. One of these types is the breath controller, a synthesizer specifically built to mimic the sound of wind instruments using the actual breath from a physical person. Available breath controllers can be pricey, though, so [Andrey] built his own.

To build the synthesizer, [Andrey] used a melodica hose and mouthpiece connected to a pressure sensor. He then built a condenser circuit on a custom Arduino shield and plugged it all into an Arduino Mega (although he notes that this is a bit of overkill). From there, the Arduino needed to be programmed to act as a MIDI device and to interact with the pressure sensor, and he was well on his way to a wind instrument synthesizer.

The beauty of synthesizers is not just in their ability to match the look and sound of existing instruments but to do things beyond the realm of traditional instruments as well, sometimes for a greatly reduced price point.

A HID For Robots

Whether with projects featured here or out in the real world, we have a tendency to focus most upon the end product. The car, solar panel, or even robot. But there’s a lot more going on behind the scenes that needs to be taken care of as well, whether it’s fuel infrastructure to keep the car running, a semiconductor manufacturer to create silicon wafers, or a control system for the robot. This project is one of the latter: a human interface device for a robot arm that is completely DIY.

While robots are often automated, some still need human input. The human input can be required all the time, or can be used to teach the robot initially how to perform a task which will then be automated. This “keyboard” of sorts built by [Ahmed] comes with a joystick, potentiometer, and four switch inputs that are all fully programmable via an Arduino Due. With that, you can perform virtually any action with whatever type of robot you need, and since it’s based on an Arduino it would also be easy to expand.

The video below and project page have all the instructions and bill of materials if you want to roll out your own. It’s a pretty straightforward project but one that might be worth checking out since we don’t often feature controllers for other things, although we do see them sometimes for controlling telescopes rather than robots.


Hack a Day 02 Jun 06:00