Posts with «interface» label

Understanding Custom Signal Protocols with Old Nintendos

For retro gaming, there’s really no substitute for original hardware. As it ages, though, a lot of us need to find something passable since antique hardware won’t last forever. If a console isn’t working properly an emulator can get us some of the way there, but using an original controller is still preferred even when using emulators. To that end, [All Parts Combined] shows us how to build custom interfaces between original Nintendo controllers and a PC.

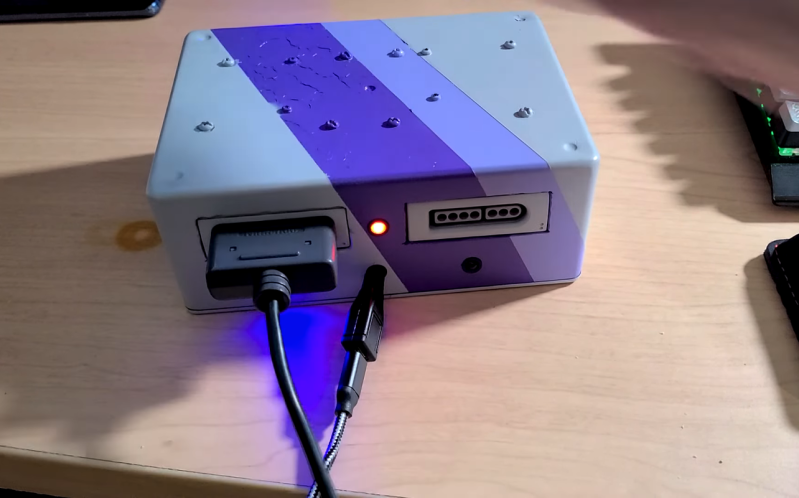
The build starts by mapping out the controller behavior. Buttons on a SNES controller don’t correspond directly to pins, rather a clock latches all of the button presses at a particular moment all at once during each timing event and sends that information to the console. To implement this protocol an Adafruit Trinket is used, and a thorough explanation of the code is given in the video linked below. From there it was a simple matter of building the device itself, for which [All Parts Combined] scavenged controller ports from broken Super Nintendos and housed everything into a tidy box where it can be attached via USB to his PC.

While it might seem like a lot of work to get a custom Nintendo controller interface running just because he had lost his Mega Man cartridge, this build goes a long way to understanding a custom controller protocol. Plus, there’s a lot more utility here than just playing Mega Man; a method like this could easily be used to interface other controllers as well. We’ve even seen the reverse process where USB devices were made to work on a Nintendo 64.

14 Year Old Builds Communication Device for Brain-Injured Friend

Try not to get anything in your eye as you hear this moving story of a teen helping an injured friend communicate with the world again.

Read more on MAKE

The post 14 Year Old Builds Communication Device for Brain-Injured Friend appeared first on Make: DIY Projects and Ideas for Makers.

Touchless MIDI: The Secret’s In the Mitten

MIDI is a great tool for virtually any musician. Unless you’re a keyboard player, though, it might be hard to use it live. [Evan] recently came up with a great solution for all of the wistful guitar players out there who have been dreaming of having a MIDI interface as useful as their pianist brethren, though. He created a touchless MIDI controller that interfaces directly with a guitar.

[Evan] set up an Arduino Nano to handle the MIDI interface to the computer. A detector coil from a previous project was installed onto the guitar can recognize how far away the guitarist’s hand is from the body of the guitar, giving the musician control over an effect of their choosing. The guitarist simply needs to be wearing a special mitten for use with the detector coil. [Evan] also added three tactile buttons, meaning that this MIDI usefulness can be extended to three different selectable effects.

Be sure to check out the video below for a demonstration of how the interface works. [Evan] has also made the schematics and Arduino code available if you decide to build your own. This isn’t [Evan]’s first MIDI rodeo, either. He’s also created a MIDI drum interface from a Rock Band drum set, too.


Filed under: musical hacks
Hack a Day 06 Nov 21:00

The Newest Graphing Calculator Game

Certainly everyone remembers passing time in a boring high school class playing games on a graphing calculator. Whether it was a Mario-esque game, Tetris, or BlockDude, there are plenty of games out there for pretty much all of the graphing calculators that exist. [Christopher], [Tim], and their colleagues from Cemetech took their calculator game a little bit farther than we did, and built something that’ll almost surely disrupt whatever class you’re attempting to pay attention in: They built a graphing calculator whac-a-mole game.

This game isn’t the standard whac-a-mole game, though, and it isn’t played on the calculator’s screen. Instead of phyiscal “moles” the game uses LEDs and light sensors enclosed in a box to emulate the function of the moles. In order to whack a mole, the player only needs to interrupt the light beam which can be done with any physical object. The team made extensive use of the ArTICL library which allows graphing calculators to interface with microcontrollers like the MSP432 that they used, and drove the whole thing with a classic TI-84.

This project is a fun way to show what can be done with a graphing calculator and embedded electronics, and it was a big hit at this past year’s World Maker Faire. Calculators are versatile in other ways as well. We’ve seen them built with open hardware and free software, And we’ve even seen them get their own Wi-Fi.


Filed under: handhelds hacks

Arduino Percussion Car


The user [selcukartut] sent us a project full integrated with Arduino boards. Filika (Istanbul) designed and produced an Interactive Percussion Playing Car for Volkswagen’s breathtaking pickup Amarok. Several sensors were implemented on the board, so that the participants were able to trigger percussion sounds via tapping their hands on the car.

Technically speaking, there were two types of sensors to gather user interaction data. Force Resistive Sensors were placed on the front panel and piezzo sensors were placed on the sides of the car’s body. Received user interaction was mapped onto a code via customized Arduino Board. Arduino code was commuicating with a sound patch that was built in MaxMSP/Jitter, and finally delivered into Ableton Live as Midi Data. In sum when a person taps onto a sensor that hides under the car’s surface, that interaction was turning into a percussion sound. There were tons of cables, sawing, soldering, coding and etc…

On the [website] there are some videos that show the project in action. Unfortunately all the text are in Turkish, we hope for an English, more international, version.

Arduino Blog 13 Dec 11:40

The Arcade Machine, by Timothy (15)

[Timothy], a 15 years old Arduino enthusiast has sent us his first Arduino Project, an arcade interface based on Arduino Leonardo.

The cabinet is made of 4mm HDF and were laser cut at “Fabriken” in Malmö. The red arcade sign in the top is produced in 5mm translucent acrylic. All design and construction drawings were made in Illustrator. I used an Arduino Leonardo to connect the joystick, buttons and the LED light.  The game installed, Superstar Chefs, is an old game developed by my dad’s cousins. My prototype board was made with Fritzing.

It includes:

- 6 green 3mm LED’s,

- 11 resistors (6 330 ohm, 4 10K ohm and one 100 ohm),

-1 dip8 socket with an ATtiny45,

- 1 potentiometer,

- 4 pushbutton and header sockets.

I created this prototype board to easily get started with Arduino.

Timonthy, welcome on board!

A custom Pi shield or an Arduino?

As more and more people get a Pi they are asking how to interface it to their robot. I do not own a Pi but I looked at the GPIO pins available for interfacing. Apart from general digital I/O pins you have I2C, SPI and Serial interfacing available. I assume there is a library or something that allows these pins to be easily access from within the Linux operating system.

So the question becomes do you just use another MCU such as an Arduino to provide the necessary I/O functionality or do you use a custom shield?

read more

Let's Make Robots 04 Oct 13:38
arduino  i2c  ideas  interface  pi  raspberry  serial  shield  spi  

Build a Touchless 3D Tracking Interface with Everyday Materials


Combine low-tech materials with some high-tech components and build a completely Touchless 3D Tracking Interface. Explore capacitive sensing by using several panels of cardboard lined with aluminum foil. These panels, when charged, create electric fields that correspond to X, Y, and Z axes to create a 3D cube. With the aid of an Arduino microcontroller and some supplied code, movements inside the cube are tracked as your hand moves around inside the field.

For Weekend Projects makers looking for an introduction to Arduino, this is a great project to learn from. Once you’ve gathered all your parts, this project should only take a couple hours to complete – you’ll be playing 3D Tic Tac Toe before the weekend is over!

Once your touchless 3D tracker is up and running, what you do with it is only limited by your own imagination! The original implementation of this project comes from media artist Kyle McDonald, who has suggested the following uses and applications:

  • Make an RGB or HSB color picker
  • Control video or music parameters; sequence a beat or melody
  • Large, slightly bent surface with multiple plates + a projector = “Minority Report” interface

Sign up below for the Weekend Projects Newsletter to receive the projects before anybody else does, get tips, see other makers’ builds, and more.

Sign Up for the "Weekend Projects" Newsletter
-->-->
-->-->

More:
See all of the Weekend Projects posts


Filed under: Arduino, MAKE Projects, Weekend Projects

Interfacing yor robot to your PC using Gobetwenio (can work with any MCU)

I am currently working on a project where I need to teach my robot to "see" using an ultrasound sensor. In particular it must find and collect drink cans on a playfield and return them to a specific location.

To make the programming easier I wanted to take the sensor output from the robot and display it on the computer as a chart. As I am a terrible programmer I did a quick google search and came up with Gobetwenio.

read more