Posts with «handhelds hacks» label

Odd Inputs and Peculiar Peripherals: The GameBug Turns Your Breadboard Into a Game Console

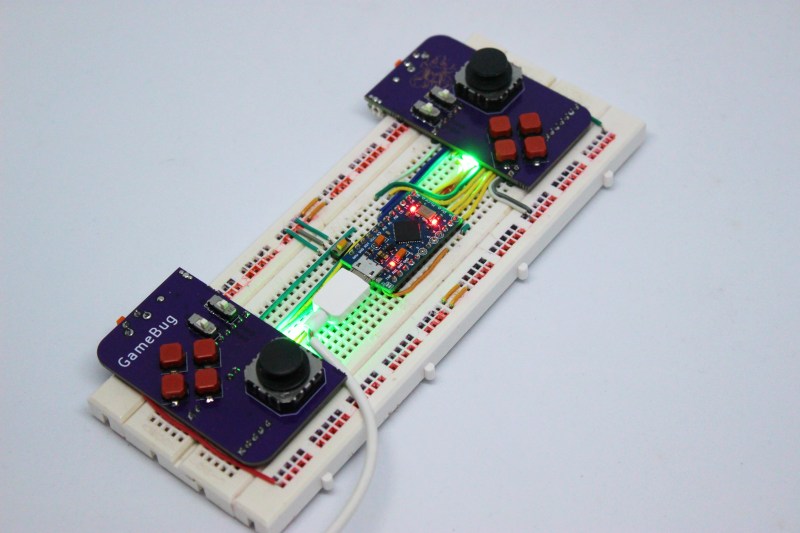
What’s more fun than playing video games? Designing your own video game hardware, of course! If you’ve followed these pages long enough you’ll have seen dozens of great examples of homebrew hardware, and perhaps been inspired to try such a project yourself. This often starts with assembling the basic bits onto a solderless breadboard, which is fine for programming but not so great for testing: squeezing pushbuttons into your breadboard works for basic debugging, but is not very user-friendly or reliable. A better solution can be found in [Dimitar]’s GameBug: a set of breadboard-compatible joypad-like controllers.

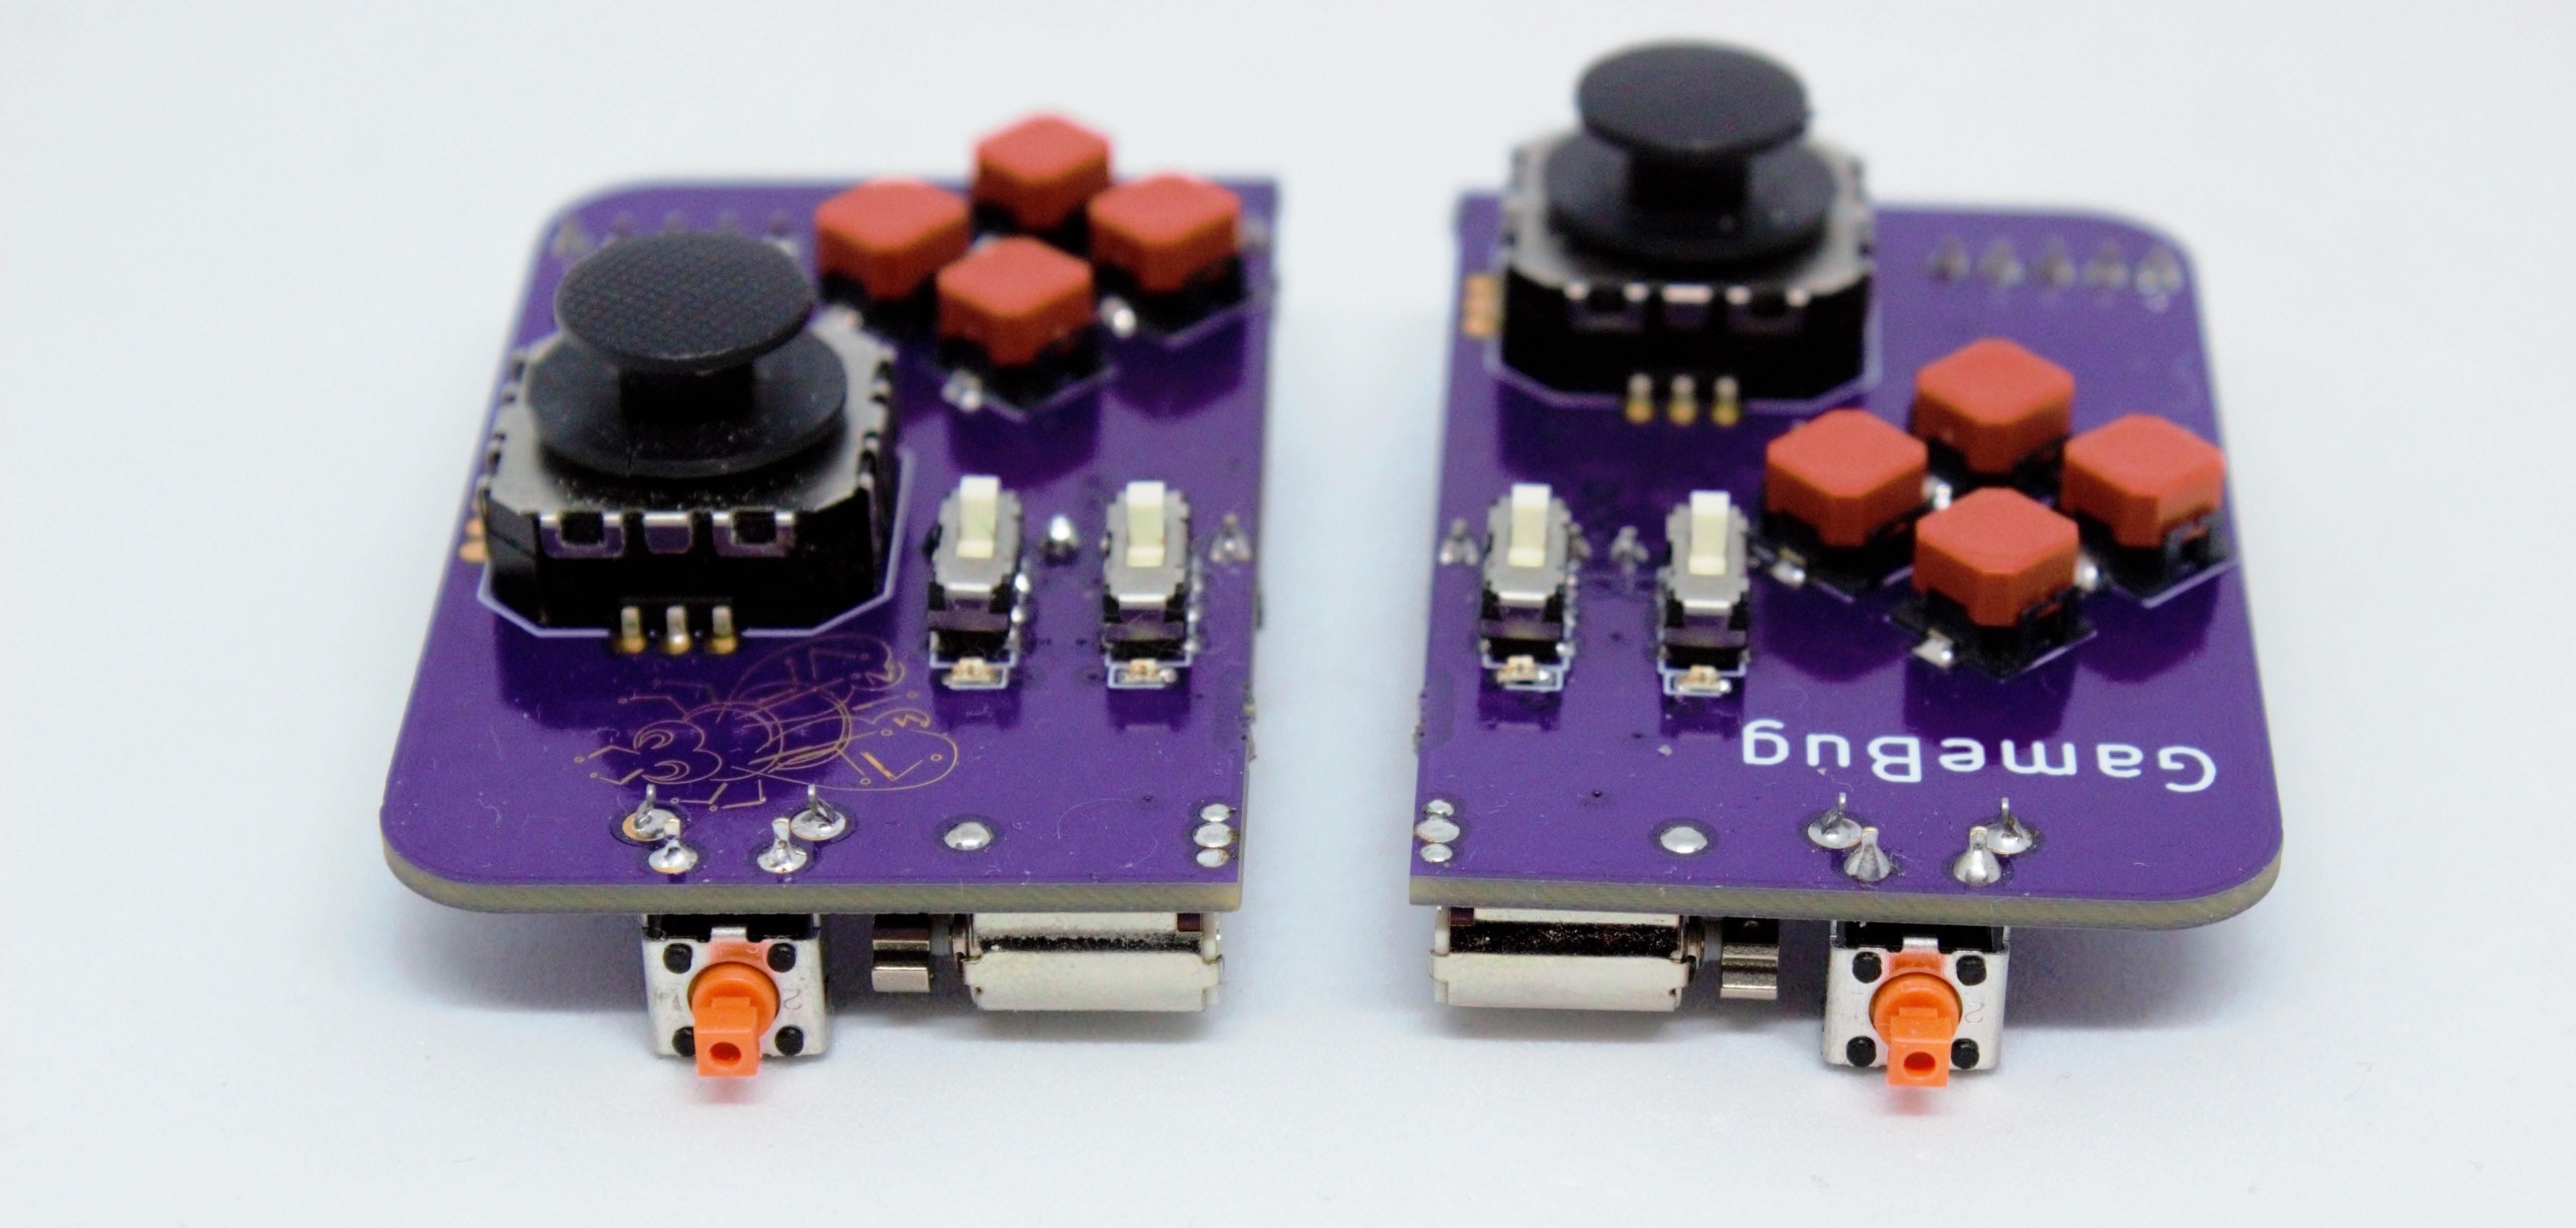
The GameBug’s design excels in its simplicity: a miniature analog joystick, four buttons arranged in a diamond pattern, a shoulder button and two sliding switches are sitting on a neat purple PCB. On the bottom are two rows of pin headers to ensure a snug fit on your solderless breadboard. There’s even a little vibrating motor for haptic feedback.

Interfacing with the GameBug is simplified by the integrated readout electronics. A Schmitt trigger-based debounce circuit ensures clean signals from all the pushbuttons, while a motor driver chip provides stable current to the haptic feedback system. An RGB LED can be used as yet another user feedback device, or simply for decorative lighting.

All design files are available on [Dimitar]’s GitHub page, along with an Arduino sketch to help you try out the GameBug’s functionality. Having a proper gamepad might come in handy with breadboard-based game systems like Tiny Duck Hunt or this impressive mess of wires that makes up a Colecovision.

DIY Handheld Game Puts its Brains on a Removable Cart

Over the years we’ve seen plenty of homebrew handheld game systems that combine an AVR microcontroller, a few buttons, and an small OLED display. We’ve even seen some of them turned into commercial products, such as the Arduboy. They’re simple, cheap, and with the right software, a lot of fun. But being based on an MCU, most of them share the same limitation of only being able to hold a single game at any one time.

But not the Game Card, by [Dylan Turner]. This handheld was specifically designed so that games could be easily swapped out using physical cartridges. But rather than trying to get the system’s microcontroller to boot code from an external flash chip, the system relocates the MCU to the removable cartridge. That might seem a bit overkill, but given how cheap the ATTINY84A on each cartridge is, it’s not exactly going to break the bank.

With the microcontroller on the cartridge, the only hardware that stays behind on the Game Card is the SSD1306 128×64 OLED display, buttons, and the battery. That means the handheld is effectively non-functional unless a game is slotted in, but that could be said of most early cartridge-based game systems as well. On the other hand, it also opens up the possibility of producing cartridges with more powerful microcontrollers down the line.

Using a different microcontroller for each game is a neat hack, but it’s not the only solution to the problem. We previously saw a community effort to add expandable storage to the Arduboy in the form of a DIY cartridge, which ultimately led to the development of an official flash chip upgrade for the handheld.

SMART Response XE Gets Wireless Bootloader

A few months back we first brought word of the progress being made in unlocking the SMART Response XE, an ATmega128RFA powered handheld computer that allowed teachers to create an interactive curriculum in the days before all the kids got Chromebooks. Featuring 2.4 Ghz wireless communication, a 384×160 LCD, and a full QWERTY keyboard, schools paid around $100 each for them 2010. Now selling for as little as $5 on eBay, these Arduino-compatible devices only need a little coaxing and an external programmer to get your own code running.

The previous post inspired [Larry Bank] to try his hand at hacking the SMART Response XE, and so far he’s made some very impressive progress. Not only has he come up with his own support library, but he’s also created a way to upload Arduino code to the devices through their integrated 802.15.4 radio. With his setup, you no longer need to open the SMART Response XE and attach a programmer, making it much easier to test and deploy software.

[Larry] has written up a very detailed account of his development process, and goes through the trouble of including his ideas that didn’t work. Getting reliable communication between two of these classroom gadgets proved a bit tricky, and it took a bit of circling around until he hit on a protocol that worked.

The trick is that you need to use one SMART Response XE attached to your computer as a “hub” to upload code to other XEs. But given how cheap they are this isn’t that big of a deal, especially considering the boost in productivity it will net you. [Larry] added a 5 x 2 female header to his “hub” XE so he could close the device back up, and also added a physical power switch. In the video after the break, you can see a demonstration of the setup sending a simple program to a nearby XE.

Between this wireless bootloader and the Arduboy compatibility covered previously, we’d suggest you get your SMART Response XE now. We wouldn’t be surprised if the prices of these things start going up like they did with the IM-ME.

Classroom Gadget Turned Arduino Compatible

Cheap second-hand hardware is usually a fertile ground for hacking, and it looks like these digital classroom aids are no exception. [is0-mick] writes in to tell us how he managed to hack one of these devices, a Smart Reponse XE, into an Arduboy compatible game system. As it turns out, this particular gadget is powered by an ATmega128RFA, which is essentially an Arduino-compatible AVR microcontroller with a 2.4GHz RF transceiver tacked on. This makes it an extremely interesting platform for hacking, especially since they are going for as little as $3 USD on eBay.

There’s no USB-Serial converter built into the Smart Response XE, so you’ll need to provide your own external programmer to flash the device. But luckily there’s a labeled ISP connector right on the board which makes it pretty straightforward to get everything wired up.

Of course, getting the hardware working was slightly more complicated than just flashing an Arduino Sketch onto the thing. [is0-mick] has provided his bootloader and modified libraries to get the device’s QWERTY keyboard and ST7586S controlled 384×160 LCD working.

Playing games is fun, but when his friend [en4rab] sent him the Smart Response XE to fiddle with, the goal was actually to turn them into cheap 2.4 GHz analyzers similar to what was done with the IM-ME. It seems they’re well on their way, and [is0-mick] invites anyone who might be interested in filling in some of the blanks on the RF side to get involved.

Beware Of Tall Grass: Pokemon Go on the Gameboy Pocket

[Pepijn de Vos] was excited to interact with the world’s most popular augmented reality pedometer, Pokemon Go, and was extremely disappointed to find that his Blackberry couldn’t run it. Still, as far as he could tell from behind his wall of obsolete technology, Pokemon Go is all about walking distractedly, being suspicious, and occasionally catching a Pokemon. That should be possible.

Not a stranger to hacking Pokemon on the Gameboy, [Pepijn] put together a plan. Using his TCPoke module, he took it a step further. Rather than just emulating the original gameboy trade signals over the internet, he hacked a Pokemon Red ROM with some custom Z80 assembly to add some features to the Cable Club in the game.

After some waiting for the delivery man to bring a flashable cartridge and along with some Arduino code, he could now translate the steps he took in the game to his steps in the real world. Well, mostly. He could pick the location where he would like to catch a Pokemon. The character stands there. Somewhere around 100m the game will trigger a random pokemon battle.

[Pepijn] is now no longer a social outcast, as you can see in the video after the break. On a simple trip to the grocery store he caught two Pokemon!


Filed under: handhelds hacks, nintendo gameboy hacks

The Newest Graphing Calculator Game

Certainly everyone remembers passing time in a boring high school class playing games on a graphing calculator. Whether it was a Mario-esque game, Tetris, or BlockDude, there are plenty of games out there for pretty much all of the graphing calculators that exist. [Christopher], [Tim], and their colleagues from Cemetech took their calculator game a little bit farther than we did, and built something that’ll almost surely disrupt whatever class you’re attempting to pay attention in: They built a graphing calculator whac-a-mole game.

This game isn’t the standard whac-a-mole game, though, and it isn’t played on the calculator’s screen. Instead of phyiscal “moles” the game uses LEDs and light sensors enclosed in a box to emulate the function of the moles. In order to whack a mole, the player only needs to interrupt the light beam which can be done with any physical object. The team made extensive use of the ArTICL library which allows graphing calculators to interface with microcontrollers like the MSP432 that they used, and drove the whole thing with a classic TI-84.

This project is a fun way to show what can be done with a graphing calculator and embedded electronics, and it was a big hit at this past year’s World Maker Faire. Calculators are versatile in other ways as well. We’ve seen them built with open hardware and free software, And we’ve even seen them get their own Wi-Fi.


Filed under: handhelds hacks

MagnID – Sneaky New Way of Interacting With Tablets

New magnetic tech dubbed “MagnID” is being presented this weekend at Stanford’s annual TEI conference. It is a clever hack aimed to hijack a tablet’s compass sensor and force it to recognize multiple objects. Here is a sneak peek at the possibilities of magnetic input for tablets.

Many tablets come with some sort of triaxial magnetic sensor but as [Andrea] and [Ian]’s demo shows, they are only capable of passing along the aggregate vector of all magnetic forces. If one had multiple magnetic objects, the sensor is not able to provide much useful information.

Their solution is a mix of software and hardware. Each object is given a magnet that rotates at a different known speed. This creates complex sinusoidal magnetic fields that can be mathematically isolated with bandpass filters. This also gives them distance to each object. The team added an Arduino with a magnetometer for reasons unexplained, perhaps the ones built into tablets are not sufficient?

The demo video below shows off what is under the hood and some new input mechanics for simple games, sketching, and a logo turtle. Their hope is that this opens the door to all manner of tangible devices.

Check out their demo at Standford’s 9th annual “Tangible, Embedded, Embodied Interaction” this January 15-19, 2015.


Filed under: handhelds hacks, tablet pcs hacks

Spicing Up the Night with a Little Arduino Code

“Less pants, more science” is the tagline for this company called Orgasmatronics that put up a tutorial showing how to hack a vibrator. No engineering experience required for this. All that’s needed is a sex toy, an Arduino Uno, a battery pack, and some handheld cutters to sleekly strip down the wires. A little tweaking and screwdriving later and just about any vibrator can be hacked and programmed. This gives the option to surprise a lover with some custom code as alternating and gyrating vibrations can be sent through the motor terminals switching up the standard LED flasher script into something more sexy. Sounds very kinky, while at the same time, very geeky to us. Experimenting between the sheets is guaranteed.

Check out the video after the break for a full tutorial. In it, a porn star transitions into a programmer in a quick few minutes. The video is hackerspace safe, but definitely not work safe. So you might want to wait until you get home, depending on where you are:


Filed under: handhelds hacks

Fantastic programming makes this Arduino gaming device something special

The hardware that went into this Arduino gaming console is just fine. But the coding that produced this game called Twisted SNAKE is beyond compare. [Rodot] has programmed several games for the hardware, which uses an Arduino, 160×168 TFT screen, a 3 axis accelerometer, and two input buttons. If you’re interested, there is a forum thread in which he talks a bit more about the hardware design. But you’re not going to want to pass up either of the two videos embedded after the break.

The first clip shows off a bouncing-ball platforming game. The accelerometer moves the ball back and forth, and the top scrolling level brings more ledges into play. This in itself is a great game. But the Twisted SNAKE game shown off in the second video makes our own ARM-based Snake game look like a 3-year-old programmed it. [Rodot] filled up all of the program memory of the ATmega328 chip to  make this happen. There’s a menu system which allows for color themes and difficulty selection. The game play itself lets the snake travel anywhere it wishes with the tail following behind in graceful curves. Wow!


Filed under: arduino hacks, handhelds hacks