Posts with «solar» label

This Sun Tracking CNC Machine Uses The Sun Instead of a Laser

We’ve all seen people goof around with a magnifying glass in the sun, but this project takes it to a new level. Cranktown City has uploaded this fantastically amusing project that is sure to impress. He built a cnc controlled engraving machine that uses the sun instead of a laser tube. As he explains in […]

The post This Sun Tracking CNC Machine Uses The Sun Instead of a Laser appeared first on Make: DIY Projects and Ideas for Makers.

Mini Library for Kids Gets Blinky Lights and Solar Upgrade

Reading is big in Québec, and [pepelepoisson]’s young children have access to a free mini library nook that had seen better days and was in dire need of maintenance and refurbishing. In the process of repairing and repainting the little outdoor book nook, he took the opportunity to install a few experimental upgrades (link in French, English translation here.)
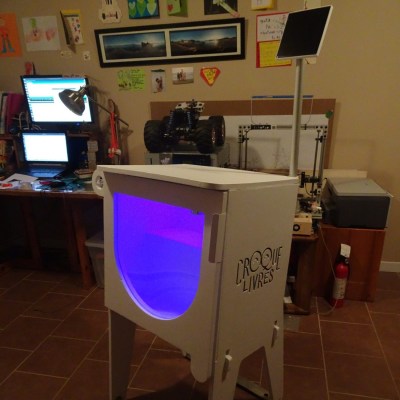
The mini library pods are called Croque-Livres, part of a program of free little book nooks for children across Québec (the name is a bit tricky to translate into English, but think of it as “snack shack, but for books” because books are things to be happily devoured.)

After sanding and repairs and a few coats of new paint, the Croque-Livres was enhanced with a strip of WS2812B LEDs, rechargeable battery with solar panel, magnet and reed switch as door sensor, and a 3.3 V Arduino to drive it all. [pepelepoisson]’s GitHub repository for the project contains the code and CAD files for the 3D printed pieces.

The WS2812B LED strip technically requires 5 V, but as [pepelepoisson] found in his earlier project Stecchino, the LED strip works fine when driven directly from a 3.7 V lithium-polymer cell. It’s not until around 3 V that it starts to get unreliable, so a single 3.7 V cell powers everything nicely.

When the door is opened, the LED strip lights up with a brief animation, then displays the battery voltage as a bar graph. After that, the number of times the door as been opened is shown on the LED strip in binary. It’s highly visual, interactive, and there’s even a small cheat sheet explaining how binary works for anyone interested in translating the light pattern into a number. How well does it all hold up? So far so good, but it’s an experiment that doesn’t interfere at all with the operation of the little box, so it’s all good fun.

Hack a Day 28 Jun 21:00

Weather Station Is A Tutorial in Low Power Design

Building your own weather station is a fun project in itself, but building it to be self-sufficient and off-grid adds another set of challenges to the mix. You’ll need a battery and a solar panel to power the station, which means adding at least a regulator and charge controller to your build. If the panel and battery are small, you’ll also need to make some power-saving tweaks to the code as well. (Google Translate from Italian) The tricks that [Danilo Larizza] uses in his build are useful for more than just weather stations though, they’ll be perfect for anyone trying to optimize their off-grid projects for battery and solar panel size.

When it comes to power conservation, the low-hanging fruit is plucked first. [Danilo] set the measurement intervals to as long as possible and put the microcontroller (a NodeMCU) to sleep in between. Removing the power from the sensors when the microcontroller was asleep was another easy step, but the device was still crashing overnight. Then he turned to a hardware solution and added a more efficient battery charger to the setup, which saved even more power. This is all the more impressive because the station communicates via WiFi which is notoriously difficult to run in low-power applications.

Besides the low power optimizations, the weather station itself is interesting for its relative simplicity. It could be built with things most of us have knocking around. Best of all, [Danilo] published the source code on his site, so most of the hard work has been done already. If you’re thinking he seems a little familiar, it’s because we’ve featured some of his projects before, like his cheap WiFi extender antenna and his homemade hybrid tube amplifier.

SPINES Design Makes for Modular Energy Harvesting

The SPINES (Self-Powered IoT Node for Environmental Sensing) Mote is a wireless IoT environmental sensor, but don’t let the neatly packed single PCB fool you into thinking it’s not hackable. [Macro Yau] specifically designed SPINES to be highly modular in order to make designing an energy harvesting sensor node an easier task. The way [Macro] sees it, there are two big hurdles to development: one is the energy harvesting itself, and the other is the software required to manage the use of every precious joule of that harvested energy.

[Macro] designed the single board SPINES Mote in a way that the energy harvesting portion can be used independently, and easily integrated into other designs. In addition, an Arduino library is being developed to make it easy for the power management to be done behind the scenes, allowing a developer to concentrate on the application itself. A solar-powered wireless sensor node is one thing, but helping people get their ideas up and running faster in the process is wonderful to see.

Dual Axis Solar Tracker with Online Energy Monitor

[Bruce Helsen] built this dual axis solar tracker as one of his final projects for school.

As can be experimentally verified in a very short timeframe, the sun moves across the sky. This is a particularly troublesome behavior for solar panels, which work best when the sun shines directly on them. Engineers soon realized that abstracting the sun away only works in physics class, and moved to the second best idea of tracking sun by moving the panel. Surprisingly, for larger installations the cost of adding tracking (and its maintenance) isn’t worth the gains, but for smaller, and especially urban, installations like [Bruce]’s it can still help.

[Bruce]’s build can be entirely sourced from eBay. The light direction is sensed via a very clever homemade directional light sensor. A 3D printer extruded cross profile sits inside an industrial lamp housing. The assembly divides the sky into four quadrants with a light-dependent resistor for each. By measuring the differences, the panel can point in the optimal direction.

The panel’s two axis are controlled with two cheap linear actuators. The brains are an Arduino glued to a large amount of solar support electronics and the online energy monitor component is covered by an ESP8266.

The construction works quite well. If you’d like to build one yourself the entire BOM, drawings, and code are provided on the instructables page.


Filed under: Arduino Hacks, solar hacks
Hack a Day 24 Jul 21:00

Solar Powered Hydroponics

[Dan Bowen] describes the construction of a backyard hydroponics set-up in an angry third person tirade. While his friends assume more nefarious, breaking, and bad purposes behind [Dan]’s interest in hydroponics; he’d just like some herbs to mix into the occasional pasta sauce.

Feel particularly inspired one day after work, he stopped by the local hardware store and hydroponics supply. He purchases some PVC piping, hoses, fittings, pumps, accessories, and most importantly, a deck box to hide all the ugly stuff from his wife.

The design is pretty neat. He has an open vertical spot that gets a lot of light on his fence. So he placed three lengths of PVC on a slant. This way the water flows quickly and aerates as it goes. The top of the pipes have holes cut in them to accept net baskets.

The deck box contains a practically industrial array of sensors and equipment. The standard procedure for small-scale hydroponics is just to throw the water out on your garden and replace the nutrient solution every week or so. The hacker’s solution is to make a rubbermaid tote bristle with more sensors than the ISS.

We hope his hydroponics set-up approaches Hanging Gardens of Babylon soon.


Filed under: cooking hacks, green hacks, home hacks

Solar Charge Controller Improves Efficiency of Solar Panels

The simplest and easiest way to charge a battery with a solar panel is to connect the panel directly to the battery. Assuming the panel has a diode to prevent energy from flowing through it from the battery when there’s no sunlight. This is fairly common but not very efficient. [Debasish Dutta] has built a charge controller that addresses the inefficiencies of such a system though, and was able to implement maximum power point tracking using an Arduino.

Maximum power point tracking (MPPT) is a method that uses PWM and a special DC-DC converter to match the impedance of the solar panel to the battery. This means that more energy can be harvested from the panel than would otherwise be available. The circuit is placed in between the panel and the battery and regulates the output voltage of the panel so it matches the voltage on the battery more closely. [Debasish] reports that an efficiency gain of 30-40% can be made with this particular design.

This device has a few bells and whistles as well, including the ability to log data over WiFi, an LCD display to report the status of the panel, battery, and controller, and can charge USB devices. This would be a great addition to any solar installation, especially if you’ve built one into your truck.

This is [Debasish]’s second entry to The Hackaday Prize. We covered his first one a few days ago. That means only one thing: start a project and start documenting it on hackaday.io


Filed under: solar hacks, The Hackaday Prize

Solar Panel System Monitoring Device Using Arduino

[Carl] recently upgraded his home with a solar panel system. This system compliments the electricity he gets from the grid by filling up a battery bank using free (as in beer) energy from the sun. The system came with a basic meter which really only shows the total amount of electricity the panels produce. [Carl] wanted to get more data out of his system. He managed to build his own monitor using an Arduino.

The trick of this build has to do with how the system works. The panel includes an LED light that blinks 1000 times for each kWh of electricity. [Carl] realized that if he could monitor the rate at which the LED is flashing, he could determine approximately how much energy is being generated at any given moment. We’ve seen similar projects in the past.

Like most people new to a technology, [Carl] built his project up by cobbling together other examples he found online. He started off by using a sketch that was originally designed to calculate the speed of a vehicle by measuring the time it took for the vehicle to pass between two points. [Carl] took this code and modified it to use a single photo resistor to detect the LED. He also built a sort of VU meter using several LEDs. The meter would increase and decrease proportionally to the reading on the electrical meter.

[Carl] continued improving on his system over time. He added an LCD panel so he could not only see the exact current measurement, but also the top measurement from the day. He put all of the electronics in a plastic tub and used a ribbon cable to move the LCD panel to a more convenient location. He also had his friend [Andy] clean up the Arduino code to make it easier for others to use as desired.


Filed under: Arduino Hacks

Maximize Your Solar Charging With a DIY Arduino Controller

Here’s how to build a buck converter using an Arduino Nano (as well as another 28 listed components) to supply the maximum power that you can to your PV cell. This is known as maximum power point tracking, abbreviated MPPT. Photovoltaic (PV) cells produce different amounts of current and voltage depending […]
MAKE » Arduino 23 Feb 23:01

Experiencing the solar flux with an interactive installation

Dmitry Morozov shared with us a new interactive installation called  Solarman at the Polytech Museum in Moscow. 2014 and It’s a work he created with Julia Borovaya and Edward Rakhmanov using 64 ultra bright LEDs, 12-channel sound system and 8 electrical nerve stimulation electrodes controlled by Arduino Mega :

Data on power of X-radiation flux from the Sun is received in real time from the satellite GOES15 which is tracking solar activity. It is being converted into streams of sound, light and electric discharges, thus allowing a spectator to experience in more intensive and evident way the influence of the main luminary of the solar system.

The data, which is measured in watts per square meter, come with a frequency of once per minute. A special computer algorithm transforms it in sound waves, distributed by 12 channels in the space. The radiation power directly controls the height of tones and spectral changes in the sound. The speed of sound displacement in the space is also dependent on these parameters. Light is generated by algorithmic transformation of X-ray emission into physical modeling of light particles, which also affect the muscle stimulators in the chair to produce weak electric discharges.

Check the video below to see the power of the sun:

Arduino Blog 09 Dec 19:57