Posts with «transportation hacks» label

Arduino Gear Shift Indicator Finds ‘Em So You Won’t Grind ‘Em
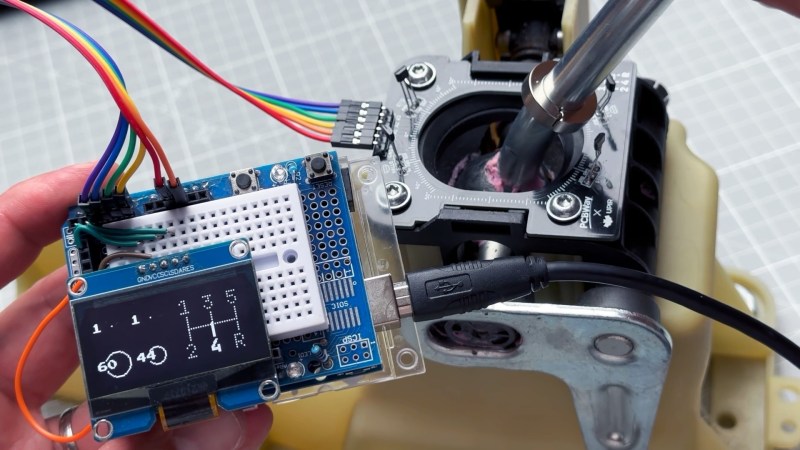
Now, it’s been a shamefully long time since we’ve driven a car with a manual transmission, but as we recall it was pretty straightforward. It certainly didn’t require a lot of help with the shifting pattern, at least not enough to require a technical solution to know what gear you’re in. But then again, we suspect that’s not really the point of [upir]’s latest build.

Oh sure, it’s pretty cool to display your current gear selection on a little LCD screen using an Arduino. And [upir] promises a follow-up project where the display goes inside the shifter knob, which will be really cool. But if you take a look at the video below, you’ll see that the real value of this project is the stepwise approach he takes to create this project. [upir] spends most of the time in the video below simulating the hardware and the code of the project in Wokwi, which lets him make changes and tune the design up before committing anything to actual hardware.
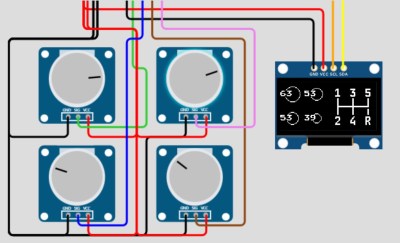
That turned out to be particularly useful with this build since he chose to use analog Hall sensors to detect the shift lever position and didn’t know exactly how that would work. Wokwi let him quickly build a virtual prototype for one sensor (using a potentiometer as a stand-in, since the simulator lacked a Hall sensor model), then quickly expand to the four sensors needed to detect all six gear positions.

By the time his simulation was complete, the code was almost entirely written. [upir] also walks us through his toolchains for both designing the graphics and laying out the PCB, a non-trivial task given the odd layout. We particularly enjoyed the tip on making smooth curved traces around the oval cutout for the shift lever in the board.

The video below is on the longish side, but it’s chock full of great little tips. Check out some more of [upir]’s work, like his pimped-out potentiometer or his custom animations on 16×2 LCDs.

Bringing Modern Technology to a Sled

Street sledding, a popular pastime in Norway, is an activity that is slowly dwindling in popularity, at least as far as [Justin] aka [Garage Avenger] has noticed. It used to be a fun way of getting around frozen lakes and roads during winter, and while some still have their sleds [Justin] wanted to see if there was a way to revitalize one of these sleds for the modern era. He’s equipped this one with powerful electric turbines than can quickly push the sled and a few passengers around the ice.

Since this particular sled is sized for child-sized passengers, fuel-burning jet engines have been omitted and replaced with electric motors that can spin their turbine blades at an impressive 80,000 rpm. The antique sled first needed to be refurbished, including removing the rust from the runners and reconditioning the wood. With a sturdy base ready to go, the sled gets a set of 3D printed cowlings for the turbines, a thumb throttle on the upgraded handlebars, and a big battery with an Arduino to bring it all together.

With everything assembled and a sheet of ice to try it out on, the powerful sled easily gets its passengers up to the 20-30 kph range depending on passenger weight and size. There’s a brake built on an old ice skate for emergency stops, and the sled was a huge hit for everyone at the skating pond. There are plenty of other ways to spruce up old sleds, too, like this one which adds a suspension for rocketing down unplowed roads.

Learn Sailing Mechanics Without Leaving Dry Land

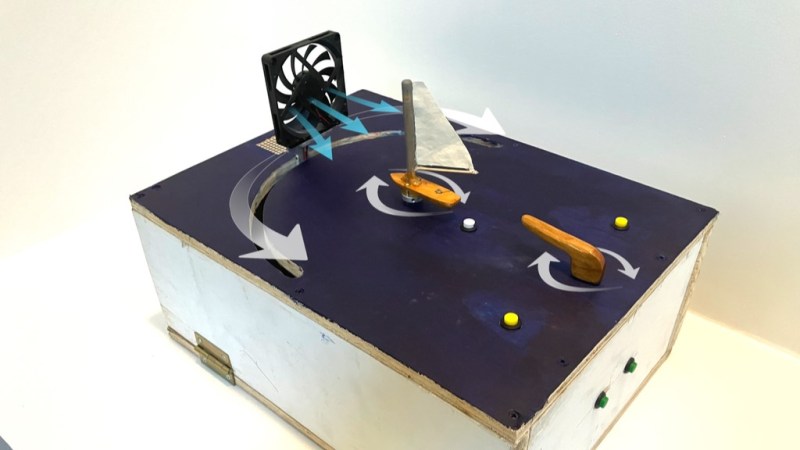
The ancient art of sailing can be very intimidating for the uninitiated given the shifty nature of wind. To help understand the interaction of wind direction and board orientation, [KifS] designed a hands-on sailing demonstrator that lets students grasp the basics before setting foot on a real sailboat.

The demonstrator uses a potentiometer as a tiller to control a model sailboat’s angle, while another stepper motor adjusts the position of a fan to simulate changing wind directions. With an Arduino Uno controlling everything, this setup affords students the opportunity to learn about sail positioning and adjusting to shifting winds in an interactive way, without the pressures and variables of being on the water.

[KifS]’s creation isn’t just about static demonstrations. It features four modes that progressively challenge learners—from simply getting a feel for the tiller, to adjusting sails with dynamic wind changes, even adding a game element that introduces random wind movements demanding quick adjustments. [KifS] mentions there are potentials aspects that can be refined, like more realistic sail response and usability, but it already achieved the main project goals.

There are a myriad of potential ways to add new tech to the ancient art of sailing. We’ve seen a DIY autopilot system, full sensor arrays, and an open source chart plotter. It’s even been proven you can have a wind powered land vehicle that travels faster than the wind.

An Open-Source Ebike Motor Controller

DIY e-bikes are often easy to spot. If they’re not built out of something insane like an old washing machine motor, the more subtle kits that are generally used still stand out when compared to a non-assisted bike. The motors tend to be hub- or mid-drive systems with visible wires leading to a bulky battery, all of which stand out when you know what to look for. To get a stealthy ebike that looks basically the same as a standard bicycle is only possible with proprietary name-brand solutions that don’t lend themselves to owner repair or modification, but this one has at least been adapted for use with an open source motor controller.

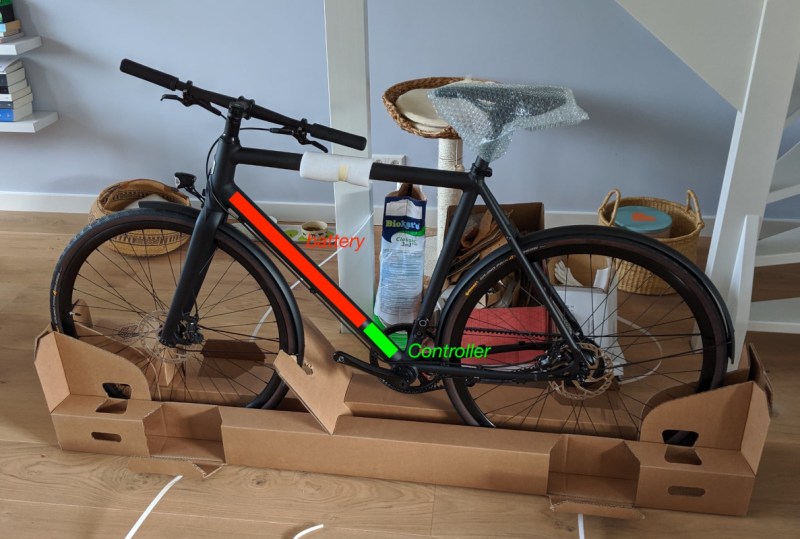
The bike in use here is a model called the Curt from Estonian ebike builder Ampler, which is notable in that it looks indistinguishable from a regular bicycle with the exception of the small 36-volt, 350-watt hub motor somewhat hidden in the rear wheel. [BB8] decided based on no reason in particular to replace the proprietary motor controller with one based on VESC, an open-source electric motor controller for all kinds of motors even beyond ebikes. Installed on a tiny Arduino, it fits inside the bike’s downtube to keep the stealthy look and can get the bike comfortably up to around 35 kph. It’s also been programmed to turn on the bike’s lights if the pedals are spun backwards, and this method is also used to change the pedal assist level, meaning less buttons and other user-interface devices on the handlebars.

[BB8] has been working on this for a while, and although the bulk of a working ebike controller is there, it still doesn’t support the torque sensing pedals included with this bike. We’re presuming that this is still a work-in-progress as the Arduino and associated code easily interfaces with all the other sensors available on this bike. Hopefully this open-source motor controller finds its way into other proprietary systems as well, since a lot of these ebikes can turn into massive paperweights if the companies who originally built them go out of business or simply decide to stop supporting older models. Of course, you can avoid this issue entirely by building your own ebike from spare parts.

Thanks to [Arnoud] for the tip!

Behold The Mega-Wheelie, a Huge One-Wheeled Electric Skateboard

DIY electric personal vehicles are a field where even hobbyists can meaningfully innovate, and that’s demonstrated by the Mega-Wheelie, a self-balancing one-wheeled skateboard constructed as an experiment in traversing off-road conditions.

[John Dingley] and [Nick Thatcher] have been building and testing self-balancing electric vehicles since 2008, with a beach being a common testing ground. They suspected that a larger wheel was the key to working better on rough ground and dry sand and tested this idea by creating a skateboard with a single wheel. A very big, very wide wheel, in fact.

The Mega-Wheelie houses a 24V LiFePO4 battery pack, 450 W gearmotor with chain and sprocket drive, SyRen motor controller from Dimension Engineering, Arduino microcontroller, and an inertial measurement unit to enable the self-balancing function. Steering is done by leaning, and the handheld controller is just a dead man’s switch that disables the vehicle if the person piloting it lets go.

Design-wise, a device like this has a few challenging constraints. A big wheel is essential for performance but takes up space that could otherwise be used for things like batteries. Also, the platform upon which the pilot stands needs to be as low to the ground as possible for maximum stability. Otherwise, it’s too easy to fall sideways. On the other hand, one must balance this against the need for sufficient ground clearance.

Beaches are rarely covered in perfectly smooth and firm sand, making them a good test area.

In the end, how well did it work? Well enough to warrant a future version, says [John]. We can’t wait to see what that looks like, considering their past 3000 W unicycle’s only limitation was “personal courage” and featured a slick mechanism that shifted the pilot’s weight subtly to aid steering. A video of the Mega-Wheelie (and a more recent unicycle design) is embedded just below the page break.

And just for reference, here is some of [John]’s previous work on a self-balancing unicycle design.

Tesla Model S Gets Boost with Jet Engine Upgrade

Tesla is well known for making cars that can accelerate quickly, but there’s always room for improvement. [Warped Perception] decided that his Tesla Model S P85D needed that little bit of extra oomph (despite the 0-60 MPH or 0-97 km/h time of 3.1 seconds), so he did what any sensible person would: add three jet turbines to the back of his car.

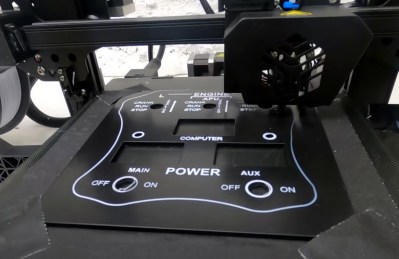
The best part of this particular build is the engineering and fabrication that made this happen. With over 200 pieces and almost all personally fabricated, this is a whirlwind of a build. The control panel is first, and there’s a particularly clever technique of 3D printing the lettering directly onto the control panel for the flat stuff. Then for the pieces with angles that would prevent the head from moving freely, he printed onto a plastic sheet in reverse, applied glue, then stuck the letters to the plate as a sheet. A top layer of clear coat ensures the letters won’t come off later.

Using a 3D printer to apply lettering on the control panel.

He installed the control electronics in the trunk with wiring strung from the car’s front to the rear. Three Arduinos serve as controllers for the jets. Afterward, came the bracket to hold the engines and attach it to the car’s underside. Unfortunately, supplies were a little hard to come by, so he had to make do with what was on hand. As a result it didn’t come out as strong as he would have hoped, but it’s still pretty impressive.

[Warped Perception] does a few tests before taking it out on the road. Then, he shifted the car into neutral and could drive the car solely on jet power, which was one of his goals. While we don’t love the idea of testing a jet engine on public roads, it certainly would discourage tailgaters.

Next, he finds a quieter road and does some speed tests. Unfortunately, it was drizzling, and the pavement was damp, putting a damper on his 0-60 standing times. Electric-only he gets 4.38 seconds, and turning on the jets plus electric shaves that down to 3.32 seconds. Overall, an incredible build that’s sure to draw a few curious glances whenever you’re out on the town.

If you’re looking to upgrade your Tesla, perhaps instead of jet engines, you might opt for a robot to plug it in for you?

Annoy Yourself into Better Driving with This Turn Signal Monitor

Something like 99% of the people on the road at any given moment will consider themselves an above-average driver, something that’s as statistically impossible as it is easily disproven by casual observation. Drivers make all kinds of mistakes, but perhaps none as annoying and avoidable as failure to use their turn signal. This turn signal monitor aims to fix that, through the judicious use of negative feedback.

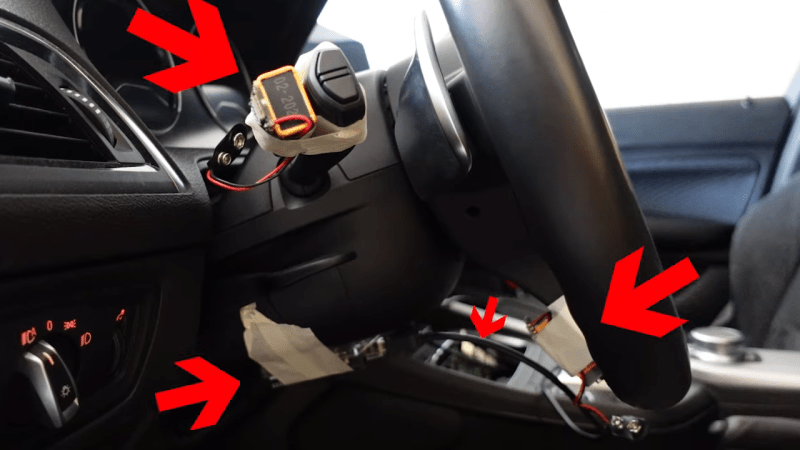
Apparently, [Mark Radinovic] feels that he has a predisposition against using his turn signal due to the fact that he drives a BMW. To break him of that habit, one that cost him his first BMW, he attached Arduino Nano 33 BLEs to the steering wheel and the turn signal stalk. The IMUs sense the position of each and send that over Bluetooth to an Arduino Uno WiFi. That in turn talks over USB to a Raspberry Pi, which connects to the car’s stereo via Bluetooth to blare an alarm when the steering wheel is turned but the turn signal remains untouched. The video below shows it in use; while it clearly works, there are a lot of situations where it triggers even though a turn signal isn’t really called for — going around a roundabout, for example, or navigating a sinuous approach to a drive-through window.

While [Mark] clearly built this tongue firmly planted in cheek, we can’t help but think there’s a better way — sniffing the car’s CANbus to determine steering angle and turn signal status comes to mind. This great workshop on CANbus sniffing from last year’s Remoticon would be a great place to start if you’d like a more streamlined solution than [Mark]’s.

[via Tom’s Hardware]

Hack a Day 07 Nov 15:15

Ground Effect Drone Flies Autonomously

There are a number of famous (yet fictional) sea monsters in the lakes and oceans around the world, but in the Caspian Sea one turned out to be real. This is where the first vehicles specifically built to take advantage of the ground effect were built by the Soviet Union, and one of the first was known as the Caspian Sea Monster due to the mystery surrounding its discovery. While these unique airplane/boat hybrids were eventually abandoned after several were built for military use, the style of aircraft still has some niche uses and can even be used as a platform for autonomous drones.

This build from [Think Flight] started off as a simple foam model of just such a ground effect vehicle (or “ekranoplan”) in his driveway. With a few test flights the model was refined enough to attach a small propeller and battery. The location of the propeller changed from rear-mounted to front-mounted and then back to rear-mounted for the final version, with each configuration having different advantages and disadvantages. The final model includes an Arudino running an autopilot program called Ardupilot, and with an air speed sensor installed the drone is able to maintain flight in the ground effect and autonomously navigate pre-programmed waypoints around a lake at high speed.

For a Cold War technology that’s been largely abandoned by militaries in favor of other modes of transportation due to its limited use case and extremely narrow flight tolerances, ground effect vehicles are relatively popular as remote controlled vehicles. This RC ekranoplan used the same Ardupilot software but paired with a LIDAR system instead of GPS to navigate its way around its environment.

Thanks to [TTN] for the tip!

Open Source Electric Vehicle Charging

Electric vehicles are becoming more and more common on the road, but when they’re parked in the driveway or garage there are still some kinks to work out when getting them charged up. Sure, there are plenty of charging stations on the market, but they all have different features, capabilities, and even ports, so to really make sure that full control is maintained over charging a car’s batteries it might be necessary to reach into the parts bin and pull out a trusty Arduino.

This project comes to us from [Sebastian] who needed this level of control over charging his Leaf, and who also has the skills to implement it from the large high voltage switching contactors to the software running its network connectivity and web app. This charging station has every available feature, too. It can tell the car to charge at different rates, and can restrict it to charging at different times (if energy is cheaper at night, for example). It is able to monitor the car’s charge state and other information over the communications bus to the vehicle, and even has a front-end web app for monitoring and controlling the device.

The project is based around an Arduino Nano 33 IoT with all of the code available on the project’s GitHub page. While we would advise using extreme caution when dealing with mains voltage and when interfacing with a high-ticket item like an EV, at first blush the build looks like it has crossed all its Ts and might even make a good prototype for a production unit in the future. If you don’t need all of the features that this charging station has, though, you can always hack the car itself to add some more advanced charging features.

Upgraded Infotainment Options on a 14 Year Old Mercedes

It used to be that upgrading a car stereo was fairly simple. There were only a few mechanical sizes and you could find kits to connect power, antennas, and speakers. Now, though, the car stereo has interfaces to steering wheel controls, speed sensors, rear-view cameras, and more. [RND_ASH] was tired of his 14-year-old system so he took an Android head unit, a tablet, and an Arduino, and made everything work as it was supposed to.

The key is to interface with the vehicle’s CAN bus which is a sort of local area network for the vehicle. Instead of having lots of wires running everywhere, today’s cars are more likely to have less wiring all shared with many devices.

[RND_ASH] has several videos describing the whole project and we expect there will be some more upcoming. You can see part one, below.

The project also reverse engineers how to display on the tiny screen in the dashboard. The code for the CAN bus interface is on GitHub. There’s also a written narrative on what he learned about the Mercedes interface in a different repository.

We’ve seen other cars get similar treatment, of course. If you want a gentle introduction to CAN hacking, we’ve done that, too.