Posts with «high voltage» label

Open Source Electric Vehicle Charging

Electric vehicles are becoming more and more common on the road, but when they’re parked in the driveway or garage there are still some kinks to work out when getting them charged up. Sure, there are plenty of charging stations on the market, but they all have different features, capabilities, and even ports, so to really make sure that full control is maintained over charging a car’s batteries it might be necessary to reach into the parts bin and pull out a trusty Arduino.

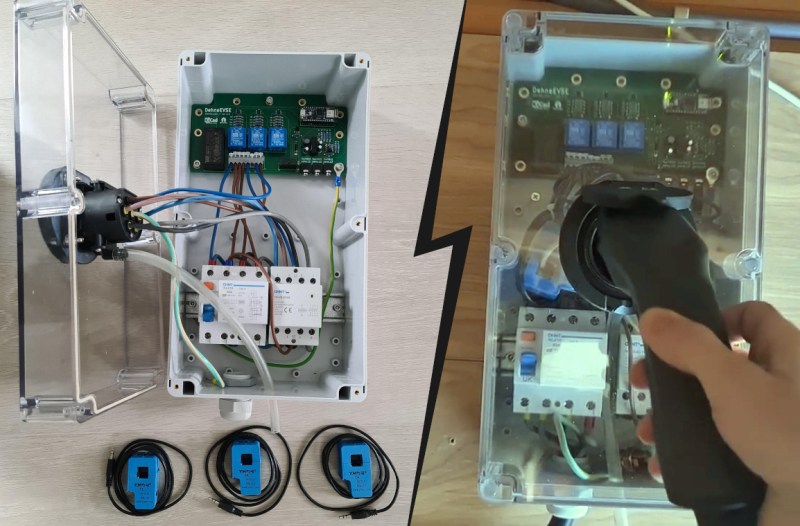
This project comes to us from [Sebastian] who needed this level of control over charging his Leaf, and who also has the skills to implement it from the large high voltage switching contactors to the software running its network connectivity and web app. This charging station has every available feature, too. It can tell the car to charge at different rates, and can restrict it to charging at different times (if energy is cheaper at night, for example). It is able to monitor the car’s charge state and other information over the communications bus to the vehicle, and even has a front-end web app for monitoring and controlling the device.

The project is based around an Arduino Nano 33 IoT with all of the code available on the project’s GitHub page. While we would advise using extreme caution when dealing with mains voltage and when interfacing with a high-ticket item like an EV, at first blush the build looks like it has crossed all its Ts and might even make a good prototype for a production unit in the future. If you don’t need all of the features that this charging station has, though, you can always hack the car itself to add some more advanced charging features.

Hackaday Prize Entry: Open Source Electrospinning Machine

Electrospinning is a fascinating process where a high voltage potential is applied between a conductive emitter nozzle and a collector screen. A polymer solution is then slowly dispensed from the nozzle. The repulsion of negative charges in the solution forces fine fibers emanate from the liquid. Those fibers are then rapidly accelerated towards the collector screen by the electric field while being stretched and thinned down to a few hundred nanometers in diameter. The large surface area of the fine fibers lets them dry during their flight towards the collector screen, where they build up to a fine, fabric-like material. We’ve noticed that electrospinning is hoped to enable fully automated manufacturing of wearable textiles in the future.

[Douglas Miller] already has experience cooking up small batches of microscopic fibers. He’s already made carbon nanotubes in his microwave. The next step is turning those nanotubes into materials and fabrics in a low-cost, open source electrospinning machine, his entry for the Hackaday Prize.

As always in fundamental research projects, a whole lot of parameters have to be tuned just right. To speed up the process of finding suitable values for the electric potential, dosing feed rate, emitter to collector plate distance, temperature, and humidity, [Douglas] build his machine with a CNC controlled vertical axis and syringe pump, that can dispense even the smallest amounts of a given solutions accurately. Temperature and humidity control will be added as the project progresses. A host software and GUI allows for easy control of all parameters and will also save and recall presets for different spinning solutions once everything has been dialed in. [Douglas] already ran a few tests, spraying saline solution from an old 3D printer nozzle, and we can soon expect first tests with polymer solutions from the better-suited syringe nozzles he installed.

Electrospun fabric, image source

To keep the build affordable and easy to reproduce for other makers, [Douglas] uses available materials and came up with a few design tricks that could also be applied to other projects. The belt-driven vertical axis is based on PVC pipes, on which a 3D-printed bushing block slides up and down, adjusting the distance between the nozzle and the collector plate. An acrylic door with a safety switch prevents the polymer spray from escaping from the spinning chamber. In the heart of the machine sits an Arduino Uno with a gShield, controlling the stepper motors and talking to the host computer. The 3D-printed syringe pump, a custom design, swings out from the side of the machine to allow for easy refilling. Submerged in mineral oil, which may have been chosen to reduce the risk of overheating and arcing, lies a half-wave series voltage multiplier, cranking up the voltage from an AC power supply to a maximum of 30 kV DC.

The HackadayPrize2016 is Sponsored by:

Filed under: hardware, The Hackaday Prize

New Project: Use an Arduino and Relays to Control AC Lights and Appliances

This plug-and-play rig will make it easy to control high-voltage outputs from a low-voltage Arduino.

Read more on MAKE

The post Use an Arduino and Relays to Control AC Lights and Appliances appeared first on Make: DIY Projects, How-Tos, Electronics, Crafts and Ideas for Makers.

Nightmare Metronome Reminds You That Time is Money

  TEMPO, TEMPO! is a piece of kinetic art in the form of a metronome with an audible spark. Or, according to creator Sanela Jahić, it’s “a kinetic object which form a narrative about accelerating the production process and enhancing work performance in order to increase competitiveness and improve profits.” […]

Read more on MAKE

Solid State Tesla Coil Plays Music

If you’ve ever wanted to build a Tesla coil but found them to be prohibitively expensive and/or complicated, look no further! [Richard] has built a solid-state Tesla coil that has a minimum of parts and is relatively easy to build as well.

This Tesla coil is built around an air-core transformer that steps a low DC voltage up to a very high AC voltage. The core can be hand-wound or purchased as a unit. The drive circuit is where this Tesla coil built is set apart from the others. A Tesla coil generally makes use of a spark gap, but [Richard] is using the Power Pulse Modulator PWM-OCXi v2 which does the switching with transistors instead. The Tesla coil will function with one drive circuit but [Richard] notes that it is more stable with two.

The build doesn’t stop with the solid-state circuitry, though. [Richard] used an Arduino with software normally used to drive a speaker to get his Tesla coil to play music. Be sure to check out the video after the break. If you’re looking for a Tesla coil that is more Halloween-appropriate, you can take a look at this Tesla coil that shocks pumpkins!


Filed under: misc hacks