Posts with «grove» label

Universal Remote a Grove Infrared project


Description

This project will convert an ordinary Keyes infra-red (IR) remote
into a programmable universal remote.

 
A single button press on the Keyes remote will be converted into precise Sony IR signal combinations using an Arduino UNO and an assortment of Seeedstudio Grove modules.
You can assign signal combinations from more than one remote if desired.
An example combination could be to:
  • Turn on the TV and then switch channels.
  • Turn on the TV, sound system, and air-conditioner.
  • Turn up the volume x 3.
With only one button press of the Keyes remote, the entire cascade of Sony signals ensues. This project can be customised for other IR methodologies, however, you may have to modify the Arduino code to accommodate them.


Parts Required

  1. Arduino Uno (or compatible board)
  2. Grove Base Shield (v2)
  3. Grove Infrared Receiver
  4. Grove Infrared Emitter
  5. Grove Button
  6. Grove 16x2 LCD (White on Blue)
  7. Grove Universal 4 pin buckled cable: one supplied with each module.
  8. KEYES IR Remote Control
  9. SONY IR remote control
  10. USB cable - to power and program the Arduino
  11. Battery pack / Power bank


More information about the Grove modules can be found here:

**Please Note: The Grove Base shield has 14 pins on the Analog side, and 18 pins on the digital side. Check the number of pins on your Arduino UNO (or compatible board) to ensure the shield will sit nicely on top. NOT compatible with Arduino boards that have the Arduino Duemilanove pin header layout.


Arduino IDE

While there are many Arduino IDE alternatives out there, I would recommend that you use the official Arduino IDE for this project. I used the official Arduino IDE app (v1.8.5) for Windows 10.
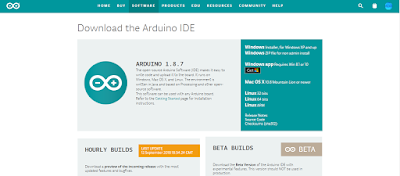
Make sure to get the most up-to-date version for your operating system here.


Libraries required

The following libraries will be used in the Arduino code:

  1. Wire Library
  2. IRLib2 Library
  3. rgb_lcd Library

Wire Library

The Wire library is used for I2C communication for the Grove LCD screen and is built into the Arduino IDE - no additional download required for this library.
 

IRLib2 Library

The IRLib2 Library is actually a "set" of IR libraries, which can be downloaded from GitHub - here. In this project, I will be transmitting and receiving NEC and Sony IR remote signals.
The required libraries (within the set) will be:
  • IRLibRecv.h
  • IRLibDecodeBase.h
  • IRLibSendBase.h
  • IRLib_P01_NEC.h
  • IRLib_P02_Sony.h
  • IRLibCombo.h
Please see the IRLib2 GitHub Page for installation instructions.
 

rgb_lcd Library

The rgb_lcd.h library simplifies the operation of the LCD screen.
Download the rgb_lcd.h library from GitHub. Install the rgb_lcd.h library ZIP file into the Arduino IDE:
  1. Load the Arduino IDE
  2. Navigate to Sketch >Include library > Add .ZIP library...
  3. Select the downloaded zip file from GitHub, and press the "Open" button
  4. Check that it installed correctly by navigating to File > Examples > Grove-LCD RGB Backlight


Arduino Code

It is always best to upload the Arduino code to the board before you make any of the connections. This way you prevent the Arduino from sending current to a component accidentally. The code is available on my GitHub repository. Or you can have a look below. This code was written for an Arduino UNO, and may need to be modified if you are using a different board.


Connection instructions

If you are using the Grove Base Shield (v2). The connections are extremely simple. Use the following table as a guide. Please note that the code above assumes the following connections.


As per the table above, you would use a Grove universal 4-pin buckled cable and connect one side to D2 on the Grove base shield, and the other side would connect to the Grove Infrared Emitter.
D3 on the base shield would connect to the Grove Infrared Receiver, and so on.
You can connect the 16x2 LCD module to ANY of the four I2C connectors on the Grove base shield.

If you do not have a Grove Base shield, you have the option to use female-to-male jumper wires (together with a breadboard). But it is easier just to get the base shield and use the universal connectors.


Project Explained

When you apply power to the Arduino, the first thing that appears on the LCD screen is:


After pressing the Grove button (connected to D5), it displays the following message:


This is the cue to press and send a signal from the Keyes remote to the Infrared receiver (which is connected to D2). The Arduino will decode the Keyes remote signal, store the value in an array, and display the signal briefly on the LCD. The LCD should now show a message:


This message is a cue to press and send the FIRST signal from the Sony remote to the Infrared receiver. The Arduino will decode and store the Sony remote signal in a different array, and display it briefly on the LCD. You have the option to send a maximum of THREE Sony signal combinations to the Infrared receiver at this step in the process. The minimum number of Sony signals you can send is zero. The way to tell the Arduino that you do not want to send any further Sony signals to the receiver in this step, is by pressing the Grove Button (connected to D5).
 
The Arduino is programmed to receive a total of 5 Keyes signals, and each signal can be paired with a maximum of 3 Sony signal combinations. Once you have recorded all of the signal combinations, you will get a message:


The Arduino will now enter the final "Universal remote mode". In this mode, it will listen out for ANY of the 5 Keyes IR remote signals recorded previously, and will send the associated Sony signal combination in return. For example, if you press the number 1 on the Keyes remote, you could potentially have it so that the Arduino will transmit a Sony signal combination to turn on the TV and jump to a specific channnel.
 
The LCD will display each of the signals being transmitted. You will know you are in "Universal remote" mode because the LCD will display:


While you may be tempted to throw your Sony remote away at this stage (because you no longer have a use for it)... I would hold on to it just in case. The signals are not stored permanently. They disappear when the Arduino is powered off. But it doesn't have to be that way. You can easily modify the code to store it in eeprom memory or something.
 
That is not the only thing you can change.Technically, you could record the signal for any remote, however, you may need to include additional libraries or code to accommodate the alternate remote symbology. You can also modify the text messages on the LCD screen to make more sense to you. The LCD can only display 16 characters per row. So keep that it mind, when you come up with creative captions.
 
I would also like to mention the reason I chose not to use Seeedstudio's IR library, was because it took up too much memory. Their library probably accommodates for a wide range of symbologies. I chose the IRLib2 Library because I could select only the symbologies that I used (Sony and NEC). Thereby reducing the total amount of memory necessary to run the project. In fact, I have been finding that many of Seeedstudio's libraries to be very memory hungry. I originally wanted to create a gesture controlled remote. But the library combinations eliminated that possibility due to the cumulative memory requirements.


Conclusion

The IRLib2 library is the key to the success of this project. Without that library, this project would have been ten times harder. I was quite amazed by the effectiveness of this record / playback technique. It felt very weird to be operating my SONY TV with a cheap and nasty Keyes remote. It was quite surreal. While I chose to control my TV in this way, I could have just as easily recorded signals from one of my other remotes that use infrared signals. As more and more devices become controllable by remotes, the more I will consider turning this project into a permanent fixture in my house. A gesture controlled remote would have been nice, however, it looks like I will have to find some other use for that module now.

If you found this tutorial helpful, please consider supporting me by buying me a virtual coffee/beer.

$3.00 AUD only
 

Social Media

You can find me on various social networks:

Follow me on Twitter: ScottC @ArduinoBasics.
I can also be found on Instagram, Pinterest, and YouTube.
And if all else fails, I have a server on Discord.


             

PobDuino Makes the Most of Grove

The chassis of a toy robot serves as the base of a robot built by [Jean Noel]. Called #PobDuino, the robot features two Arduino-compatible boards under the hood.

First, a Seeeduino Lotus, a Arduino board peppered with a dozen Grove-compatible sockets. The board, which is the size of an UNO, is mounted so that the plugs project out of the front of the robot, allowing ad-hoc experimentation with the various Grove System modules. Meanwhile, a custom ATmega328 board (the PobDuino) interprets Flowcode instructions and sends commands to the various parts of the robot: servos are controlled by an Adafruit servo driver board and the DC motors are driven by a Grove I2C motor driver.

We love how easy it is to customize the robot, with both the Lotus and the Adafruit 16-channel servo driver on the exterior of the robot. Just plug and play!

Learn more about Grove-compatible plugs and a lot more in [Elliot]’s My Life in the Connector Zoo.


Filed under: robots hacks
Hack a Day 27 Jul 09:00

My Life in the Connector Zoo

“The great thing about standards is that there are so many to choose from.” Truer words were never spoken, and this goes double for the hobbyist world of hardware hacking. It seems that every module, every company, and every individual hacker has a favorite way of putting the same pins in a row.

We have an entire drawer full of adapters that just go from one pinout to another, or one programmer to many different target boards. We’ll be the first to admit that it’s often our own darn fault — we decided to swap the reset and ground lines because it was convenient for one design, and now we have two adapters. But imagine a world where there was only a handful of distinct pinouts — that drawer would be only half full and many projects would simply snap together. “You may say I’m a dreamer…”

This article is about connectors and standards. We’ll try not to whine and complain, although we will editorialize. We’re going to work through some of the design tradeoffs and requirements, and maybe you’ll even find that there’s already a standard pinout that’s “close enough” for your next project. And if you’ve got a frequently used pinout or use case that we’ve missed, we encourage you to share the connector pinouts in the comments, along with its pros and cons. Let’s see if we can’t make sense of this mess.

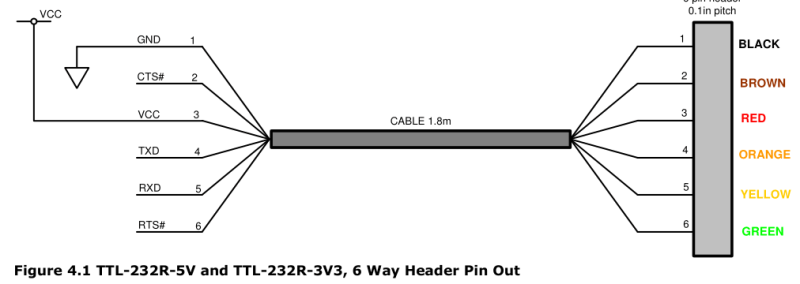
FTDI TTL Serial

The de-facto standard for a hacker’s TTL serial pinout is definitely the layout that FTDI uses for their USB/TTL serial cables. Said cable is just so handy to have on hand that you’d be silly to use any other pinout for the job. And the good news is that the rest of the world has basically joined in. From the Chinese “Pro Mini” cloneduinos to the Hackaday Edition Huzzah ESP8266 board, and from Adafruit’s FTDI Friend to Modern Device’s USB-BUB, almost everyone uses this pinout. A victory for the common man!

There is one slight point of contention, however, and that’s whether pin 6 is DTR or RTS#. We never use either, so we couldn’t care less, but if you’re counting on your programmer sending the DTR signal to enter programming mode on the device (we’re looking at you Arduino!) then you’ll want DTR on pin 6, and the original FTDI cable, ironically, has the “wrong” pinout. Perhaps that’s why Sparkfun avoided the whole debacle and went their own way, breaking out every signal off the FTDI chip into their own unique configuration.

If you’re only going to break out TTL serial lines, you’d be a fool to use any other pinout.

Modules and Other Communications

Unlike the case with simple serial, connecting various kinds of modules to mainboards is a difficult problem. Creating a single pinout or connector specification for many potential protocols or arbitrary signals is a Herculean task. Surprisingly, it’s been done a few times over. Here are some notables.

Pmod

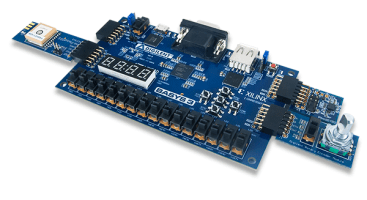
Digilent makes a wide range of FPGA demo boards, and they needed an in-house standard pinout that they could use to plug into various add-on peripheral modules that they sell. Thus Pmod was born. It has since become a full-fledged, and trademarked, open standard that you can use in your designs. Here’s the PDF version of the specification for you to print out, so you know they mean business.

There are a few aspects of Pmod that we think are particularly clever. First, the number of pins involved is “just right” at six, and it’s easily expandable. They use standard 0.1″ pitch pins and headers. Two lines carry power and ground, leaving four free pins for SPI, UART, or whatever else. The specification is that all power and signal voltages are 3.3 V because they’re designed for FPGAs after all. You can mix and match if you know what you’re doing, but they won’t let you call it Pmod(tm).

Eric Brombaugh’s iceRadio FPGA SDR, plugged together with Pmods

If you need more than four signals, there’s a twelve-pin version which is just two six-pin Pmods stacked into a double-row header. The extra power and ground are redundant, but it makes a twelve-pin output very flexible, because nothing stops it from being used as two sixes. The standard also says that the twelve-pin headers are to be spaced at 0.9″ center-to-center, so you can even connect two of them together when you need sixteen board-to-board signal connections. We like the modularity and expandability.

Pmod connectors are multi-protocol, but for each protocol there is a single pinout. So there’s an SPI Pmod and an I2C Pmod, and the pins are always in the same place. There isn’t a Pmod standard for every conceivable application, of course, so there’s a GPIO pinout that gives you free rein over what goes where. We think that it would be nice if some additional notable protocols (I2S? one-wire? servos? analog stereo audio?) were included in the specs, but the community can also handle these lower-level details.

In our eyes, Pmod is nearly perfect. It uses cheap hardware, is easily expandable, and the smallest incarnations are small enough to fit on all four sides of a one-inch-square board. If you’re willing to pay the brand-name premium, Digilent makes an incredible range of modules. We want to see more hackers outside of the FPGA scene get on it.

mikroBUS

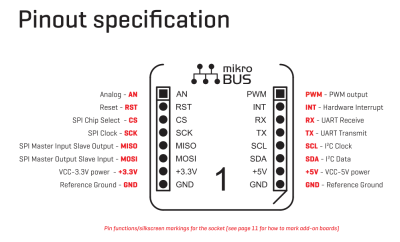
What Digilent is to development boards in the US, MikroElektronika is in Europe. While Pmod aims to be capable of doing anything, Mikro-E’s mikroBUS connector wants to do everything, which is to say it has I2C, SPI, UART, two voltages, and even a few extra signals all on the same pinout. Physically, it’s two single rows of eight pins, spaced 0.9″ apart side-to-side, which means it fits into a breadboard nicely. Here’s the spec in PDF.

The tradeoff here, relative to Pmod, is that a lot of pins go unused on any given design. With (only) one “analog” channel, you wouldn’t choose mikroBUS to send stereo audio, whereas nothing stops you from calling the Pmod’s GPIO lines analog and sending four channels of sound. But that mikroBUS gains is fool-proofness. (Well, they could have also made it asymmetric…) There’s no chance of a newbie plugging an SPI module in where an I2C module is expected and scratching their heads. With mikroBus, it should just work.

Microchip has added a mikroBus port to their Curiosity boards, and MikroElektronika makes a ton of modules. If your audience consists of beginners, and one footprint for all protocols, it’s worth considering.

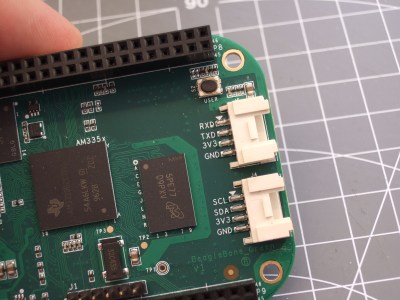
Seeed’s Grove

Meanwhile in China, Seeed Studios makes open-source modules, and makes them cheap. Their Grove connector uses only four pins, with power and ground among them. The have standard pinouts for UART, I2C, and for servo motors. Sensors and other analog peripherals are allocated one “primary” pin and one “secondary” and it’s assumed that you know what you’re doing. The idea behind their system is that you add a shield to your microcontroller board, and they break out the relevant pins into these four-pin Grove headers.

This is great for small things and I2C devices, which is Seeed’s catalog, but there just aren’t enough signal pins to run SPI or an analog RGB LED, for instance. But because of the small number of pins, they use very inexpensive polarized cables and shrouds that you can’t plug in the wrong way, and that take up relatively little board space. That’s Grove’s design trade-off.

Servo Motor control

One of these things is not like the others…

Hobby servo motors need three wires: voltage, ground, and a signal to tell them where to point. There are three distinct ways to arrange these wires, but Futaba, HiTec, Tower, GWS, and JR servos all chose to put them in SVG (or GVS) order, and there’s no reason to buck the trend. (Airtronics, what were you thinking?!)

SVG is also a handy pinout to use for all sorts of one-signal sensors or actuators where space is a premium, and we’ve seen this in a few designs (here and here, for instance). But we’re torn. Relative to the Grove, for instance, you’re just saving one pin. Even the Pmod would work with only three pins’ overhead. Is that worth complicating your life with another pinout? If you need a lot of powered one-signal devices, or servos, it probably is, and you can hardly beat SVG or GVS, whichever way you look at it.

Arduino

Viewed in the light of any of the other module interconnection systems, the Arduino is the worst of all worlds. It’s monolithic like mikroBUS, but it’s gigantic — you have to build a 55×73 mm board and accommodate 30 pins and pass-throughs if you’d like it to be stackable. The pins have a funny spacing (that gap!), that doesn’t fit any normal protoboard. Nobody goes through the trouble of building a shield just for an I2C connection. No wonder most Arduino projects look like a breadboard hedgehog. About the only good thing we can say about it is that it’s hard to plug one in backwards.

There’s also the tiny little factor that there’s a million Arduino shields out there, a huge community built around them, and widespread support for them. Which turns out to trump all of the reasonable design concerns. (Shakes head.)

Miscellany

Of course, there are other very specific pinouts that one might encounter, like the old ESP-01 module, or the XBee, or the nRF24. Adapting modules to fit boards is always going to be a pain, because the manufacturers will pick whatever suits them on that day. Programmer pinouts for specific microcontrollers are a similar story, as is JTAG, which is a beautiful standard with a dogs’ breakfast of pinout possibilities. (We could do a whole column!)

Faced with this inevitability, and the need for many one-off adapters, what can you do? What we do is buy a lot of those cheap “Dupont” female-to-female cables, get the connections working and tested, and then tape them permanently together and label them. It’s not as pretty as a dedicated PCB adapter, but it’s quick and easy and gets you moving on to what you wanted to do in the first place.

Wrapup and Recommendations

The goal of connectors, and their standards, is putting parts together. If you’re designing a sensor module with more than a couple components, and you want it to be maximally easy for yourself and others to hook up to whatever mainboard they’ve got, this is no easy task. The end result is a proliferation of translators, adapter boards, hats, shields, capes, or whatever else. We have a drawer and a half full, and we bet you do too.

Yes, I do see what I’m suggesting here. [source: xkcd 927]
We’d be happy to see the world settle on Pmod for most needs, honestly, and we’d even throw away our beloved FTDI serial pinout in the name of standardization (or make an adapter). We can also see the need for exceptions like SVG / servo connectors when small sensors or multiples are in play. There will always be the need for dedicated on-board connectors as well, of course. Nobody said hardware was easy.

What’s your solution to the ultimate connector conundrum? Are there important connector systems that we’ve left out? What are their design tradeoffs? How stoked would you be if things could just plug together? Let us know!

Thumbnail image courtesy of [Raspberry Pi Controller].


Filed under: Engineering, Hackaday Columns, hardware, rants

Win a Jetduino robotics board for the JetsonTK1

I just launched a contest to give away 2 prototypes of the new Jetduino robotics interface board for the Jetson TK1. The Jetduino mounts on top of the TK1 and level shifts all of its GPIO, I2C, serial and SPI lines to 3.3V or 5v. It has Grove and 3-pin 2.54mm headers to make it very easy to connect commercial off-the-shelf sensors to the Jetson and communicate with them via Python or C++. It also has a built-in shield for any Mega or Uno form factor Arduino.

read more

Control DC motors with a Grove H-Bridge and DynamixShield

I just uploaded a new video tutorial on how to use the Grove dual H-Bridge module with the DynamixShield and an Arduino Due to control DC motors. 


read more

Video tutorial on using RobotGeek modules with the DynamixShield and Arduino Due

Arduino Heart Rate Monitor


Project Description


Heart Rate Monitors are very popular at the moment.
There is something very appealing about watching the pattern of your own heart beat. And once you see it, there is an unstoppable urge to try and control it. This simple project will allow you to visualize your heart beat, and will calculate your heart rate. Keep reading to learn how to create your very own heart rate monitor.


Parts Required:


Fritzing Sketch


Grove Base Shield to Module Connections


Arduino Sketch


1
2
3
4
5
6
7
8
9
10
11
12
13
14
15
16
17
18
19
20
21
22
23
24
25
26
27
28
29
30
31
32
33
34
35
36
37
38
39
40
41
42
43
44
45
/* =================================================================================================
      Project: Arduino Heart rate monitor
       Author: Scott C
      Created: 21st April 2015
  Arduino IDE: 1.6.2
      Website: http://arduinobasics.blogspot.com/p/arduino-basics-projects-page.html
  Description: This is a simple sketch that uses a Grove Ear-clip Heart Rate sensor attached to an Arduino UNO,
               which sends heart rate data to the computer via Serial communication. You can see the raw data
               using the Serial monitor on the Arduino IDE, however, this sketch was specifically
               designed to interface with the matching Processing sketch for a much nicer graphical display.
               NO LIBRARIES REQUIRED.
=================================================================================================== */

#define Heart 2                            //Attach the Grove Ear-clip sensor to digital pin 2.
#define LED 4                              //Attach an LED to digital pin 4

boolean beat = false; /* This "beat" variable is used to control the timing of the Serial communication
                                           so that data is only sent when there is a "change" in digital readings. */

//==SETUP==========================================================================================
void setup() {
  Serial.begin(9600); //Initialise serial communication
  pinMode(Heart, INPUT); //Set digital pin 2 (heart rate sensor pin) as an INPUT
  pinMode(LED, OUTPUT); //Set digital pin 4 (LED) to an OUTPUT
}


//==LOOP============================================================================================
void loop() {
  if(digitalRead(Heart)>0){ //The heart rate sensor will trigger HIGH when there is a heart beat
    if<!beat){><span>//Only send data when it first discovers a heart beat - otherwise it will send a high value multiple times</span><br />      beat=<span>true</span>; <span>//By changing the beat variable to true, it stops further transmissions of the high signal</span><br />      <span>digitalWrite</span>(LED, <span>HIGH</span>); <span>//Turn the LED on </span><br />      <span><b>Serial</b></span>.<span>println</span>(1023); <span>//Send the high value to the computer via Serial communication.</span><br />    }<br />  } <span>else</span> { <span>//If the reading is LOW, </span><br />    <span>if</span>(beat){ <span>//and if this has just changed from HIGH to LOW (first low reading)</span><br />      beat=<span>false</span>; <span>//change the beat variable to false (to stop multiple transmissions)</span><br />      <span>digitalWrite</span>(LED, <span>LOW</span>); <span>//Turn the LED off.</span><br />      <span><b>Serial</b></span>.<span>println</span>(0); <span>//then send a low value to the computer via Serial communication.</span><br />    }<br />  }<br />}</pre> </td> </tr> </table></div></p> <br />  <br />   <br />  <br />  <p> <h4><a href="https://processing.org/download/?processing">Processing Sketch</a></h4> <br />  <div> <table> <tr> <td> <pre> 1<br /> 2<br /> 3<br /> 4<br /> 5<br /> 6<br /> 7<br /> 8<br /> 9<br /> 10<br /> 11<br /> 12<br /> 13<br /> 14<br /> 15<br /> 16<br /> 17<br /> 18<br /> 19<br /> 20<br /> 21<br /> 22<br /> 23<br /> 24<br /> 25<br /> 26<br /> 27<br /> 28<br /> 29<br /> 30<br /> 31<br /> 32<br /> 33<br /> 34<br /> 35<br /> 36<br /> 37<br /> 38<br /> 39<br /> 40<br /> 41<br /> 42<br /> 43<br /> 44<br /> 45<br /> 46<br /> 47<br /> 48<br /> 49<br /> 50<br /> 51<br /> 52<br /> 53<br /> 54<br /> 55<br /> 56<br /> 57<br /> 58<br /> 59<br /> 60<br /> 61<br /> 62<br /> 63<br /> 64<br /> 65<br /> 66<br /> 67<br /> 68<br /> 69<br /> 70<br /> 71<br /> 72<br /> 73<br /> 74<br /> 75<br /> 76<br /> 77<br /> 78<br /> 79<br /> 80<br /> 81<br /> 82<br /> 83<br /> 84<br /> 85<br /> 86<br /> 87<br /> 88<br /> 89<br /> 90<br /> 91<br /> 92<br /> 93<br /> 94<br /> 95<br /> 96<br /> 97<br /> 98<br /> 99<br />100<br />101<br />102<br />103<br />104<br />105<br />106<br />107<br />108<br />109<br />110<br />111<br />112<br />113<br />114<br />115<br />116<br />117<br />118<br />119<br />120<br />121<br />122<br />123<br />124<br />125<br />126<br />127<br />128<br />129<br />130<br />131<br />132<br />133<br />134<br />135<br />136<br />137<br />138<br />139<br />140<br />141<br />142<br />143<br />144<br />145<br />146<br />147<br />148<br />149<br />150<br />151<br />152<br />153<br />154<br />155<br />156<br />157<br />158<br />159<br />160<br />161<br />162<br />163<br />164<br />165<br />166<br />167<br />168<br />169<br />170<br />171<br />172<br />173<br />174<br />175<br />176<br />177<br />178<br />179<br />180<br />181<br />182<br />183<br />184<br />185<br />186<br />187<br />188<br />189<br />190<br />191<br />192<br />193<br />194<br />195<br />196<br />197<br />198<br />199<br />200<br />201<br />202<br />203<br />204<br />205<br />206<br />207<br />208<br />209<br />210<br />211<br />212<br />213<br />214<br /></pre> </td> <td> <pre><br /><span>/* =================================================================================================</span><br /><span>       Project: Arduino Heart rate monitor</span><br /><span>        Author: Scott C</span><br /><span>       Created: 21st April 2015</span><br /><span>Processing IDE: 2.2.1</span><br /><span>       Website: http://arduinobasics.blogspot.com/p/arduino-basics-projects-page.html</span><br /><span>   Description: A Grove Ear-clip heart rate sensor allows an Arduino UNO to sense your pulse.</span><br /><span>                The data obtained by the Arduino can then be sent to the computer via Serial communication</span><br /><span>                which is then displayed graphically using this Processing sketch.</span><br /><span>                </span><br /><span>=================================================================================================== */</span><br /><br /><span>import</span> processing.serial.*; <span>// Import the serial library to allow Serial communication with the Arduino</span><br /><br /><span>int</span> numOfRecs = 45; <span>// numOfRecs: The number of rectangles to display across the screen</span><br />Rectangle[] myRecs = <span>new</span> Rectangle[numOfRecs]; <span>// myRecs[]: Is the array of Rectangles. Rectangle is a custom class (programmed within this sketch)</span><br /><br />Serial myPort;                                         <br /><span>String</span> comPortString=<span>"0"</span>; <span>//comPortString: Is used to hold the string received from the Arduino</span><br /><span>float</span> arduinoValue = 0; <span>//arduinoValue: Is the float variable converted from comPortString</span><br /><span>boolean</span> beat = <span>false</span>; <span>// beat: Used to control for multiple high/low signals coming from the Arduino</span><br /><br /><span>int</span> totalTime = 0; <span>// totalTime: Is the variable used to identify the total time between beats</span><br /><span>int</span> lastTime = 0; <span>// lastTime: Is the variable used to remember when the last beat took place</span><br /><span>int</span> beatCounter = 0; <span>// beatCounter: Is used to keep track of the number of beats (in order to calculate the average BPM)</span><br /><span>int</span> totalBeats = 10; <span>// totalBeats: Tells the computer that we want to calculate the average BPM using 10 beats.</span><br /><span>int</span>[] BPM = <span>new</span> <span>int</span>[totalBeats]; <span>// BPM[]: Is the Beat Per Minute (BPM) array - to hold 10 BPM calculations</span><br /><span>int</span> sumBPM = 0; <span>// sumBPM: Is used to sum the BPM[] array values, and is then used to calculate the average BPM.</span><br /><span>int</span> avgBPM = 0; <span>// avgBPM: Is the variable used to hold the average BPM calculated value.</span><br /><br /><span>PFont</span> f, f2; <span>// f & f2 : Are font related variables. Used to store font properties. </span><br /><br /><br /><span>//==SETUP==============================================================================================</span><br /><span>void</span> <span><b>setup</b></span>(){<br />  <span>size</span>(<span>displayWidth</span>,<span>displayHeight</span>); <span>// Set the size of the display to match the monitor width and height</span><br />  <span>smooth</span>(); <span>// Draw all shapes with smooth edges.</span><br />  f = <span>createFont</span>(<span>"Arial"</span>,24); <span>// Initialise the "f" font variable - used for the "calibrating" text displayed at the beginning</span><br />  f2 = <span>createFont</span>(<span>"Arial"</span>,96); <span>// Initialise the "f2" font variable - used for the avgBPM display on screen</span><br />  <br />  <span>for</span>(<span>int</span> i=0; i<numOfRecs; i++){ <span>// Initialise the array of rectangles</span><br />    myRecs[i] = <span>new</span> Rectangle(i, numOfRecs);<br />  }<br />  <br />  <span>for</span>(<span>int</span> i=0; i<totalBeats; i++){ <span>// Initialise the BPM array</span><br />    BPM[i] = 0;<br />  }<br />  <br />  myPort = <span>new</span> Serial(<span>this</span>, Serial.<span>list</span>()[0], 9600); <span>// Start Serial communication with the Arduino using a baud rate of 9600</span><br />  myPort.bufferUntil(<span>'\n'</span>); <span>// Trigger a SerialEvent on new line</span><br />}<br /><br /><br /><span>//==DRAW==============================================================================================</span><br /><span>void</span> <span><b>draw</b></span>(){<br />  <span>background</span>(0); <span>// Set the background to BLACK (this clears the screen each time)</span><br />  drawRecs();                                           <span>// Method call to draw the rectangles on the screen</span><br />  drawBPM();                                            <span>// Method call to draw the avgBPM value to the top right of the screen</span><br />}<br /><br /><br /><span>//==drawRecs==========================================================================================</span><br /><span>void</span> drawRecs(){ <span>// This custom method will draw the rectangles on the screen </span><br />  myRecs[0].setSize(arduinoValue);                      <span>// Set the first rectangle to match arduinoValue; any positive value will start the animation.</span><br />  <span>for</span>(<span>int</span> i=numOfRecs-1; i>0; i--){ <span>// The loop counts backwards for coding efficiency - and is used to draw all of the rectangles to screen</span><br />    myRecs[i].setMult(i);                               <span>// setMulti creates the specific curve pattern. </span><br />    myRecs[i].setRed(avgBPM);                           <span>// The rectangles become more "Red" with higher avgBPM values</span><br />    myRecs[i].setSize(myRecs[i-1].getH());              <span>// The current rectangle size is determined by the height of the rectangle immediately to it's left</span><br />    <span>fill</span>(myRecs[i].getR(),myRecs[i].getG(), myRecs[i].getB()); <span>// Set the colour of this rectangle</span><br />    <span>rect</span>(myRecs[i].getX(), myRecs[i].getY(), myRecs[i].getW(), myRecs[i].getH()); <span>// Draw this rectangle</span><br />  }<br />}<br /><br /><br /><span>//==drawBPM===========================================================================================</span><br /><span>void</span> drawBPM(){ <span>// This custom method is used to calculate the avgBPM and draw it to screen.</span><br />  sumBPM = 0;                                           <span>// Reset the sumBPM variable</span><br />  avgBPM = 0;                                           <span>// Reset the avgBPM variable</span><br />  <span>boolean</span> calibrating = <span>false</span>; <span>// calibrating: this boolean variable is used to control when the avgBPM is displayed to screen</span><br />  <br />  <span>for</span>(<span>int</span> i=1; i<totalBeats; i++){<br />    sumBPM = sumBPM + BPM[i-1];                         <span>// Sum all of the BPM values in the BPM array.</span><br />    <span>if</span>(BPM[i-1]<1){ <span>// If any BPM values are equal to 0, then set the calibrating variable to true. </span><br />      calibrating = <span>true</span>; <span>// This will be used later to display "calibrating" on the screen.</span><br />    }<br />  }<br />  avgBPM = sumBPM/(totalBeats-1);                       <span>// Calculate the average BPM from all BPM values</span><br />                                                        <br />  <span>fill</span>(255); <span>// The text will be displayed as WHITE text</span><br />  <span>if</span>(calibrating){<br />    <span>textFont</span>(f);<br />    <span>text</span>(<span>"Calibrating"</span>, (4*<span>width</span>)/5, (<span>height</span>/5)); <span>// If the calibrating variable is TRUE, then display the word "Calibrating" on screen</span><br />    <span>fill</span>(0); <span>// Change the fill and stroke to black (0) so that other text is "hidden" while calibrating variable is TRUE</span><br />    <span>stroke</span>(0);<br />  } <span>else</span> {<br />    <span>textFont</span>(f2);<br />    <span>text</span>(avgBPM, (4*<span>width</span>)/5, (<span>height</span>/5)); <span>// If the calibrating variable is FALSE, then display the avgBPM variable on screen</span><br />    <span>stroke</span>(255); <span>// Change the stroke to white (255) to show the white line underlying the word BPM.</span><br />  }<br />  <br />   <span>textFont</span>(f);<br />   <span>text</span>(<span>"BPM"</span>, (82*<span>width</span>)/100, (<span>height</span>/11)); <span>// This will display the underlined word "BPM" when calibrating variable is FALSE.</span><br />   <span>line</span>((80*<span>width</span>)/100, (<span>height</span>/10),(88*<span>width</span>)/100, (<span>height</span>/10));<br />   <span>stroke</span>(0);<br />}<br /><br /><br /><span>//==serialEvent===========================================================================================</span><br /><span>void</span> serialEvent(Serial cPort){ <span>// This will be triggered every time a "new line" of data is received from the Arduino</span><br /> comPortString = cPort.readStringUntil(<span>'\n'</span>); <span>// Read this data into the comPortString variable.</span><br /> <span>if</span>(comPortString != <span>null</span>) { <span>// If the comPortString variable is not NULL then</span><br />   comPortString=<span>trim</span>(comPortString); <span>// trim any white space around the text.</span><br />   <span>int</span> i = <span>int</span>(<span>map</span>(<span>Integer</span>.<span>parseInt</span>(comPortString),1,1023,1,<span>height</span>)); <span>// convert the string to an integer, and map the value so that the rectangle will fit within the screen.</span><br />   arduinoValue = <span>float</span>(i); <span>// Convert the integer into a float value.</span><br />   <span>if</span> (!beat){<br />     <span>if</span>(arduinoValue>0){ <span>// When a beat is detected, the "trigger" method is called.</span><br />       trigger(<span>millis</span>()); <span>// millis() creates a timeStamp of when the beat occured.</span><br />       beat=<span>true</span>; <span>// The beat variable is changed to TRUE to register that a beat has been detected.</span><br />     }<br />   }<br />   <span>if</span> (arduinoValue<1){ <span>// When the Arduino value returns back to zero, we will need to change the beat status to FALSE.</span><br />     beat = <span>false</span>;<br />   }<br /> }<br />} <br /><br /><br /><span>//==trigger===========================================================================================</span><br /><span>void</span> trigger(<span>int</span> time){ <span>// This method is used to calculate the Beats per Minute (BPM) and to store the last 10 BPMs into the BPM[] array.</span><br />  totalTime = time - lastTime;                         <span>// totalTime = the current beat time minus the last time there was a beat.</span><br />  lastTime = time;                                     <span>// Set the lastTime variable to the current "time" for the next round of calculations.</span><br />  BPM[beatCounter] = 60000/totalTime;                  <span>// Calculate BPM from the totalTime. 60000 = 1 minute.</span><br />  beatCounter++;                                       <span>// Increment the beatCounter </span><br />  <span>if</span> (beatCounter>totalBeats-1){ <span>// Reset the beatCounter when the total number of BPMs have been stored into the BPM[] array.</span><br />    beatCounter=0;                                     <span>// This allows us to keep the last 10 BPM calculations at all times.</span><br />  }<br />}<br /><br /><br /><span>//==sketchFullScreen==========================================================================================</span><br /><span>boolean</span> sketchFullScreen() { <span>// This puts Processing into Full Screen Mode</span><br /> <span>return</span> <span>true</span>;<br />}<br /><br /><br /><span>//==Rectangle CLASS==================================================================================*********</span><br /><span>class</span> Rectangle{<br />  <span>float</span> xPos, defaultY, yPos, myWidth, myHeight, myMultiplier; <span>// Variables used for drawing rectangles</span><br />  <span>int</span> blueVal, greenVal, redVal; <span>// Variables used for the rectangle colour</span><br />  <br />  Rectangle(<span>int</span> recNum, <span>int</span> nRecs){ <span>// The rectangles are constructed using two variables. The total number of rectangles to be displayed, and the identification of this rectangle (recNum)</span><br />    myWidth = <span>displayWidth</span>/nRecs; <span>// The width of the rectangle is determined by the screen width and the total number of rectangles.</span><br />    xPos = recNum * myWidth;                                      <span>// The x Position of this rectangle is determined by the width of the rectangles (all same) and the rectangle identifier.</span><br />    defaultY=<span>displayHeight</span>/2; <span>// The default Y position of the rectangle is half way down the screen.</span><br />    yPos = defaultY;                                              <span>// yPos is used to adjust the position of the rectangle as the size changes.</span><br />    myHeight = 1;                                                 <span>// The height of the rectangle starts at 1 pixel</span><br />    myMultiplier = 1;                                             <span>// The myMultiplier variable will be used to create the funnel shaped path for the rectangles.</span><br />    redVal = 0;                                                   <span>// The red Value starts off being 0 - but changes with avgBPM. Higher avgBPM means higher redVal</span><br />    <br />    <span>if</span> (recNum>0){ <span>// The blue Value progressively increases with every rectangle (moving to the right of the screen)</span><br />      blueVal = (recNum*255)/nRecs;<br />    } <span>else</span> {<br />      blueVal = 0;<br />    }<br />    greenVal = 255-blueVal;                                       <span>// Initially, the green value is at the opposite end of the spectrum to the blue value.</span><br />  }<br />  <br />  <span>void</span> setSize(<span>float</span> newSize){ <span>// This is used to set the new size of each rectangle </span><br />    myHeight=newSize*myMultiplier;<br />    yPos=defaultY-(newSize/2);<br />  }<br />  <br />  <span>void</span> setMult(<span>int</span> i){ <span>// The multiplier is a function of COS, which means that it varies from 1 to 0.</span><br />    myMultiplier = <span>cos</span>(<span>radians</span>(i)); <span>// You can try other functions to experience different effects.</span><br />  }<br />  <br />  <span>void</span> setRed(<span>int</span> r){<br />    redVal = <span>int</span>(<span>constrain</span>(<span>map</span>(<span>float</span>(r), 60, 100, 0, 255),0,255)); <span>// setRed is used to change the redValue based on the "normal" value for resting BPM (60-100). </span><br />    greenVal = 255 - redVal;                                       <span>// When the avgBPM > 100, redVal will equal 255, and the greenVal will equal 0.</span><br />  }                                                                <span>// When the avgBPM < 60, redVal will equal 0, and greenVal will equal 255.</span><br />  <br />  <span>float</span> getX(){ <span>// get the x Position of the rectangle</span><br />    <span>return</span> xPos;<br />  }<br /> <br />  <span>float</span> getY(){ <span>// get the y Position of the rectangle</span><br />    <span>return</span> yPos;<br />  }<br />  <br />  <span>float</span> getW(){ <span>// get the width of the rectangle</span><br />    <span>return</span> myWidth;<br />  }<br />  <br />  <span>float</span> getH(){ <span>// get the height of the rectangle</span><br />    <span>return</span> myHeight;<br />  }<br />  <br />  <span>float</span> getM(){ <span>// get the Multiplier of the rectangle</span><br />    <span>return</span> myMultiplier;<br />  }<br />  <br />  <span>int</span> getB(){ <span>// get the "blue" component of the rectangle colour</span><br />    <span>return</span> blueVal;<br />  }<br />  <br />  <span>int</span> getR(){ <span>// get the "red" component of the rectangle colour</span><br />    <span>return</span> redVal;<br />  }<br />  <br />  <span>int</span> getG(){ <span>// get the "green" component of the rectangle colour</span><br />    <span>return</span> greenVal;<br />  }<br />}<br /><br /></pre> </td> </tr> </table></div></p> <br />  <br /> <p> <h4>Processing Code Discussion:</h4><br /> </p><p> The Rectangle class was created to store relevant information about each rectangle. By using a custom class, we were able to design our rectangles any way we wanted. These rectangles have properties and methods which allow us to easily control their position, size and colour. By adding some smart functionality to each rectangle, we were able to get the rectangle to automatically position and colour itself based on key values. </p> <p> The Serial library is used to allow communication with the Arduino. In this Processing sketch, the values obtained from the Arduino were converted to floats to allow easy calulations of the beats per minute (BPM). I am aware that I have over-engineered the serialEvent method somewhat, because the Arduino is only really sending two values. I didn't really need to convert the String. But I am happy with the end result, and it does the job I needed it to... </p> <div> <p> <div> <a href="http://4.bp.blogspot.com/-EVTCQ3vkgGc/VTnOarlOWSI/AAAAAAAABdc/MslEU5oirAY/s1600/Complete%2BWorkstation2.jpg"><img src="http://4.bp.blogspot.com/-EVTCQ3vkgGc/VTnOarlOWSI/AAAAAAAABdc/MslEU5oirAY/s1600/Complete%2BWorkstation2.jpg" /> </a> </div> </p> </div> </div><!--separator --><img src="https://images-blogger-opensocial.googleusercontent.com/gadgets/proxy?url=http%3A%2F%2F1.bp.blogspot.com%2F-XQiwNpdqOxk%2FT_rKCzDh4nI%2FAAAAAAAAAQY%2FOfYBljhU6Lk%2Fs1600%2FSeparator.jpg&container=blogger&gadget=a&rewriteMime=image%2F*" /><br /><p> <div> This project is quite simple. I designed it so that you could omit the Processing code if you wanted to. In that scenario, you would only be left with a blinking LED that blinks in time with your pulse. The Processing code takes this project to the next level. It provides a nice animation and calculates the beats per minute (BPM). <br />   <br /> I hope you liked this tutorial. Please feel free to share it, comment or give it a plus one. If you didn't like it, I would still appreciate your constructive feedback. </div> <br />  <div> <p> <!--separator --> <img src="https://images-blogger-opensocial.googleusercontent.com/gadgets/proxy?url=http%3A%2F%2F1.bp.blogspot.com%2F-XQiwNpdqOxk%2FT_rKCzDh4nI%2FAAAAAAAAAQY%2FOfYBljhU6Lk%2Fs1600%2FSeparator.jpg&container=blogger&gadget=a&rewriteMime=image%2F*" /><br /> <br /> </p> </div> </p><p> <div> If you like this page, please do me a favour and show your appreciation : <br /> <br />  <br /> Visit my <a href="https://plus.google.com/u/0/b/107402020974762902161/107402020974762902161/posts">ArduinoBasics Google + page</a>.<br /> Follow me on Twitter by looking for <a href="https://twitter.com/ArduinoBasics">ScottC @ArduinoBasics</a>.<br /> I can also be found on <a href="https://www.pinterest.com/ArduinoBasics/">Pinterest</a> and <a href="https://instagram.com/arduinobasics">Instagram</a>. <br /> Have a look at my videos on my <a href="https://www.youtube.com/user/ScottCMe/videos">YouTube channel</a>.<br /> </div> </p> <br />  <br />  <p> <div> <a href="http://3.bp.blogspot.com/-x_TA-qhOCzM/VTnULXoWhQI/AAAAAAAABds/quh02BWGsec/s1600/Slide1.JPG"><img src="http://3.bp.blogspot.com/-x_TA-qhOCzM/VTnULXoWhQI/AAAAAAAABds/quh02BWGsec/s1600/Slide1.JPG" /></a></div><br /> </p> <br />  <br />  <br />  <div> <p> <!--separator --> <img src="https://images-blogger-opensocial.googleusercontent.com/gadgets/proxy?url=http%3A%2F%2F1.bp.blogspot.com%2F-XQiwNpdqOxk%2FT_rKCzDh4nI%2FAAAAAAAAAQY%2FOfYBljhU6Lk%2Fs1600%2FSeparator.jpg&container=blogger&gadget=a&rewriteMime=image%2F*" /><br /> <br /> </p> </div> <p> However, if you do not have a google profile... <br />Feel free to share this page with your friends in any way you see fit. </p>

Arduino BeatBox

Create your very own Arduino BeatBox !

Home-made capacitive touch sensors are used to trigger the MP3 drum sounds stored on the Grove Serial MP3 player. I have used a number of tricks to get the most out of this module, and I was quite impressed on how well it did. Over 130 sounds were loaded onto the SDHC card. Most were drum sounds, but I added some farm animal noises to provide an extra element of surprise and entertainment. You can put any sounds you want on the module and play them back quickly. We'll put the Grove Serial MP3 module through it's paces and make it into a neat little BeatBox !!


Key learning objectives

  • How to make your own beatbox
  • How to make capacitive drum pad sensors without using resistors
  • How to speed up Arduino's Analog readings for better performance
  • How to generate random numbers on your Arduino


Parts Required:

Making the drum pads


Fritzing Sketch


Grove Connections


Grove Connections (without base shield)


Arduino Sketch


  1
2
3
4
5
6
7
8
9
10
11
12
13
14
15
16
17
18
19
20
21
22
23
24
25
26
27
28
29
30
31
32
33
34
35
36
37
38
39
40
41
42
43
44
45
46
47
48
49
50
51
52
53
54
55
56
57
58
59
60
61
62
63
64
65
66
67
68
69
70
71
72
73
74
75
76
77
78
79
80
81
82
83
84
85
86
87
88
89
90
91
92
93
94
95
96
97
98
99
100
101
102
103
104
105
106
107
108
109
110
111
112
113
114
115
116
117
118
119
120
121
122
123
124
125
126
127
128
129
130
131
132
133
134
135
136
137
138
139
140
141
142
143
144
145
146
147
148
149
150
151
152
153
154
155
156
157
158
159
160
161
162
163
164
165
166
167
168
169
170
171
172
173
174
175
176
177
178
179
180
181
182
183
184
185
186
187
188
189
190
191
192
193
194
195
196
197
198
199
200
201
202
203
204
205
206
207
208
209
210
211
212
213
214
215
216
217
218
219
220
221
222
223
224
225
226
227
228
229
230
231
232
233
234
235
236
237
238
239

/* =================================================================================================
      Project: Arduino Beatbox
       Author: Scott C
      Created: 9th April 2015
  Arduino IDE: 1.6.2
      Website: http://arduinobasics.blogspot.com/p/arduino-basics-projects-page.html
  Description: This project uses home made capacitive sensors to trigger over 130 MP3 sounds
               on the Grove Serial MP3 player. 
               
               The ADCTouch library is used to eliminate the resistors from the Capacitive sensing circuit. 
               The code used for capacitive sensing was adapted from the ADCTouch library example sketches. 
               You can find the ADCTouch library and relevant example code here:
               http://playground.arduino.cc/Code/ADCTouch
               
               "Advanced Arduino ADC" is used to improve the analogRead() speed, and enhance the
               drum pad or capacitive sensor response time. The Advanced Arduino ADC code 
               was adapted from this site:
               http://www.microsmart.co.za/technical/2014/03/01/advanced-arduino-adc/
               
               
=================================================================================================== */
  #include <ADCTouch.h>
  #include <SoftwareSerial.h>
  
  
  //Global variables
  //===================================================================================================
  int potPin = A4; //Grove Sliding potentiometer is connected to Analog Pin 4
  int potVal = 0;
  byte mp3Vol = 0; //Variable used to control the volume of the MP3 player
  byte oldVol = 0;
  
  int buttonPin = 5; //Grove Button is connected to Digital Pin 5
  int buttonStatus = 0;
  
  byte SongNum[4] = {0x01,0x02,0x03,0x04}; //The first 4 songs will be assigned to the drum pads upon initialisation
  byte numOfSongs = 130; //Total number of MP3 songs/sounds loaded onto the SDHC card
  
  long randNumber; //Variable used to hold the random number - used to randomise the sounds.
  
  int ledState[4]; //Used to keep track of the status of all LEDs (on or off)
  int counter = 0;
  
  SoftwareSerial mp3(3, 4); // The Grove MP3 Player is connected to Arduino digital Pin 3 and 4 (Serial communication)
       
  int ref0, ref1, ref2, ref3; //reference values to remove offset
  int threshold = 100;
      
  // Define the ADC prescalers
  const unsigned char PS_64 = (1 << ADPS2) | (1 << ADPS1);
  const unsigned char PS_128 = (1 << ADPS2) | (1 << ADPS1) | (1 << ADPS0);


  //Setup()
  //===================================================================================================
  void setup(){
    //Initialise the Grove MP3 Module
    delay(2500); //Allow the MP3 module to power up
    mp3.begin(9600); //Begin Serial communication with the MP3 module
    setPlayMode(0x00);                        //0x00 = Single song - played once ie. not repeated. (default)
    
    //Define the Grove Button as an INPUT
    pinMode(buttonPin, INPUT);
    
    //Define the 4 LED Pins as OUTPUTs
    pinMode(8, OUTPUT); //Green LED
    pinMode(9, OUTPUT); //Blue LED
    pinMode(10, OUTPUT); //Red LED
    pinMode(11, OUTPUT); //Yellow LED
    
    //Make sure each LED is OFF, and store the state of the LED into a variable.
    for(int i=8;i<12;i++){
      digitalWrite(i, LOW);
      ledState[i-8]=0;
    } 
    
    //Double our clock speed from 125 kHz to 250 kHz
    ADCSRA &= ~PS_128;   // set up the ADC
    ADCSRA |= PS_64;    // set our own prescaler to 64
    
    //Create reference values to account for the capacitance of each pad.
    ref0 = ADCTouch.read(A0, 500);
    ref1 = ADCTouch.read(A1, 500); //Take 500 readings
    ref2 = ADCTouch.read(A2, 500);
    ref3 = ADCTouch.read(A3, 500);
    
     //This helps to randomise the drum pads.
     randomSeed(analogRead(0));
  }


  // Loop()
  //===================================================================================================
  void loop(){
     
    //Take a reading from the Grove Sliding Potentiometer, and set volume accordingly
    potVal = analogRead(potPin);
    mp3Vol = map(potVal, 0, 1023, 0,31); // Convert the potentometer reading (0 - 1023) to fit within the MP3 player's Volume range (0 - 31)
    if((mp3Vol>(oldVol+1))|(mp3Vol<(oldVol-1))){ // Only make a change to the Volume on the Grove MP3 player when the potentiometer value changes
      oldVol = mp3Vol;
      setVolume(mp3Vol);
      delay(10); // This delay is necessary with Serial communication to MP3 player
    }
    
    //Take a reading from the Pin attached to the Grove Button. If pressed, randomise the MP3 songs/sounds for each drum pad, and make the LEDs blink randomly.
    buttonStatus = digitalRead(buttonPin);
    if(buttonStatus==HIGH){
      SongNum[0]=randomSongChooser(1, 30);
      SongNum[1]=randomSongChooser(31, 60);
      SongNum[2]=randomSongChooser(61, 86);
      SongNum[3]=randomSongChooser(87, (int)numOfSongs);
      randomLEDBlink();
    }
    
    //Get the capacitive readings from each drum pad: 50 readings are taken from each pad. (default is 100)
    int value0 = ADCTouch.read(A0,50); // Green drum pad
    int value1 = ADCTouch.read(A1,50); // Blue drum pad
    int value2 = ADCTouch.read(A2,50); // Red drum pad
    int value3 = ADCTouch.read(A3,50); // Yellow drum pad
    
    //Remove the offset to account for the baseline capacitance of each pad.
    value0 -= ref0;       
    value1 -= ref1;
    value2 -= ref2;
    value3 -= ref3;
    
    
    //If any of the values exceed the designated threshold, then play the song/sound associated with that drum pad.
    //The associated LED will stay on for the whole time the drum pad is pressed, providing the value remains above the threshold.
    //The LED will turn off when the pad is not being touched or pressed.
    if(value0>threshold){
      digitalWrite(8, HIGH);
      playSong(00,SongNum[0]);
    }else{
      digitalWrite(8,LOW);
    }
    
    if(value1>threshold){
      digitalWrite(9, HIGH);
      playSong(00,SongNum[1]);
    }else{
      digitalWrite(9,LOW);
    }
    
    if(value2>threshold){
      digitalWrite(10, HIGH);
      playSong(00,SongNum[2]);
    }else{
      digitalWrite(10,LOW);
    }
    
    if(value3>threshold){
      digitalWrite(11, HIGH);
      playSong(00,SongNum[3]);
    }else{
      digitalWrite(11,LOW);
    }
  }
      
   
  // writeToMP3:
  // a generic function that simplifies each of the methods used to control the Grove MP3 Player
  //===================================================================================================
  void writeToMP3(byte MsgLEN, byte A, byte B, byte C, byte D, byte E, byte F){
    byte codeMsg[] = {MsgLEN, A,B,C,D,E,F};
    mp3.write(0x7E); //Start Code for every command = 0x7E
    for(byte i = 0; i<MsgLEN+1; i++){
      mp3.write(codeMsg[i]); //Send the rest of the command to the GROVE MP3 player
    }
  }
  
  
  //setPlayMode: defines how each song is to be played
  //===================================================================================================
  void setPlayMode(byte playMode){
    /* playMode options:
          0x00 = Single song - played only once ie. not repeated.  (default)
          0x01 = Single song - cycled ie. repeats over and over.
          0x02 = All songs - cycled 
          0x03 = play songs randomly                                           */
    writeToMP3(0x03, 0xA9, playMode, 0x7E, 0x00, 0x00, 0x00);  
  }
  
  
  //playSong: tells the Grove MP3 player to play the song/sound, and also which song/sound to play
  //===================================================================================================
  void playSong(byte songHbyte, byte songLbyte){
    writeToMP3(0x04, 0xA0, songHbyte, songLbyte, 0x7E, 0x00, 0x00);            
    delay(100);
  }
  
  
  //setVolume: changes the Grove MP3 player's volume to the designated level (0 to 31)
  //===================================================================================================
  void setVolume(byte Volume){
    byte tempVol = constrain(Volume, 0, 31); //Volume range = 00 (muted) to 31 (max volume)
    writeToMP3(0x03, 0xA7, tempVol, 0x7E, 0x00, 0x00, 0x00); 
  }
  
  
  //randomSongChooser: chooses a random song to play. The range of songs to choose from
  //is limited and defined by the startSong and endSong parameters.
  //===================================================================================================
  byte randomSongChooser(int startSong, int endSong){
    randNumber = random(startSong, endSong);
    return((byte) randNumber);
  }
  
  
  //randomLEDBlink: makes each LED blink randomly. The LEDs are attached to digital pins 8 to 12.
  //===================================================================================================
  void randomLEDBlink(){
   counter=8;
   for(int i=0; i<40; i++){
     int x = constrain((int)random(8,12),8,12);
     toggleLED(x);
     delay(random(50,100-i));
   }
     
    for(int i=8;i<12;i++){
      digitalWrite(i, HIGH);
    }
    delay(1000);
    for(int i=8;i<12;i++){
      digitalWrite(i, LOW);
      ledState[i-8]=0;
    }
  }
  
  
  //toggleLED: is used by the randomLEDBlink method to turn each LED on and off (randomly).
  //===================================================================================================
  void toggleLED(int pinNum){
    ledState[pinNum-8]= !ledState[pinNum-8];
    digitalWrite(pinNum, ledState[pinNum-8]);
  }


Arduino Code Discussion

You can see from the Arduino code above, that it uses the ADCTouch library. This library was chosen over the Capacitive Sensing Library to eliminate the need for a high value resistor which are commonly found in Capacitive Sensing projects).
 
To increase the speed of the Analog readings, I utilised one of the "Advanced Arduino ADC" techniques described by Guy van den Berg on this Microsmart website.
 
The readings are increased by modifying the Arduino's ADC clock speed from 125kHz to 250 kHz. I did notice an overall better response time with this modification. However, the Grove Serial MP3 player is limited by it's inability to play more than one song or sound at a time. This means that if you hit another drum pad while the current sound is playing, it will stop playing the current sound, and then play the selected sound. The speed at which it can perform this task was quite impressive. In fact it was much better than I thought it would be. But if you are looking for polyphonic playability, you will be dissapointed.
 
This Serial MP3 module makes use of a high quality MP3 audio chip known as the "WT5001". Therefore, you should be able to get some additional features and functionality from this document. Plus you may find some extra useful info from the Seeedstudio wiki. I have re-used some code from the Arduino Boombox tutorial... you will find extra Grove Serial MP3 functions on that page.
 
I will warn you... the Grove Serial MP3 player can play WAV files, however for some reason it would not play many of the sound files in this format. Once the sounds were converted to the MP3 format, I did not look back. So if you decide to take on this project, make sure your sound files are in MP3 format, you'll have a much better outcome.
 
I decided to introduce a random sound selection for each drum pad to extend the novelty of this instrument, which meant that I had to come up with a fancy way to illuminate the LEDs. I demonstrated some of my other LED sequences on my instagram account. I sometimes use instagram to show my work in progress.
 
Have a look at the video below to see this project in action, and putting the Grove Serial MP3 player through it's paces.
 

The Video


First there was the Arduino Boombox, and now we have the Arduino Beatbox..... who knows what will come next !
 
Whenever I create a new project, I like to improve my Arduino knowledge. Sometimes it takes me into some rather complicated topics. There is a lot I do not know about Arduino, but I am enjoying the journey. I hope you are too !! Please Google plus one this post if it helped you in any way. These tutorials are free, which means I survive on feedback and plus ones... all you have to do is just scroll a little bit more and click that button :)


If you like this page, please do me a favour and show your appreciation :

 
Visit my ArduinoBasics Google + page.
Follow me on Twitter by looking for ScottC @ArduinoBasics.
I can also be found on Pinterest and Instagram.
Have a look at my videos on my YouTube channel.


However, if you do not have a google profile...
Feel free to share this page with your friends in any way you see fit.