Posts with «software development» label

Arduino IDE 2.0 is Here

Arduino have released the latest version of their Integrated Development Environment (IDE), Version 2.0 and it is a big step up from the previous release, boasting plenty of new features to help you to develop your code more easily.

As the de-facto way for beginners to get into programming hardware, more experienced users have sometimes complained about what they see as the over-simplistic IDE — even lacking relatively basic features such as autocomplete. The new version provides this, and much more besides.

The press-release from Arduino offers a few clues to the main features, but the real detail is tucked away in a range of new tutorials, designed to get you up to speed with the new look.

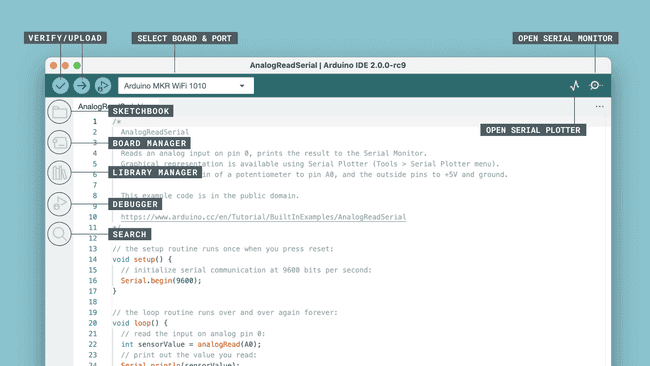
The main screen is organised differently, to show off the new capabilities and to make development faster and easier. The new “Remote Sketchbook” has been integrated closely with the Arduino Cloud, to allow for easy switching between computers during development. V2.0 will pick up any Cloud sketches automatically, while computers using the previous versions of the IDE can still access the sketches via the Web Editor as before.

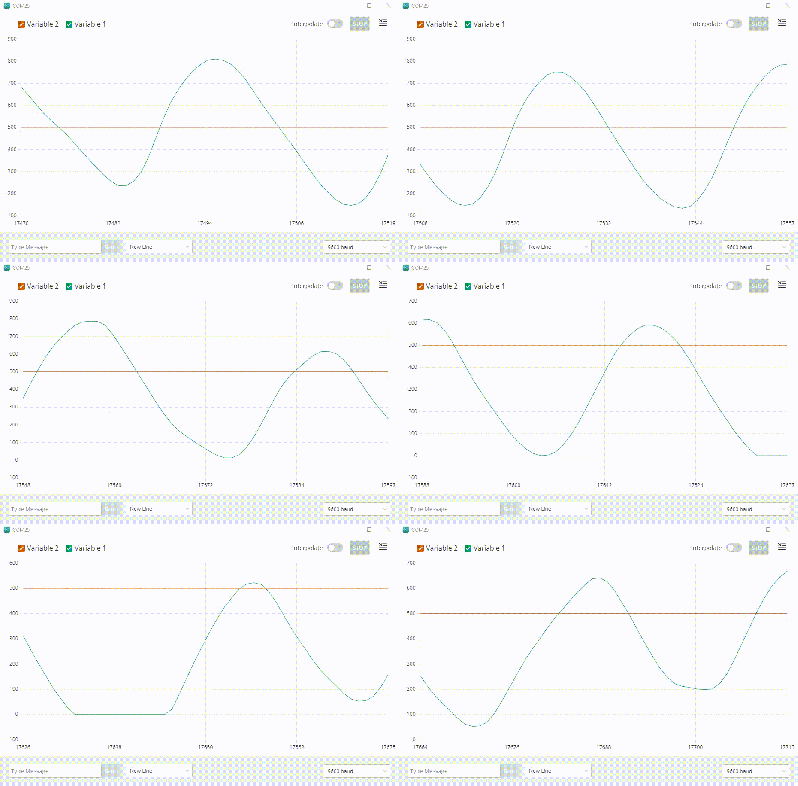
The Serial Plotter can now be used at the same time as the text Serial Monitor, rather than having to choose one or the other. In addition, there is a host of new Debug functionality for those devices that support it. This works with the usual In-Circuit Emulators (such as the Atmel ICE), but also natively with newer Arduino boards like the Arduino Zero without any additional hardware. The debugger gives you access to powerful features like Breakpoints, Step-Into and Step-Over to really understand what your code is doing.

Installation is straightforward, and will automatically pull in any libraries and sketches that you created in previous versions of the Arduino software to ease the transition.

There’s a lot to like in the new IDE, but we expect it will take a little while to discover and use all the new features effectively.  Some of them are carry-overs from the “Arduino Pro IDE” that we covered a few years ago, but it’s great to see the software evolve and improve over time.

Have you tried new new IDE yet?  What are your thoughts on how it compares to the older version, or other development environments?  Let us know in the comments.

Thanks to [cardboardBaron] for the tip.

Arduino and Git: Two Views

You can’t do much development without running into Git, the version control management system. Part of that is because so much code lives on GitHub which uses Git, although you don’t need to know anything about that if all you want to do is download code. [Dr. Torq] has a good primer on using Git with the Arduino IDE, if you need to get your toes wet.

You might think if you develop by yourself you don’t need something like Git. However, using a version control system is a great convenience, especially if you use it correctly. There’s a bug out in the field? What version of the firmware? You can immediately get a copy of the source code at that point in time using Git. A feature is broken? It is very easy to see exactly what changed. So even if you don’t work in a team, there are advantages to having source code under control.

If you are already using a more advanced IDE, Git is probably integrated into your environment, or, at least, it could be. If you are allergic to the command line, there are plenty of GUI tools to use Git, also. One nice thing about Git is that your local repository is just a directory. You don’t need to stand up a special server or anything to use it.

We don’t think it is directly related, but [Andreas] recently had a video on Git and Arduino. It isn’t as detailed, but it does have some good stuff and is worth the time to watch. You can see it below.

We’ve used Git for some odd things in the past. Note that Git is the version control system while GitHub is a website. However, if you are a hardcore command line user, you can manipulate GitHub from there, too.

Arduino IDE Creates Bootable x86 Floppy Disks

Arguably the biggest advantage of the Arduino ecosystem is how easy it is to get your code running. Type a few lines into the IDE, hit the button, and in a few seconds you’re seeing an LED blink or some text get echoed back over the serial port. But what if that same ease of use didn’t have to be limited to microcontrollers? What if you could use the Arduino IDE to create computer software?

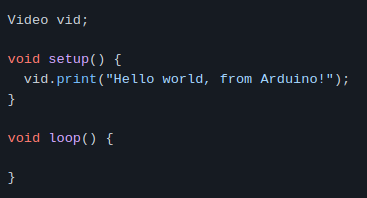
That’s exactly what boot2duino, a project developed by [Jean THOMAS] hopes to accomplish. As you might have guessed from the name, the code you write in the Arduino is turned into a bootable floppy disk image that you can stick into an old PC. After a few seconds of beeping and grinding your “Hello World” should pop up on the monitor, and you’ve got yourself the world’s biggest Arduino.

A minimal x86 Arduino sketch.

Now to be clear, this isn’t some kind of minimal Linux environment that boots up and runs a compiled C program. [Jean] has created an Arduino core that provides basic functionality on x86 hardware. Your code has full control over the computer, and there’s no operating system overhead to contend with. As demonstrated in a series of videos, programs written with boot2duino can display text, read from the keyboard, and play tones over the PC’s speaker.

The documentation for boot2duino says the project serves no practical purpose, but we’re not so sure. While the feature set is minimal, the low overhead means you could theoretically press truly ancient PCs into service. There’s certainly an appeal to being able to write your code on a modern OS and effortlessly deploy it on a retrocomputer, from somewhat modernized versions of early computer games to more practical applications. If any readers end up exploring this concept a bit further, be sure to let us know how it goes.

The Arduboy, Ported To Desktop and Back Again

A neat little hacker project that’s flying off the workbenches recently is the Arduboy. This tiny game console looks like a miniaturized version of the O.G. Game Boy, but it is explicitly designed to be hacked. It’s basically an Arduino board with a display and a few buttons, anyway.

[rv6502] got their hands on an Arduboy and realized that while there were some 3D games, there was nothing that had filled polygons, or really anything resembling a modern 3D engine. This had to be rectified, and the result is pretty close to Star Fox on a microcontroller.

This project began with a simple test on the Arduboy to see if it would be even possible to render 3D objects at any reasonable speed. This test was just a rotating cube, and everything looked good. Then began a long process of figuring out how fast the engine could go, what kind of display would suit the OLED best, and how to interact in a 3D world with limited controls.

Considering this is a fairly significant engineering project, the fastest way to produce code isn’t to debug code on a microcontroller. This project demanded a native PC port, so all the testing could happen on the PC without having to program the Flash every time. That allowed [rv] to throw out the Arduino IDE and USB library; if you’re writing everything on a PC and only uploading a hex file to a microcontroller at the end, you simply don’t need it.

One of the significant advances of the graphics capability of the Arduboy comes from exploring the addressing modes of the OLED. By default, the display is in a ‘horizontal mode’ which works for 2D blitting, but not for rasterizing polygons. The ‘vertical addressing mode’, on the other hand, allows for a block of memory, 8 x 128 bytes, that maps directly to the display. Shove those bytes over, and there’s no math necessary to display an image.

This is, simply, one of the best software development builds we’ve seen. It’s full of clever tricks (like simply not doing math if you’ll never need the result) and stuffing animations into far fewer bytes than you would expect. You can check out the demo video below.

Arduino and Pidgin C++

What do you program the Arduino in? C? Actually, the Arduino’s byzantine build processes uses C++. All the features you get from the normal libraries are actually C++ classes. The problem is many people write C and ignore the C++ features other than using object already made for them. Just like traders often used pidgin English as a simplified language to talk to non-English speakers, many Arduino coders use pidgin C++ to effectively code C in a C++ environment. [Bert Hubert] has a two-part post that isn’t about the Arduino in particular, but is about moving from C to a more modern C++.

Even those of us who use C++ often use what we think of as “classic” C++. More or less the C++ that started life as a preprocessor in front of the C compiler. C++ has changed a lot since then, though. [Bert] looks mostly at useful features from the C++ 2014 standard which is widely available in compilers now. He only talks a little about some 2017 features. He doesn’t, however, talk about super new features or very specialized features that probably won’t be your first stop in a transition from C.

In particular, [Bert] doesn’t cover multiple inheritance, template metaprogramming, a big chunk of iostreams, C++ locales, user-defined literals, or exotics. Just to motivate you, he shows an example where calling the C library to sort a large array is slower than the code using C++ templates that take advantage of parallelism. While this is a special case, it does show that C++ isn’t just “another way to write the same thing.” You could write a faster sort in C, but you’d be writing a lot of code, not just pulling in a library.

What he does cover is strings, namespaces, classes, smart pointers, threads and error handling. Some of these will be more useful on the Arduino than others, but if you are writing for other platforms like a PC or a Raspberry Pi you could use all of them. He’s planning on adding more items in future installments of the series.

Meanwhile, we had our own story about modern C++ and the Arduino last year. If you want to know more about templates, we’ve talked about that, too.

Debugging an Arduino with an Arduino

As every Hackaday reader knows, and tells us at every opportunity in the comments, adding an Arduino to your project instantly makes it twice as cool. But what if, in the course of adding an Arduino to your project, you run into a problem and need to debug the code? What if you could use a second Arduino to debug the first? That would bring your project up to two Arduinos, instantly making it four times as awesome as before you started! Who could say no to such exponential gains?

Debugging an ATTiny85

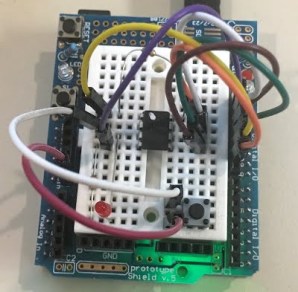
Not [Wayne Holder], that’s for sure. He writes in to let us know about a project he’s been working on for a while that allows you to debug the execution of code on an Arduino with a second Arduino. In fact, the target chip could even be another AVR series microcontroller such as a the ATTiny85. With his software you can single-step through the code, view and modify values in memory, set breakpoints, and even disassemble the code. Not everything is working fully yet, but what he has so far is very impressive.

The trick is exploiting a feature known as “debugWIRE” that’s included in many AVR microcontrollers. Unfortunately documentation on this feature is hard to come by, but with some work [Wayne] has managed to figure out how most of it works and create an Arduino Sketch that lets the user interact with the target chip using a simple menu system over the serial monitor, similar to the Bus Pirate.

[Wayne] goes into plenty of detail on his site and in the video included after the break, showing many of the functions he’s got working so far in his software against an ATTiny85. If you spend a lot of time working on AVR projects, this looks like something you might want to keep installed on an Arduino in your tool bag for the future.

Debugging microcontroller projects can be a huge time saver when your code starts running on real hardware, but often takes some hacking to get working.

The Maven Box is an Arduino controller for software developers

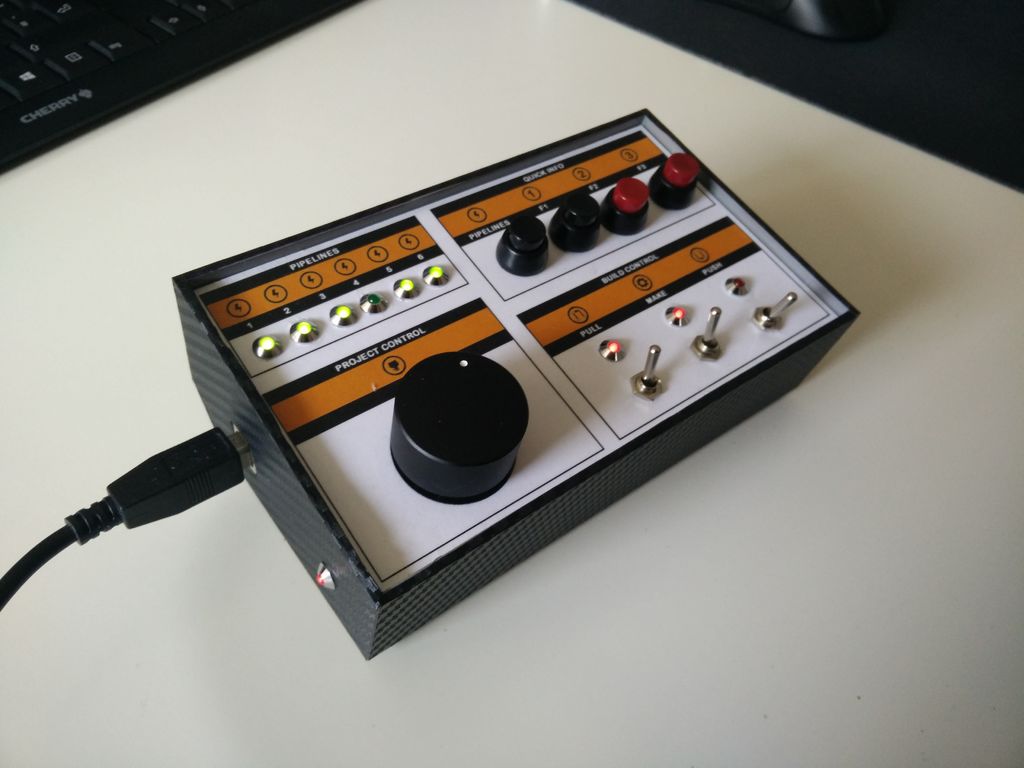
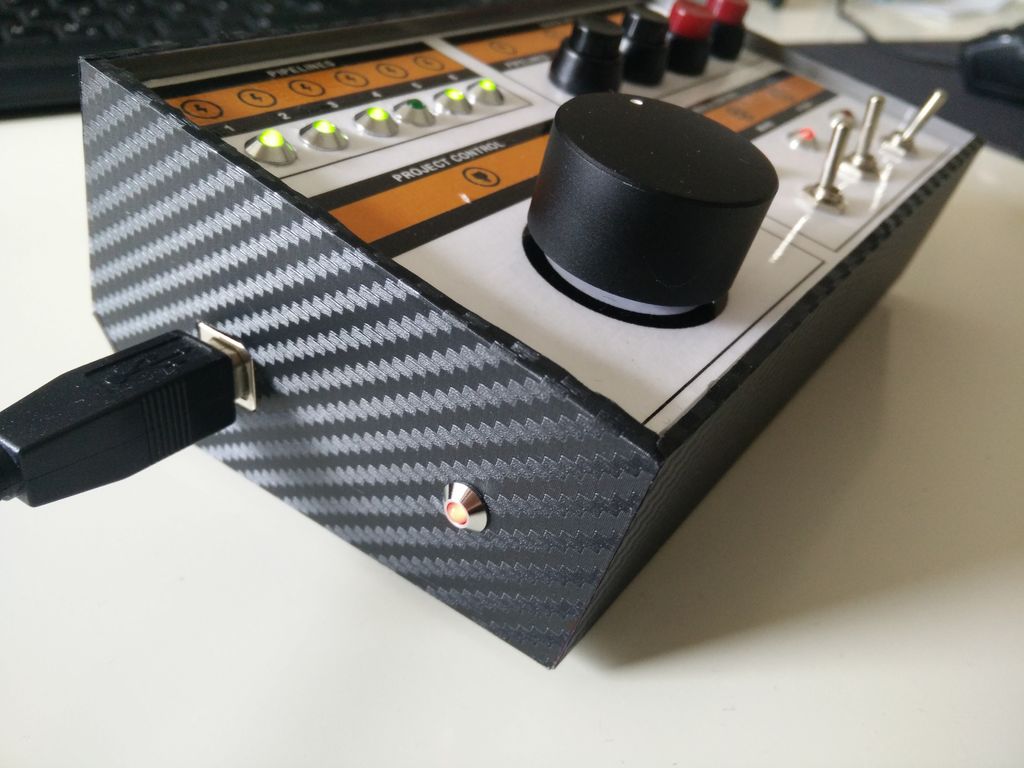
Matthias Faust has created an Arduino controller for speeding up software development.

The “Maven Box” is based on an Uno and communicates with a Java program running on a desktop. The device is equipped with customizable buttons, switches and a dial, which act as physical inputs for expediting his daily routine. This enables Faust to select a branch from several GitHub projects, stash changes before pulling, pull the changes, trigger a maven build, as well as display the status of six tests on a set of notification LEDs.

Every job has it’s routine. I am a software developer who works with a Git/Maven based workspace everyday. So when I start working, my daily routine is to update and build my local workspace, pulling changes from GitHub, execute a maven build and execute the updated software. Usually I get my first coffee after that, but because I love coffee so much I thought there must be a faster way to get my system updated and running.

Whether a software developer yourself or simply a fan of awesome Arduino builds, check out the Maven Box’s Instructables page to see more!

Code Craft-Embedding C++: Hacking the Arduino Software Environment

The Arduino software environment, including the IDE, libraries, and general approach, are geared toward education. It’s meant as a way to introduce embedded development to newbies. This is a great concept but it falls short when more serious development or more advanced education is required. I keep wrestling with how to address this. One way is by using Eclipse with the Arduino Plug-in. That provides a professional development environment, at least.

The code base for the Arduino is another frustration. Bluntly, the use of setup() and loop() with main() being hidden really bugs me. The mixture of C and C++ in libraries and examples is another irritation. There is enough C++ being used that it makes sense it should be the standard. Plus a good portion of the library code could be a lot better. At this point fixing this would be a monumental task requiring many dedicated developers to do the rewrite. But there are a some things that can be done so let’s see a couple possibilities and how they would be used.

The Main Hack

As mentioned, hiding main() bugs me. It’s an inherent part of C++ which makes it an important to learning the language. Up until now I’d not considered how to address this. I knew that an Arduino main() existed from poking around in the code base – it had to be there because it is required by the C++ standard. The light dawned on me to try copying the code in the file main.cpp into my own code. It built, but how could I be sure that it was using my code and not the original from the Arduino libraries? I commented out setup() and it still built, so it had to be using my version otherwise there’d be an error about setup() being missing. You may wonder why it used my version.

When you build a program… Yes, it’s a “program” not a “sketch”, a “daughter board” not a “shield”, and a “linker” not a “combiner”! Why is everyone trying to change the language used for software development?

When you build a C++ program there are two main stages. You compile the code using the compiler. That generates a number of object files — one for each source file. The linker then combines the compiled objects to create an executable. The linker starts by looking for the C run time code (CRTC). This is the code that does some setup prior to main() being called. In the CRTC there will be external symbols, main() being one, whose code exists in other files.

The linker is going to look in two places for those missing symbols. First, it loads all the object files, sorts out the symbols from them, and builds a list of what is missing. Second, it looks through any included libraries of pre-compiled objects for the remaining symbols. If any symbols are still missing, it emits an error message.

If you look in the Arduino files you’ll find a main.cpp file that contains a main() function. That ends up in the library. When the linker starts, my version of main() is in a newly created object file. Since object files are processed first the linker uses my version of main(). The library version is ignored.

There is still something unusual about main(). Here’s the infinite for loop in main():

	for (;;) {
		loop();
		if (serialEventRun) serialEventRun();
	}

The call to loop() is as expected but why is there an if statement and serialEventRun? The function checks if serial input data is available. The if relies on a trick of the tool chain, not C++, which checks the existence of the symbol serialEventRun. When the symbol does not exist the if and its code are omitted.

Zapping setup() and loop()

Now that I have control over main() I can address my other pet peeve, the setup() and loop() functions. I can eliminate these two function by creating my own version of main(). I’m not saying the use of setup() and loop() were wrong, especially in light of the educational goal of Arduino. Using them makes it clear how to organize an embedded system. This is the same concept behind C++ constructors and member functions. Get the initialization done at the right time and place and a good chunk of software problems evaporate. But since C++ offers this automatically with classes, the next step is to utilize C++’s capabilities.

Global Instantiation

One issue with C++ is the cost of initialization of global, or file, scope class instances. There is some additional code executed before main() to handle this as we saw in the article that introduced classes. I think this overhead is small enough that it’s not a problem.

An issue that may be a problem is the order of initialization. The order is defined within a compilation unit (usually a file) from the first declaration to the last. But across compilation units the ordering is undefined. One time all the globals in file A may be initialized first and the next time those in file B might come first. The order is important when one class depends on another being initialized first. If they are in different compilation units this is impossible to ensure. One solution is to put all the globals in a single compilation unit. This may not work if a library contains global instances.

A related issue occurs on large embedded computer systems, such as a Raspberry Pi running Linux, when arguments from the command line are passed to main(). Environment variables are also a problem since they may not be available until main() executes. Global instance won’t have access to this information so cannot use it during their initialization. I ran into this problem with my robots whose control computer was a PC. I was using the robot’s network name to determine their initial behaviors. It wasn’t available until main() was entered, so it couldn’t be used to initialize global instances.

This is an issue with smaller embedded systems that don’t pass arguments or have environment values but I don’t want to focus only on them. I’m looking to address the general situation that would include larger systems so we’ll assume we don’t want global instances.

Program Class

The approach I’m taking and sharing with you is an experiment. I have done something similar in the past with a robotics project but the approach was not thoroughly analyzed. As often happens, I ran out of time so I implemented this as a quick solution. Whether this is useful in the long run we’ll have to see. If nothing else it will show you more about working with C++.

My approach is to create a Program class with a member run() function. The setup for the entire program occurs in the class constructor and the run() function handles all the processing. What would normally be global variables are data members.

Here is the declaration of a skeleton Program class and the implementation of run():

class Program {
public:
	void run();
	static Program& makeProgram() {
		static Program p;
		return p;
	}

private:
	Program() { }
	void checkSerialInput();
};

void Program::run() {
	for (;;) {
		// program code here
		checkSerialInput();
	}
}

We only want one instance of Program to exist so I’ve assured this by making the constructor private and providing the static makeProgram() function to return the static instance created the first time makeProgram() is called. The Program member function checkSerialInput() handles checking for the serial input as discussed above. In checkSerialInput() I introduced an #if block to eliminate the actual code if the program is not using serial input.

Here is how Program is used in main.cpp:


void arduino_init() {
	init();
	initVariant();
}

int main(void) {
	arduino_init();
	Program& p = Program::makeProgram();
	p.run();
	return 0;
}

The function initArduino() is inlined and handles the two initialization routines required to setup the Arduino environment.

One of the techniques for good software development is to hide complexity and provide a descriptive name for what it does. These functions hide not only the code but, in one case, the conditional compilation.

Redbot Line Follower Project

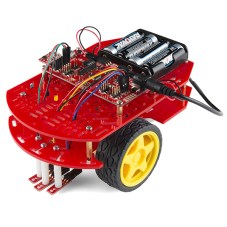
This code experiment uses a Sparkfun Redbot setup for line following. This is a two wheeled robot with 3 optical sensors to detect the line and an I2C accelerometer to sense bumping into objects. The computer is a Sparkfun Redbot Mainboard which is compatible with the Arduino Uno but provides a much different layout and includes a motor driver IC.

This robot is simple enough to make a manageable project but sufficiently complex to serve as a good test, especially when the project gets to the control system software. The basic code for handling these motors and sensors comes from Sparkfun and uses only the basic pin-level Arduino routines. I can’t possibly hack the entire Arduino code but using the Sparkfun code provides a manageable subset for experimenting.

For this article we’ll just look at the controlling the motors. Let’s start with the declaration of the Program class for testing the motor routines:

class Program {
public:
	void run();
	static Program& makeProgram() {
		static Program p;
		return p;
	}

private:
	Program() { }
	static constexpr int delay_time { 2000 };

	rm::Motor l_motor { l_motor_forward, l_motor_reverse, l_motor_pwm };
	rm::Motor r_motor { r_motor_forward, r_motor_reverse, r_motor_pwm };
	rm::Wheels wheels { l_motor, r_motor };

	void checkSerialInput();
};

There is a namespace rm enclosing the classes I’ve defined for the project, hence the rm:: prefacing the class names. On line 11 is something you may not have seen, a constexpr which is new in C++ 11 and expanded in C++14. It declares that delay_time is a true constant used during compilation and will not be allocated storage at run-time. There is a lot more to constexpr and we’ll see it more in the future. One other place I used it for this project is to define what pins to use. Here’s a sample:

constexpr int l_motor_forward = 2;
constexpr int l_motor_reverse = 4;
constexpr int l_motor_pwm = 5;
constexpr int r_motor_pwm = 6;
constexpr int r_motor_forward = 7;
constexpr int r_motor_reverse = 8;

The Motor class controls a motor. It requires two pins to control the direction and one pulse width modulation (PWM) pin to control the speed. The pins are passed via constructor and the names should be self-explanatory. The Wheels class provides coordinated movement of the robot using the Motor instances. The Motor instances are passed as references for the use of Wheels. Here are the two class declarations:

class Motor : public Device {
public:
	Motor(const int forward, const int reverse, const int pwm);

	void coast();
	void drive(const int speed);

	int speed() const {
		return mSpeed;
	}

private:
	void speed(const int speed);

	PinOut mForward;
	PinOut mReverse;
	PinOut mPwm;
	int mSpeed { };
};


class Wheels {
public:
	Wheels(Motor& left, Motor& right) :
			mLeft(left), mRight(right) {
	}

	void move(const int speed) {
		drive(speed, speed);
	}
	void pivot(const int speed) {
		drive(speed, -speed);
	}
	void stop() {
		mLeft.coast();
		mRight.coast();
	}

	void drive(const int left, const int right) {
		mLeft.drive(left);
		mRight.drive(right);
	}

private:
	Motor& mLeft;
	Motor& mRight;
};

The workhorse of Wheels is the function drive() which just calls the Motor drive() functions for each motor. Except for stop(), the other Wheels functions are utilities that use drive() and just make things easier for the developer. The compiler should convert those to a direct call to driver() since they are inline by being inside the class declaration. This is one of the interesting ways of using inline functions to enhance the utility of a class without incurring any cost in code or time.

The run() method in Program tests the motors by pivot()ing first in one direction and then the other at different speeds. A pivot() rotates the robot in place. Once the speed is set it continues until changed so the delay functions simply provide a little time for the robot to turn. Here’s the code:

void Program::run() {
	for (;;) {
		wheels.pivot(50);
		delay (delay_time);

		wheels.pivot(-100);
		delay(delay_time);

		checkSerialInput();
		if (serialEventRun) {
		}
	}
}

Wrap Up

The Redbot project is an interesting vehicle for demonstrating code techniques. The current test of the motor routines demonstrates how to override the existing Arduino main(). Even if you don’t like my approach with Program, the flexibility of using your own main() may come in handy for your own projects. The next article is going to revisit this program using templates.

THE EMBEDDING C++ PROJECT

Over at Hackaday.io, I’ve created an Embedding C++ project. The project will maintain a list of these articles in the project description as a form of Table of Contents. Each article will have a project log entry for additional discussion. Those interested can delve deeper into the topics, raise questions, and share additional findings.

The project also will serve as a place for supplementary material from myself or collaborators. For instance, someone might want to take the code and report the results for other Arduino boards or even other embedded systems. Stop by and see what’s happening.


Filed under: Arduino Hacks, Hackaday Columns, Software Development, software hacks

Code Craft – Embedding C++: Templates

The language C++ is big. There is no doubting that. One reason C++ is big is to allow flexibility in the technique used to solve a problem. If you have a really small system you can stick to procedural code encapsulated by classes. A project with a number of similar but slightly different entities might be best addressed through inheritance and polymorphism.

A third technique is using generics, which are implemented in C++ using templates. Templates have some similarities with #define macros but they are a great deal safer. The compiler does not see the code inserted by a macro until after it has been inserted into the source. If the code is bad the error messages can be very confusing since all the developer sees is the macro name. A template is checked for basic syntax errors by the compiler when it is first seen, and again later when the code is instantiated. That first step eliminates a lot of confusion since error messages appear at the location of the problem.

Templates are also a lot more powerful. They actually are a Turing complete language. Entire non-trivial programs have been written using templates. All the resulting executable does is report the results with all the computation done by the compiler. Don’t worry, we aren’t going there in this article.

Template Basics

You can use templates to create both functions and classes. The way this is done is quite similar for both so let’s start with a template function example:

template<typename T, int EXP = 2>
T power(const T value, int exp = EXP) {
	T res { value };
	for (; exp > 1; --exp) {
		res *= value;
	}
	return res;
}

This is a template function for raising value by the integer exponent, exp. The keyword template is followed in angle brackets by parameters. A parameter is specified using either typename or class followed by a name, or by an integer data type followed by a name. You can also use a function or class as a template parameter but we won’t look at that usage.

The name of a parameter is used within the body of the class or function just as you would use any other type, or value. Here we use T as the type name for the input and return values of the function. The integer EXP is used to set a default value of 2 for the exponent, i.e. making power calculate the square.

When the compiler instantiates a template function or class, it creates code that is the same as a handwritten version. The data types and values are inserted as text substitutions. This creates a new version typed by the actual arguments to the parameters. Each different set of arguments creates a new function or type. For example, an instance of power() for integers is not the same as power() for floats. Similarly, as we’ll see in a moment, a class Triple for integers is not the same as one for float. Each are distinct types with separate code.

Since power() is a template function it will work directly for any numeric data type, integer or floating point. But what if you want to use it with a more complex type like the Triple class from the last article? Let’s see.

Using Templates

Here’s the declaration of Triple reduced to only what is needed for this article:

class Triple {
public:
	Triple(const int x, const int y, const int z);
	Triple& operator *=(const Triple& rhs);

	int x() const;
	int y() const;
	int z() const;

private:
	int mX { 0 };	// c++11 member initialization
	int mY { 0 };
	int mZ { 0 };
};

I switched the plus equal operator to the multiple equal operator since it is needed by the power() function.

Here is how the power() function is used for integer, float, and our Triple data types:

int p = power(2, 3);
float f = power(4.1, 2);

Triple t(2, 3, 4);
Triple res = power(t, 3);

The only requirement for using a user defined data type (UDT) like Triple with power() is the UDT must define an operator=*() member function.

Template Classes

Assume you’ve been using Triple in a project for awhile with integer values. Now a project requirement needs it for floating point values. The Triple class code is all debugged and working, and more complex than what we’ve seen here. It’s not a pleasant thought to create a new class for float. There are also hints that a long or double version might be needed.

With not much work Triple can be converted to a generic version as a template class. It’s actually fairly straightforward. Begin with the template declaration just as with the function power() and replace all the declarations of int with T. Also check member function arguments for passing parameters by value. They may need to be changed to references to more efficiently handle larger data types or UDTs. I changed the constructor parameters to references for this reason.

Here is Triple as a template class:

template<typename T>
class Triple {
public:
	Triple(const T& x, const T& y, const T& z);
	Triple& operator *=(const Triple& rhs);

	T x() const;
	T y() const;
	T z() const;

private:
	T mX { 0 };	// c++11 member initialization
	T mY { 0 };
	T mZ { 0 };
};

Not a lot of difference. Here’s how it could be used:

Triple<int> ires = power(Triple { 2, 3, 4 }, 3);
Triple fres = power(Triple(1.2F, 2.2, 3.3)); // calc square
Triple dres = power(Triple(1.2, 2.2, 3.3));// calc square
Triple lres = power(Triple(1, 2, 3.3), 2);

Unfortunately, the new flexibility comes at the cost of telling the template the data type to use for Triple. That is done by putting the data type inside brackets following the class name. If that is a hassle you can always use typedef or the new using to create an alias:

using TripleInt = Triple;
TripleInt ires = power(Triple { 2, 3, 4 }, 3);

Creating a template class like this saves debugging and maintenance costs overall. Once the code is working, it works for all related data types. If a bug is found and fixed, it’s fixed for all versions.

Template Timing and Code Size

The code generated by a template is exactly the same code as a handwritten version of the same function or class. All that changes between versions is the data type used in the instantiation. Since the code is the same as the handwritten version, the timing is going to be the same. Therefore there is no need to actually test timing. Phew!

Templates are Inline Code

Templates are inherently inline code. That means every time you use a template function or a template class member function the code is duplicated inline. Each instance with a different data type creates its own set of code, but that will be no more than if you’d written a class for each data type. There can be savings using template classes since member functions are not instantiated if they are not used. For example, if the Triple class getter functions – x(), y(), z() – are never used, their code is not instantiated. They would be for a regular class, although a smart linker might drop them from the executable.

Consider the following use of power() and Triple:

int i1 = power(2, 3);
int i2 = power(3, 3);
Triple t1 = power(Triple(1, 2, 3), 2);

This creates two inline integer versions of power even though both are instantiated for the same data type. Another instance is created for the Triple version. A single copy of the Triple class is created because the data type is always int.

Here we’re relying on implicit instantiation. That means we’re letting the compiler determine when and where the code is generated. There is also explicit instantiation that allows the developer to specify where the code is produced. This takes a little effort and knowledge of which data types are used for the templates.

Generally, implicit instantiation means inline function code with the possibility of duplication of code. Whether that matters depends on the function. When a function, not an inline function, is called there is overhead in invocation. The parameters to the function are pushed onto the stack along with the housekeeping information. When the function returns those operations are reversed. For a small function the invocation may take more code than the function’s body. In that case, inlining the function is most effective.

The power() function used here is interesting because the function’s code and the code to invoke it on an Uno are similar in size. Of course, both vary depending on the data type since large data types require more stack manipulation. On a Arduino Uno, calling power() with an int takes more code than the function. For float, the call is slightly larger. For Triple, the code to invoke is a good piece larger. On other processors the calling power() could be different. Keep in mind that power() is a really small function. Larger functions, especially member functions, are typically going to outweigh the cost to call them.

Specifying where the compiler generates the code is an explicit instantiation. This will force an out-of-line call with the associated overhead. In a source file you tell the compiler which specializations you need. For the test scenario we want them for int and Triple:

template int power(int, int);
template Triple<int> power(Triple<int>, int);

The compiler will create these in the source file. Then, as with any other function, you need to create an extern declaration. This tells the compiler to not instantiate them as inline. These declarations are just the same as above, only with extern added:

extern template int power(int, int);
extern template Triple power(Triple, int);

Scenario for Testing Code Size

It took me a bit to create a test scenario for demonstrating the code size differences between these two instantiations. The problem is the result from the power() function must be used later in the code or the compiler optimizes the call away. Adding code to use the function changes the overall code size in ways that are not relevant to the type of instantiation. That makes comparisons difficult to understand.

I finally settled on creating a class, Application, with data members initialized using the power() function. Adding data members of the same or different types causes minimal overall size changes so the total application code size closely reflects the changes only due to the type of instantiation.

Here is the declaration of Application:

struct Application {
public:
	Application(const int value, const int exp);

	static void loop() {
	}

	int i1;
	int i2;
	int i3;
	Triple t1;
	Triple t2;
	Triple t3;
};

and the implementation of the constructor:

Application::Application(int value, const int exp) :
		i1 { power(value++, exp) }, //
				i2 { power<int, 3="">(value++) }, // calcs cube
				i3 { power(value++, exp) }, //

				t1 { power(Triple(value++, 2, 3)) }, // calcs square
				t2 { power(Triple(value++, 4, 5), exp) }, //
				t3 { power(TripleInt(value++, 2, 3), exp) } //
{
}

The minimum application for an Arduino has just an empty setup and loop() functions which takes 450 bytes on a Uno. The loop() used for this test is a little more than minimum but it only creates an instance of Application and calls its loop() member function:

void loop() {
	rm::Application app(2, 3);
	rm::Application::loop();	// does nothing
}

Code Size Results

Here are the results for various combinations of implicit and explicit instantiation with different numbers of class member variables:
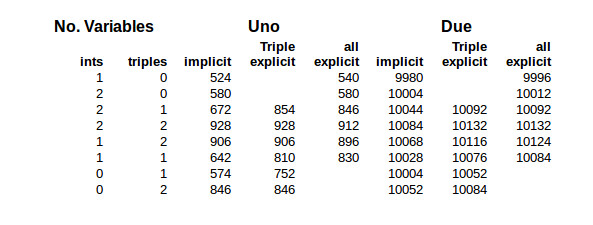
The first columns specify how many variables were included in the Application class. The columns under Uno and Due are the code size for those processors. They show the size for implicit instantiation, explicit instantiation of power() for just the Triple class, and explicit instantiation for both int and Triple data types.

The code sizes are dependent on a number of factors so can only provide a general idea of the changes when switching from implicit to explicit template instantiation. Actual results depend on the tool chains compiler and linker. Some of that occurs here using the Arduino’s GCC tool chain.

In all the cases with the Uno where one variable is used, the code size increases with explicit instantiation. In this case the function’s code plus the code for calling the function is, as expected, greater than the inline function’s code.

Now look at the Uno side of the table where there are 2 integers and 2 Triples, i.e. the fourth line. The first two code sizes remain the same at 928 bytes. The compiler optimized the code for the two Triples() by creating power() out-of-line without being told to do it explicitly. In the third column there is a decrease in code size when the integer version of power() is explicitly instantiated. It did the same a couple of lines below that when there are only the 2 Triples. These were verified by examing the assembly code running objdump on the ELF file.

In general, the Due’s code size did not improve with explicit instantiation. The larger word size of the Due requires less code to call a function. It would take a function larger than power() to make explicit instantiation effective in this scenario.

As I mentioned, don’t draw too many conclusions for these code sizes. I repeatedly needed to check the content of the ELF file using objdump to verify my conclusions. As a case in point, look at the Due side, with 2 integers and a Triple, with the two code sizes of 10092. They’re just coincidence. In one the integer version of power() is inlined and in the other, explicitly out-of-lined. The same occurs on the first line under Uno where there are just two integers and no Triples.

You can find other factors influencing code size. When three Triples are involved the compiler lifts the multiplication code from power(), but not the entire function. This isn’t because power() is a template function but just a general optimization, i.e. lifting code from inside a loop.

Wrap Up

Templates are a fascinating part of C++ with extremely powerful capabilities. As mentioned above, you can write an entire program in templates so the compiler actually does the computation. The reality is you probably are not going to be creating templates in every day programming. They are better suited for developing libraries and general utilities. Both power() and Triple fall into, or are close to, that category. This is why the C++ libraries consist of so many template classes. Creating a library requires attention to details beyond regular coding.

It’s important to understand templates even if you don’t write them. We’ve discussed some of the implications of usage and techniques for making optimal use of templates because they are an inherent part of the language. With them being such a huge part of C++ we’ll come back to them again to address places where they can be used.

The Embedding C++ Project

Over at Hackaday.io, I’ve created an Embedding C++project. The project will maintain a list of these articles in the project description as a form of Table of Contents. Each article will have a project log entry for additional discussion. Those interested can delve deeper into the topics, raise questions, and share additional findings.

The project also will serve as a place for supplementary material from myself or collaborators. For instance, someone might want to take the code and report the results for other Arduino boards or even other embedded systems. Stop by and see what’s happening.


Filed under: Arduino Hacks, Hackaday Columns, Software Development

Code Craft-Embedding C++: Hidden Activities?

What is an embedded system? The general definition is a computer system dedicated to a specific purpose, i.e. not a general purpose system usable for different tasks. That is a very broad definition. I was just skimming the C++ coding guidelines for the Joint Strike Fighter. That’s a pretty big embedded system and the first DOD project that allowed C++! When you use an ATM to get money you’re using an embedded system. Those are basically hardened PCs. Then at the small end we have all the Internet of Things (IoT) gadgets.

The previous articles about embedding C++ discussing classes, virtual functions, and macros garnered many comments. I find both the positive and critical comments rewarding. More importantly, the critical comments point me toward issues or questions that need to be addressed, which is what got me onto the topic for this article. So thank you, all.

Let’s take a look at when embedded systems should or should not use C++, taking a hard look at the claim that there may be hidden activities ripe to upset your carefully planned code execution.

Limits of Embedded Development Boards

Embedded systems are often thought of as having limited resources, e.g. memory, processing power. Having real-time constraints is another requirement frequently brought up. While those do occur in embedded systems they are not defining characteristics.

At some point a processor or memory limits preclude using C++, and often even C. Vendors might resort to a restricted version of C on some processors to provide a high-level language capability, an effort that would be silly for C++.

But we’ve not hit the limit on the boards used in these articles. We see with the Arduino Uno and its relatives that C++ is usable. The Uno is restricted to a subset of C++, in part because the developers did not have a C++ standard library available. (If you really want one, there are ports of the STL for the Uno.) The compiler in the Uno toolset supports C++11 and there is some support for C++14, but I haven’t explored the latter to know what is usable. There are capabilities in C++11, and C+14, that improve C++ use in embedded systems.

The Due, a larger Arduino board I’ve used to contrast with the Uno, does have the full standard library. Switch over to the Raspberry Pi, or equivalents, where you not only get the GCC toolset but can run Eclipse on the board, and it feels like the sky’s the limit.

Should You C++?

While all the above is valid, it misses a critical point. The issue isn’t whether you can use C++ on the smaller systems but whether solving the problem needs C++’s capabilities. What I’m suggesting is changing the question from “Can you use C++?” to “Should you use C++?”

We’ve addressed some of the really basic objections to using C++. Code bloat is not the great explosion folks imagine. Virtual functions are not super slow. But the comments raise other issues. One comment advised against using C++ because of the hidden activities. Specifically mentioned were copy constructors, side effects, hidden allocation, and unexpected operations.

What is a copy constructor, and why do we need one? It’s a constructor that makes a copy of an existing instance. Any time a copy is made the copy constructor is called. Recall that all constructors initialize instances so they are ready to be used.

A copy constructor is required if you pass a parameter by value. That’s a copy. Returning a value from a function causes a copy, although a decent compiler will optimize it away. Assignment also involves making a copy.

With built in types the cost of a copy is low, except maybe if you are using long doubles at 16 bytes a value. For large data structures a copy can be expensive and can be tricky. Rather than bemoan that C++ does copies, we need to recognize they are a necessity. That recognition means we can work to avoid them and get them right when they are needed.

One way to avoid copies is to pass structures by reference. In C, passing by pointer is a pass by reference. C++ allows that and introduces the reference operator. The reference operator is not just syntactic sugar. For example, references eliminate the dangling pointer problem since you cannot have a null reference.

Which brings up the ownership problem with pointers and the questions they raise for data structure copies. Quite frequently, even in C++, a data structure contains a pointer to another data structure. When you make a copy who owns the structure at the end of the pointer? Do you copy the pointer or the data? If you just copy the pointer you are sharing data between the two copies. One copy can modify the data in the other copy. That is usually not a good thing. Copying the data might be expensive. Also, who ultimately decides when the target of a pointer is deleted, or even if it should be deleted?

C++ doesn’t introduce a problem with copy constructors; it highlights a requirement that needs to be addressed, sometimes by looking to the problem requirements. What is needed by the solution when a copy is made?

Copying Data

In my robotics work I use an inertial measurement unit (IMU) to help track position and bearing, the robot’s pose. Inside the IMU are an accelerometer, a gyroscope, and a compass. The accelerometer and gyroscope both provide data as a triple of data, i.e. measurements in x, y, and z axis. There are a number of operations that need to be done on that data to make it usable, many more than we want to look at here. But we can look at how to handle this triple of data and to add a triple of values together. This is done with the gyroscope since it reports the angular rate of change per unit of time. By accumulating those readings you can obtain, theoretically, the bearing of the robot.

C++ Implementation

Here’s the declaration of the class Triple and the overloaded addition operator:

class Triple {
public:
	Triple() = default; // C++11 use default constructor despite other constructors being declared
	Triple(const Triple& t);	// copy constructor so we can track usage
	Triple(const int x, const int y, const int z);

	const Triple& operator +=(const Triple& rhs);

	int x() const;
	int y() const;
	int z() const;
private:
	int mX { 0 };	// C++11 member initialization
	int mY { 0 };
	int mZ { 0 };
};

inline Triple operator+(const Triple& lhs, const Triple& rhs);

I’m using a number of C++11 features here. They’re marked, and the implications for most are obvious if you are familiar with earlier versions of C++. The line with Triple() = default; probably isn’t obvious. It requests that the compiler generate the default constructor. Without it we couldn’t create a variable with no arguments on the constructor: Triple t3;. Normally the default constructor is only created by the compiler when no other constructors are defined. Since Triple has two other constructors there would be no default constructor. I requested one using the notation so variables could be created without arguments.

The next constructor, Triple(const Triple& t), is the copy constructor. It is not needed for this class since C++ would have generated one by default that would have worked fine for this simple class. I created it to show how one works and illustrate where it is invoked. This uses a new C++11 feature where a constructor can invoke another constructor to handle the initialization. This came into being to avoid code duplication, which often led to errors, or the use of a class member to perform initialization.

The final constructor allows us to initialize a Triple with three values. Those three values are stored in the data members of the class.

The next function overloads the plus equals operator. It turns out that the most effective way to implement the actual addition operator, seen a few lines below, is to first implement this operator.

The remaining functions are getters because they allow us to get data from the class. Some classes also have setters that allow setting class values. We don’t want them in Triple.

Here are the implementations of the arithmetic operators:

inline const Triple& Triple::operator +=(const Triple& rhs) {
	mX += rhs.mX;
	mY += rhs.mY;
	mZ += rhs.mZ;
	return *this;
}

inline Triple operator+(const Triple& lhs, const Triple& rhs) {
	Triple left { lhs };
	left += rhs;
	return left;
}

The first operator is straightforward; it simply applies the plus equal operator to each value in the class and returns the instance as a reference. This operator modifies the data in the calling object so the returned reference is valid.

The addition operator uses the plus equal operator in its implementation. Here is where the copy constructor comes into play. We have to create a new object to hold the result so one is created from the lhs value. That’s a copy.

The rhs is added to the new object using plus equal operator and the result returned by value, not by reference. The return is another copy. It cannot be returned by reference because the result object, left, was created inside the function.

There are two possible copies in any arithmetic operator. However, C++ in the standard specifically allows compilers to optimize away the copy for the return value. This is the return value optimization. You’re welcome to try adjusting the code, but there is no way you can avoid creating a copy or two somewhere during this operation.

This code will run on an Arduino, but I created it and ran it on Linux so I could step through the operations to verify where the copy constructor was called and where it wasn’t.

How do you use this? Pretty much the same as any arithmetic operation:

	Triple t1 { 1, 2, 3 };
	Triple t2 { 10, 20, 30 };

	Triple t3 { t1 + t2 };

C Implementation

What would a similar implementation look like in C? How about this:

struct Triple {
	int mX;
	int mY;
	int mZ;
};

void init(struct Triple* t, const int x, const int y, const int z) {
	t->mX = x;
	t->mY = y;
	t->mZ = z;
}
struct Triple add(struct Triple* lhs, struct Triple* rhs) {
	struct Triple result;
	result.mX = lhs->mX + rhs->mX;
	result.mY = lhs->mY + rhs->mY;
	result.mZ = lhs->mZ + rhs->mZ;
	return result;
}

Overall it looks shorter and neater. The struct Triple contains the three data items for the axis. The routine init sets them to user specified values. The add function adds two Triples and returns the result. The add routine avoids initializing result because we know its content will be overwritten by the addition operations. That’s a bit of a savings for C. There is still a copy when the function returns the value. You just don’t have any control of how that copy is done. In this simple situation it doesn’t matter but with a more complicated data structure, say, one with pointers, the copy might be more challenging. We’d probably need to resort to an output parameter using pass by reference with pointers instead of a return value.

Here is how it is used:

	struct Triple t1;
	init(&t1, 1, 2, 3);

	struct Triple t2;
	init(&t2, 10, 20, 30);

	struct Triple t3 = add(&t1, &t2);

Two values are created and initialized and then added. Simple, but you’ve got to remember to take the addresses of the structures and to assure the init routine is only called once.

Consider how the two different versions would look if you implemented a complicated expression. I’ll just say I know which I would prefer.

Wrap Up

I didn’t start this article intending to do a direct comparison between the two languages. I only wanted to illustrate that the copy constructor is, if you insist, a necessary evil. Copies occur in multiple places in both C++ and C. They become critical to understand in C++ when using user defined data types, i.e. classes. Copying in C is less obvious but still necessary.

Since I didn’t intend to make a comparison, I don’t have code size or timings for the two versions. As I pointed out and demonstrated in the article on virtual functions, comparing these simple examples on those parameters is often misleading. A C++ capability is used to solve a problem, not just as an exercise of the language features. Only if an equivalent solution in C is created is a comparison valid.

The Embedding C++ Project

Over at Hackaday.io, I’ve created an Embedding C++project. The project will maintain a list of these articles in the project description as a form of Table of Contents. Each article will have a project log entry for additional discussion. Those interested can delve deeper into the topics, raise questions, and share additional findings.

The project also will serve as a place for supplementary material from myself or collaborators. For instance, someone might want to take the code and report the results for other Arduino boards or even other embedded systems. Stop by and see what’s happening.


Filed under: Hackaday Columns, Software Development