Posts with «atmega328» label

Ethersweep: An Easy-To-Deploy Ethernet Connected Stepper Controller
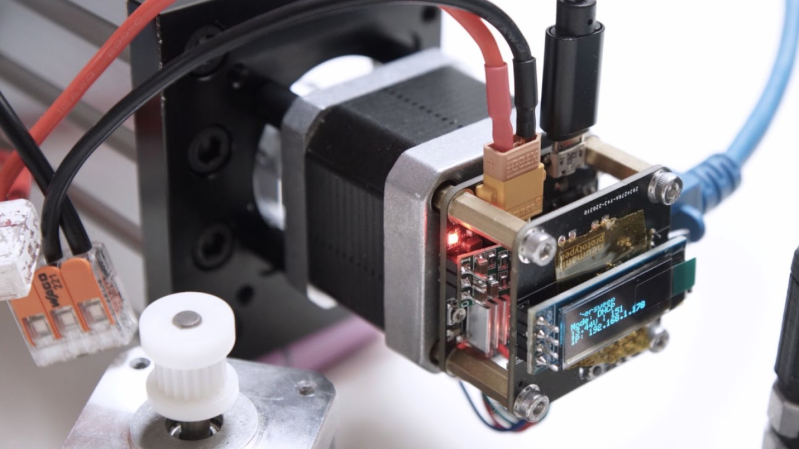
[Neumi] over on Hackaday.IO wanted a simple-to-use way to drive stepper motors, which could be quickly deployed in a wide variety of applications yet to be determined. The solution is named Ethersweep, and is a small PCB stack that sits on the rear of the common NEMA17-format stepper motor. The only physical connectivity, beside the motor, are ethernet and a power supply via the user friendly XT30 connector. The system can be closed loop, with both an end-stop input as well as an on-board AMS AS5600 magnetic rotary encoder (which senses the rotating magnetic field on the rear side of the motor assembly – clever!) giving the necessary feedback. Leveraging the Trinamic TMC2208 stepper motor driver gives Ethersweep silky smooth and quiet motor control, which could be very important for some applications. A rear-facing OLED display shows some useful debug information as well as the all important IP address that was assigned to the unit.

Control is performed with the ubiquitous ATMega328 microcontroller, with the Arduino software stack deployed, making uploading firmware a breeze. To that end, a USB port is also provided, hooked up to the uC with the cheap CP2102 USB bridge chip as per most Arduino-like designs. The thing that makes this build a little unusual is the ethernet port. The hardware side of things is taken care of with the Wiznet WS500 ethernet chip, which implements the MAC and PHY in a single device, needing only a few passives and a magjack to operate. The chip also handles the whole TCP/IP stack internally, so only needs an external SPI interface to talk to the host device.

Talking about firmware for a moment, to ease deployment, the network configuration is handled by DHCP, although some control over MAC address assignment is promised for the future. All control is via UDP over ethernet, and again the basic functionality is there, but some niceties such as motor synchronisation and state querying are again subject to further releases. Hardware design is implemented in KiCAD and FreeCAD, with Arduino covering the firmware and host control side in python. You can read all about it on the Ethersweep project GitHub, what is there not to like?

If you thought you’d seen this stepper-mounted driver setup before, you’d be correct, here’s a Hackaday Prize 2017 Entry for a CANBUS controlled driver. We also saw this on Dummy: the obscenely well made robot arm by [Zhihui Jun], which if you missed it, then do circle back and take a look, you won’t regret it!

12-Note Polyphony On An Arduino Synth

When synthesizers first hit the scene back in the mid-20th century, many were monophonic instruments, capable of producing just one pitch at a time. This was a major limitation, and over time polyphonic synthesizers began to flood into the scene, greatly expanding performance possibilities. [Kevin] decided to build his own polyphonic synthesizer, but far from taking the easy route, he built it around the Arduino Uno – not a platform particularly well known for its musical abilities! 

[Kevin]’s build manages 12-note polyphony, an impressive feat for the ATmega328 at the heart of the Arduino Uno. It’s done by running an interrupt on a timer at a steady rate, and implementing 12 counters, one per note. When a counter overflows, a digital IO pin is flipped. This outputs a square wave at a certain pitch on the IO pin, producing the given note. The outputs of 12 digital IO pins are mixed together with a simple resistor arrangement, producing a basic square wave synth. Tuning isn’t perfect, but [Kevin] notes a few ways it could be improved down the line.

[Kevin] has added features along the way, expanding the simple synth to work over several octaves via MIDI, while also building a small tactile button keyboard, too. It’s a project that serves as a great gateway into basic synthesis and music electronics, and we’re sure [Kevin] learned a lot along the way. We’ve seen other microcontroller synths before too, like this tiny device that fits inside a MIDI plug. Video after the break.

Insert Coin (Cell) To Play LedCade

In this era of 4K UHD game console graphics and controllers packed full of buttons, triggers, and joysticks, it’s good to occasionally take a step back from the leading edge. Take a breath and remind ourselves that we don’t always need all those pixels and buttons to have some fun. The LedCade is a μ (micro) arcade game cabinet built by [bobricius] for just this kind of minimalist gaming.

Using just three buttons for input and an 8×8 LED matrix for output, the LedCade can nevertheless play ten different games representing classic genres of retro arcade gaming. And in a brilliant implementation of classic hardware hacking humor, a player starts their game by inserting not a monetary coin but a CR2032 coin cell battery.

Behind the screen is a piezo speaker for appropriately vintage game sounds, and an ATmega328 with Arduino code orchestrating the fun. [bobricius] is well practiced at integrating all of these components as a result of developing an earlier project, the single board game console. This time around, the printed circuit board goes beyond being the backbone, the PCB sheet is broken apart and reformed as the enclosure. With classic arcade cabinet proportions, at a far smaller scale.

If single player minimalist gaming isn’t your thing, check out this head-to-head gaming action on 8×8 LED arrays. Or if you prefer your minimalist gaming hardware to be paper-thin, put all the parts on a flexible circuit as the Arduflexboy does.

The HackadayPrize2019 is Sponsored by:

A Smartwatch You Can Easily Build Yourself

The concept of a smartwatch was thrown around for a long time before the technology truly came to fruition. Through the pursuit of miniaturisation, modern smartwatches are sleek, compact, and remarkably capable for their size. Companies such as Apple and Samsung throw serious money into research and development, but that doesn’t mean you can’t create something of your own. [Electronoobs] has done just that, with this Arduino-based smartwatch build.

The brain of the watch is that hacker staple, the venerable ATmega328, most well known for its use in the Arduino Uno and Nano platforms. An FTDI module is used for USB communication, making programming the board a snap. Bluetooth communication is handled by another pre-built module, and a smartphone app called Notiduino handles passing notifications over to the watch.

This is a build that doesn’t do anything crazy or difficult to understand, but simply combines useful parts in a very neat and tidy way. The watch is impressively thin and compact for a DIY build, and has a host of useful functions without going overboard.

We’ve seen other DIY builds in this space, too – such as this ESP8266-based smartwatch. Video after the break.

Want to Learn Ethernet? Write Your Own Darn AVR Bootloader!

There’s a school of thought that says that to fully understand something, you need to build it yourself. OK, we’re not sure it’s really a school of thought, but that describes a heck of a lot of projects around these parts.

[Tim] aka [mitxela] wrote kiloboot partly because he wanted an Ethernet-capable Trivial File Transfer Protocol (TFTP) bootloader for an ATMega-powered project, and partly because he wanted to understand the Internet. See, if you’re writing a bootloader, you’ve got a limited amount of space and no device drivers or libraries of any kind to fall back on, so you’re going to learn your topic of choice the hard way.

[Tim]’s writeup of the odyssey of cramming so much into 1,000 bytes of code is fantastic. While explaining the Internet takes significantly more space than the Ethernet-capable bootloader itself, we’d wager that you’ll enjoy the compressed overview of UDP, IP, TFTP, and AVR bootloader wizardry as much as we did. And yes, at the end of the day, you’ve also got an Internet-flashable Arduino, which is just what the doctor ordered if you’re building a simple wired IoT device and you get tired of running down to the basement to upload new firmware.

Oh, and in case you hadn’t noticed, cramming an Ethernet bootloader into 1 kB is amazing.

Speaking of bootloaders, if you’re building an I2C slave device out of an ATtiny85¸ you’ll want to check out this bootloader that runs on the tiny chip.

GPS Tracker Gets SMS Upgrade

In May of 2000, then-President Bill Clinton signed a directive that would improve the accuracy of GPS for anyone. Before this switch was flipped, this ability was only available to the military. What followed was an onslaught of GPS devices most noticeable in everyday navigation systems. The large amount of new devices on the market also drove the price down to the point where almost anyone can build their own GPS tracking device from scratch.

The GPS tracker that [Vadim] created makes use not just of GPS, but of the GSM network as well. He uses a Neoway M590 GSM module for access to the cellular network and a NEO-6 GPS module. The cell network is used to send SMS messages that detail the location of the unit itself. Everything is controlled with an ATmega328P, and a lithium-ion battery and some capacitors round out the fully integrated build.

[Vadim] goes into great detail about how all of the modules operate, and has step-by-step instructions on their use that go beyond what one would typically find in a mundane datasheet. The pairing of the GSM and GPS modules seems to go match up well together, much like we have seen GPS and APRS pair for a similar purpose: tracking weather balloons.


Filed under: gps hacks
Hack a Day 07 Jul 06:00
arduino  atmega328  atmega328p  cell  gps  gps hacks  gsm  sms  tracker  

Parts Bin Bonanza Leads to Arduino FM Radio

Trolling eBay for parts can be bad for your wallet and your parts bin. Yes, it’s nice to be well stocked, but eventually you get to critical mass and things start to take on a life of their own.

This unconventional Arduino-based FM receiver is the result of one such inventory overflow, and even though it may take the long way around to listening to NPR, [Kevin Darrah]’s build has some great tips in it for other projects. Still in the mess-o-wires phase, the radio is centered around an ATmega328 talking to a TEA5767 FM radio module over I²C. Tuning is accomplished by a 10-turn vernier pot with an analog meter for frequency display. A 15-Watt amp drives a pair of speakers, but [Kevin] ran into some quality control issues with the amp and tuner modules that required a little extra soldering as a workaround. The longish video below offers a complete tutorial on the hardware and software and shows the radio in action.

We like the unconventional UI for this one, but a more traditional tuning method using the same guts is also possible, as this retro-radio refit shows.


Filed under: Arduino Hacks, misc hacks

Convert a weed wacker toy into a metal detector

Evan Kale is back with another hack. This time, the YouTuber decided to convert a weed wacker-like toy into a metal detector with the help of an Arduino Uno.

As Kale explains, the project is based on a Colpitts Oscillator, which combines an LC circuit with a transistor amplifier for feedback. The frequency of oscillation is somewhere in the 100KHz range, which cannot be heard by humans. Enter the Arduino. When the trigger is pressed, an Arduino program translates the oscillation into an audible tone that is played out of the speaker. When the oscillation exceeds a certain threshold, it also emits a celebratory light show because… why not?

Kale walks through his entire build—along with the science of it all and how it works—in the video below. The schematics can be found on Imgur.

Strap a Robot to Your Face! Your Expressions Are Now Controlled by Technology

Turn an old headlamp into a power assist for your eyebrows. Use an infrared remote control to raise, lower, waggle, and adjust.

Read more on MAKE

The post Strap a Robot to Your Face! Your Expressions Are Now Controlled by Technology appeared first on Make: DIY Projects and Ideas for Makers.

Hackaday Links: October 11, 2015

[Kratz] just turned into a rock hound and has a bunch of rocks from Montana that need tumbling. This requires a rock tumbler, and why build a rock tumbler when you can just rip apart an old inkjet printer? It’s one of those builds that document themselves, with the only other necessary parts being a Pizza Hut thermos from the 80s and a bunch of grit.

Boot a Raspberry Pi from a USB stick. You can’t actually do that. On every Raspberry Pi, there needs to be a boot partition on the SD card. However, there’s no limitation on where the OS resides,  and [Jonathan] has all the steps to replicate this build spelled out.

Some guys in Norway built a 3D printer controller based on the BeagleBone. The Replicape is now in its second hardware revision, and they’re doing some interesting things this time around. The stepper drivers are the ‘quiet’ Trinamic chips, and there’s support for inductive sensors, more fans, and servo control.

Looking for one of those ‘router chipsets on a single board’? Here you go. It’s the NixCoreX1, and it’s pretty much a small WiFi router on a single board.

[Mowry] designed a synthesizer. This synth has four-voice polyphony, 12 waveforms, ADSR envelopes, a rudimentary sequencer, and fits inside an Altoids tin. The software is based on The Synth, but [Mowry] did come up with a pretty cool project here.


Filed under: Hackaday Columns, Hackaday links