Posts with «bicycle» label

An Open-Source Ebike Motor Controller

DIY e-bikes are often easy to spot. If they’re not built out of something insane like an old washing machine motor, the more subtle kits that are generally used still stand out when compared to a non-assisted bike. The motors tend to be hub- or mid-drive systems with visible wires leading to a bulky battery, all of which stand out when you know what to look for. To get a stealthy ebike that looks basically the same as a standard bicycle is only possible with proprietary name-brand solutions that don’t lend themselves to owner repair or modification, but this one has at least been adapted for use with an open source motor controller.

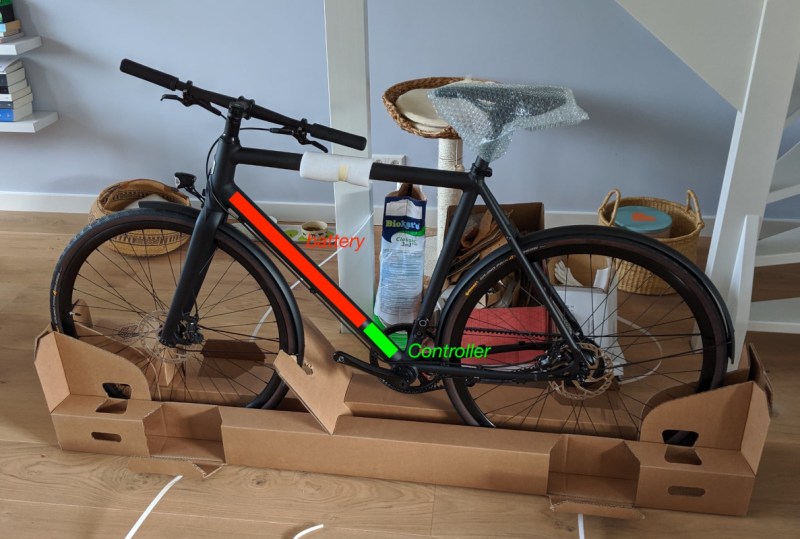
The bike in use here is a model called the Curt from Estonian ebike builder Ampler, which is notable in that it looks indistinguishable from a regular bicycle with the exception of the small 36-volt, 350-watt hub motor somewhat hidden in the rear wheel. [BB8] decided based on no reason in particular to replace the proprietary motor controller with one based on VESC, an open-source electric motor controller for all kinds of motors even beyond ebikes. Installed on a tiny Arduino, it fits inside the bike’s downtube to keep the stealthy look and can get the bike comfortably up to around 35 kph. It’s also been programmed to turn on the bike’s lights if the pedals are spun backwards, and this method is also used to change the pedal assist level, meaning less buttons and other user-interface devices on the handlebars.

[BB8] has been working on this for a while, and although the bulk of a working ebike controller is there, it still doesn’t support the torque sensing pedals included with this bike. We’re presuming that this is still a work-in-progress as the Arduino and associated code easily interfaces with all the other sensors available on this bike. Hopefully this open-source motor controller finds its way into other proprietary systems as well, since a lot of these ebikes can turn into massive paperweights if the companies who originally built them go out of business or simply decide to stop supporting older models. Of course, you can avoid this issue entirely by building your own ebike from spare parts.

Thanks to [Arnoud] for the tip!

Automatic Arduino Bicycle Shifter

One of the keys to efficient cycling performance is a consistent pedalling cadence. To achieve this the cyclist must always be in the correct gear, which can be tricky when your legs are burning and you’re sucking air. To aid in this task, [Jan Oelbrandt] created Shift4Me, an open-source Arduino powered electronic shifter.

The system consists of a hall effect sensor at the pedals to measure cadence, an Arduino controller, and a servo mechanism to replace the manual shifter. Everything is mounted in a small enclosure on the frame. The only way to get one is to build your own, so a forum is available for Shift4Me builders, where the BOM, instructions, code and other documentation is available for download. Most bikes should be easy to convert, and [Jan] invites builders to post their modifications and improvements.

Since the only input is the cadence sensor, we wonder if the system will interfere more than help when the rider has to break cadence. It does however include allowance to hold on the current gear, or reset to a starting gear by pushing a button. One major downside is that you will be stuck in a single gear if the battery dies since the manual shifter is completely removed.

As one of the oldest continuously used forms of mechanical transport, there is no shortage of bicycle-related hacks. Some of the more recent ones we’ve seen on Hackaday include e-bike with a washing machine motor, and a beautifully engineered steam-powered bicycle.

Enforce Speed Limits with a Rusty Bike

They say you can’t manage what you can’t measure, and that certainly held true in the case of this bicycle that was used to measure the speed of cars in one Belgian neighborhood. If we understand the translation from Dutch correctly, the police were not enforcing the speed limit despite complaints. As a solution, the local citizenry built a bicycle with a radar gun that collected data which was then used to convince the police to enforce the speed limit on this road.

The bike isn’t the functional part of this build, as it doesn’t seem to have been intended to move. Rather, it was chosen because it is inconspicuous (read: rusty and not valuable) and simply housed the radar unit and electronics in a rear luggage case. The radar was specially calibrated to have less than 1% error, and ran on a deep cycle lead acid battery for around eight days. Fitting it with an Arduino-compatible shield and running some software (provided on the github page) is enough to get it up and running.

This is an impressive feat of citizen activism to provide the local police with accurate data to change a problem in a neighborhood. Not only was the technology put to good use, but the social engineering involved with hiding expensive electronics in plain sight with a rusty bicycle is a step beyond what we might have thought of as well.

Thanks to [Jo_elektro] for the tip!

Cheating the Perfect Wheelie With Sensors And Servos

Everyone remembers popping their first wheelie on a bike. It’s an exhilarating moment when you figure out just the right mechanics to get balanced over the rear axle for a few glorious seconds of being the coolest kid on the block. Then gravity takes over, and you either learn how to dismount the bike over the rear wheel, or more likely end up looking at the sky wondering how you got on the ground.

Had only this wheelie cheating device been available way back when, many of us could have avoided that ignominious fate. [Tom Stanton]’s quest for the perfect wheelie led him to the design, which is actually pretty simple. The basic idea is to apply the brakes automatically when the bike reaches the critical angle beyond which one dares not go. The brakes slow the bike, the front wheel comes down, and the brakes release to allow you to continue pumping along with the wheelie. The angle is read by an accelerometer hooked to an Arduino, and the rear brake lever is pulled by a hobby servo. We honestly thought the servo would have nowhere near the torque needed, but in fact it did a fine job. As with most of [Tom]’s build his design process had a lot of fits and starts, but that’s all part of the learning. Was it worth it? We’ll let [Tom] discuss that in the video, but suffice it to say that he never hit the pavement in his field testing, although he appeared to be wheelie-proficient going into the project.

Still, it was an interesting build, and begs the question of how the system could be improved. Might there be some clues in this self-balancing motorized unicycle?

Pavement Projection Provides Better Bicycle Visibility at Night

Few would question the health benefits of ditching the car in favor of a bicycle ride to work — it’s good for the body, and it can be a refreshing relief from rat race commuting. But it’s not without its perils, especially when one works late and returns after dark. Most car versus bicycle accidents occur in the early evening, and most are attributed to drivers just not seeing cyclists in the waning light of day.

To decrease his odds of becoming a statistics and increase his time on two wheels, [Dave Schneider] decided to build a better bike light. Concerned mainly with getting clipped from the rear, and having discounted the commercially available rear-mounted blinkenlights and wheel-mounted persistence of vision displays as insufficiently visible, [Dave] looked for ways to give drivers as many cues as possible. Noticing that his POV light cast a nice ground effect, he came up with a pavement projecting display using four flashlights. The red LED lights are arranged to flash onto the roadway in sequence, using the bike’s motion to sweep out a sort of POV “bumper” to guide motorists around the bike. The flashlight batteries were replaced with wooden plugs wired to the Li-ion battery pack and DC-DC converter in the saddle bag, with an Arduino tasked with the flashing duty.

The picture above shows a long exposure of the lights in action, and it looks very effective. We can’t help but think of ways to improve this: perhaps one flashlight with a servo-controlled mirror? Or variable flashing frequency based on speed? Maybe moving the pavement projection up front for a head-down display would be a nice addition too.

Keep Pedaling to Keep Playing

It’s been said that the best way to tackle the issue of childhood obesity would be to hook those children’s video game consoles up to a pedal-powered generator. Of course, this was said by [Alex], the creator of Cykill. Cykill interfaces an Xbox to an exercise bike, so to keep the video game going you’ll have to keep pedaling the bike.

While there is no generator involved in this project, it does mimic the effect of powering electronics from a one. The exercise bike has a set of communications wires, which are connected to a relay on the Xbox’s power plug. When the relay notices that the bike isn’t being pedaled enough, it automatically cuts power to the console. Of course, the risk of corrupting a hard drive is high with this method, but that only serves to increase the motivation to continue pedaling.

The project goes even further in order to eliminate temptation to bypass the bike. [Alex] super-glued the plug of the Xbox to the relay, making it extremely difficult to get around the exercise requirement. If you’re after usable energy instead of a daily workout, though, there are bikes out there that can power just about any piece of machinery you can imagine.


Filed under: xbox hacks
Hack a Day 08 Aug 12:00

Arduino + Geometry + Bicycle = Speedometer

It is pretty easy to go to a big box store and get a digital speedometer for your bike. Not only is that no fun, but the little digital display isn’t going to win you any hacker cred. [AlexGyver] has the answer. Using an Arduino and a servo he built a classic needle speedometer for his bike. It also has a digital display and uses a hall effect sensor to pick up the wheel speed. You can see a video of the project below.

[Alex] talks about the geometry involved, in case your high school math is well into your rear view mirror. The circumference of the wheel is the distance you’ll travel in one revolution. If you know the distance and you know the time, you know the speed and the rest is just conversions to get a numerical speed into an angle on the servo motor. The code is out on GitHub.

Granted, reading a magnet, keeping time, and driving a servo isn’t exactly cutting edge. On the other hand, it made us think about what other kinds of outputs you could drive. We haven’t seen a nixie tube speedometer (well, not on a bicycle, anyway), for example. Or maybe one built with mechanical flip numbers like an old clock.

We have seen some with Arduinos and lots of LEDs (although, again, not really for a bicycle). This speedometer might still be our favorite, though.


Filed under: Arduino Hacks, transportation hacks

Blinky LED Bike Bag

Bicycle riders can never be too visible: the more visible you are, the less chance there is someone will hit you. That’s the idea behind the Arduibag, a neat open-source project from [Michaël D’Auria] and [Stéphane De Graeve]. The project combines a joystick that mounts on the handlebars with a dot matrix LED display in a backpack. By moving the joystick, the user can indicate things such as that they are turning, stopping, say thank you or show a hazard triangle to warn of an accident.

The whole project is built from simple components, such as an Adafruit LED matrix and a Bluno (an Arduino-compatible board with built-in Bluetooth 4.0) combined with a big battery that drives the LED matrix. This connects to the joystick, which is in a 3D printed case that clips onto the handlebars for easy use. It looks like a fairly simple build, with the larger components being mounted on a board that fits into the backpack and holds everything in place. You then add a clear plastic cover to part of the backpack over the LED matrix, and you are ready to hit the road, hopefully without actually hitting the road.

Like any good project, [Michaël] and [Stéphane] aren’t finished with it yet: they are also looking for ways to improve it. In particular, they want to reduce the number of batteries, as there is currently a large battery that drives the display and another smaller one that drives the Arduino.


Filed under: Arduino Hacks, wearable hacks
Hack a Day 13 Mar 18:00

Secure and Track Your Bike with this Arduino-Based GPS Lock

Riding a bike can be fun, great exercise, and, if you live in a city conducive to it, a great mode of transportation. According to author Scott Bennett who lives in Vancouver BC, Canada, a city with a high bike theft rate, he “wanted to have some peace of mind […]

Read more on MAKE

The post Secure and Track Your Bike with this Arduino-Based GPS Lock appeared first on Make:.