Posts with «computer» label

Hackaday Prize 2023: Building a Relay ALU

There’s much truth in the advice that, to truly understand something, you need to build it yourself from the ground up. That’s the idea behind [Christian]’s entry for the Re-engineering Education category of the 2023 Hackaday Prize. Built as an educational demonstrator, this is a complete arithmetic-logic unit (ALU) using discrete relays — and not high-density types either — these are the big honking clear-cased kind.

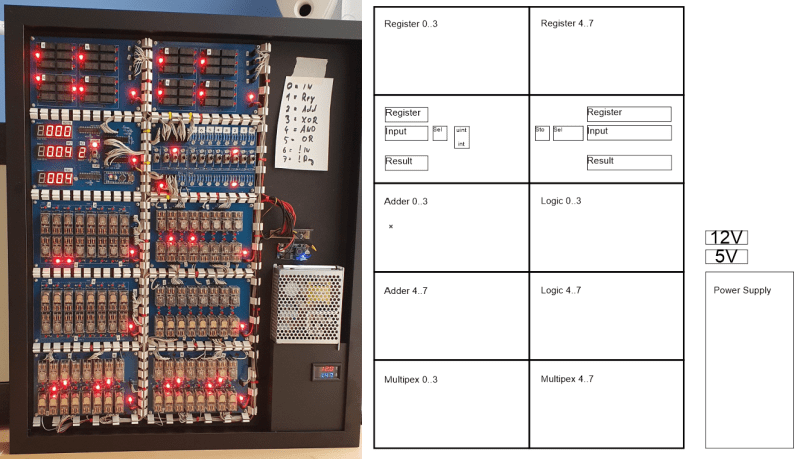
The design is neatly, intentionally, partitioned along functional lines, with four custom PCB designs, each board operating on 4-bits. To handle a byte-length word, boards are simply cascaded, making a total of eight. The register, adder, logic function, and multiplex boards are the heart of the build with an additional two custom boards for visualization (using an Arduino for convenience) and IO forming the interface. After all, a basic CPU is just an ALU and some control around it, the magic is really in the ALU.
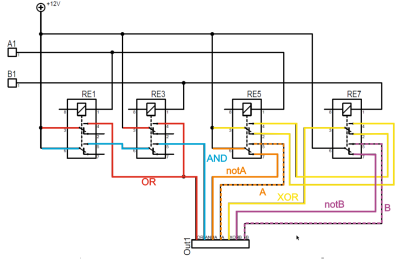
The fundamental logical operations operating upon two operands, {A, B} are A, ~A, B, ~B, A or B, A and B, A xor B, can be computed from just four relays per bit. The logic outputs do need to be fed into a 7-to-1 bit selector before being fed to the output register, but that’s the job of a separate board. The adder function is the most basic, simply a pair of half-adders and an OR-gate to handle the chaining of the carry inputs and generate the carry chain output.

3D printed cable runs are a nice touch and make for a slick wiring job to tie it all together.

For a more complete relay-based CPU, you could check out the MERCIA relay computer project, not to mention this wonderfully polished build.


The HackadayPrize 2023 is Sponsored by:

Pocket Computer Reminds Us of PDAs

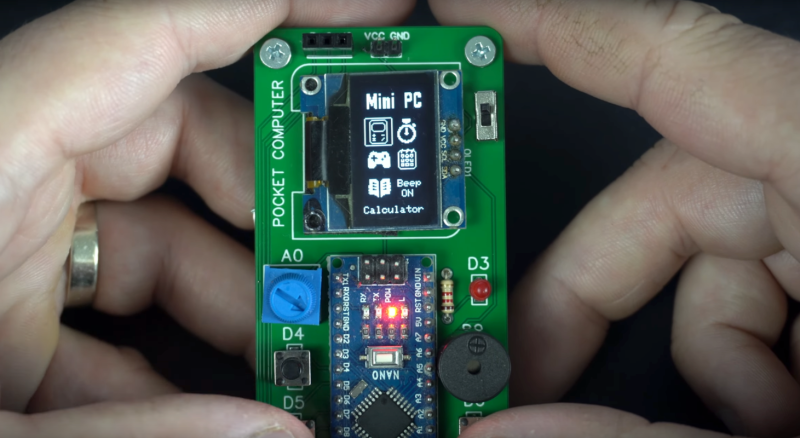
Before smartphones exploded on the scene in the late 00s, there was still a reasonable demand for pocket-sized computers that could do relatively simple computing tasks. Palm Pilots and other PDAs (Personal Digital Assistants) were all the rage in the ’90s and early ’00s, although for cutting-edge tech from that era plenty of these devices had astronomical price tags. This Arduino-based PDA hearkens back to that era, albeit with a much more accessible parts list.

The build is based around an Arudino Nano with an OLED screen and has the five necessary functions for a PDA: calculator, stopwatch, games, phonebook, and a calendar. With all of these components on such a small microcontroller, memory quickly became an issue when using the default libraries. [Danko] uses his own custom libraries in order to make the best use of memory which are all available on the project’s GitHub page. The build also includes a custom PCB to keep the entire pocket computer pocket-sized.

There are some other features packed into this tiny build as well, like the breakout game that can be played with a potentiometer. It’s an impressive build that makes as much use of the microcontroller’s capabilities as is possible, and if you enjoy projects where a microcontroller is used as if it is a PC take a look at this Arduino build with its own command-line interface.

Hack a Day 23 Jun 21:00

Robot Maps Rooms with Help From iPhone

The Unity engine has been around since Apple started using Intel chips, and has made quite a splash in the gaming world. Unity allows developers to create 2D and 3D games, but there are some other interesting applications of this gaming engine as well. For example, [matthewhallberg] used it to build a robot that can map rooms in 3D.

The impetus for this project was a robotics company that used a series of robots around their business. The robots navigate using computer vision, but couldn’t map the rooms from scratch. They hired [matthewhallberg] to tackle this problem, and this robot is a preliminary result. Using the Unity engine and an iPhone, the robot can perform in one of three modes. The first is a user-controlled mode, the second is object following, and the third is 3D mapping.

The robot seems fairly easy to construct and only carries and iPhone, a Node MCU, some motors, and a battery. Most of the computational work is done remotely, with the robot simply receiving its movement commands from another computer. There’s a lot going on here, software-wise, and a lot of toolkits and software packages to install and communicate with one another, but the video below does a good job of showing what you’ll need and how it all works together. If that’s all too much, there are other robots with a form of computer vision that can get you started into the world of computer vision and mapping.

Send HEX values to Arduino

FIVE MINUTE TUTORIAL

Project Description: Sending Hex values to an Arduino UNO


This simple tutorial will show you how to send Hexadecimal values from a computer to an Arduino Uno. The "Processing" programming language will be used to send the HEX values from the computer when a mouse button is pressed. The Arduino will use these values to adjust the brightness of an LED.


Learning Objectives


  • To Send Hexadecimal (Hex) values from a computer to the Arduino
  • Trigger an action based on the press of a mouse button
  • Learn to create a simple Computer to Arduino interface
  • Use Arduino's PWM capabilities to adjust brightness of an LED
  • Learn to use Arduino's analogWrite() function
  • Create a simple LED circuit


Parts Required:


Fritzing Sketch


The diagram below will show you how to connect an LED to Digital Pin 10 on the Arduino.
Don't forget the 330 ohm resistor !


Arduino Sketch


The latest version of Arduino IDE can be downloaded here.
 
  1
2
3
4
5
6
7
8
9
10
11
12
13
14
15
16
17
18
19
20
21
22
23
24
25
26
27
28
29
30
31
/* ==================================================================================================================================================
         Project: 5 min tutorial: Send Hex from computer to Arduino
          Author: Scott C
         Created: 21th June 2015
     Arduino IDE: 1.6.4
         Website: http://arduinobasics.blogspot.com/p/arduino-basics-projects-page.html
     Description: Arduino Sketch used to adjust the brightness of an LED based on the values received
                  on the serial port. The LED needs to be connected to a PWM pin. In this sketch
                  Pin 10 is used, however you could use Pin 3, 5, 6, 9, or 11 - if you are using an Arduino Uno.
===================================================================================================================================================== */

byte byteRead; //Variable used to store the byte received on the Serial Port
int ledPin = 10; //LED is connected to Arduino Pin 10. This pin must be PWM capable.

void setup() {
 Serial.begin(9600); //Initialise Serial communication with the computer
 pinMode(ledPin, OUTPUT); //Set Pin 10 as an Output pin
 byteRead = 0;                   //Initialise the byteRead variable to zero.
}

void loop() {
  if(Serial.available()) {
    byteRead = Serial.read(); //Update the byteRead variable with the Hex value received on the Serial COM port.
  }
  
  analogWrite(ledPin, byteRead); //Use PWM to adjust the brightness of the LED. Brightness is determined by the "byteRead" variable.
}


Processing Sketch


The latest version of the Processing IDE can be downloaded here.
 
  1
2
3
4
5
6
7
8
9
10
11
12
13
14
15
16
17
18
19
20
21
22
23
24
25
26
27
28
29
30
31
32
33
34
35
36
37
38
39
40
41
42
43
/* ==================================================================================================================================================
         Project: 5 min tutorial: Send Hex from computer to Arduino
          Author: Scott C
         Created: 21th June 2015
  Processing IDE: 2.2.1
         Website: http://arduinobasics.blogspot.com/p/arduino-basics-projects-page.html
     Description: Processing Sketch used to send HEX values from computer to Arduino when the mouse is pressed.
                  The alternating values 0xFF and 0x00 are sent to the Arduino Uno to turn an LED on and off.
                  You can send any HEX value from 0x00 to 0xFF. This sketch also shows how to convert Hex strings
                  to Hex numbers.
===================================================================================================================================================== */

import processing.serial.*; //This import statement is required for Serial communication

Serial comPort;                       //comPort is used to write Hex values to the Arduino
boolean toggle = false; //toggle variable is used to control which hex variable to send
String zeroHex = "00"; //This "00" string will be converted to 0x00 and sent to Arduino to turn LED off.
String FFHex = "FF"; //This "FF" string will be converted to 0xFF and sent to Arduino to turn LED on.

void setup(){
    comPort = new Serial(this, Serial.list()[0], 9600); //initialise the COM port for serial communication at a baud rate of 9600.
    delay(2000);                      //this delay allows the com port to initialise properly before initiating any communication.
    background(0); //Start with a black background.
    
}


void draw(){ //the draw() function is necessary for the sketch to compile
    //do nothing here //even though it does nothing.
}


void mousePressed(){ //This function is called when the mouse is pressed within the Processing window.
  toggle = ! toggle;                   //The toggle variable will change back and forth between "true" and "false"
  if(toggle){ //If the toggle variable is TRUE, then send 0xFF to the Arduino
     comPort.write(unhex(FFHex)); //The unhex() function converts the "FF" string to 0xFF
     background(0,0,255); //Change the background colour to blue as a visual indication of a button press.
  } else {
    comPort.write(unhex(zeroHex)); //If the toggle variable is FALSE, then send 0x00 to the Arduino
    background(0); //Change the background colour to black as a visual indication of a button press.
  }
}


The Video


The tutorial above is a quick demonstration of how to convert Hex strings on your computer and send them to an Arduino. The Arduino can use the values to change the brightness of an LED as shown in this tutorial, however you could use it to modify the speed of a motor, or to pass on commands to another module. Hopefully this short tutorial will help you with your project. Please let me know how it helped you in the comments below.


If you like this page, please do me a favour and show your appreciation :

 
Visit my ArduinoBasics Google + page.
Follow me on Twitter by looking for ScottC @ArduinoBasics.
I can also be found on Pinterest and Instagram.
Have a look at my videos on my YouTube channel.


However, if you do not have a google profile...
Feel free to share this page with your friends in any way you see fit.

The Arduino Experience at Computer History Museum

Thursday May 28th at noon The Computer History Museum is hosting an open lecture by Massimo Banzi, co-founder of the Arduino project. He will cover the historical origins of Arduino, including discussion of the process of designing tools which make digital technology accessible to people who are not experts, and the essential role of the larger Arduino ecosystem that supports this remarkable computer platform.

The Computer History Museum, located in Mountain View (California), is a nonprofit organization  exploring the history of computing and its ongoing impact on society in the last 40 years. The Museum is dedicated to the preservation and celebration of computer history, it hosts the largest international collection of computing artifacts in the world and many virtual exhibition you can explore directly online.

If you like vintage images and history of computing, check the “visible storage” collection below.


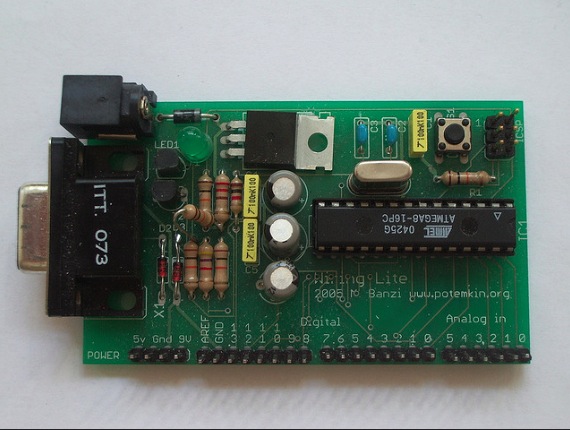
The main image of this post is a picture by Massimo Banzi showing the first useable Arduino prototype. Still called “Wiring Lite”, used as a low cost module for wiring users. David Cuartielles joined at this point (the flying resistor is his first contribution to the design) from this point on the project becomes Arduino. 


The KIM-1 Computer Minified

The KIM-1 wasn’t the firs microcomputer available to computer hobbyists and other electron aficionados, but it was the first one that was cheap. It was also exceedingly simple, with just a 6502 CPU, a little more than 1k of RAM, 2k of ROM, a hexadecimal keypad and a few seven-segment displays. Still, a lot of software was written for this machine, and one of these boards can be found in every computer history museum.

[Oscar] thought the KIM-1 was far too cool to be relegated to the history books so he made his own. It’s not a direct copy – this one uses an Arduino for the brains, only breaking out some buttons, a pair of four-digit seven-segment displays, and the I2C and SPI pins on the ‘duino. The KIM-1 is emulated by the Arduino, allowing for the same interface as an original connected up to an old teletype, and [Oscar] got his hands on the original code for Microchess and the first 6502 disassembler from [Woz] and [Baum].

[Oscar] put the schematics for his version of the KIM-1 up, and has the PCBs up on SeeedStudio. If you’re looking for an awesome replica of a vintage computer and a nice weekend project, here ‘ya go.


Filed under: classic hacks

Homebrew 8-bit computer packs in 16 cores, multitasks like a champ

It looks like Jack Eisenmann has done it again. A couple of years after the hobbyist hacker built his first 8-bit computer, he's cobbled together yet another one, but this time with a whopping 16 cores. Appropriately dubbed the DUO Mega, the multicore wonder is made with 16 ATMega328p microcontrollers, each connected to an 8-bit data bus and designed to interpret a custom bytecode that runs the software. Compiled inside a nondescript plastic bin, the machine is also comprised of 16MHz crystal oscillators attached to each of the aforementioned cores, three Arduino UNO boards, 32kb of SRAM, 512kb of flash memory, eight breadboards, an Ethernet shield, a VGA out port and a multitude of components that combine to look like that mess of wires seen above. Because of all that processing power, this relatively primitive machine multitasks beautifully and can perform complicated calculations at an impressive clip. To get a demo of what this marvelous feat of DIY computing can do, have a peek at Eisenmann's video, complete with an 8-bit soundtrack, after the break.

Filed under: Desktops

Comments

Via: Hackaday

Source: DUO Mega

Basics of ARDUINO BOARD...

The video explains some basics of ARDUINO BOARD and its related components...

Interfacing yor robot to your PC using Gobetwenio (can work with any MCU)

I am currently working on a project where I need to teach my robot to "see" using an ultrasound sensor. In particular it must find and collect drink cans on a playfield and return them to a specific location.

To make the programming easier I wanted to take the sensor output from the robot and display it on the computer as a chart. As I am a terrible programmer I did a quick google search and came up with Gobetwenio.

read more