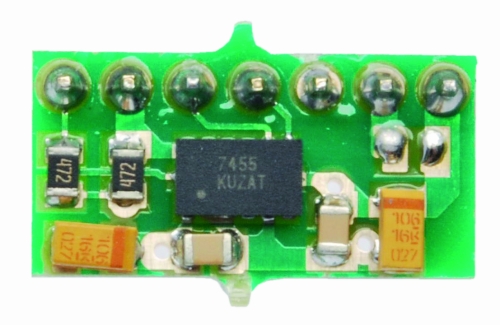
This module integrates the sensor MMA7455L (produced by Freescale), able to detect the movement on three axes, and then in every direction. The chip offers the possibility to select three different sensitivity (± 2g, ± 4g, ± 8g) and makes available, on an SPI bus and the I ² C-Bus, the data detected by allowing a more easily read by a microcontroller. There are also two programmable interrupt lines to communicate a certain event, or to perform one or more actions when it detects a certain acceleration or when the module is stopped.

The accelerometer connections are carried out on a male strip pitch 2.54 mm, seven contacts, which allows the insertion in any dip socket, female strip or directly on the printed circuit. The module, powered with a DC voltage of 2.5 to 3.6 V, is suitable for be used in all systems that require the detection of movement, acceleration, such as an alarm systems for vehicle, laboratory analytical instruments, electrical equipment, machinery test and robots.
The module has extremely compact dimensions (10x18x3, 6mm).

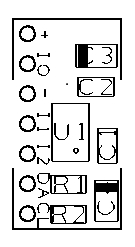
Before using this module is necessary to establish (through jumper J1) which must be the voltage applied to pin VIO (Digital Power for I/O pads), levels of the I / O interface must be the same of micro. If the voltage applied between the pin + and – of the module is the same as the interface device is necessary to close J1, while if it is different (for example because the micro operates at 5V) the jumper must be open and the line VIO must be connects to the same supply voltage of the microcontroller. The I ² C-Bus module is assigned to 00111011. For more information on the chip MMA7455L consult the datasheet from the Internet site www.freescale.com.
To show the operation of the module I made a little demo with Arduino.
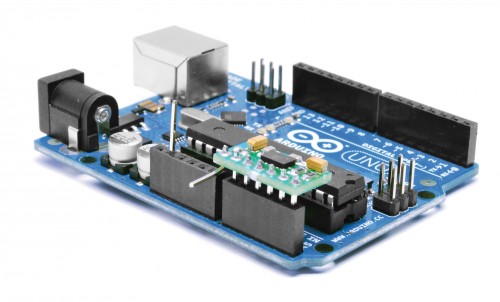
The connection to the microcontroller is very simple and the pin-out allows you to insert the module in the 6-pin for the analog inputs.
The low absorption permit to use the input pin A0 as level of communicationis (VIO) brought it to a high logic level (5V), while the pin A1 is set to 0, the mass for the MMA7455L.
The main supply voltage is provide from 3.3 V by Arduino.
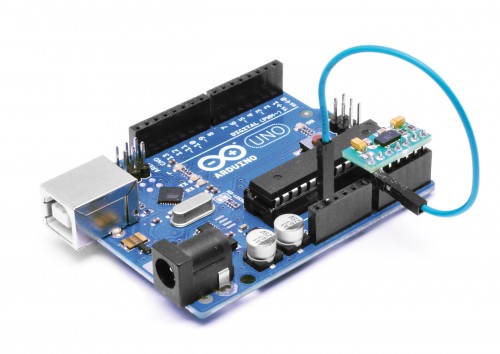
Thanks to the library Wire.h pin A4 and A5 are used to communicate directly with the module.
The communication is very simple thank the library MMA_7455.h developed by Moritz Kemper.
// Example which uses the MMA_7455 library
// Moritz Kemper, IAD Physical Computing Lab
// moritz.kemper@zhdk.ch
// ZHdK, 20/11/2011

//Modified by Boris Landoni
//www.open-electronics.org

#include <Wire.h> //Include the Wire library
#include <MMA_7455.h> //Include the MMA_7455 library

const int vcc =  A0;
const int gnd =  A1;

MMA_7455 mySensor = MMA_7455(); //Make an instance of MMA_7455

char xVal, yVal, zVal; //Variables for the values from the sensor
float x, y, z;

void setup()
{
  pinMode(gnd, OUTPUT);
  pinMode(vcc, OUTPUT);
  digitalWrite(gnd, LOW);
  digitalWrite(vcc, HIGH);
  delay (1000);

  Serial.begin(9600);
  Serial.println("start");

  // Set the sensitivity you want to use
  // 2 = 2g, 4 = 4g, 8 = 8g
  mySensor.initSensitivity(8);
  // Calibrate the Offset, that values corespond in
  // flat position to: xVal = -30, yVal = -20, zVal = +20
  // !!!Activate this after having the first values read out!!!
  mySensor.calibrateOffset(0, 0, 0);

}

void loop()
{
  long start = micros();
  //xVal = mySensor.readAxis('x'); //Read out the 'x' Axis
  //yVal = mySensor.readAxis('y'); //Read out the 'y' Axis
  //zVal = mySensor.readAxis('z'); //Read out the 'z' Axis
 /* Serial.print("x: ");
  Serial.print(xVal*0.016, 2);
  Serial.print("\t y: ");
  Serial.print(yVal*0.016, 2);
  Serial.print("\t z: ");
  Serial.println(zVal*0.016, 2);

  Serial.print("x: ");
  Serial.print(xVal,DEC);
  Serial.print("\t y: ");
  Serial.print(yVal,DEC);
  Serial.print("\t z: ");
  Serial.print(zVal,DEC);
  Serial.print("\t summ: ");
  Serial.println((abs(xVal)+abs(yVal)+abs(zVal)),DEC);*/
    if (Serial.available() > 0) {
    int inByte = Serial.read();
      if (inByte==0x01){
        Serial.print( average(5,'x')); //Serial.print( "\t" );
        Serial.print( average(5,'y')); //Serial.print( "\t" );
        Serial.print( average(5,'z')); //Serial.print( "\t" );
      }
    //Serial.print( micros() - start ); Serial.println();
  }
}

char average(int num, char axis){
  long tot=0;
  char val;
  for (int i=1; i<=num; i++){
    val=mySensor.readAxis(axis);
    tot += val;
   //Serial.print( val,DEC );Serial.print( " " );
   delay(2);
  }
  val=tot/num;
  //Serial.println( val );
  return(val);

}
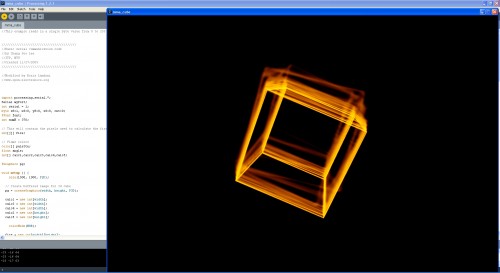
The software written in Processing By IAN allows you to immediately verify the correct operation of Freescale chip. A cube will rotate like the movements of the sensor.
The applications of this sensor are different and I will show you just developed.
//This example reads in a single byte value from 0 to 255 and graphs it.

/////////////////////////////////////////
//Basic serial communication code
//by Chang Soo Lee
//ITP, NYU
//Created 11/27/2005
/////////////////////////////////////////

//Modified by Boris Landoni
//www.open-electronics.org

import processing.serial.*;
Serial myPort;
int serial = 1;
byte s8=1, x8=0, y8=0, z8=0, cnt=0;
PFont font;
int numH = 370;

// This will contain the pixels used to calculate the fire effect
int[][] fire;

// Flame colors
color[] palette;
float angle;
int[] calc1,calc2,calc3,calc4,calc5;

PGraphics pg;

void setup () {
    size(1500, 1000, P2D);

  // Create buffered image for 3d cube
  pg = createGraphics(width, height, P3D);

  calc1 = new int[width];
  calc3 = new int[width];
  calc4 = new int[width];
  calc2 = new int[height];
  calc5 = new int[height];

    colorMode(HSB);

  fire = new int[width][height];
  palette = new color[255];

  // Generate the palette
  for(int x = 0; x < palette.length; x++) {
    //Hue goes from 0 to 85: red to yellow
    //Saturation is always the maximum: 255
    //Lightness is 0..255 for x=0..128, and 255 for x=128..255
    palette[x] = color(x/3, 255, constrain(x*3, 0, 255));

  }

  // Precalculate which pixel values to add during animation loop
  // this speeds up the effect by 10fps
  for (int x = 0; x < width; x++) {
    calc1[x] = x % width;
    calc3[x] = (x - 1 + width) % width;
    calc4[x] = (x + 1) % width;
  }

  for(int y = 0; y < height; y++) {
    calc2[y] = (y + 1) % height;
    calc5[y] = (y + 2) % height;
  }

  //size(270, 440);
  println(Serial.list());
  myPort = new Serial(this, Serial.list()[15], 9600);
  // Load the font. Fonts must be placed within the data
  // directory of your sketch. Use Tools > Create Font
  // to create a distributable bitmap font.
  // For vector fonts, use the createFont() function.
  hint(ENABLE_NATIVE_FONTS);
  //font = loadFont("ArialMT-48.vlw");
  smooth();
    myPort.write(0x01);

}

void draw () {
  if (myPort.available() > 0) {
    serial = (myPort.read());
    s8=0;
    s8+=serial;
    switch(cnt) {
      case 0:
        x8=s8;
         break;
      case 1:
        y8=s8;
         break;
      case 2:
        z8=s8;
         break;
      default:
        cnt=0;
        break;
    }
    if(cnt<2){
      cnt++;
      return;
    }
    cnt=0;
    serialEvent();
  }
  //serial=50;
        //rect(120,numH-serial, 20, serial);
  angle = angle + 0.05;

  // Rotating wireframe cube
  pg.beginDraw();
  pg.translate(width >> 1, height >> 1);
  pg.rotateZ(radians((-x8)));
  pg.rotateX(radians(y8));
  pg.background(0);
  pg.stroke(128);
  pg.scale(80);
  pg.noFill();
  pg.box(4);
  pg.endDraw();

  loadPixels();

  int counter = 0;
    // Do the fire calculations for every pixel, from top to bottom
  for (int y = 0; y < height; y++) {
    for(int x = 0; x < width; x++) {
      // Add pixel values around current pixel

      fire[x][y] =
          ((fire[calc3[x]][calc2[y]]
          + fire[calc1[x]][calc2[y]]
          + fire[calc4[x]][calc2[y]]
          + fire[calc1[x]][calc5[y]]) << 5) / 129;

      // Output everything to screen using our palette colors
      pixels[counter] = palette[fire[x][y]];

      // Extract the red value using right shift and bit mask
      // equivalent of red(pg.pixels[x+y*w])
      if ((pg.pixels[counter++] >> 16 & 0xFF) == 128) {
        // Only map 3D cube 'lit' pixels onto fire array needed for next frame
        fire[x][y] = 128;
      }
    }
  }
  //updatePixels();

}

void serialEvent(){

   background(255);
  line(70,70,70,370);
  line(70,270,200,270);
  line(70,370,200,370);
  fill(0);
  //textFont(font, 11);
  text("Sensor\nValue",22,80);
  text("Analog Input", 95, 390);

  noFill();

  println(x8+" "+y8+" "+z8);

  rect(100,270, 20, x8);
  rect(140,270, 20, y8);
  rect(180,270, 20, z8);
    text(s8,25,110);
        myPort.write(0x01);

}