2024 Business Card Challenge: Tiny MIDI Keyboard
The progress for electronics over the past seven decades or so has always trended towards smaller or more dense components. Moore’s Law is the famous example of this, but even when we’re not talking about transistors specifically, technology tends to get either more power efficient or smaller. This MIDI keyboard, for example, is small enough that it will fit in the space of a standard business card which would have been an impossibility with the technology available when MIDI first became standardized, and as such is the latest entry in our Business Card Challenge.
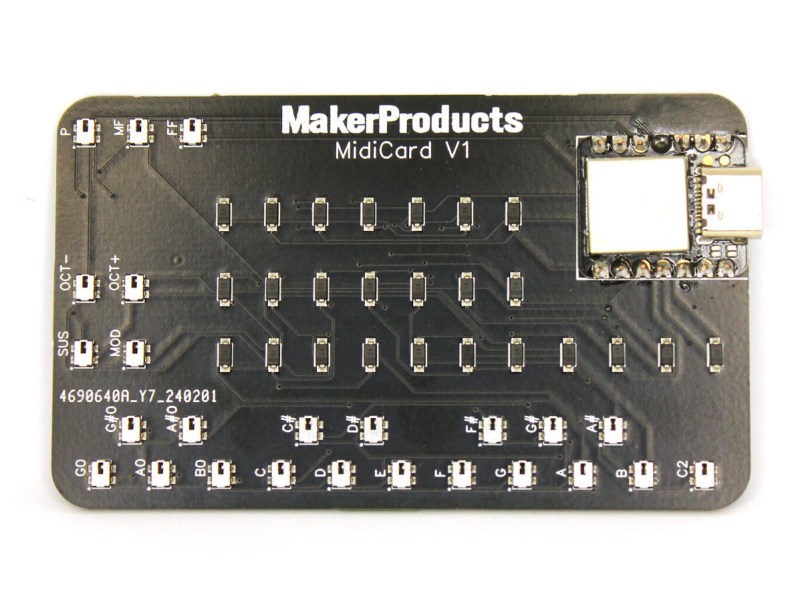
[Alana] originally built this tiny musical instrument to always have a keyboard available on the go, and the amount of features packed into this tiny board definitely fits that design goal. It has 18 keys with additional buttons to change the octave and volume, and has additional support for sustain and modulation as well. The buttons and diodes are multiplexed in order to fit the IO for the microcontroller, a Seeed Studio Xiao SAMD21, and it also meets the USB-C standards so it will work with essentially any modern computer available including most smartphones and tablets so [Alana] can easily interface it with Finale, a popular music notation software.
Additionally, the project’s GitHub page has much more detail including all of the Arduino code needed to build a MIDI controller like this one. This particular project has perhaps the best size-to-usefulness ratio we’ve seen for compact MIDI controllers thanks to the USB-C and extremely small components used on the PCB, although the Starshine controller or these high-resolution controllers are also worth investigating if you’re in the market for compact MIDI devices like this one.