Posts with «model» label

AI System Drops a Dime on Noisy Neighbors

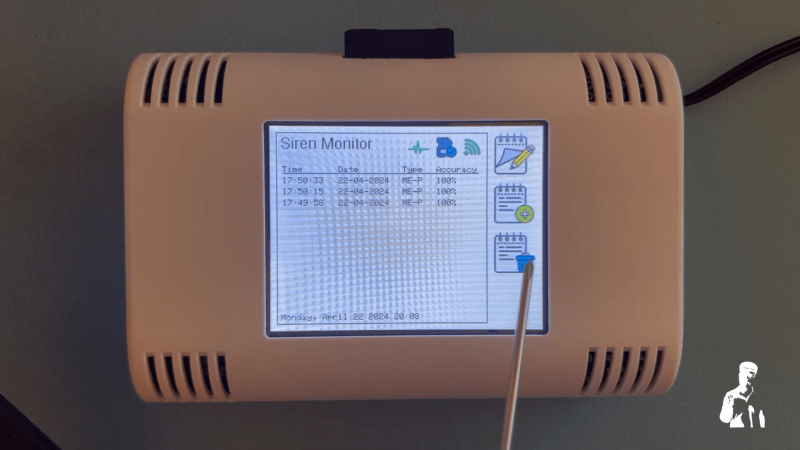
“There goes the neighborhood” isn’t a phrase to be thrown about lightly, but when they build a police station next door to your house, you know things are about to get noisy. Just how bad it’ll be is perhaps a bit subjective, with pleas for relief likely to fall on deaf ears unless you’ve got firm documentation like that provided by this automated noise detection system.

OK, let’s face it — even with objective proof there’s likely nothing that [Christopher Cooper] is going to do about the new crop of sirens going off in his neighborhood. Emergencies require a speedy response, after all, and sirens are perhaps just the price that we pay to live close to each other. That doesn’t mean there’s no reason to monitor the neighborhood noise, though, so [Christopher] got to work. The system uses an Arduino BLE Sense module to detect neighborhood noises and Edge Impulse to classify the sounds. An ESP32 does most of the heavy lifting, including running the UI on a nice little TFT touchscreen.

When a siren-like sound is detected, the sensor records the event and tries to classify the type of siren — fire, police, or ambulance. You can also manually classify sounds the system fails to understand, and export a summary of events to an SD card. If your neighborhood noise problems tend more to barking dogs or early-morning leaf blowers, no problem — you can easily train different models.

While we can’t say that this will help keep the peace in his neighborhood, we really like the way this one came out. We’ve seen the BLE Sense and Edge Impulse team up before, too, for everything from tuning a bike suspension to calming a nervous dog.

Machine Learning with Microcontrollers Hack Chat

Join us on Wednesday, September 11 at noon Pacific for the Machine Learning with Microcontrollers Hack Chat with Limor “Ladyada” Fried and Phillip Torrone from Adafruit!

We’ve gotten to the point where a $35 Raspberry Pi can be a reasonable alternative to a traditional desktop or laptop, and microcontrollers in the Arduino ecosystem are getting powerful enough to handle some remarkably demanding computational jobs. But there’s still one area where microcontrollers seem to be lagging a bit: machine learning. Sure, there are purpose-built edge-computing SBCs, but wouldn’t it be great to be able to run AI models on versatile and ubiquitous MCUs that you can pick up for a couple of bucks?

We’re moving in that direction, and our friends at Adafruit Industries want to stop by the Hack Chat and tell us all about what they’re working on. In addition to Ladyada and PT, we’ll be joined by Meghna NatrajDaniel Situnayake, and Pete Warden, all from the Google TensorFlow team. If you’ve got any interest in edge computing on small form-factor computers, you won’t want to miss this chat. Join us, ask your questions about TensorFlow Lite and TensorFlow Lite for Microcontrollers, and see what’s possible in machine learning way out on the edge.

Our Hack Chats are live community events in the Hackaday.io Hack Chat group messaging. This week we’ll be sitting down on Wednesday, September 11 at 12:00 PM Pacific time. If time zones have got you down, we have a handy time zone converter.

Click that speech bubble to the right, and you’ll be taken directly to the Hack Chat group on Hackaday.io. You don’t have to wait until Wednesday; join whenever you want and you can see what the community is talking about.

Simulate Climate With An Arduino

There are usually two ways to go about any task: the easy way and the hard way. Sometimes we might not know there are two options, but once we see someone else’s solution we might feel differently. When running a greenhouse or small farm, for example, we might decide to set up dozens of sensors to measure temperature, humidity, soil moisture, dew point, sunlight, or any number of other variables. That’s the hard way. The easy way is to use the Arduino-powered Norman climate simulator from [934Virginia].

Rather than relying on an array of sensors, any of which could fail or provide erroneous data for any number of reasons, Norman relies on a simple input of data about the current location – target coordinates, specified date ranges, and minimum/maximum values for temperature and humidity – in order to learn and predict the weather conditions in that location. It makes extensive use of the Dusk2Dawn library, and models other atmospheric conditions using mathematical modeling methods in order to make relatively accurate estimates of the climate it is installed in. There are some simulations on the project’s Plotly page which show its successes as well.

Presumably anyone using this device could run a greenhouse relatively well on only $10 worth of electronics rather than relying on a suite of sensors and input data, which is helpful for anyone strapped for cash (especially in developing areas of the world). The project is named after Norman Borlaug, a famous soil scientist and someone worth reading about. The first (and possibly only) sensor we might want to add to this project is a soil moisture sensor, since yearly estimates won’t tell us whether it has just rained or not.

Images courtesy of Wikimedia Commons.

Hack a Day 03 Aug 06:00

Old Kit Review – Talking Electronics Fluorescent Simulator

Introduction

Slowly we’re working through the stock of old kits, and in this article we have the “Fluorescent Lamp” simulator from Talking Electronics. To save repeating myself you can read more about Talking Electronics here and watch interviews of the founder Colin Mitchell here.

So why would you want to simulate a fluoro’ tube anyway? Model railways! When your model world moves from day to night, it’s neat to have street lights and so on “flicker” on just like the real thing. And thus you can create this effect as well. It can drive incandescent lamps up to 12V, and allowing it to be powered easily from most layouts.

The kit was originally described in the Talking Electronics book “Electronics for Model Railways” (volume 1) which was full of useful and interesting electronics to liven up any layout. The book may now out of print however at the time of writing this you can download or view most of the projects from the index column of the Talking Electronics website… or contact Talking Electronics if they have any copies of the book (or kit) to sell.

Assembly

Time was not kind to the kit, to be frank it was surprising to find one at all:

(Just a note for any over-enthusiastic readers, Talking Electronics is no longer at the address on the bag shown above). However it was complete and ready for assembly. The PCB has a silk-screen with the required component placement information, polarities and so on – a first for the time:

The instructions and “how it works” are not included with the kit as you were meant to have the book, however TE have made them available as a separate download (.pdf) The kit included everything required to get started, and there’s an LED which replicates the effect so you can test the board without having to watch the connected bulb (which may be a distance away). Finally an IC socket is included

The actual assembly process was very straight forward, which simply required starting with the low-profile components and working up to the large ones:

The only problem with the PCB was the holes – looks like only one drill size had been used (apart from the mounting holes) which made getting that rectifier diode in a little tricky. Otherwise it was smooth sailing.

Not having a model railway at the moment left me with the simple example of the onboard LED and a small incandescent globe to try with the circuit. You can see the kit working in this video.

John – Why do you publish these “Old Kit Reviews”?

They’re more of  a selfish article, like many electronics enthusiasts I have enjoyed kits for decades – and finding kits from days gone by is a treat. From various feedback some of you are enjoying them, so they will continue for fun and some nostalgia. If you’re not interested, just ignore the posts starting with “Old”!

Conclusion

For a kit from the mid-1980s, this would have solved the problem neatly for model railway enthusiasts. By using two or more of the kits with different capacitor values, many model lights could blink on with seemingly random patterns. However it’s 2014 so you could use a PIC10F200 or ATtiny45 and reduce the board space and increase the blinking potential.

Nevertheless, it was an interesting example of what’s possible with a digital logic IC. Full-sized images and a lot more information about the kit are available on flickr. And if you enjoyed this article, or want to introduce someone else to the interesting world of Arduino – check out my book (now in a third printing!) “Arduino Workshop”.

Have fun and keep checking into tronixstuff.com. Why not follow things on twitterGoogle+, subscribe  for email updates or RSS using the links on the right-hand column, or join our forum – dedicated to the projects and related items on this website. Sign up – it’s free, helpful to each other –  and we can all learn something.

The post Old Kit Review – Talking Electronics Fluorescent Simulator appeared first on tronixstuff.