Posts with «talking electronics» label

Old Kit Review – Talking Electronics Fluorescent Simulator

Introduction

Slowly we’re working through the stock of old kits, and in this article we have the “Fluorescent Lamp” simulator from Talking Electronics. To save repeating myself you can read more about Talking Electronics here and watch interviews of the founder Colin Mitchell here.

So why would you want to simulate a fluoro’ tube anyway? Model railways! When your model world moves from day to night, it’s neat to have street lights and so on “flicker” on just like the real thing. And thus you can create this effect as well. It can drive incandescent lamps up to 12V, and allowing it to be powered easily from most layouts.

The kit was originally described in the Talking Electronics book “Electronics for Model Railways” (volume 1) which was full of useful and interesting electronics to liven up any layout. The book may now out of print however at the time of writing this you can download or view most of the projects from the index column of the Talking Electronics website… or contact Talking Electronics if they have any copies of the book (or kit) to sell.

Assembly

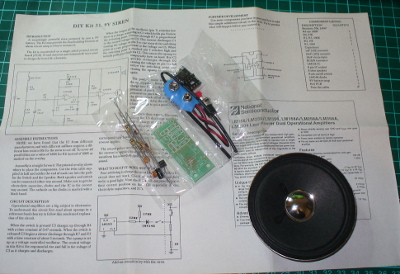
Time was not kind to the kit, to be frank it was surprising to find one at all:

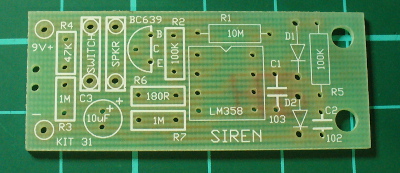
(Just a note for any over-enthusiastic readers, Talking Electronics is no longer at the address on the bag shown above). However it was complete and ready for assembly. The PCB has a silk-screen with the required component placement information, polarities and so on – a first for the time:

The instructions and “how it works” are not included with the kit as you were meant to have the book, however TE have made them available as a separate download (.pdf) The kit included everything required to get started, and there’s an LED which replicates the effect so you can test the board without having to watch the connected bulb (which may be a distance away). Finally an IC socket is included

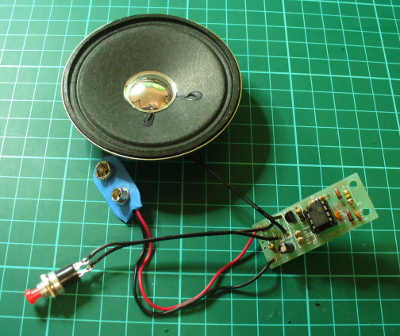
The actual assembly process was very straight forward, which simply required starting with the low-profile components and working up to the large ones:

The only problem with the PCB was the holes – looks like only one drill size had been used (apart from the mounting holes) which made getting that rectifier diode in a little tricky. Otherwise it was smooth sailing.

Not having a model railway at the moment left me with the simple example of the onboard LED and a small incandescent globe to try with the circuit. You can see the kit working in this video.

John – Why do you publish these “Old Kit Reviews”?

They’re more of  a selfish article, like many electronics enthusiasts I have enjoyed kits for decades – and finding kits from days gone by is a treat. From various feedback some of you are enjoying them, so they will continue for fun and some nostalgia. If you’re not interested, just ignore the posts starting with “Old”!

Conclusion

For a kit from the mid-1980s, this would have solved the problem neatly for model railway enthusiasts. By using two or more of the kits with different capacitor values, many model lights could blink on with seemingly random patterns. However it’s 2014 so you could use a PIC10F200 or ATtiny45 and reduce the board space and increase the blinking potential.

Nevertheless, it was an interesting example of what’s possible with a digital logic IC. Full-sized images and a lot more information about the kit are available on flickr. And if you enjoyed this article, or want to introduce someone else to the interesting world of Arduino – check out my book (now in a third printing!) “Arduino Workshop”.

Have fun and keep checking into tronixstuff.com. Why not follow things on twitterGoogle+, subscribe  for email updates or RSS using the links on the right-hand column, or join our forum – dedicated to the projects and related items on this website. Sign up – it’s free, helpful to each other –  and we can all learn something.

The post Old Kit Review – Talking Electronics Fluorescent Simulator appeared first on tronixstuff.

Australian Electronics Nostalgia – Talking Electronics Kits

Introduction

From 1981, Australian electrical engineer Colin Mitchell started publishing his home-grown electronics magazine “Talking Electronics”. His goal was to get people interested and learning about electronics, and more so with a focus on digital electronics. It was (and still is) a lofty goal – in which he succeeded. From a couple of rooms in his home the magazine flourished, and many projects described within were sold as kits. At one stage there were over 150 Talking Electronics kits on the market. You could find the books and kits in retail outlets such as Dick Smith Electronics, and for a short while there was a TE store in Moorabbin (Victoria). Colin and the team’s style of writing was easy to read and very understandable – but don’t take my word for it, you can download the magazines from his website (they’re near the bottom of the left column). Dave Jones recently interviewed Colin, and you can watch those for much more background information.

Over fifteen issues you could learn about blinking LEDs all the way to making your own expandable Z80 board computer, and some of the kits may still be available. Colin also published a series of tutorial books on electronics, and also single-magazine projects. And thus the subjects of our review … we came across the first of these single-issue projects from 1981 – the Mini Frequency Counter (then afterwards we have another kit):

How great is that? The PCB comes with the magazine. This is what set TE apart from the rest, and helped people learn by actually making it easy to build what was described in the magazine instead of just reading about it. For 1981 the PCB was quite good – they were silk-screened which was quite rare at the time:

And if you weren’t quite ready, the magazine also included details of a square-wave oscillator to make and a 52-page short course in digital electronics. However back to the kit…

Assembly

The kit uses common parts and I hoard CMOS ICs so building wasn’t a problem. This (original) version of the kit used LEDs instead of 7-segment displays (which were expensive at the time) so there was plenty of  careful soldering to do:

And after a while the counter started to come together. I used IC sockets just in case:

The rest was straight-forward, and before long 9 V was supplied, and we found success:

To be honest progress floundered for about an hour at this point – the display wouldn’t budge off zero. After checking the multi-vibrator output, calibrating the RC circuits and finally tracing out the circuit with a continuity tester, it turned out one of the links just wasn’t soldered in far enough – and the IC socket for the 4047 was broken So a new link and directly fitting the 4047 fixed it. You live and learn.

Operation

So – we now have a frequency counter that’s good for 100 Hz to the megahertz range, with a minimum of parts. Younger, non-microcontroller people may wonder how that is possible – so here’s the schematic:

The counter works by using a multi-vibrator using a CD4047 to generate a square-wave at 50, 500 and 5 kHz, and the three trimpots are adjusted to calibrate the output. The incoming pulses to measure are fed to the 4026 decade counter/divider ICs. Three of these operate in tandem and each divide the incoming count by ten – and display or reset by the alternating signal from the 4047. However for larger frequencies (above 900 Hz) you need to change the frequency fed to the display circuit in order to display the higher (left-most) digits of the result. A jumper wire is used to select the required level (however if you mounted the kit in a case, a knob or switch could be used).

For example, if you’re measuring 3.456 MHz you start with the jumper on H and the display reads 345 – then you switch to M to read 456 – then you switch to the L jumper and read 560, giving you 3456000 Hz. If desired, you can extend the kit with another PCB to create a 5-digit display. The counter won’t be winning any precision contests – however it has two purposes, which are fulfilled very well. It gives the reader an inexpensive piece of test equipment that works reasonably well, and a fully-documented project so the reader can understand how it works (and more).

And for the curious –  here it is in action:

[Update 20/07/2013] Siren Kit

Found another kit last week, the Talking Electronics “DIY Kit #31 – 9V siren”. It’s an effective and loud siren with true rise and fall, unlike other kits of the era that alternated between two fixed tones. The packaging was quite strong and idea for mail-order at the time:

The label sells the product (and shows the age):

The kit included every part required to work, apart from a PP3 battery, and a single instruction sheet with a good explanation of how the circuit works, and some data about the LM358:

… and as usual the PCB was ahead of its’ time with full silk-screen and solder mask:

Assembly was quite straight-forward. The design is quite compact, so a lot of vertical resistor mounting was necessary due to the lack of space. However it was refreshing to not have any links to fit. After around twenty minutes of relaxed construction, it was ready to test:

It’s a 1/2 watt speaker, however much louder than originally anticipated:

Once again, another complete and well-produced kit.

Conclusion

That was a lot of fun, and I’m off to make the matching square-wave oscillator for the frequency counter. Kudos to Colin for all those years of publication and helping people learn. Lots of companies bang on about offering tutorials and information on the Internet for free, but Colin has been doing it for over ten years. Check out his Talking Electronics website for a huge variety of knowledge, an excellent electronics course you can get on CD – and go easy on him if you have any questions.

Full-sized images available on flickr. This kit was purchased without notifying the supplier.

And if you made it this far – check out my new book “Arduino Workshop” from No Starch Press.

In the meanwhile have fun and keep checking into tronixstuff.com. Why not follow things on twitterGoogle+, subscribe  for email updates or RSS using the links on the right-hand column? And join our friendly Google Group – dedicated to the projects and related items on this website. Sign up – it’s free, helpful to each other –  and we can all learn something.

The post Australian Electronics Nostalgia – Talking Electronics Kits appeared first on tronixstuff.