Posts with «sd card» label

Upgraded Toy Guitar Plays Music
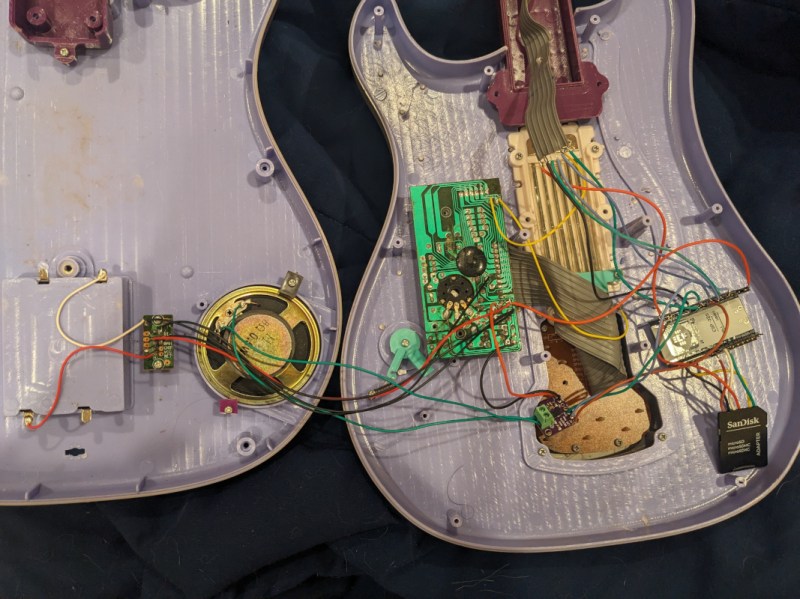
Getting the finishing details on a Halloween costume completed is the key to impressing friends and strangers alike on the trick-or-treat rounds. Especially when it comes to things like props, these details can push a good Halloween costume to great with the right touches. [Jonathan]’s friend’s daughter will be well ahead of the game thanks to these additions to a toy guitar which is part of her costume this year.

The toy guitar as it was when it arrived had the capability to play a few lackluster sound effects. The goal here was to get it to play a much more impressive set of songs instead, and to make a couple upgrades along the way as well. To that end, [Jonathan] started by dismantling the toy and investigating the PCBs for potential reuse. He decided to keep the buttons in the neck of the guitar despite their non-standard wiring configuration, but toss out the main board in favor of an ESP32. The ESP32 is tasked with reading the buttons, playing a corresponding song loaded on an SD card, and handling the digital to analog conversion when sending it out to be played on the speaker.

The project doesn’t stop there, though. [Jonathan] also did some custom mixing for the songs to account for the lack of stereo sound and a working volume knob, plus he used the ESP32’s wireless capabilities to set the guitar up as a local file server so that songs can be sent to and from the device without any wires. He also released the source code on the project’s GitHub page for anyone looking to use any parts of this project. Don’t forget there’s a Halloween contest going on right now, so be sure to submit the final version of projects like these there!

Hack a Day 26 Oct 00:00

Remote Water Quality Monitoring

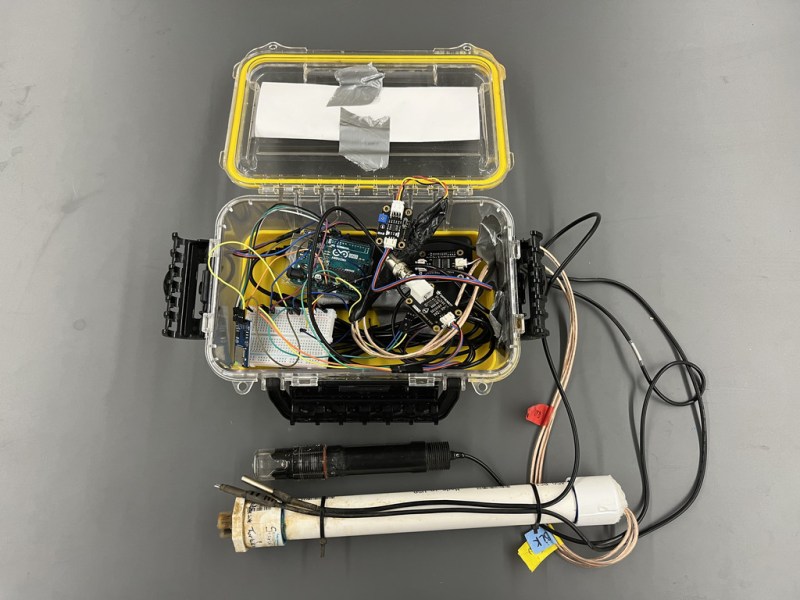
While it can be straightforward to distill water to high purity, this is rarely the best method for producing water for useful purposes. Even drinking water typically needs certain minerals in it, plants may need a certain pH, and wastewater systems have a whole host of other qualities that need to be measured. Measuring water quality is a surprisingly complex endeavor as a result and often involves a wide array of sensors, much like this water quality meter from [RowlesGroupResearch].

The water quality meters that they are putting to use are typically set up in remote locations, without power, and are targeting natural bodies of water and also wastewater treatment plants. Temperature and pH are simple enough to measure and grasp, but this device also includes sensors for total dissolved solids (TDS) and turbidity which are both methods for measuring various amounts and types of particles suspended in the water. The build is based around an Arduino so that it is easy for others to replicate, and is housed in a waterproof box with a large battery, and includes data logging to an SD card in order to make it easy to deploy in remote, outdoor settings and to gather the data at a later time.

The build log for this device also goes into detail about all of the steps needed to set this up from scratch, as well as a comprehensive bill of materials. This could be useful in plenty of professional settings such as community wastewater treatment facilities but also in situations where it’s believed that industrial activity may be impacting a natural body of water. For a water quality meter more focused on drinking water, though, we’d recommend this build that is trained on its own neural network.

Open Source Stream Deck Does it Without Touch Screens

[Adam Welch] has built macro pads in the past out of pre-fab key matrices and handfuls of Cherry MX clones. But all the stickers and custom keycaps in the world wouldn’t make those macro pads as versatile as a stream deck — those visual shortcut panels with tiny touchscreens for each button that some streamers use to change A/V settings or switch between applications.

Let’s face it, stream decks are expensive. But 0.96″ OLED displays are not, and neither are SMD tactile buttons. Why not imitate a screen deck on the cheap by making it so the screens actuate buttons behind them? [Adam] based this baby on the clever design of [Kilian Gosewisch]’s FreeDeck, and they ended up working together to improve it with a dedicated PCB.

The brains of the operation is an Arduino Pro Micro, which addresses each screen individually via two 74HC4051 mux ICs. Thanks to an SD card module, there’s no need to flash the ‘duino every time you want to change a shortcut or its picture. Even if this deck doesn’t hold up forever, it won’t break the bank to build another one. Poke past the break for the build video, which has all the links you’d need to make your own, including a handy configurator.

There’s more than one way to do a visual macro pad. Here’s one that uses a single screen and splits it Brady Bunch style to match the matrix.

Thanks for the tip, [arturo182]!

Inject Keystrokes Any Way You Like With This Bluetooth Keystroke Injector

[Amirreza Nasiri] sends in this cool USB keystroke injector.

The device consists of an Arduino, a Bluetooth module, and an SD card. When it’s plugged into the target computer the device loads the selected payload from the SD card, compromising the system. Then it does its unique trick which is to switch the injector over to Bluetooth mode. Now the attacker has much more control, albeit local, over the system.

While we would never even be tempted to plug this device into a real computer, we like some of the additional features, like how an added dip switch can be used to select from up to eight different payloads depending on the required attack. The addition of a photo diode is also interesting, and makes us dream of all sorts of impractical movie hacker scenarios. [Amirreza] says it’s to trigger when the person leaves the room and turns the lights off.

[Amirreza] has all the code and design files on the GitHub. There are also a few payload examples, which should be fun to hack on. After all, one of life’s pleasures is to find new ways to mess with your friends.

Chest of Drawers Stores Audio Memories

Some people collect stamps, some collect barbed wire, and some people even collect little bits of silicon and plastic. But the charmingly named [videoschmideo] collects memories, mostly of his travels around the world with his wife. Trinkets and treasures are easy to keep track of, but he found that storing the audio clips he collects a bit more challenging. Until he built this audio memory chest, that is.

Granted, you might not be a collector of something as intangible as audio files, and even if you are, it seems like Google Drive or Dropbox might be the more sensible place to store them. But the sensible way isn’t always the best way, and we really like this idea. Starting with what looks like an old card catalog file — hands up if you’ve ever greedily eyed a defunct card catalog in a library and wondered if it would fit in your shop for parts storage — [videoschmideo] outfitted 16 drawers with sensors to detect when they’re opened. Two of the drawers were replaced by speaker grilles, and an SD card stores all the audio files. When a drawer is opened, a random clip from that memory is played while you look through the seashells, postcards, and what-have-yous. Extra points for using an old-school typewriter for the drawer labels, and for using old card catalog cards for the playlists.

This is a simple idea, but a powerful one, and we really like the execution here. This one manages to simultaneous put us in the mood for some world travel and a trip to a real library.


Filed under: misc hacks
Hack a Day 18 Sep 12:00

Pocket Serial Host acts as an Apple II disk drive

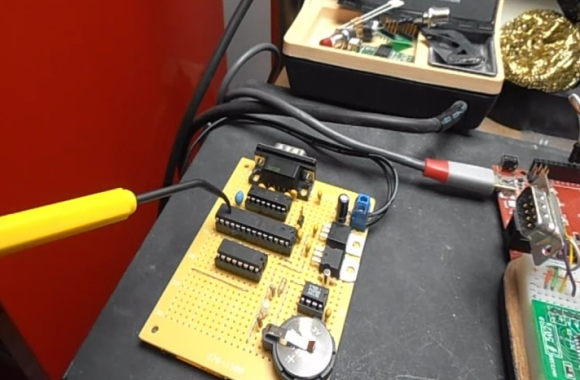
[Osgeld] is showing off what he calls a sanity check. It’s the first non-breadboard version of his Pocket Serial Host. He’s been working on the project as a way to simplify getting programs onto the Apple II he has on his “retro bench”. When plugged in, the computer sees it as a disk drive.

The storage is provided by an SD card which is hidden on the underside of that protoboard. This makes it dead simple to hack away at your programs using a modern computer, then transfer them over to the retro hardware. The components used (starting at the far side of the board) are a DB9 serial connector next to a level converter to make it talk to the ATmega328 chip being pointed at with a tool. The chip below that is a level converter to get the microcontroller talking to the RTC chip seen to the right. The battery keeps that clock running when there’s no power from the 5V and 3.3V regulators mounted in the upper right.

The video after the break shows off this prototype, the breadboard circuit, and a demonstration with the Apple II.

[Thanks Brendan]


Filed under: classic hacks, computer hacks

Tracking Solar Brightness with a Homemade Sun Logger

The Sun Logger, a data logging device, combines several components we’ve used in previous Weekend Projects. You may recognize the light-sensitive photoresistor (Optical Tremolo Box) and the Arduino Uno microcontroller (Touchless 3D Tracking Interface). These parts, when combined with a 74AHC125 Level Shifter and SD card socket mounted on a homemade “shield,” will record the levels of light shining down on your project box. That data, recorded every 15 seconds to the SD card, can be exported later to any popular spreadsheet software and graphed, giving you a visual representation of light changes over time. This data could aid in knowing where best to plant a garden, or simply to understand changes of light intensity throughout the seasons in your micro-climate.

And while this project is readymade for recording levels of sunlight, the Arduino has a total of six analog inputs (labeled A0 – A5) and could easily record other variables. For example temperature, motion, or barometric pressure. Makers looking for a mid-level Arduino build, or knowledgeable coders looking to solder together their first homemade shield, the Sun Logger is a great project to build!


Filed under: Arduino, MAKE Projects, Weekend Projects

I2SDv3 - Arduino buckler with microSD

The Wyolum machine (these are the people who generously offered $3000 in innovation grants, with no strings attached) is forging ahead with a new and improved version of I2SD.
I just received their v3 prototype and it looks impressive. I must say it is the most feature-rich data logger / SD card backpack (here is the list of the competing products that I compared with).

Like its predecessor, I2SD v3 is a software-compatible Arduino (ATmega328/16MHz) with extras. It has on-board microSD card, DS3231 extremely accurate real-time-clock with backup battery, infrared receiver and 2 LED indicators for errors or status.


I2SDv3 comes assembled (all SMD), with the bootloader burnt in. Sketches can be uploaded through the FTDI connector.

The board can be plugged directly into Arduino, using one row of headers (A0-A4-GND-RST), hence the name "buckler" (like a "semi-shield", got it?)
I2SDv3 also offers header access to D4-D7 (v2 lacked that; my complaint was heard :), and it is compatible with the ChronoDot headers.

To test it, I decided to try the OpenLog library, by Nathan Seidle of Sparkfun. Surprisingly, it worked without a glitch from the first try. Well, kind of, I had to read the documentation :), and to change HardwareSerial.cpp, a "system file" (function SIGNAL(USART_RX_vect) is redefined in OpenLog.pde).

To emulate the OpenLog board closer, I changed the code to use D2 for the status LED, as shown:

from
#define STAT1  5 //On PORTD
int statled1 = 5;  //This is the normal status LED

to
#define STAT1  2 //On PORTD
int statled1 = 2;  // status LED on I2SDv3;

Note: The second LED of OpenLog board is connected to SCK (D13), so it blinks when the SD card is active (while reading or writing). The second LED on I2SDv3, being on D3, cannot be easily re-purposed.

Following OpenLog documentation, I connected to I2SDv3 using CoolTerm, typed in some text, pressed CtrlZ three times and voila!: file LOG0001.TXT got created and it contained the characters I typed in. Cool indeed.

Note: OpenLog won't compile with Arduino 1.0 IDE without some minor changes, as follows:
1. "WProgram.h" replaced everywhere with "Arduino.h"
2. function SdFile::write(uint8_t) must return size_t now (since it is virtual function defined in Stream.h); both SdFile.cpp and SdFat.h will need to be updated to reflect that.

Reminder: The OpenLog library should work with FAT32-formatted SD cards as well as FAT16. I will test it as soon as I get a 4GB microSD card.

Wise time with Arduino 21 Jan 00:25
i2c  sd card  

I2SDv3 - Arduino buckler with microSD

The Wyolum machine (these are the people who generously offered $3000 in innovation grants, with no strings attached) is forging ahead with a new and improved version of I2SD.
I just received their v3 prototype and it looks impressive. I must say it is the most feature-rich data logger / SD card backpack (here is the list of the competing products that I compared with).

Like its predecessor, I2SD v3 is a software-compatible Arduino (ATmega328/16MHz) with extras. It has on-board microSD card, DS3231 extremely accurate real-time-clock with backup battery, infrared receiver and 2 LED indicators for errors or status.


I2SDv3 comes assembled (all SMD), with the bootloader burnt in. Sketches can be uploaded through the FTDI connector.

The board can be plugged directly into Arduino, using one row of headers (A0-A4-GND-RST), hence the name "buckler" (like a "semi-shield", got it?)
I2SDv3 also offers header access to D4-D7 (v2 lacked that; my complaint was heard :), and it is compatible with the ChronoDot headers.

To test it, I decided to try the OpenLog library, by Nathan Seidle of Sparkfun. Surprisingly, it worked without a glitch from the first try. Well, kind of, I had to read the documentation :), and to change HardwareSerial.cpp, a "system file" (function SIGNAL(USART_RX_vect) is redefined in OpenLog.pde).

To emulate the OpenLog board closer, I changed the code to use D2 for the status LED, as shown:

from
#define STAT1  5 //On PORTD
int statled1 = 5;  //This is the normal status LED

to
#define STAT1  2 //On PORTD
int statled1 = 2;  // status LED on I2SDv3;

Note: The second LED of OpenLog board is connected to SCK (D13), so it blinks when the SD card is active (while reading or writing). The second LED on I2SDv3, being on D3, cannot be easily re-purposed.

Following OpenLog documentation, I connected to I2SDv3 using CoolTerm, typed in some text, pressed CtrlZ three times and voila!: file LOG0001.TXT got created and it contained the characters I typed in. Cool indeed.

Note: OpenLog won't compile with Arduino 1.0 IDE without some minor changes, as follows:
1. "WProgram.h" replaced everywhere with "Arduino.h"
2. function SdFile::write(uint8_t) must return size_t now (since it is virtual function defined in Stream.h); both SdFile.cpp and SdFat.h will need to be updated to reflect that.

Reminder: The OpenLog library should work with FAT32-formatted SD cards as well as FAT16. I will test it as soon as I get a 4GB microSD card.


Wise time with Arduino 21 Jan 00:25
i2c  sd card