Posts with «eeprom» label

Stress-Testing An Arduino’s EEPROM

Every time one of us flashes an Arduino’s internal memory, a nagging thought in the backs of our minds reminds us that, although everything in life is impermanent, nonvolatile re-writable memory is even more temporary. With a fixed number of writes until any EEPROM module fails, are we wasting writes every time we upload code with a mistake? The short answer is that most of us shouldn’t really be concerned with this unless we do what [AnotherMaker] has done and continually write data until the memory in an Arduino finally fails.

The software for this is fairly simple. He simply writes the first 256 ints with all zeros, reads them to make sure they are all there, and then repeats the process with ones. After iterating this for literally millions of times continuously over the course of about a month he was finally able to get his first read failure. Further writes past this point only accelerated the demise of the memory module. With this method he was able to get nearly three million writes before the device failed, which is far beyond the tens or hundreds of thousands typically estimated for a device of this type.

To prove this wasn’t an outlier, [AnotherMaker] repeated the test, and did a few others while writing to a much smaller amount of memory. With this he was able to push the number of cycles to over five million. Assuming the Arduino Nano clone isn’t using an amazingly high-quality EEPROM we can safely assume that most of us have nothing to worry about and our Arduinos will be functional for decades to come. Unless a bad Windows driver accidentally bricks your device.

Thanks to [morgan] for the tip!

Hack a Day 08 Apr 03:00

Back To Basics With An Arduino And An EEPROM

There are plenty of techniques and components that we use in our everyday hardware work, for which their connection and coding is almost a done deal. We are familiar with them and have used them before, so we drop them in without a second thought. But what about the first time we used them, we had to learn somewhere, right? [TheMagicSmoke] has produced just what we’d have needed then for one component that’s ubiquitous, the I2C EEPROM.

These chips provide relatively small quantities of non-volatile memory storage, and though they are not the fastest of memory technologies they have a ready application in holding configuration or other often-read and rarely written data.

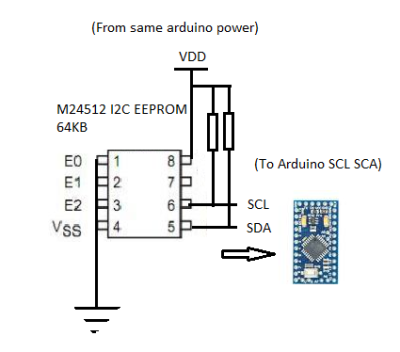
Since the ST24C04 512-byte device in question has an I2C bus it’s a straightforward add-on for an Arduino Mega, so we’re shown the wiring for which only a couple of pull-down resistors are required, and some sample code. It’s not the most complex of projects, but it succinctly shows what you need to do so that you too can incorporate an EEPROM in your work.

If learning about I2C EEPROMs piques your interest, perhaps you’d like to read a previous look we made at them.

Hack a Day 25 May 12:00
arduino  eeprom  i2c  i2c eeprom  parts  

Dual-boot Your Arduino

There was a time, not so long ago, when all the cool kids were dual-booting their computers: one side running Linux for hacking and another running Windows for gaming. We know, we were there. But why the heck would you ever want to dual-boot an Arduino? We’re still scratching our heads about the application, but we know a cool hack when we see one; [Vinod] soldered the tiny surface-mount EEPROM on top of the already small AVR chip! (Check the video below.)

Aside from tiny-soldering skills, [Vinod] wrote his own custom bootloader for the AVR-based Arduino. With just enough memory to back up the AVR’s flash, the bootloader can shuffle the existing program out to the EEPROM while flashing the new program in. For more details, read the source.

While you might think that writing a bootloader is deep juju (it can be), [Vinod]’s simple bootloader application is written in C, using a style that should be familiar to anyone who has done work with an Arduino. It could certainly be optimized for size, but probably not for readability (and tweakability).

Why would you ever want to dual boot an Arduino? Maybe to be able to run testing and stable code on the same device? You could do the same thing over WiFi with an ESP8266. But maybe you don’t have WiFi available? Whatever, we like the hack and ‘because you can’ is a good enough excuse for us. If you do have a use in mind, post up in the comments!


Filed under: Arduino Hacks, Microcontrollers

Staring at the Sun: Erasing an EPROM

Flash memory is the king today. Our microcontrollers have it embedded on the die. Phones, tablets, and computers run from flash. If you need re-writable long term storage, flash is the way to go. It hasn’t always been this way though. Only a few years ago EPROM was the only show in town. EPROM typically is burned out-of-circuit in a programming fixture. When the time comes to erase the EPROM, just pop it under an ultraviolet (UV) bulb for 30 minutes, and you’re ready to go again. The EPROM’s quartz window allows UV light to strike the silicon die, erasing the memory.

The problem arises when you want to use an EPROM for long term storage. EPROM erasers weren’t the only way to blank a chip. The sun will do it in a matter of weeks. Even flourescent light will do it — though it could take years.

[TechEkspert] wanted to learn about the nature of erasing an EPROM with the sun, so he got out an old EPROM and started hacking. (translated link) [TechEkspert] programmed the EPROM with a known pattern of ones and zeros. A pair of 74HC4040 counters would address the entire 32 KB memory of the EPROM. An Arduino Mini read the data out, storing it in an SD card. A bit of python code translated the data to PNG files, which were then combined to render a video.

The whole setup was placed on the roof in full sun. Then the waiting began. Nothing much happened for two weeks. Then some bits started to flicker. This means that sometimes they would read as a 0, and other times a 1. The sun was starting to destroy the stored data. Right at the 3 week mark, all the remaining data quickly started to disappear. In the end the entire chip was erased.

While [TechEkspert’s] chip could be re-programmed, that’s not always the case with EEPROM and flash. Check out this EEPROM killer which calculated how many cycles it took to destroy the electronically erasable storage in an Atmel ATmega328.


Filed under: classic hacks
Hack a Day 14 Sep 12:01