Posts with «cyberdeck» label

Framework Motherboard Turned Cyberdeck

The beauty of a modular ecosystem lies in how it allows individuals to repurpose components in unconventional ways. This is precisely what [Ben Makes Everything] has achieved by using a Framework laptop’s motherboard and battery to create a slab-style cyberdeck. (Video, embedded below.)

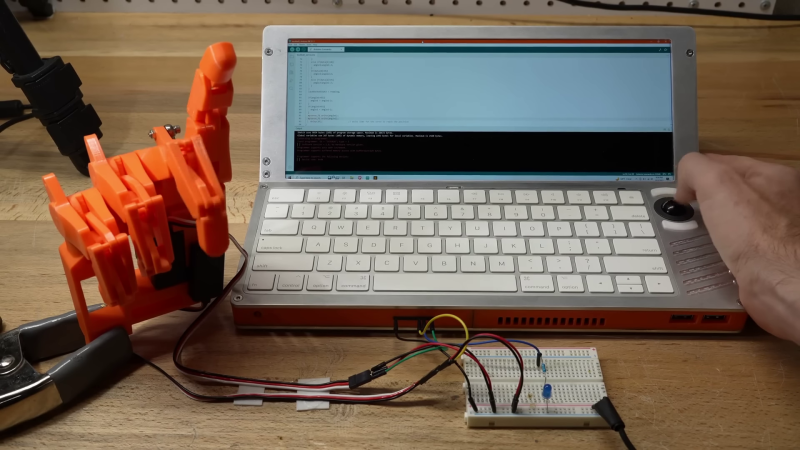
The Framework motherboard presents an excellent choice for custom portable computer projects due to its relatively compact size and built-in modular I/O port options, all based on USB-C. Framework even released additional documentation to support this use-case. It’s significantly more powerful than the standard Raspberry PI, which is typically employed in similar projects. Ben chose a 2400 x 900 IPS display that can draw power and video through a single USB-C cable. For user input, he opted for an Apple keyboard and an optical trackball with a PS2 interface. He utilized a Arduino Pro Micro as a PS2-to-USB adaptor, using the remaining pins on the Arduino as a versatile interface for electronic projects.

The enclosure is crafted from machined aluminum plates with 3D printed spacers to secure all components. The screen can be tilted up to 45 degrees for more ergonomic desktop use. The Framework motherboard is equipped with four USB-C ports for peripheral devices; [Ben] allocated one for the display and another for a USB hub which connects the keyboard, Arduino, and external USB and HDMI connectors. The remaining USB-C ports are still available for original Framework expansion cards.

The completed project not only looks fantastic but may also be highly functional. It would have been a great entry in our recent Cyberdeck Challenge.

Bringing a Baofeng into the Cyberpunk 2077 Universe

You’ve got to love the aesthetics of dystopian cyberpunk video games, where all the technology looks like it’s cobbled together from cast-off bits of the old world’s remains. Kudos go to those who attempt to recreate these virtual props and bring them into the real world, but our highest praise goes to those who not only make a game-realistic version of a prop, but make it actually work.

Take the Nokota Manufacturing radio from Cyberpunk 2077, for instance. [Taylor] took one look at that and knew it would be the perfect vessel for a Baofeng UV-5R, the dual-band transceiver that amateur radio operators love to hate. The idea is to strip the PCB out of a Baofeng — no worries, the things cost like $25 — and install it in a game-accurate 3D printed case. But this is far from just a case mod, since [Taylor]’s goal is to replace the radio’s original controls with something closer to what’s in the game.

To that end, [Taylor] is spinning up an interface to the stock radio’s keypad using some 7400-series bilateral analog switches. Hooked to the keypad contacts and controlled by a Mini MEGA 2560 microcontroller, the interface is able to send macros that imitate the keypresses necessary to change frequencies and control the radio’s settings, plus display the results on the yellow OLED screen that seems a dead-ringer for the in-game display. The video below shows some early testing of the interface.

While very much still a work in progress, we’ve been following [Taylor]’s project for a week or so and he’s really gaining some ground. We’ve encouraged him to enter this one in the Cyberdeck Challenge we’ve got going on now; it might not have much “deck” going for it, but it sure does have a lot of “cyber.”

Cybercube Makes a Great Computing Companion

Oh, sure, there have been a few cube-shaped PCs over the years, like the G4 and the NeXT cube. But can they really be called cubes when the display and the inputs were all external? We think not.

[ikeji] doesn’t think so either, and has created a cube PC that puts them all to shame. Every input and output is within the cube, including our favorite part — the 48-key ortholinear keyboard, which covers two sides of the cube and must be typed on vertically. (If you’ve ever had wrist pain from typing, you’ll understand why anyone would want to do that.) You can see a gif of [ikeji] typing on it after the break.

Inside the 3D printed cube is a Raspberry Pi 4 and a 5″ LCD. There’s also an Arduino Pro Micro for the keyboard matrix, which is really two 4×6 matrices — one for each half. There’s a 6cm fan to keep things cool, and one panel is devoted to a grille for heat output. Another panel is devoted to vertically mounting the microcontrollers and extending the USB ports.

Don’t type on me or my son ever again.

When we first looked at this project, we thought the tiny cube was a companion macro pad that could be stored inside the main cube. It’s really a test cube for trying everything out, which we think is a great idea and does not preclude its use as a macro pad one of these days. [ikeji] already has plenty of plans for the future, like cassette support, an internal printer, and a battery, among other things. We can’t wait to see the next iteration.

We love a good cyberdeck around here, and it’s interesting to see all the things people are using them for. Here’s a cyberduck that quacks in Python and CircuitPython.