Posts with «atmega 328p» label

Vacuum Chamber Gets Automation

[Nick] does a lot of custom work with vacuum tubes. So much so that he builds his own vacuum tubes of various shapes, sizes, and functions right on his own workbench. While the theory of vacuum tubes is pretty straightforward, at least to those of us who haven’t only been exposed to semiconductors, producing them requires some specialized equipment. A simple vacuum won’t get you all the way there, and the complexity of the setup that’s needed certainly calls for some automation.

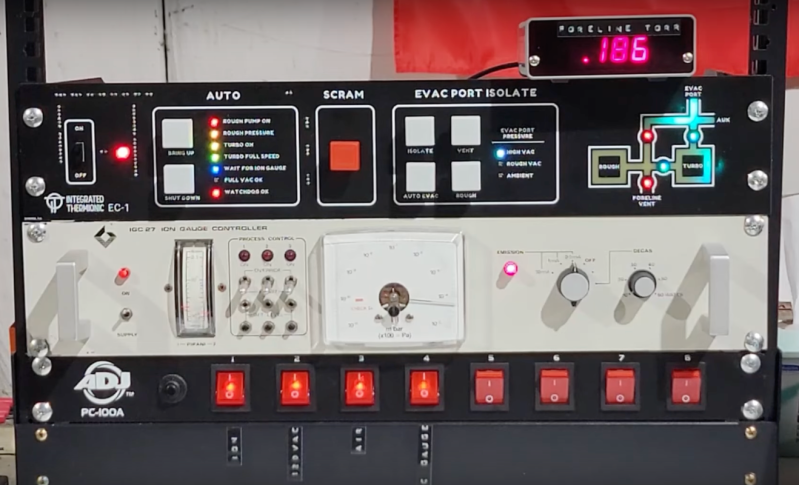
The vacuum system that [Nick] uses involves three sections separated by high-vacuum valves in order to achieve the pressures required for vacuum tube construction. There’s a rough vacuum section driven by one pump, a high vacuum section driven by a second pump, and a third section called the evac port where the tube is connected. Each second must be prepared properly before the next section can be engaged or disengaged. An Arduino Pro is tasked with all of this, chosen for its large amount of ADC inputs for the instrumentation monitoring the pressures in each section, as well as the digital I/O to control the valves and switches on the system.

The control system is built into a 19-inch equipment rack with custom faceplates which outline the operation of the vacuum system. A set of addressable LEDs provide the status of the various parts of the system, and mechanical keyboard switches are used to control everything, including one which functions as an emergency stop. The automation provided by the Arduino reduces the chances for any mistakes to be caused by human error, allows the human operator to focus on other tasks like forming the glass, and can also react much faster to any potentially damaging situations such as the high-pressure pump being exposed to atmospheric pressure.

[Nick] might look a little familiar to some of us as well. If you can’t quite place him, he did a talk at Hackaday Supercon 2022 detailing all of the intricacies of building one’s own vacuum tubes. Since getting into the somewhat niche field of constructing vacuum tubes, he’s gone on to produce all kinds of specialty devices and his YouTube channel is definitely worth a watch.

Thanks to [M] for the tip!

Kinetic Sculpture Achieves Balance Through Machine Learning

We all know how important it is to achieve balance in life, or at least so the self-help industry tells us. How exactly to achieve balance is generally left as an exercise to the individual, however, with varying results. But what about our machines? Will there come a day when artificial intelligences and their robotic bodies become so stressed that they too will search for an elusive and ill-defined sense of balance?

We kid, but only a little; who knows what the future field of machine psychology will discover? Until then, this kinetic sculpture that achieves literal balance might hold lessons for human and machine alike. Dubbed In Medio Stat Virtus, or “In the middle stands virtue,” [Astrid Kraniger]’s kinetic sculpture explores how a simple system can find a stable equilibrium with machine learning. The task seems easy: keep a ball centered on a track suspended by two cables. The length of the cables is varied by stepper motors, while the position of the ball is detected by the difference in weight between the two cables using load cells scavenged from luggage scales. The motors raise and lower each side to even out the forces on each, eventually achieving balance.

The twist here is that rather than a simple PID loop or another control algorithm, [Astrid] chose to apply machine learning to the problem using the Q-Behave library. The system detects when the difference between the two weights is decreasing and “rewards” the algorithm so that it learns what is required of it. The result is a system that gently settles into equilibrium. Check out the video below; it’s strangely soothing.

We’ve seen self-balancing systems before, from ball-balancing Stewart platforms to Segway-like two-wheel balancers. One wonders if machine learning could be applied to these systems as well.

Tiny Radio Tracks Your Balloons

The name of the game in rocketry or ballooning is weight. The amount of mass that can be removed from one of these high-altitude devices directly impacts how high and how far it can go. Even NASA, which estimates about $10,000 per pound for low-earth orbit, has huge incentives to make lightweight components. And, while the Santa Barbara Hackerspace won’t be getting quite that much altitude, their APRS-enabled balloon/rocket tracker certainly helps cut down on weight.

Tracksoar is a 2″ x .75″ x .5″ board which weighs in at 45 grams with a pair of AA batteries and boasts an ATmega 328P microcontroller with plenty of processing power for its array of on-board sensors. Not to mention everything else you would need like digital I/O, a GPS module, and, of course, the APRS radio which allows it to send data over amateur radio frequencies. The key to all of this is that the APRS module is integrated with the board itself, which saves weight over the conventional method of having a separate APRS module in addition to the microcontroller and sensors.

As far as we can see, this is one of the smallest APRS modules we’ve ever seen. It could certainly be useful for anyone trying to save weight in any high-altitude project. There are a few other APRS projects out there as well but remember: an amateur radio license will almost certainly be required to use any of these.


Filed under: radio hacks

A Remote for CHDK Cameras Made Possible with Arduino

[AlxDroidDev] built himself a nice remote control box for CHDK-enabled cameras. If you haven’t heard of CHDK, it’s a pretty cool software modification for some Canon cameras. CHDK adds many new features to inexpensive cameras. In this case, [AlxDroidDev] is using a feature that allows the camera shutter to be activated via USB. CHDK can be run from the SD card, so no permanent modifications need to be made to the camera.

[AlxDroidDev’s] device runs off of an ATMega328p with Arduino. It operates from a 9V battery. The circuit contains an infrared receiver and also a Bluetooth module. This allows [AlxDroidDev] to control his camera using either method. The device interfaces to the camera using a standard USB connector and cable. It contains three LEDs, red, green, and blue. Each one indicates the status of a different function.

The Arduino uses Ken Shirrif’s IR Remote library to handle the infrared remote control functions. SoftwareSerial is used to connect to the Bluetooth module. The Arduino code has built-in functionality for both Canon and Nikon infrared remote controls. To control the camera via Bluetooth, [AlxDroidDev] built a custom Android application. The app can not only control the camera’s shutter, but it can also control the level of zoom.


Filed under: Arduino Hacks