[Nick] does a lot of custom work with vacuum tubes. So much so that he builds his own vacuum tubes of various shapes, sizes, and functions right on his own workbench. While the theory of vacuum tubes is pretty straightforward, at least to those of us who haven’t only been exposed to semiconductors, producing them requires some specialized equipment. A simple vacuum won’t get you all the way there, and the complexity of the setup that’s needed certainly calls for some automation.
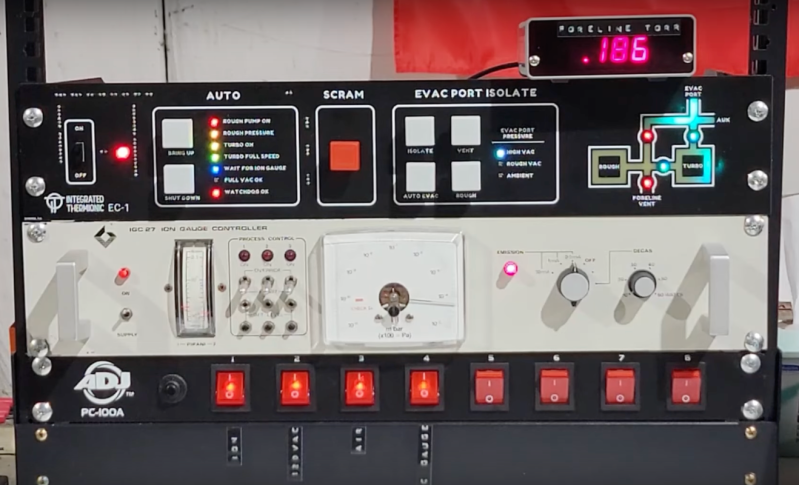
The vacuum system that [Nick] uses involves three sections separated by high-vacuum valves in order to achieve the pressures required for vacuum tube construction. There’s a rough vacuum section driven by one pump, a high vacuum section driven by a second pump, and a third section called the evac port where the tube is connected. Each second must be prepared properly before the next section can be engaged or disengaged. An Arduino Pro is tasked with all of this, chosen for its large amount of ADC inputs for the instrumentation monitoring the pressures in each section, as well as the digital I/O to control the valves and switches on the system.
The control system is built into a 19-inch equipment rack with custom faceplates which outline the operation of the vacuum system. A set of addressable LEDs provide the status of the various parts of the system, and mechanical keyboard switches are used to control everything, including one which functions as an emergency stop. The automation provided by the Arduino reduces the chances for any mistakes to be caused by human error, allows the human operator to focus on other tasks like forming the glass, and can also react much faster to any potentially damaging situations such as the high-pressure pump being exposed to atmospheric pressure.
[Nick] might look a little familiar to some of us as well. If you can’t quite place him, he did a talk at Hackaday Supercon 2022 detailing all of the intricacies of building one’s own vacuum tubes. Since getting into the somewhat niche field of constructing vacuum tubes, he’s gone on to produce all kinds of specialty devices and his YouTube channel is definitely worth a watch.
This is a guest post from Surrogate, a team of developers building games that people play in real-life over the internet.
We introduced this concept last year, and have launched 3 games so far. Our final game of 2019 was SumoBots Battle Royale — where players from anywhere in the world can fight real robots on a battle royale style arena. The aim of the project was to have the game run semi-autonomously, meaning that the bots could self-reset in between the games, and the arena could run by itself with no human interaction. This was our most complex project to date, and we wanted to share some parts of the build process in more detail, specifically, how we’ve built these robots and hooked them online for people to control remotely.
Robot selection
We’ve started our process by choosing which robots we’d want to use for the game. There were a couple of requirements for the robots when making the evaluation:
Are able to withstand 24/7 collision
Easily modifiable and fixable
Can rotate on the same spot
Must have enough space to fit the electronics
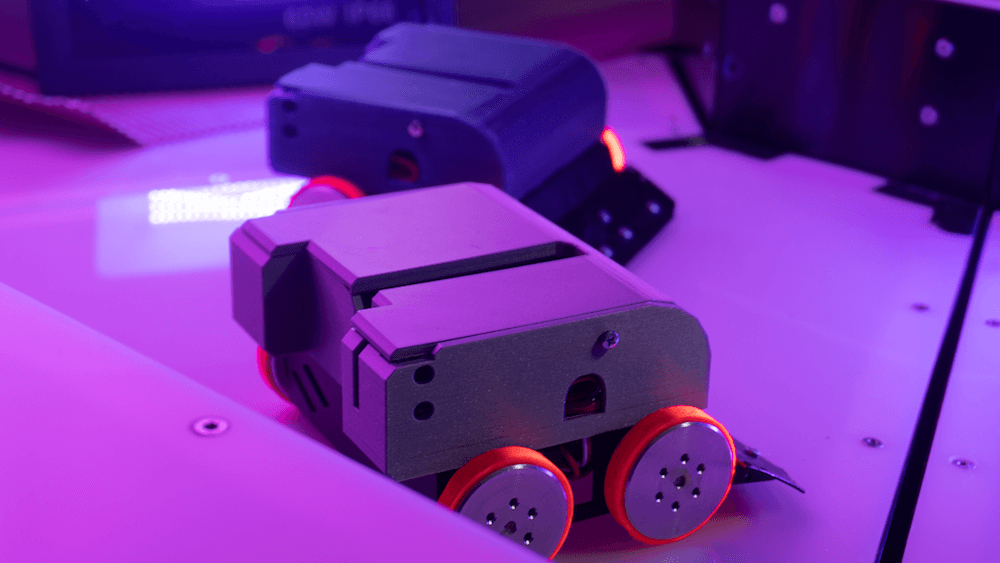
After looking at a lot of different consumer robots, maker projects, and competitive fighting bots, we’ve decided to use the JSUMO BB1 robots for this game. We liked the fact that these bots have a metal casing which makes them very durable, all parts are easily replaceable and can be bought separately, and it has 4 independent motors (motor shields included), one for each wheel, which allows it to rotate on the same spot.
We were pretty skeptical of being able to fit all the electronics into the original casing, but we decided to go with this robot anyways, as it had the best overall characteristics. As this robot is easily modifiable, we can always 3D print an extra casing to fit all the parts.
What is the board?
Now that we’ve decided on the robot, it was the time to define what electronics should we use in this build. As usual, it all starts with the requirements. Here’s what we need for the game to run smoothly:
The robot should be able to recover from any position
Can stay online while charging
Supports WiFi network connection and offers reliable connectivity
Easily programmable and supports OTA updates
Can control 4 motors simultaneously
Based on these requirements we had the following electronics layout in mind:
We had to find a board that is energy efficient, can send commands to motors, supports parallel charging and has a small footprint on the robot size. With so many requirements, finding the perfect board can be a challenge.
Arduino to the rescue
Fortunately, Arduino was there to help us out. They offer a rich selection of boards to fit every possible robotics project out there and have very detailed documentation for each of the boards.
More importantly, Arduino is known for its high quality, something that is crucial for semi-autonomous types of applications. Coming from an embedded software background and having to work with all sorts of hardware, we often see that some features or board functionalities are not fully finished which can lead to all sorts of unpleasant situations.
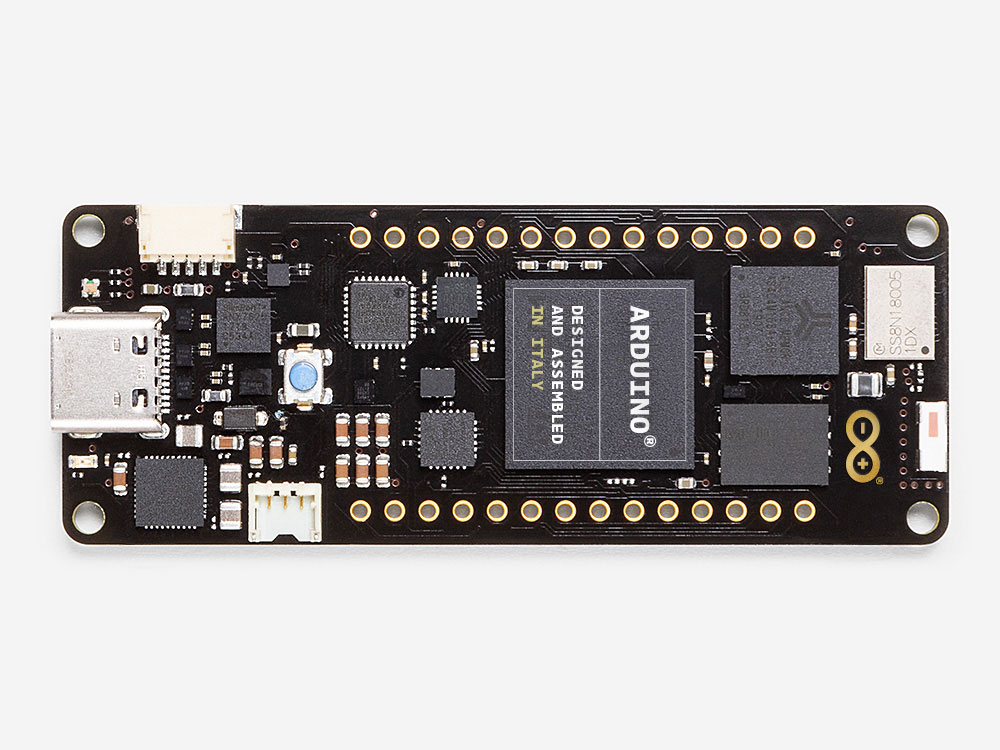
After looking at the Arduino’s collection of boards we quickly found a perfect candidate for our project, the Arduino MKR1000 WiFi. This board fits all of our main requirements for the motor controls, is easily programmable via Arduino IDE, and due to its low power design is extremely power efficient, allowing us to have a lower capacity battery. Additionally, it has a separate WiFi chip onboard, which solely focuses on providing a reliable WiFi connection, something that is very important in our use case.
Now that we’ve decided on the “brain” of our robot, it was time to choose the rest of the components.
Robust hardware means working software
Something to keep in mind is that when working with hardware, you should always try to avoid any possible risks. This means that you should always over-do your minimal hardware requirements where possible. The reason is — if your hardware doesn’t work as intended, your whole software stack becomes unusable too. Always chose reliable hardware components for mission-critical applications.
Some of our electric components might look a bit overkill, but due to the nature of our projects, they are a critical requirement.
Avoiding the battery explosions
As there is a lot of robot collision involved in the game, we decided to go with a high safety standard battery solution. After evaluating multiple options on the market, we decided to go with the RRC2040 from RRC (Germany). It has a capacity of 2950 MaH that allows us to run the robots for up to 5 hours on a single charge. It has an internal circuitry for power management, protection features and it supports SMBUS communications (almost like I2C), and is certified for all of the consumer electronics battery standards. For charging, we used RRC’s charging solution designed specifically for this battery and that offers the possibility to feed power to the application while the battery is being charged.
Note: the Arduino MKR1000 has a pretty neat charging solution on the board itself. You can connect the battery to the board directly as the main power source, and you charge it directly through the MKR1000’s micro USB port. We really wanted to use it to save space and have a more robust design, but due to the large capacity of our battery, we couldn’t use it at full potential. In our future projects with smaller scale robots, we definitely plan to use the board’s internal charging system, as it works perfectly for 700-1800 MaH power packs.
Bot recovery
For the bot to be able to recover from falling on its head, we’ve implemented a flipping servo. We didn’t want to have any risk of not enough torque, so we went with DS3218, which is capable of lifting up to 20KG of weight. Here’s how it works:
Hooking everything together
Now that we’ve decided on all of the crucial elements of this setup, it was time to connect all the elements together. As the first step, we figured what would be the best step way to locate all the pieces within the bot. We then 3D-printed a casing to protect the electronics. With all of the preliminary steps completed, we’ve wired all of the components together and mounted them inside of the casing. Here’s how it looks:
It was really convenient for us that all the pins on the board could be connected just by plugging them in, this avoids a lot of time spent on soldering the cables for 12 robots and more importantly, allowed us to cut out the risk of bad soldering that usually can’t be easily identified.
Arduino = Quick code
Arduino MKR1000 offered us the connectivity we needed for the project. Each sumo robot hosts their own UDP server using MKR1000 WiFi libraries to receive their control commands for a central control PC and broadcasting their battery charge status. The user commands are translated to 3 different PWM signals using Arduino Servo library for the flipping, left and right side motor controllers. The board used has support for hardware PWM output which was useful for us. Overall we managed to keep the whole Arduino code in a few hundred lines of code due to the availability of Servo and Wifi libraries.
The out of the box ArduinoOTA support for updating the code over the WiFi came in handy during the development phase, but also anytime we update the firmware for multiple robots at the same time. No need to open the covers and attach a USB cable! We created a simple Bash script using the OTA update tool bundled in Arduino IDE to send firmware updates to every robot at the same time.
To summarize
It’s pretty amazing that we live in the age where you can use a mass market tiny, small form factor board like the Arduino MKR1000 and have so much functionality. We’ve had a great experience developing our SumoBots Battle Royale game using the MKR1000 board. It made the whole process very smooth and streamlined, the documentation was right on point, and we never had to hit a bottleneck where the hardware wouldn’t work as expected.
More importantly, the boards have proven to be very robust throughout the time. These SumoBots have been used for more than 3000 games already, and we haven’t seen a single failure from the Arduino MKR1000. For a game where you literally slam the robots in to each other at a high speed, that’s pretty impressive to say the least.
We look forward to working with Arduino on our future games, and we can’t wait to see what they will be announcing in 2020!
We’re kicking off this year’s CES with some big news.
Millions of users and thousands of companies across the world already use Arduino as an innovation platform, which is why we have drawn on this experience to enable enterprises to quickly and securely connect remote sensors to business logic within one simple IoT application development platform: a new solution for professionals in traditional sectors aspiring for digital transformation through IoT.
Combining a low-code application development platform with modular hardware makes tangible results possible in just one day. This means companies can build, measure, and iterate without expensive consultants or lengthy integration projects.
Built on ARM Pelion technology, the latest generation of Arduino solutions brings users simplicity of integration and a scalable, secure, professionally supported service.
“By combining the power and flexibility of our production ready IoT hardware with our secure, scalable and easy to integrate cloud services we are putting in the hands of our customers something really disruptive,” commented Arduino CEO Fabio Violante. “Among the millions of Arduino customers, we’ve even seen numerous businesses transform from traditional ‘one off’ selling to subscription-based service models, creating new IoT-based revenue streams with Arduino as the enabler. The availability of a huge community of developers with Arduino skills is also an important plus and gives them the confidence to invest in our technology”.
But that’s not all. At CES 2020, we are also excited to announce the powerful, low-power new Arduino Portenta family. Designed for demanding industrial applications, AI edge processing and robotics, it features a new standard for open high-density interconnect to support advanced peripherals. The first member of the family is the Arduino Portenta H7 module – a dual-core Arm Cortex-M7 and Cortex-M4 running at 480MHz and 240MHz, respectively, with industrial temperature-range (-40 to 85°C) components. The Portenta H7 is capable of running Arduino code, Python and JavaScript, making it accessible to an even broader audience of developers.
The new Arduino Portenta H7 is now available for pre-order on the Arduino online store, with an estimated delivery date of late February 2020.
While the Arduino has a very vocal fan club, there are always a few people less than thrilled with the ubiquitous ecosystem. While fans may just dismiss it as sour grapes, there are a few legitimate complaints you can fairly level at the stock setup. To address at least some of those concerns, Arduino is rolling out the Arduino Pro IDE and while it doesn’t completely address every shortcoming, it is worth a look and may grow to quiet down some of the other criticisms, given time.
For the record, we think the most meaningful critiques fall into three categories: 1) the primitive development environment, 2) the convoluted build system, and 3) the lack of debugging. Of course, there are third party answers for all of these problems, but now the Pro IDE at least answers the first one. As far as we can tell, the IDE hides the build process just like the original IDE. Debugging, though, will have to wait for a later build.
We were happy to see a few things with the new IDE. There’s some autocompletion support, Git is integrated, and there’s still our old friend the serial monitor. The system still uses the Arduino CLI, so that means there isn’t much danger of the development getting out of sync. The actual editor is Eclipse Theia. People typically either love Eclipse or hate it, however, it is at least a credible editor. However, Theia uses Electron which makes many people unhappy because Electron applications typically eat a lot of resources. We’ll have to see how taxing using the new Pro IDE is on typical systems with normal workloads.
On the future feature list is our number one pick: debugging. They are also promising support for new languages, third party plugins, and synchronization with the Web-based editor. All good features.
This is just an alpha preview release, but it is a great start. Our only question is will existing users really care? Most people already write code in another editor. Many use an external build system like PlatformIO. Eclipse already has a plug in for Arduino that supports debugging with the right hardware. So while new users may appreciate the features, advanced users may be wondering why this is so late to the party.
When working on a new project, it’s common to let feature creep set in and bloat the project. Or to over-design a project well beyond what it would need to accomplish its task. Over at Black Mesa Labs, their problem wasn’t with one of their projects, it was with one of their tools: their hot plate. For smaller projects, an 800W hot plate was wasteful in many ways: energy, space, and safety. Since a lot of their reflow solder jobs are on boards that are one square inch, they set out to solve this problem with a tiny hot plate.
The new hot plate is perfectly sized for the job. Including control circuitry, it’s around the size of a credit card. The hot plate is powered from a small surplus 20V 5A laptop power supply and does a nice 4 minute reflow profile and cools off completely in under a minute. Compared to their full-sized hot plate, this is approximately 29 minutes faster, not to mention the smaller workspace footprint that this provides. The entire setup cost about $20 from the heating element to the transistors and small circuit board, and assuming that you have an Arduino Pro sitting in your junk bin.
It’s a good idea to have a reflow oven or a hot plate at your disposal, especially if you plan to do any surface mount work. There are lots of options available, from re-purposed toaster ovens to other custom hot plates of a more standard size. Overkill isn’t always a bad thing!