Posts with «pid control» label

PID Controlled Charcoal BBQ – Put an Arduino on it!

At Maker Faire Milwaukee this past weekend, [basement tech]  was showing off his latest build, a PID controlled charcoal grill. While it hasn’t QUITE been tested yet with real food, it does work in theory.

PID (a feedback loop with some fancy math used to adjust the input to get a consistent output) controlled cooking is commonly used for sous vide, where one heats up a water bath to a controlled temperature to cook food in plastic bags. Maintaining water temperature is fairly easy. Controlling a charcoal barbecue is much more difficult. [basement tech] accomplishes this with controlled venting and fans. With the charcoal hot and the lid on, there are two ways to control temperature; venting to let hot air out, and blowing air on the coals to make them hotter. A thermocouple sensor stuck through the grill gives the reading of the air inside, and an Arduino nearby reads that and adjusts the vents and fans accordingly.

The video goes into extensive detail on the project, and describes some of the challenges he had along the way, such as preventing the electronics and servos from melting.

There’s not a lot of time left in the grilling season, so we hope [basement tech] gets an opportunity to enjoy the meats of his labor. Maybe he can trade food with [Jason] and his PID controlled meat smoker.


Filed under: cooking hacks

Stewart Platform Ball Bearing Balancer

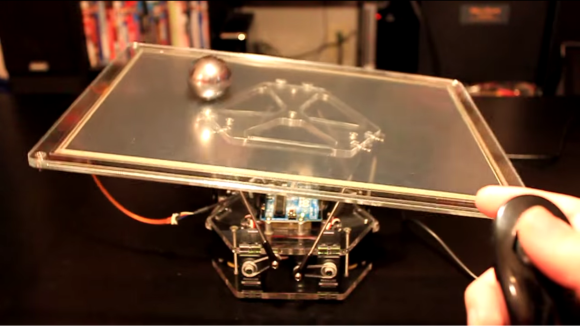
For their Mechanical Engineering senior design project at San Jose State University, [Tyler Kroymann] and [Robert Dee] designed and built a racing motion simulator. Which is slightly out of the budget of most hackers, so before they went full-scale, a more affordable Arduino powered Stewart platform proof of concept was built. Stewart platforms typically use six electric or hydraulic linear actuators to provide motion in six degrees of freedom (6 DOF), surge (X), sway (Y), heave (Z), pitch, roll, and yaw. With a simple software translation matrix, to account for the angular displacement of the servo arm, you can transform the needed linear motions into PWM signals for standard hobby servos.

The 6 DOF platform, with the addition of a resistive touch screen, also doubled as a side project for their mechatronic control systems class. However, in this configuration the platform was constrained to just pitch and roll. The Arduino reads the resistive touch screen and registers the ball bearing’s location. Then a PID compares this to the target location generating an error vector. The error vector is used to find an inverse kinematic solution which causes the actuators to move the ball towards the target location. This whole process is repeated 50 times a second. The target location can be a pre-programmed or controlled using the analog stick on a Wii nunchuck.

Watch the ball bearing seek the target location after the break.

Thanks to [Toby] for sending in this tip.

We at Hackaday look forward to the real life implementation of Marble Madness!

Need help Demystifying PID Control? Or perhaps you would like to build your own Stewart Platform?


Filed under: Arduino Hacks, robots hacks